Vim in full: Working with Git
Table of contents
- Introduction (vim_lib)
- Plugin Manager without fatal flaws (vim_lib, vim_plugmanager)
- Project level and file system (vim_prj, nerdtree)
- Snippets and File Templates (UltiSnips, vim_template)
- Compiling and doing anything (vim-quickrun)
- Work with Git (vim_git)
- Deploy (vim_deploy)
- Testing with xUnit (vim_unittest)
- The library on which everything is kept (vim_lib)
- Other useful plugins
Do you often have to use git? In a sense, do you commit changes every hour or every few minutes? I do this very often and do not follow the purity of the repository, because I consider it to be nothing more than a journal of changes, and not a work of art. This approach requires the editor to integrate well with Git, allowing you to create a new commit in a couple of keystrokes, return to the previous state, switch to another branch, and so on. If you use a modern development environment that integrates with Git, you are very lucky, but what do users of the Vim editor do? Is there a plugin that not only implements Vim commands for GitCommit , GitCheckout and GitBranch , but provides a convenient interface in the best traditions of the editor?
GUI to CLI
When I first thought about integrating Vim with Git, I, of course, tried ready-made plug-ins and solutions, but why do they all only implement the commands of the editor, and do not provide something more? I actively use Git using both the CLI and various GUI programs. Both have advantages and disadvantages, but the following tasks are often accomplished in the work:
- Indexing and adding commits
- View changes
- Transition between branches and merge
- View history, its filtering and transition to previous states
Git has a lot more useful, but, as my experience has shown, these four actions are most often used. It is important to note that all of them are by no means trivial. For example, to add several files to a commit, you need to execute two commands and list the addresses of these files, which is quite long (when using CLI). On the other hand, to constantly switch between the editor and the program used with the GUI for working with Git is also quite expensive, since for me personally, it is difficult to switch between the context (read - interface) of the editor (Vim) and GUI (mouse) used. Noticing this, I decided to write my own plugin for Vim, which will be convenient for users of this editor and at the same time is quite simple, even for GUI lovers. By the way, the vim_lib library, about which you have already heard in my previous articles, started from this plugin.
What is the raisin of this plugin? Using hotkeys you can easily index files, commit an index, etc. In turn, the editor's windows are used by the plugin so that it turns out a GUI with the usual control of the Vim user. For example, to delete a branch, just open the branches window, move the cursor to the desired branch and use dd , “like at home”!
Main features
The plugin I want to talk about is called vim_git . The plugin is quite complicated, since I tried to take into account all the needs of the Git user, from which it implements many possibilities, but in this article I will try to tell everyone as simply and clearly as possible.
About windows
For a start, remember: the plugin actively uses the windows (window) of the editor as elements of the graphical interface.
Example
Windows are implemented in such a way that they are used using standard Vim editor commands. That is, to select an element, for example a branch, you need to move the pointer (text) to the name of this branch, to delete it, use the dd command , and to add the a command, and so on everywhere. All windows are accompanied by built-in documentation, which is indicated by a hint like "Branch list (Press? For help)". Pressing?, The tooltip will be expanded in the same window.
Example
Simple enough?
About the plugin API
Also, you should know: all the plugins I create implement the API in the form of Vim functions. So, all APIs of this plugin are present in the form of vim_git # ... functions, for example, vim_git # status , vim_git # tagList , vim_git # branchList , etc. At the same time, most plug-ins implement both Vim menu items that use the plug-in API and commands. Personally, it is more convenient for me to bind keys, this is faster than any menus and commands of the editor, but I do not insist.
Here is an example of how I zabindil keys for the plugin vim_git:
Plugin 'vim_git', { \ 'map': { \ 'status': '<Leader>gs', " \ 'log': '<Leader>gl', " \ 'branchList': '<Leader>gb', " \ 'tagList': '<Leader>gt', " \ 'addCurrent': '<Leader>ga', " \ 'addAll': '<Leader>gA', " \ 'commit': '<Leader>gc', " \ 'commitAll': '<Leader>gC', " \ 'pushCurrent': '<Leader>go', " Push \ 'pullCurrent': '<Leader>gi', " Pull \ 'remoteList': '<Leader>gr', " \ } \} About the stack of windows
Many windows vim_git (as well as all my plugins) are implemented in the form of a stack. This means that if you execute a command in a window that causes another window to open (for example, trying to see the differences between two commits), this new window will open in the current window. If you close a new window (for example using : q ), the first window opens. So you use a stack of windows.
If these points are clear to you, then get down to business.
Index
To view the status of a Git index, use vim_git # status (or the gs combination). This window contains detailed information about the status of the repository and the index in the form of a response from Git itself. That is, the plugin does not perform any processing, everything is standard.
Status window
The following commands are implemented in this window (keyboard shortcuts):
- a - add the file under the cursor to the index. The window will be automatically redrawn and you will see that the file is really added to the index. In order not to repeat, all windows of the plugin are redrawn automatically as needed.
- dd - delete the file under the cursor from the index
- da - remove all files from the index
- u - restore the file under the cursor to the last commit state
- U - restore all files to the last commit state
- d - show changes in file modeGit-diff

- D - show changes in file modeVim diff

Commit
When committing, the plugin will open a new window in which you will need to write a comment. After saving and closing this window (for example using ZZ ), the commit will be created. To cancel the creation of a commit, just close the window without saving ( : q! ). Naturally, only those changes that were added to the index at the time of the commit will be included in the commit.
Commit window
Commit history
To view the commit history, use vim_git # log (or a combination of gl). This window displays the history of commits in two modes:
- Classic - commits are listed as blocksExample

- Count - commits are presented as a treeExample

The following commands are implemented in this window (keyboard shortcuts):
- Enter - go to the specified commit
- u - discard changes
- d - show the difference between the current state of the repository and the specified commit in Git-diff mode
- v - switch between history display modes (classic and graph)
Separately, mention should be made of the filter and the state of the commit.
History filter
The command (keyboard shortcut) f opens a dialog in which you can add various filters for the story, be it the name of the author you are interested in or the date of the creation of a commit.
Filter dialog
State of commit
If we hover over the hash of the commit we are interested in and press s , the commit status window opens, listing all the files changed by the commit.
Commit status window
The following commands are implemented in this window (keyboard shortcuts):
- d - changes (in Git-diff mode) in the file under the cursor made by the commit
- D - changes (in Git-vim mode) in the file under the cursor made by the commit
Branches
To view the available branches (local and remote) use vim_git # branchList (or a combination of gb).
Branch window
The following commands are implemented in this window (keyboard shortcuts):
- Enter - go to the branch under the cursor
- a - add new thread
- r - rename the branch under the cursor
- dd - delete branch
- m - merge the current branch with the branch under the cursor
- o - push branches (only for local branches)
- d - show the difference between the current branch and the branch under the cursor (in Git-diff mode)
- s - show the state of the branch (similar to the state of a commit)
- i - merge changes from a remote branch to the current one
Remote repositories
To view the registered remote repositories, use vim_git # remoteList (or the combination of gr).
Remote repository window
The following commands are implemented in this window (keyboard shortcuts):
- a - add a new alias of the remote repository
- dd - delete the alias under the cursor
- r - rename the alias under the cursor
- f - get changes from the repository under the cursor
- i - get and merge changes from the remote repository under the cursor to the current branch
- o - send all changes of the current branch to the remote repository under the cursor
Tags
To view tags use vim_git # tagList (or a combination of gt).
Tag window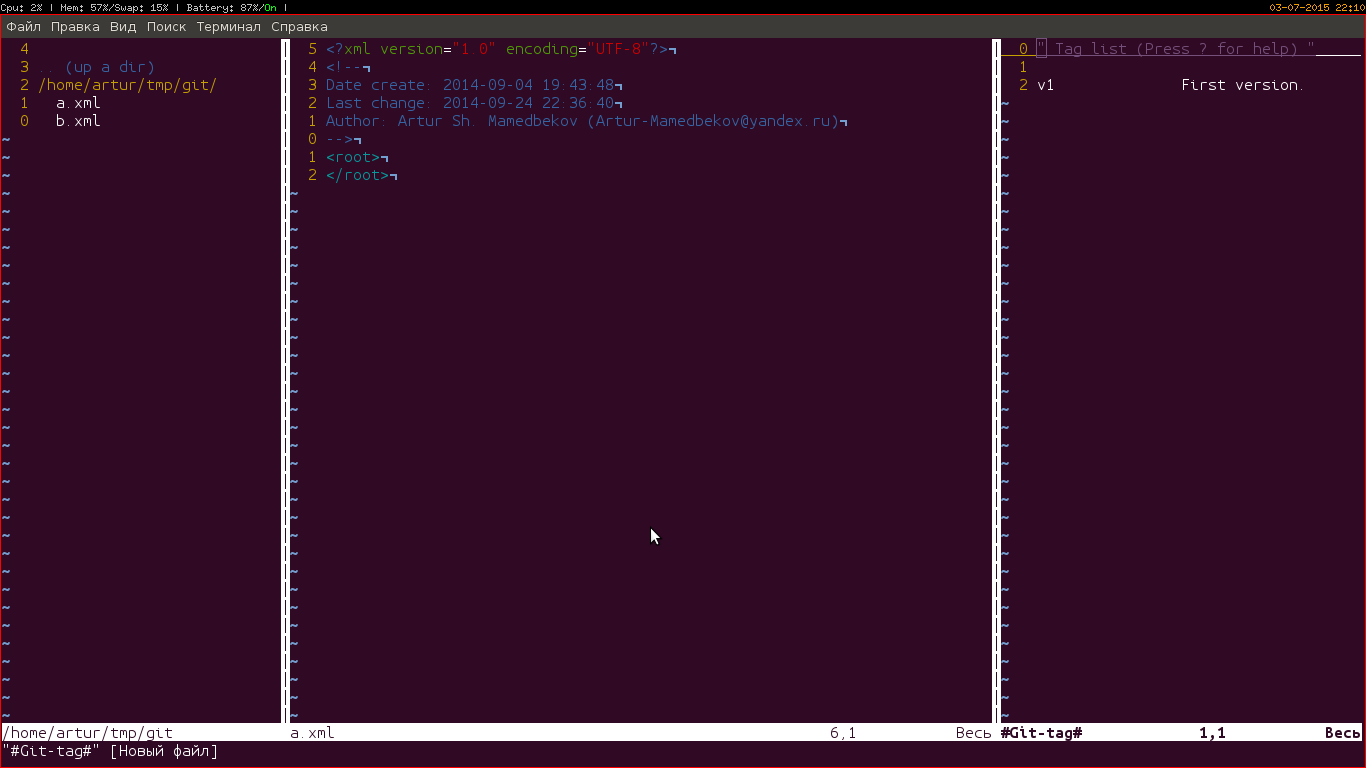
The following commands are implemented in this window (keyboard shortcuts):
- Enter - go to the commit indicated by the tag under the cursor
- a - add a new tag for the current commit
- A - add annotation tag for current commit
- dd - delete the tag under the cursor
- s - show tag information
Bye all
The power of the plugin is in a convenient API and GUI, which allows me to actively use Git without leaving the editor. Of course, I didn’t cover all vim_git functions, since the article is already quite long and I don’t want to bore the reader, so you will find many more interesting things in this plugin (for example, using go is easy to push, and using gi pull changes).
')
Source: https://habr.com/ru/post/261783/
All Articles