Deploying Nano Server with Windows Assessment and Deployment Kit (ADK) RC for Windows 10
The article was written by Mikhail Komarov, MVP in the direction of Hyper-V .
The purpose of this article is to demonstrate the possibility of using the ADK for deploying Microsoft Nano Server, which will further allow the use of the standard Windows Deployment Service for mass deployment. All actions can be performed under the operating system Windows 8.1 or higher. If you plan to deploy on Hyper-V, then you must enable the Hyper-V role or use a real computer. In this article, I used Windows 8.1 with the Hyper-V and HP Microserver Gen 8 roles enabled.
In May 2015, a revolutionary product was introduced at Microsoft Ignite conference - Microsoft Nano Server. This product is a completely redesigned version of Windows with a minimum code size and only the necessary functions. Server roles and advanced features are outside the Nano Server. Independent packages are installed as applications. Key product roles and features are Hyper-V, storage systems (SoFS) and clustering, as well as support for CLR core, ASP.NET 5, and PaaS. The size of the distribution with installed packages does not exceed 1GB and can be located on the SD card.
')
The deployment process consists of several steps.
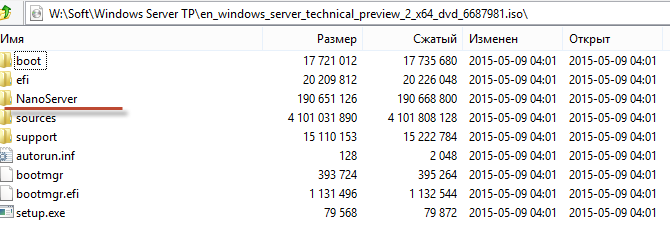
Let's start with the first step . We need the Windows Server Technical Preview 2 distribution, the links are at the end of the article. After we downloaded the distribution as an ISO file, we need to open it and extract the NanoServer directory from the root.
Next, we need to download the Windows Assessment and Deployment Kit (ADK) RC for Windows 10. The product is downloaded in the form of a small executable file, at the start of which you can select the necessary components or complete download, after which you can start the installation. We do not need the whole package for this work; we only select options for deployment.

After installing this package, run the administrator shortcut “Deployment and Imaging tool Environment”

and execute the " copype amd64 W: \ WinPE_64 " command . Copype is not a Windows command, but a script that comes with the ADK. The meaning of this command is to copy the Windows Preinstallation Environment files to W: \ WinPE_64. On my machine for additional data, I use the W disk, in your case it can be any disk and any directory.

After creating a directory with Windows Preinstallation Environment (Windows PE) files, the first step is complete.
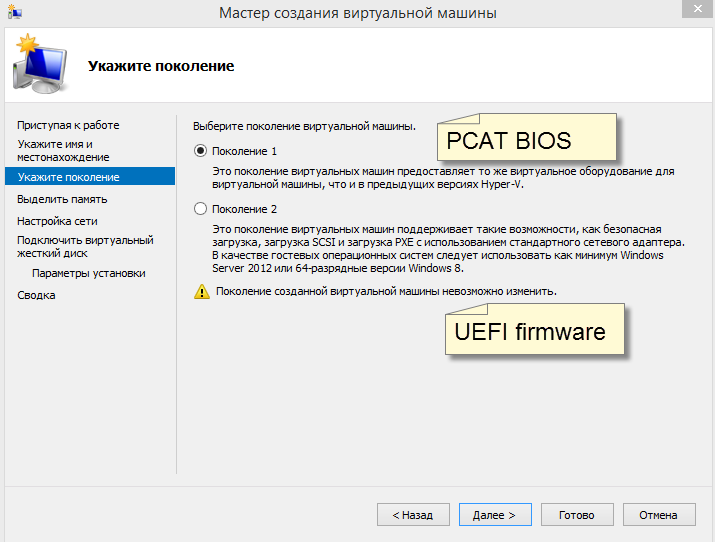
In the second step, we need to figure out how the machine will boot from the Nano Server. This is important because we will be deploying the Nano Server from scratch. So, we have two options for booting our machine: using a classic BIOS or a modern UEFI. For Hyper-V, there are also two options that depend on the type of virtual machine. Below is an example for Hyper-V.
Ordinary modern computer.

This question is of key importance for us, since it depends on it how we will partition the disk.
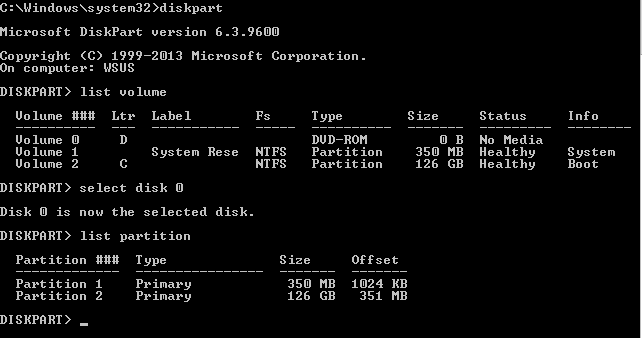
Let's start with the classic BIOS. By default, partitions on the disk look like this:

However, there is another option for disk layout, which is usually used in client operating systems for OEM deployments. Recovery Image is an image of the operating system plus utilities that allow you to re-deploy the operating system to a Windows partition after a crash.

In our case, we restrict ourselves to a simple case, using a simple version of the script. A link to the original Microsoft article from the extended versions of the script and comments is given at the end.
select disk 0 clean create partition primary size=350 format quick fs=ntfs label="System" assign letter="S" active create partition primary format quick fs=ntfs label="Windows" assign letter="W" exit Pay attention to the letters of the volumes. These letters are used only during operations when the machine is booted from Windows PE. The final appearance of the partitions and volumes after applying the script, applying the image and rebooting looks like this.

Let's move on to the modern UEFI. The MBR came to replace the GPT with its sections. One of the reasons for switching to UEFI is support for boot volumes larger than 2TB. By default, the disk layout looks like this:

However, there is another option for disk layout, which is usually used in client operating systems for OEM deployments. Recovery Image is an operating system image plus utilities that allow you to re-deploy the operating system to a Windows partition after a crash.

In our case, we restrict ourselves to a simple case, using a simple version of the script. A link to the original Microsoft article from the extended versions of the script and comments is given at the end.
select disk 0 clean convert gpt create partition primary size=300 format quick fs=ntfs label="Windows RE tools" assign letter="T" create partition efi size=100 rem == Note: for Advanced Format Generation One drives, change to size=260. format quick fs=fat32 label="System" assign letter="S" create partition msr size=128 create partition primary format quick fs=ntfs label="Windows" assign letter="W" As in the previous case, these letters are used only during operations when the machine is booted from Windows PE. The final appearance of the partitions and volumes after applying the script, applying the image and rebooting looks like this.


In this article I will not dwell on what these sections are for. For those who are interested, there is a link to the materials at the end. Now we can create two text files Bios_Partition_Structure.txt and UEFI_Partition_Structure.txt , in which our scripts will be located. In the future, we will run the diskpart / s Bios_Partition_Structure.txt command or the diskpart / s UEFI_Partition_Structure.txt command . The choice of team that will create partitions is determined by the type of load.
The third step is to create an answer file and a script that will start after installation. A sample unattend.xml answer file is taken from “ Getting Started with Nano Server ”. Tag values ComputerName , Value , RegisteredOwner , RegisteredOrganization, you can change.
<ComputerName>NanoServer1503</ComputerName> <AdministratorPassword> <Value>P@ssw0rd</Value> <PlainText>true</PlainText> </AdministratorPassword> <RegisteredOwner>Mikhail Komarov</RegisteredOwner> <RegisteredOrganization>Virtual Lab</RegisteredOrganization> Regarding the script after installation - you must first create a directory
md W: \ Windows \ Setup , then put the SetupComplete.cmd file there with the following content:
ping 127.0.0.1 -n 4 hostname ipconfig netsh advfirewall set domainprofile state off netsh advfirewall set privateprofile state off netsh advfirewall set publicprofile state off netsh advfirewall set currentprofile state off From the content it is clear that we will receive the IP address via DHCP and disable the firewall.
The fourth step is to create final scripts that will deploy the image, add packages, and apply the answer file. So, we will create two files whose names make it clear what they are for: Apply_on_Hardware.bat and Apply_on_Hyper-V_VM.bat . These two files will have a common part.
Deploy the image to disk.
dism /Apply-Image /ImageFile:d:\NanoServer\nanoserver.wim /Index:1 /ApplyDir:W:\ We add packages (there will be a different composition for files).
dism /Add-Package Add an answer file.
dism /Apply-Unattend:d:\NanoServer\unattend/image:W:\ Place for additional logs.
md W:\Windows\panther Copy the answer file.
copy d:\NanoServer\unattend.xml W:\Windows\panther\ Create a directory for running scripts after installation.
md W:\Windows\Setup Copy the answer file.
copy d:\NanoServer\SetupComplete.cmd W:\Windows\Setup\Scripts\ Create a boot record.
bcdboot W:\Windows The difference in files is due to differences in the platforms.

Therefore, the following packages will be in the Apply_on_Hardware.bat file:
dism /Add-Package /PackagePath:d:\NanoServer\Packages\Microsoft-NanoServer-Compute-Package.cab /Image:W:\ dism /Add-Package /PackagePath:d:\NanoServer\Packages\en-us\Microsoft-NanoServer-Compute-Package.cab /Image:W:\ dism /Add-Package /PackagePath:d:\NanoServer\Packages\Microsoft-OneCore-ReverseForwarders-Package.cab /Image:W:\ dism /Add-Package /PackagePath:d:\NanoServer\Packages\en-us\Microsoft-OneCore-ReverseForwarders-Package.cab /Image:W:\ dism /Add-Package /PackagePath:d:\NanoServer\Packages\Microsoft-NanoServer-Storage-Package.cab /Image:W:\ dism /Add-Package /PackagePath:d:\NanoServer\Packages\en-us\Microsoft-NanoServer-Storage-Package.cab /Image:W:\ dism /Add-Package /PackagePath:d:\NanoServer\Packages\Microsoft-NanoServer-OEM-Drivers-Package.cab /Image:W:\ dism /Add-Package /PackagePath:d:\NanoServer\Packages\en-us\Microsoft-NanoServer-OEM-Drivers-Package.cab /Image:W:\ dism /Add-Package /PackagePath:d:\NanoServer\Packages\Microsoft-NanoServer-FailoverCluster-Package.cab /Image:W:\ dism /Add-Package /PackagePath:d:\NanoServer\Packages\en-us\Microsoft-NanoServer-FailoverCluster-Package.cab /Image:W:\ And in the file Apply_on_Hyper-V_VM.bat there will be the following packages:
dism /Add-Package /PackagePath:d:\NanoServer\Packages\Microsoft-NanoServer-Guest-Package.cab /Image:W:\ dism /Add-Package /PackagePath:d:\NanoServer\Packages\en-us\Microsoft-NanoServer-Guest-Package.cab /Image:W:\ dism /Add-Package /PackagePath:d:\NanoServer\Packages\Microsoft-OneCore-ReverseForwarders-Package.cab /Image:W:\ dism /Add-Package /PackagePath:d:\NanoServer\Packages\en-us\Microsoft-OneCore-ReverseForwarders-Package.cab /Image:W:\ dism /Add-Package /PackagePath:d:\NanoServer\Packages\Microsoft-NanoServer-Storage-Package.cab /Image:W:\ dism /Add-Package /PackagePath:d:\NanoServer\Packages\en-us\Microsoft-NanoServer-Storage-Package.cab /Image:W:\ dism /Add-Package /PackagePath:d:\NanoServer\Packages\Microsoft-NanoServer-FailoverCluster-Package.cab /Image:W:\ dism /Add-Package /PackagePath:d:\NanoServer\Packages\en-us\Microsoft-NanoServer-FailoverCluster-Package.cab /Image:W:\ As a result, we get a set of files that we place in the directory with the Nano Server.

In the fifth step, we need to decide how Windows PE will boot and where our files and Nano Server files will be. There are several ways, for example, to make a bootable USB-sticker and to download and install from it, or, for example, to make a bootable ISO, and put the Nano Server files on USB and install it on a real computer. Or make an ISO-image, which will be Windows PE and Nano Server files. We will go this way. Copy the NanoServer directory to W: \ WinPE_64 \ media \ . After this, create an ISO image using the MakeWinPEMedia / ISO command W: \ WinPE_64 W: \ WinPE_64.iso Note that MakeWinPEMedia is a script in the ADK, and if you change the key, it will also make a bootable USB sticker with the same success.

At the end of this procedure, we get the image file WinPE_64.iso , in which Windows PE is prepared and the Nano Server files are located.
The sixth step is to boot from the image on the newly created virtual machine or physical computer, after which we get to the command line, in which you need to go to the directory on the d: \ nanoServer disk . If drive D is empty or you did not find the directory, try the following:
Attention!!! Perform only on the Windows PE command line:
Diskpart (call the partition editor) Select disk 0 (choose disk 0) Clean (delete all partitions from this disk) Exit (exit the partition editor) exit (after this command, the computer will restart)Next, try moving to the d: \ nanoserver directory . Then run the diskpart / s Bios_Partition_Structure.txt or diskpart / s UEFI_Partition_Structure.txt command . The choice of team that will create partitions is determined by the type of load. The content of Bios_Partition_Structure.txt and UEFI_Partition_Structure.txt we discussed at the end of the second section.
After creating the partitions, run the Apply_on_Hardware_Bios.bat or Apply_on_Hyper-V_VM.bat script , depending on the type of machine. After the script finishes, the machine will reboot. After a reboot, nothing appears on the screen for a long time, all the same control from the screen will not be available.
The seventh and final step is to connect to the Nano Server. Look at our DHCP server that gave us the address, and remember it. Run PowerShell on behalf of the administrator on the local machine:
$ip = "192.168.10.105" $user = "Administrator" Set-Item WSMAN:\\localhost\client\TrustedHosts $ip -Force chcp 65001 Enter-PSSession -ComputerName $ip -Credential $user enter the password and run cmdlet get-process

Resources:
Windows Assessment and Deployment Kit (ADK) RC for Windows 10
Microsoft Ignite 2015 (video from the conference)
Windows Server Technical Preview 2
Sample: Configure UEFI / GPT-Based Hard Drive Partitions by Using Windows PE and DiskPart
Sample: Configure BIOS / MBR-Based Hard Disk Partitions Using Windows PE and DiskPart
Creating partition structure in GPT markup on a UEFI PC
Getting Started with Nano Server
Source: https://habr.com/ru/post/261701/
All Articles