How I compiled the application bundle for MacOS on Linux
So, I happened to recently update the build script of a single application written in Java Swing. The application has been developed for a long time, and has been written by any generation of programmers, but it does its job well and clearly, therefore it is built for the main platforms (Window's, Unix, MacOS). So we decided to upgrade our old app bundle for MacOS, and at the same time put the built-in jre version 1.8 into it. And then interesting things started to come to light: the old bundle was built for Java 6 from Apple, and now it didn’t work, the Info.plist format changed, because Oracle loves its own preferences, the old JavaApplicationStub is now outlawed, long live JavaAppLauncher, and many other interesting things . Personally, I like more Linux, forgive me MacOS lovers, and even such a familiar terminal console weakly warmed my soul after long trials in the Internet in search of the experience of the same brave people who defeated my problem. This is almost unbelievable, but in the end, I found an article in the blog of David Clunie , in which he described step by step almost all my attempts to find ways to solve the problem. I am interested in rolling up, for lovers of originals, here is a link to a cherished article , I apologize in advance for the quality of my translation, because it will not be complete and literal.
Summary:
Packing a Java application into a Mac bundle executable process is not complicated, but it changes over time. JavaApplicationStub is replaced by the JavaAppLauncher file, it is easy to manually assemble the contents of the bundle and edit the Info.plist, but the structure of the bundle and the properties in the Info.plist have been changed.
David has been a Mac and Java fan for a long time, he really liked the cross-platform approach to development, He also prefers the terminal console I love, and Xcode uses only as a text editor, he really likes make, and he uses ant to build large projects. he sure ant is cool. David thinks that all this sometimes drives people reading his code crazy, but such is life.
')
All of the above makes it possible for its rather outdated approach to keep up with changes in Java from Apple and Oracle. Developing and deploying Java applications on a Mac is not a big challenge. David, like me, needs his application to work under three main platforms: Mac, Unix and Windows.
Once there was only one way to build an application for Mac - use the tool supplied by Apple, which was called jarbundler. Jarbundler created the correct file and folder structure for a Mac bundled application. Each Mac application is actually a folder called “something.app”, which consists of various files with resources, properties, etc., including a binary executable file. In the pre-Oracle era, when Apple delivered its own version of Java, the required binary file was JavaApplicationStub, and jarbundler expects this file to be in the right place when the application starts. Here is a link to outdated documentation on this topic.
Having tried once to use jarbundler to get the correct structure of folders and bundle files, I stopped using it, and simply manually copied the files and folders of each of my new applications to the right places, edited the Info.plist file. Automating the update of such standard structures in a makefile was trivial. Since I used very few Apple-JRE-specific things in my work, when Apple stopped supplying JRE and Oracle started doing this, it had little impact on my development process. So now I have a habit of using different versions of OpenJDK depending on the phase of the moon, and it still seems that everything is working fine.
For a long time, David collected his projects under Java 1.5 simply because maybe someone else used this old unsupported version of JRE, but eventually, with gritted teeth, he switched to version 1.7. It seemed sensible when he found out that Java 9 (with which he was experimenting) will no longer compile for such an old target. After short experiments with the appropriate javac options (-target, -source and -bootclasspath) to silence various (important) warnings, it seemed that everything was going well.
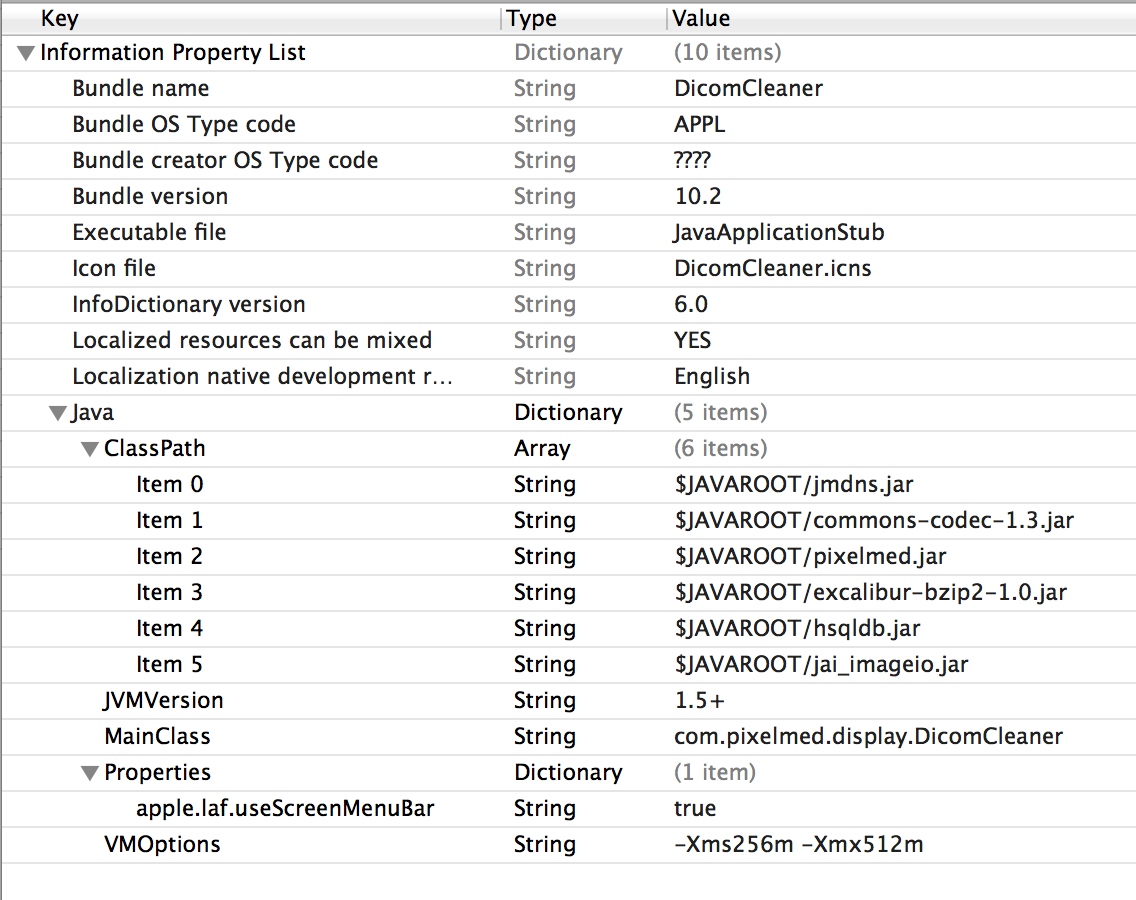
Until I copied the jar file compiled for Java 1.7 into my Mac bundle and did not think, why not increase the value of the JVMVersion property in Info.plist from “1.5+” to “1.7+”? After that, my application no longer worked and issued a warning about the error "unsupported versions".
From this point of view, I for years smugly ignored any messages on Mac Java mailing list about some new tool called appbundler described by Oracle, and Apple’s policy was such that applications no longer depended on the installed JRE, instead applications should were to be associated with their own full copy of acceptable JRE .
Then there was a bit of reflection of the author, the result is that he switched to using appbundler. So, it turned out that the use of appbundler depends on ant, which the author did not usually use (and I used it, so I was lucky), and unfortunately the appbundler task configuration for ant did not support the JVM options that David needed so much. Here is a description of the supported appbundler options. At the time of writing the article to the blog (October 2014), the appbundler looked a bit outdated, and it was clear that Oracle was not actively developing it, which made the author a little worried. There is one more version of appbundler , which other people are actively keeping mainlands, there are many more options in it, and its use is much more complicated. Next, a Michael Hall post was found in Mac Java developers mailing list, which mentioned the tool written by Michael, namely AppConverter , which was expected to convert old applications into new ones (sorry for the misty pun, but as it is, that's it, for David I have nothing I do not finish). It sounded like I found what I needed. Unfortunately, when I tried to use the converter, it turned out that the converted applications did not respond to the drag and drop application bundle, as promised.
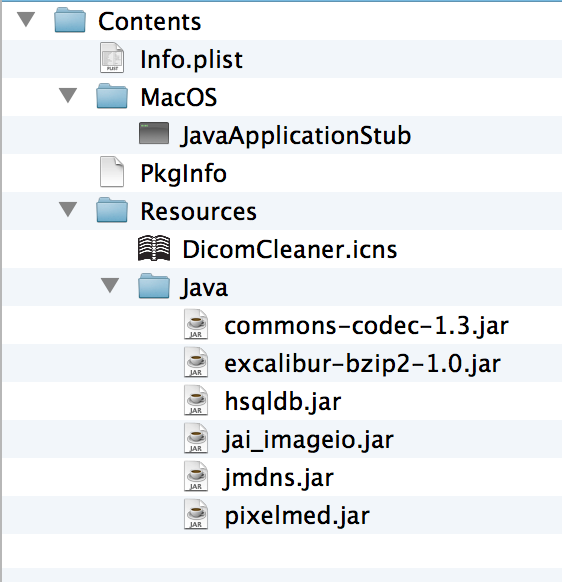
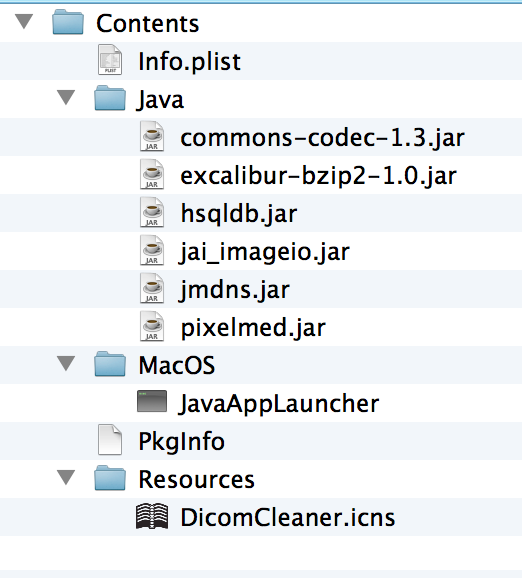
In general, AppConverter was useless for David, with one exception, David looked at the contents of the bundle, made sure that this is a Java application containing the binary executable file JavaAppLauncher, which is now used instead of JavaApplicationStub, also contains an Info.plist, which showed that necessary. In addition to everything, it turned out that all jar files now from the Contents / Resources / Java folder moved to Contents / Java (which was confirmed by posts on Mac Java developers mailing list, by the way, personally, in my opinion, this is a bad decision it was so good when I could personally add all the folders I need to the classpath through Info.plist, well, for example, there are different packages with the same classes and jar files with the same name, but in different folders, in the old bundles it all worked completely without problems, and now, when for me, all that is added to the classpath is copied into one unity This folder, you can simply forget about support for different versions of FOP, you have to rebuild new jar files with different names, for example fop-0.20.jar; fop-1.0.jar; fop-2.0.jar, thanks for adding the work).
So, David edited the Info.plist structure a little by hand and copied the JavaAppLauncher from the bundle obtained after using AppConverter, got a completely working application, which allowed him not to think about how else to configure the appbundler so that he would still collect the working bundles .
As an example, here is the old application bundle structure (which I miss so much):
but a new one, from which one cannot get anywhere now:
and here is the old Info.plist:
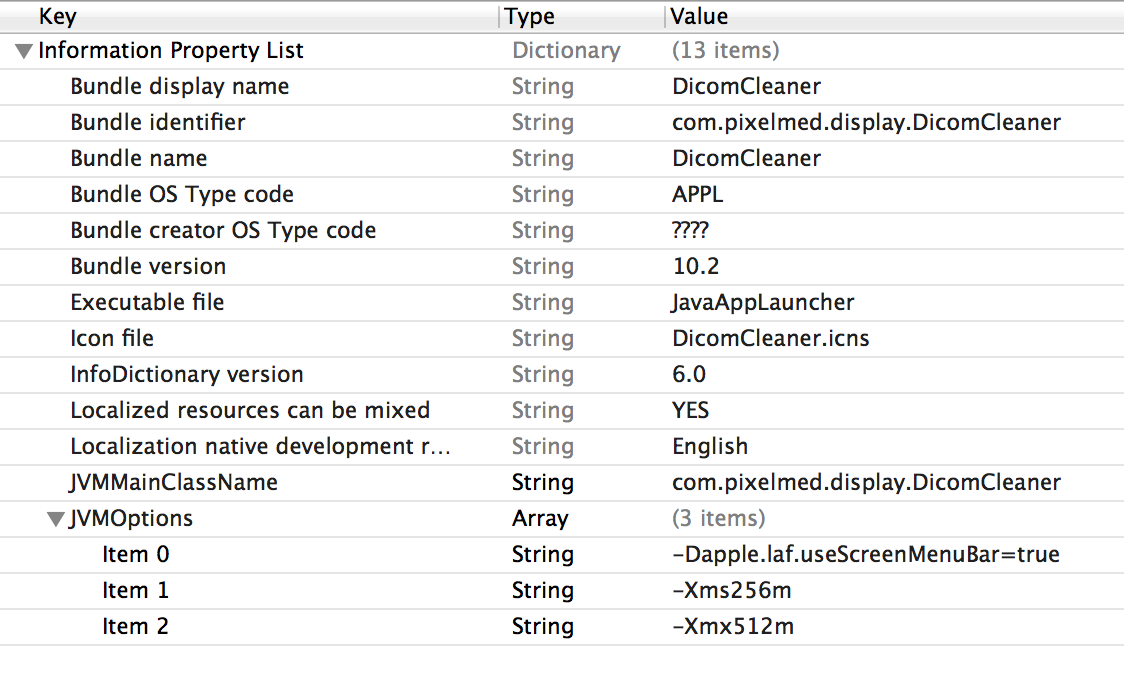
Well, for comparison, the new one:
Again, note that now you don’t need to add anything to the classpath, JavaAppLauncher itself automatically adds to the classpath everything that will be in the Contents / Java folder.
Now, instead of having all java-properties under the common Java tag, JavaAppLauncher uses the JVMMainClassName property instead of Java / MainClass, and JVMOptions instead of Java / VMOptions.
Then David describes his further experiments with the application bundle, the software versions that he used, and also resentment about what prevented the appbundler authors from using the old bundle structure and Info.plist. And here is the current documentation on this subject.
Ps At first, David did not succeed in embedding the JRE in the application bundle, but he did not lose hope, read articles with similar subjects, looked for new tools that could help, and were well documented and then renamed . And finally, the apotheosis of this parable, there is still a universal launcher for Mac application bundle. Summing up, I want to say a big thank you to a man named Dylan Myers, who left a wonderful comment, the essence of which boils down to what you need to rename the universaleJavaApplicationStub to JavaApplicationStub, I went a little further and renamed it to JavaAppLauncher. That was the solution for me: we build a project with ant, including assembling a bundle using the appbundle task for ant (if you need a built-in JRE, you will need to build on a Mac, because the JRE that is installed on your Mac, this is just a stub, I manually brought the bundle to a healthy state, but the basic properties for Info.plist can still be specified in the appbundle task), replace the standard JavaAppLauncher with the universaleJavaApplicationStub and rename it to JavaAppLauncher. After all the manipulations, I put the finished application bundle on my Linux server build, and Jenkins completely merges the new version of the application from the repository, runs the ant task, copies the necessary jar files to the bundle, and most importantly, it works. Thanks for attention.
Summary:
Packing a Java application into a Mac bundle executable process is not complicated, but it changes over time. JavaApplicationStub is replaced by the JavaAppLauncher file, it is easy to manually assemble the contents of the bundle and edit the Info.plist, but the structure of the bundle and the properties in the Info.plist have been changed.
David has been a Mac and Java fan for a long time, he really liked the cross-platform approach to development, He also prefers the terminal console I love, and Xcode uses only as a text editor, he really likes make, and he uses ant to build large projects. he sure ant is cool. David thinks that all this sometimes drives people reading his code crazy, but such is life.
')
All of the above makes it possible for its rather outdated approach to keep up with changes in Java from Apple and Oracle. Developing and deploying Java applications on a Mac is not a big challenge. David, like me, needs his application to work under three main platforms: Mac, Unix and Windows.
Once there was only one way to build an application for Mac - use the tool supplied by Apple, which was called jarbundler. Jarbundler created the correct file and folder structure for a Mac bundled application. Each Mac application is actually a folder called “something.app”, which consists of various files with resources, properties, etc., including a binary executable file. In the pre-Oracle era, when Apple delivered its own version of Java, the required binary file was JavaApplicationStub, and jarbundler expects this file to be in the right place when the application starts. Here is a link to outdated documentation on this topic.
Having tried once to use jarbundler to get the correct structure of folders and bundle files, I stopped using it, and simply manually copied the files and folders of each of my new applications to the right places, edited the Info.plist file. Automating the update of such standard structures in a makefile was trivial. Since I used very few Apple-JRE-specific things in my work, when Apple stopped supplying JRE and Oracle started doing this, it had little impact on my development process. So now I have a habit of using different versions of OpenJDK depending on the phase of the moon, and it still seems that everything is working fine.
For a long time, David collected his projects under Java 1.5 simply because maybe someone else used this old unsupported version of JRE, but eventually, with gritted teeth, he switched to version 1.7. It seemed sensible when he found out that Java 9 (with which he was experimenting) will no longer compile for such an old target. After short experiments with the appropriate javac options (-target, -source and -bootclasspath) to silence various (important) warnings, it seemed that everything was going well.
Until I copied the jar file compiled for Java 1.7 into my Mac bundle and did not think, why not increase the value of the JVMVersion property in Info.plist from “1.5+” to “1.7+”? After that, my application no longer worked and issued a warning about the error "unsupported versions".
From this point of view, I for years smugly ignored any messages on Mac Java mailing list about some new tool called appbundler described by Oracle, and Apple’s policy was such that applications no longer depended on the installed JRE, instead applications should were to be associated with their own full copy of acceptable JRE .
Then there was a bit of reflection of the author, the result is that he switched to using appbundler. So, it turned out that the use of appbundler depends on ant, which the author did not usually use (and I used it, so I was lucky), and unfortunately the appbundler task configuration for ant did not support the JVM options that David needed so much. Here is a description of the supported appbundler options. At the time of writing the article to the blog (October 2014), the appbundler looked a bit outdated, and it was clear that Oracle was not actively developing it, which made the author a little worried. There is one more version of appbundler , which other people are actively keeping mainlands, there are many more options in it, and its use is much more complicated. Next, a Michael Hall post was found in Mac Java developers mailing list, which mentioned the tool written by Michael, namely AppConverter , which was expected to convert old applications into new ones (sorry for the misty pun, but as it is, that's it, for David I have nothing I do not finish). It sounded like I found what I needed. Unfortunately, when I tried to use the converter, it turned out that the converted applications did not respond to the drag and drop application bundle, as promised.
In general, AppConverter was useless for David, with one exception, David looked at the contents of the bundle, made sure that this is a Java application containing the binary executable file JavaAppLauncher, which is now used instead of JavaApplicationStub, also contains an Info.plist, which showed that necessary. In addition to everything, it turned out that all jar files now from the Contents / Resources / Java folder moved to Contents / Java (which was confirmed by posts on Mac Java developers mailing list, by the way, personally, in my opinion, this is a bad decision it was so good when I could personally add all the folders I need to the classpath through Info.plist, well, for example, there are different packages with the same classes and jar files with the same name, but in different folders, in the old bundles it all worked completely without problems, and now, when for me, all that is added to the classpath is copied into one unity This folder, you can simply forget about support for different versions of FOP, you have to rebuild new jar files with different names, for example fop-0.20.jar; fop-1.0.jar; fop-2.0.jar, thanks for adding the work).
So, David edited the Info.plist structure a little by hand and copied the JavaAppLauncher from the bundle obtained after using AppConverter, got a completely working application, which allowed him not to think about how else to configure the appbundler so that he would still collect the working bundles .
As an example, here is the old application bundle structure (which I miss so much):
but a new one, from which one cannot get anywhere now:
and here is the old Info.plist:
Well, for comparison, the new one:
Again, note that now you don’t need to add anything to the classpath, JavaAppLauncher itself automatically adds to the classpath everything that will be in the Contents / Java folder.
Now, instead of having all java-properties under the common Java tag, JavaAppLauncher uses the JVMMainClassName property instead of Java / MainClass, and JVMOptions instead of Java / VMOptions.
Then David describes his further experiments with the application bundle, the software versions that he used, and also resentment about what prevented the appbundler authors from using the old bundle structure and Info.plist. And here is the current documentation on this subject.
Ps At first, David did not succeed in embedding the JRE in the application bundle, but he did not lose hope, read articles with similar subjects, looked for new tools that could help, and were well documented and then renamed . And finally, the apotheosis of this parable, there is still a universal launcher for Mac application bundle. Summing up, I want to say a big thank you to a man named Dylan Myers, who left a wonderful comment, the essence of which boils down to what you need to rename the universaleJavaApplicationStub to JavaApplicationStub, I went a little further and renamed it to JavaAppLauncher. That was the solution for me: we build a project with ant, including assembling a bundle using the appbundle task for ant (if you need a built-in JRE, you will need to build on a Mac, because the JRE that is installed on your Mac, this is just a stub, I manually brought the bundle to a healthy state, but the basic properties for Info.plist can still be specified in the appbundle task), replace the standard JavaAppLauncher with the universaleJavaApplicationStub and rename it to JavaAppLauncher. After all the manipulations, I put the finished application bundle on my Linux server build, and Jenkins completely merges the new version of the application from the repository, runs the ant task, copies the necessary jar files to the bundle, and most importantly, it works. Thanks for attention.
Source: https://habr.com/ru/post/261699/
All Articles