FLProg - continuation of evolution

Long enough on Habré there was no news about the FLProg project. Unfortunately, employment at the main job and household chores did not leave me time to write posts. But the project is not dead, but continues to evolve. What new has happened since the last post ?
Three new versions of the program have been released. In version 1.8, it became possible to create blocks of users. Blocks can be created in either of two languages, and used in any FLProg project. They are not tied to a specific controller. User blocks can be combined into libraries, saved as a file on disk, as a separate block, or as a whole block library. You can exchange blocks, load someone else's blocks into your library. For more information about working with user blocks, see the video tutorials.
Work with user blocks in FLProg
Video tutorial "Working with user blocks and creating a block in the FBD language":
')
Video tutorial "Working with user blocks and creating a block in the LAD language":
')
Video tutorial "Working with user blocks and creating a block in the LAD language":
Since in version 1.8. the core of the program was greatly changed, then at the first time after the start of its operation a sufficiently large number of critical errors were detected. This necessitated the release of version 1.8.1 with their corrections.
Yesterday version 1.9 was released, the main purpose of which was the organization of work with Bluetooth. To solve this problem, we had to significantly expand the functionality of the program. Six new blocks for working with strings have been added, two new data types previously missing in the project have been added (Char and Byte). Work with arrays and SoftwareSerial is also implemented. About new blocks in the program and work with them can be viewed in the video tutorial.
What's new in the program FLProg -1.9. Work with arrays, strings, com-port, bluetooth.
In addition, I found on the Internet an interesting project RemoteXY .

The main idea of the project is to enable the creation of custom management interfaces for Arduino boards in a visual online editor. The interface description is in the controller firmware, which allows one Android program to work with any interface created in the editor.
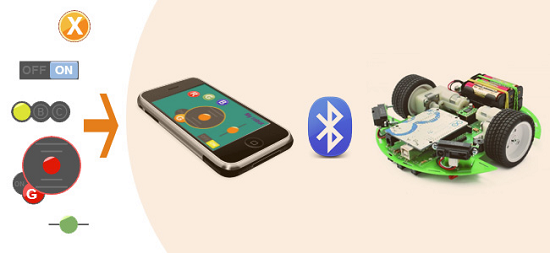
I contacted the authors of the project, and we agreed on cooperation. FLProg support was added to the project site, and I made a specialized unit for working with the RemoteXY program. The result of this collaboration can be viewed on video.
Work with the RemoteXY program in the FLProg project
Well, the most anticipated update users in the project. Starting from version 1.9 in the project, you can change the controller at any time, and copy between different projects written in the same language. The implementation of this seemingly simple at first glance functionality turned out to be very complex, which caused a delay in the release of the new version.
And finally, as usual, a review of new user projects on the FLprog website. Saved text of the authors of publications.
Author: Amateur
Solar Charge Controller
Good day, colleagues!
The purpose of this project is an example of the fact that the program of the respected Sergei Glushenko is actively used and quite serious projects can be collected on it. Almost at the very beginning I wrote a simple FLProg timer and published it here, when there was not even half of what we have in the program. Next, I wanted to create something more and, accordingly, useful and applicable)). But for quite a long time I lacked imagination for something interesting.
But then the day came when inspiration rushed over me! The culprit was my work colleague and a close friend. He purchased a solar battery and a pair of batteries, but he refused from the factory charge controller, as he considered that he could do it himself. So we decided to work together to assemble our own controller.
After reading many articles in the Internet about the principle of smart battery charging, we have already presented an algorithm for the program. It remains only to apply it in the gland.
I started programming, and a friend took it upon himself to twist and solder it all. The program was written in about a day, but after numerous tests new bugs were added, bugs were corrected. At the moment, everything is perfectly charged and work out all the protection.
What can I say about the algorithm of the program? Charging is "smooth", that is, PWM. There is also a boost mode (intensive charging). Protecting the temperature from discharging and recharging the battery. Output readings on the display and of course in the COM-port. Turning on the display and turning on / off load output in manual and automatic mode.
As everyone probably guesses that everyone has a different style of writing a program and therefore do not kick much)) If you have any comments or good advice, then I will listen with pleasure and take note in the future.
Thanks for attention.
Actually the program yadi.sk/d/oPgcPit8eSHyX
Posted by: seval
Aquastorozh
I had the need to make Aquastoroz, Filled like the entire first floor in the house. Thanks to the author FLProg, I easily wrote a program for akvastorozha. Works more than a year. Once already worked.
To implement this project, a ball valve with a 12 volt motor and two-wire control, with built-in limit switches, was purchased. Just bought Arduino Pro mini. The rest was available.
Drawn scheme.
Algorithm: when a leak is detected, the Accident bit is triggered. 4 seconds (observed by experience) voltage is applied to the valve.
And then the Diode blinks. If you eliminate the leakage and press Reset, the Alarm bit is reset and you can open the valve with the Open button.
About once a week I close the valve with the Close button and open it for the purpose of prevention.
I spread the scheme and the program .
The only thing that is not mastered is when the bit is triggered. An accident is constantly applied to the valve. Do not reset the accident yet. But this is not critical for me.
Added a diagram in the form of a picture.

I will clarify that the inputs and outputs on the scheme and in the program may differ. I drew a scheme for a long time, but I constantly change the program.
Posted by: Balzamalex
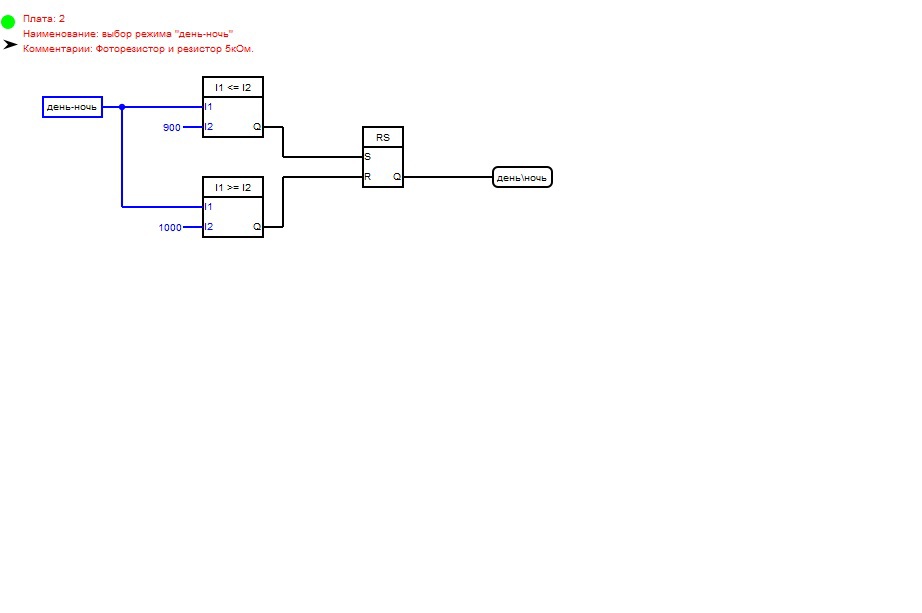
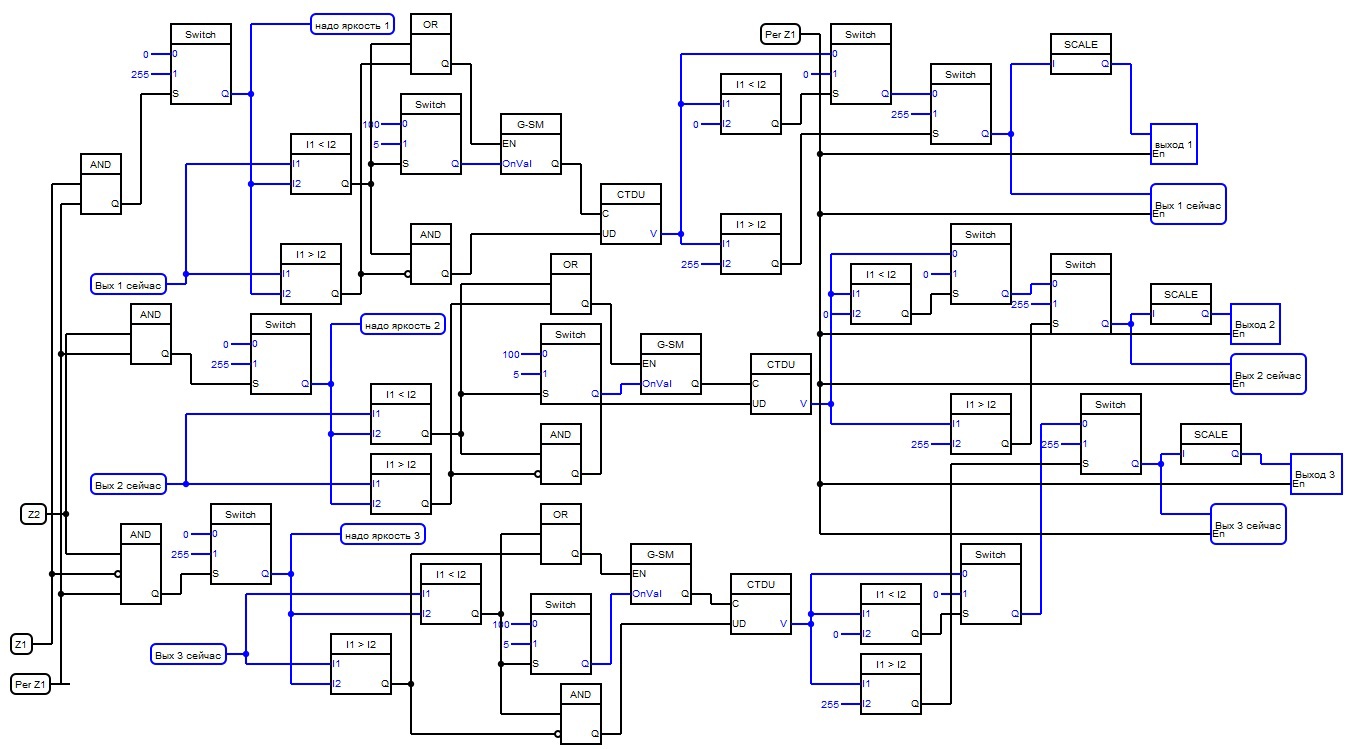
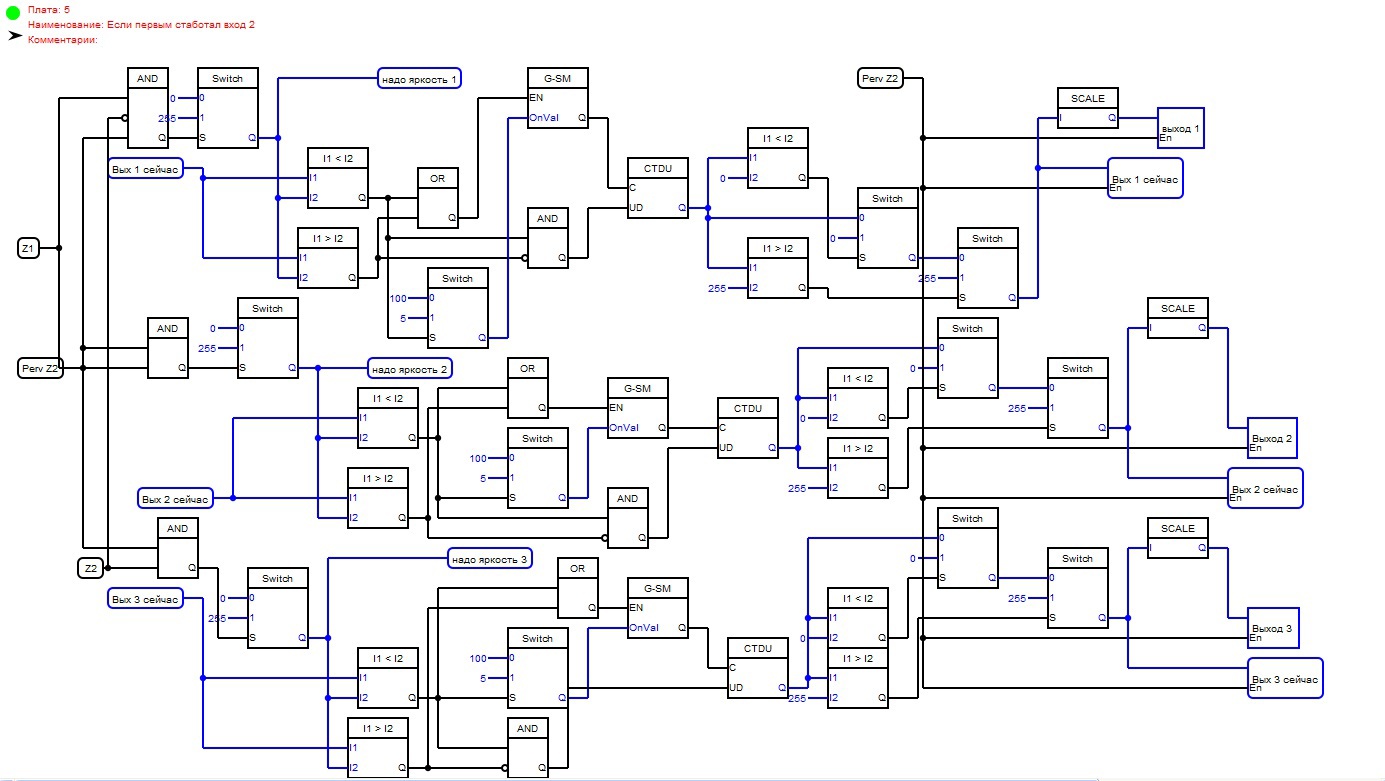
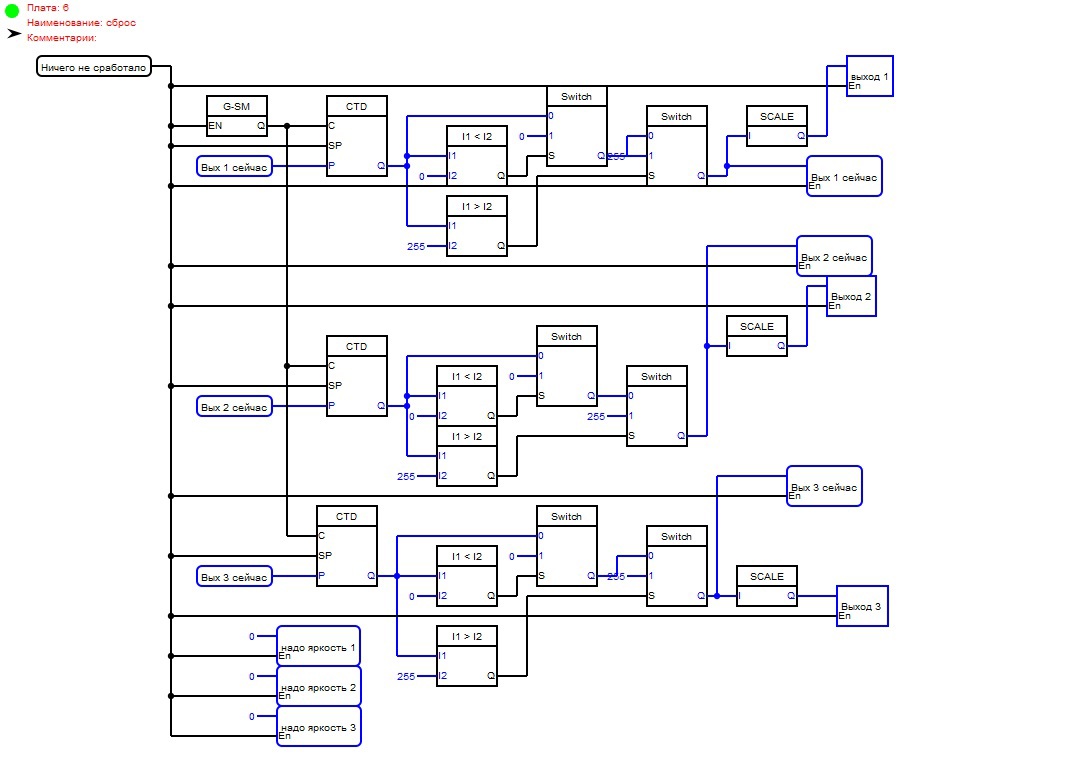
Dark corridor
It so happened that I had a large corridor in my apartment. And at the end of the corridor bathroom. It's dark at night. But sometimes you want ... Not that I would not remember from memory where to go, but decided to make it more beautiful.
So, the lighting of the dark corridor:
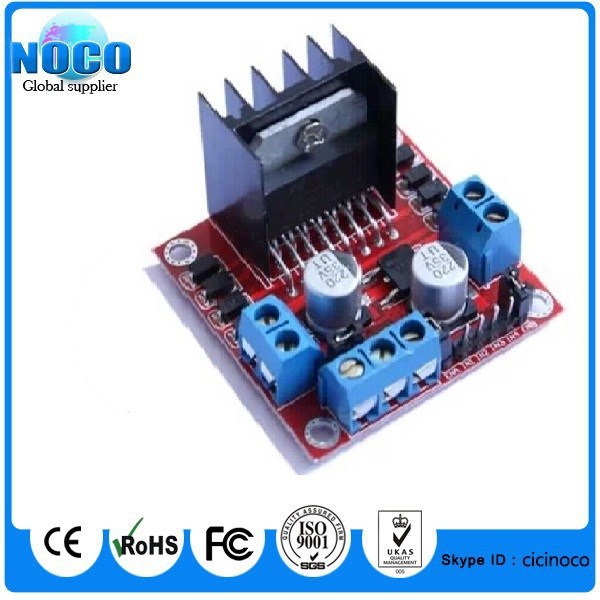
Used Arduino ATmega328. As keys for management the module L298N is used.
The backlight itself is made of SMD 5630 LED strip glued onto an aluminum profile. It turned out three LED lines, approximately 1.8 meters each.
Briefly the algorithm works:
There are 2 digital sensors: c1 and c2
There are 3 analog outputs: b1, b2, b3
It is necessary: If at first the t1 activates, then it turns on b1, then the t1 and q2 turns on - it turns on b1 and b2, then after 2 seconds it turns on b2 and b3.
If at first F2 works, then it turns on at 3, then when c2 and c1 turn on at 3 and at 2, then, after 2 seconds, work at b2 and at 1.
When both sensors stop working, all outputs turn off.
Switching off the diode lamps is organized smoothly. (In principle, the inclusion is also smooth, but it turned out to be unnecessary for me, and the inclusion delay is minimal)
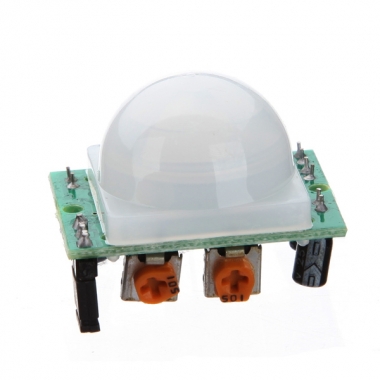
As sensors used sensors HC-SR501 (2 pieces):
The backlight is installed below, along the built-in cabinet, other parts, sensors, etc. above (about a height of 3 meters).
The idea of the scheme was suggested to me by Comrade Slimper, for which many thanks to him.
And the scheme itself: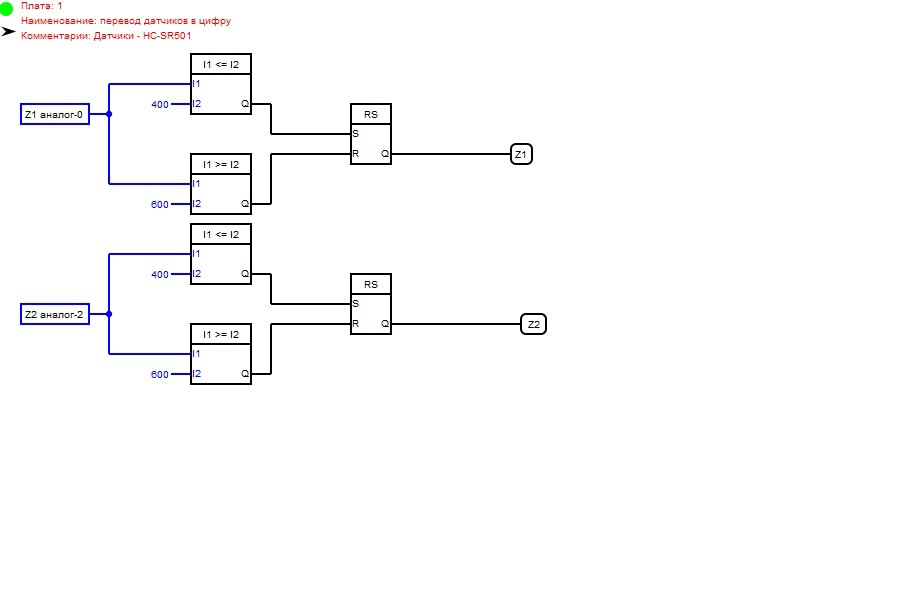

The scheme is already installed and valid. If you have questions I will try to answer. Don't scold the code, I'm not a programmer at all.
PS The project itself: flprog.ru/images/hostingFiles/118191721.flp
The author: Vyacheslav Mikhailov
Programmable mini manipulator
Toy manipulator on Chinese servomotors. It is assembled literally "on the knee" of the trash and the Ardiuno controller. The controller program remembers up to 10 steps. A dynamic servo speed control unit is inserted into the program, depending on the required angle of rotation.
The program .
Source: https://habr.com/ru/post/261691/
All Articles