Manage dependencies in iOS applications correctly: Typhoon modularity
In the previous article of the cycle, we briefly reviewed the basic principles of the structure and operation of the Typhoon Framework - Dependency Injection Container for iOS. Nevertheless, it is not enough to understand how the instrument works - the most important thing is to use it correctly. In the first part, we looked at various examples of configuring the created dependencies, now we will deal with a higher level - breaking up the TyphoonAssembly into modules and testing them.
Cycle "Manage dependencies in iOS applications correctly"
- Meet Typhoon
- Typhoon device
- Modularity Typhoon
- Typhoon Tips & Tricks
- Alternatives to Typhoon
- (Optional) Rambler.iOS # 3. Dependency Injection in iOS. Slides
- (Optional) Rambler.iOS # 3. Dependency Injection in iOS. Video
Why do we need modularity
Take as an example a fairly simple application - a client for a weather service (by the way, one of the demo applications ). It consists of the following screens:
- List of cities for which there is weather data
- Information about the weather in the selected city,
- Adding a new geographic point
- Application settings.

Here there are the first four methods that give definitions for these screens.
Method Counter: 4
We distract for a while from UI and we will pass to structure of a layer of business logic. We group all logically related functionality into separate entities that are independent of each other, called services . They perform the following tasks:
- Managing the list of cities (getting a collection of cities, adding / deleting / changing any of them),
- Getting weather data (getting weather information for a selected city),
- Works with geolocation (getting current user geolocation, history of its movements),
- Handling push notifications (device registration, changing subscription settings),
- Obtaining data about the application (help, license, versioning).
Method counter: 4 + 5 = 9
By themselves, these services are quite useless, as they only describe certain rules of the application business logic. Let's see what dependencies they need.
')
We will need several clients (entities responsible for interacting with an external data source). We will thicken the colors and imagine the situation when you will have to work with several weather providers at once.
- Interaction with your server,
- Working with Weather Service API 1,
- Working with Weather Service API 2,
- ...
- Working with Weather Service API n,
- Work with the database.
Method counter: 9 + n + 2 = 11 + n
In addition to clients, each network service needs a mapper (responsible for converting raw data received from the server to model objects) and a validator (responsible for checking the received data).
Method Counter: 11 + n + 2 * (n + 1) = 13 + 3n
Let's not forget some more wonderful helpers:
- Logging
- Work with networkActivityIndicator,
- Connection status monitoring
Method Counter: 13 + 3n + 3 = 16 + 3n
The number of entities does not end there, since we return to the UI layer. Depending on the chosen architecture, the number of dependencies for each of the screens can reach several dozen. We, of course, make a simple application, so we will select only the most necessary objects:
- Screen status animator,
- DataSource (not important for a table or any other view),
- An object that encapsulates logic related to scrolling,
- Router between the screens,
- Error handler associated with the current screen.
Counter methods: 16 + 3n + 4 * 5 = 36 + 3n
In this formula, n is the number of weather services whose data is needed for the application to work correctly. We want to use Gismeteo , Yandeks.Pogodu and Yahoo.Weather .
Method counter: 36 + 3 * 3 = 45
Forty-five methods that configure various dependencies for a seemingly very simple application. If we stay within the framework of one TyphoonAssembly , then we will face several rather serious problems:
- The huge size of the class TyphoonAssembly - it will be very difficult to analyze and maintain in a clean state.
- Blur of responsibility - the creation of objects of completely different and unrelated layers of abstraction occurs in the same place.
- Lack of structuredness - if necessary, you cannot provide various implementations of logically related definitions.
To avoid such problems, TyphoonAssembly is divided into modules that are interconnected both vertically and horizontally. As I mentioned in the last part , in fact, when several assemblies are activated under the hood, they create one common TyphoonComponentFactory containing a register of all definitions and pools of created objects. Such a framework architecture allows us to safely decompose TyphoonAssembly , which is a general proxy for accessing the internal factory.
Let's sum up. The modularity of the TyphoonAssembly level is needed in order to:
- Group related dependencies , thereby building a clear architecture,
- Keep the interface of each assembly clean and declare only the methods needed by other components,
- Provide, if necessary, another implementation of any of the selected components (say, the level of customers),
- To enable an outsider to get an idea of the architecture of the entire project only on the structure of TyphoonAssembly modules.
Module breakdown
It is not enough to group logically related elements in separate subclasses of TyphoonAssembly — in most cases they should know something about each other. Let's return to the example of the weather application discussed earlier and see what dependencies are required for a screen with weather information in the selected city:
@interface RCTWeatherViewController: UIViewController
@interface RCTWeatherViewController : UIViewController // @property (strong, nonatomic) id <RCTCityService> cityService; @property (strong, nonatomic) id <RCTWeatherService> weatherService; @property (strong, nonatomic) id <RCTLocationService> locationService; // @property (strong, nonatomic) id <RCTAnimator> cloudAnimator; @end Based on this, we need to build a model of interaction between three different assemblies - creating controllers, services, and animators, respectively. “Aha!” You think. “Now this guy will start injecting one module into another, and generally write a factory of factories!” You must not be in a hurry! One of the next wonderful possibilities of Typhoon is that no additional injection is required for the interaction of the modules. It is enough only to specify other modules in the TyphoonAssembly interface that it needs to work with - and you can safely use their public methods:
@interface RCTWeatherUserStoryAssembly: TyphoonAssembly
@interface RCTWeatherUserStoryAssembly : TyphoonAssembly @property (strong, nonatomic, readonly) RCTAnimatorAssembly *animatorAssembly; @property (strong, nonatomic, readonly) TyphoonAssembly<RCTServiceAssembly>* serviceAssembly; - (UIViewController *)weatherViewController; @end And this is what the method for TyphoonDefinition will look like:
- (UIViewController *) weatherViewController
- (UIViewController *)weatherViewController { return [TyphoonDefinition withClass:[RCTWeatherViewController class] configuration:^(TyphoonDefinition *definition) { [definition injectProperty:@selector(cityService) with:[self.serviceAssembly cityService]]; [definition injectProperty:@selector(weatherService) with:[self.serviceAssembly weatherService]]; [definition injectProperty:@selector(locationService) with:[self.serviceAssembly locationService]]; [definition injectProperty:@selector(cloudAnimator) with:[self.animatorAssembly cloudAnimator]]; }]; } I will make a small digression. It is possible, instead of directly specifying the assembly and its method, to use syntax of the following form:
[definition injectProperty:@selector(cityService)]; In this case, Typhoon takes the property type (class or protocol) and looks for a suitable definition for all the assembly in the project. However, I do not recommend using such an approach - it will be much more obvious both for other project participants and for you in the future, to directly indicate the origin of the dependency. In addition, it will avoid the emergence of implicit links between assemblies of different layers of abstraction.
As I already mentioned, modules can be interconnected both horizontally (for example, assembly for different user stories), and vertically ( RCTWeatherUserStoryAssembly and RCTServiceAssembly from the example above). In order to build a competent TyphoonAssembly architecture, you must strictly adhere to the following rules:
- Modules at one level of abstraction know nothing about each other ,
- The modules of the lower level do not know anything about the modules of the upper level .
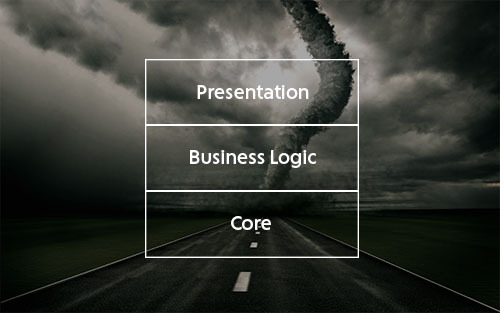
The most basic example of splitting TyphoonAssembly modules into layers:
Each of the layers inside can consist of any number of assembly. For example, it makes sense to break dependencies from Presentation Level into several user stories.
Consider a more difficult case of typing TyphoonAssembly into modules using the example, as usual, Rambler . Mail .
Assembly structure in Rambler. Mail
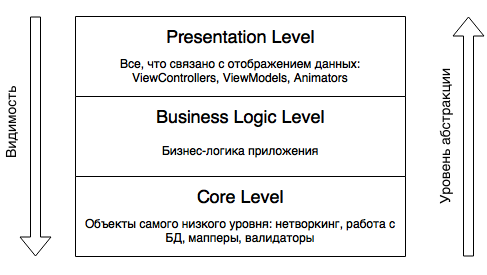
In general, all modules are divided into three standard layers - Presentation, Business Logic and Core.
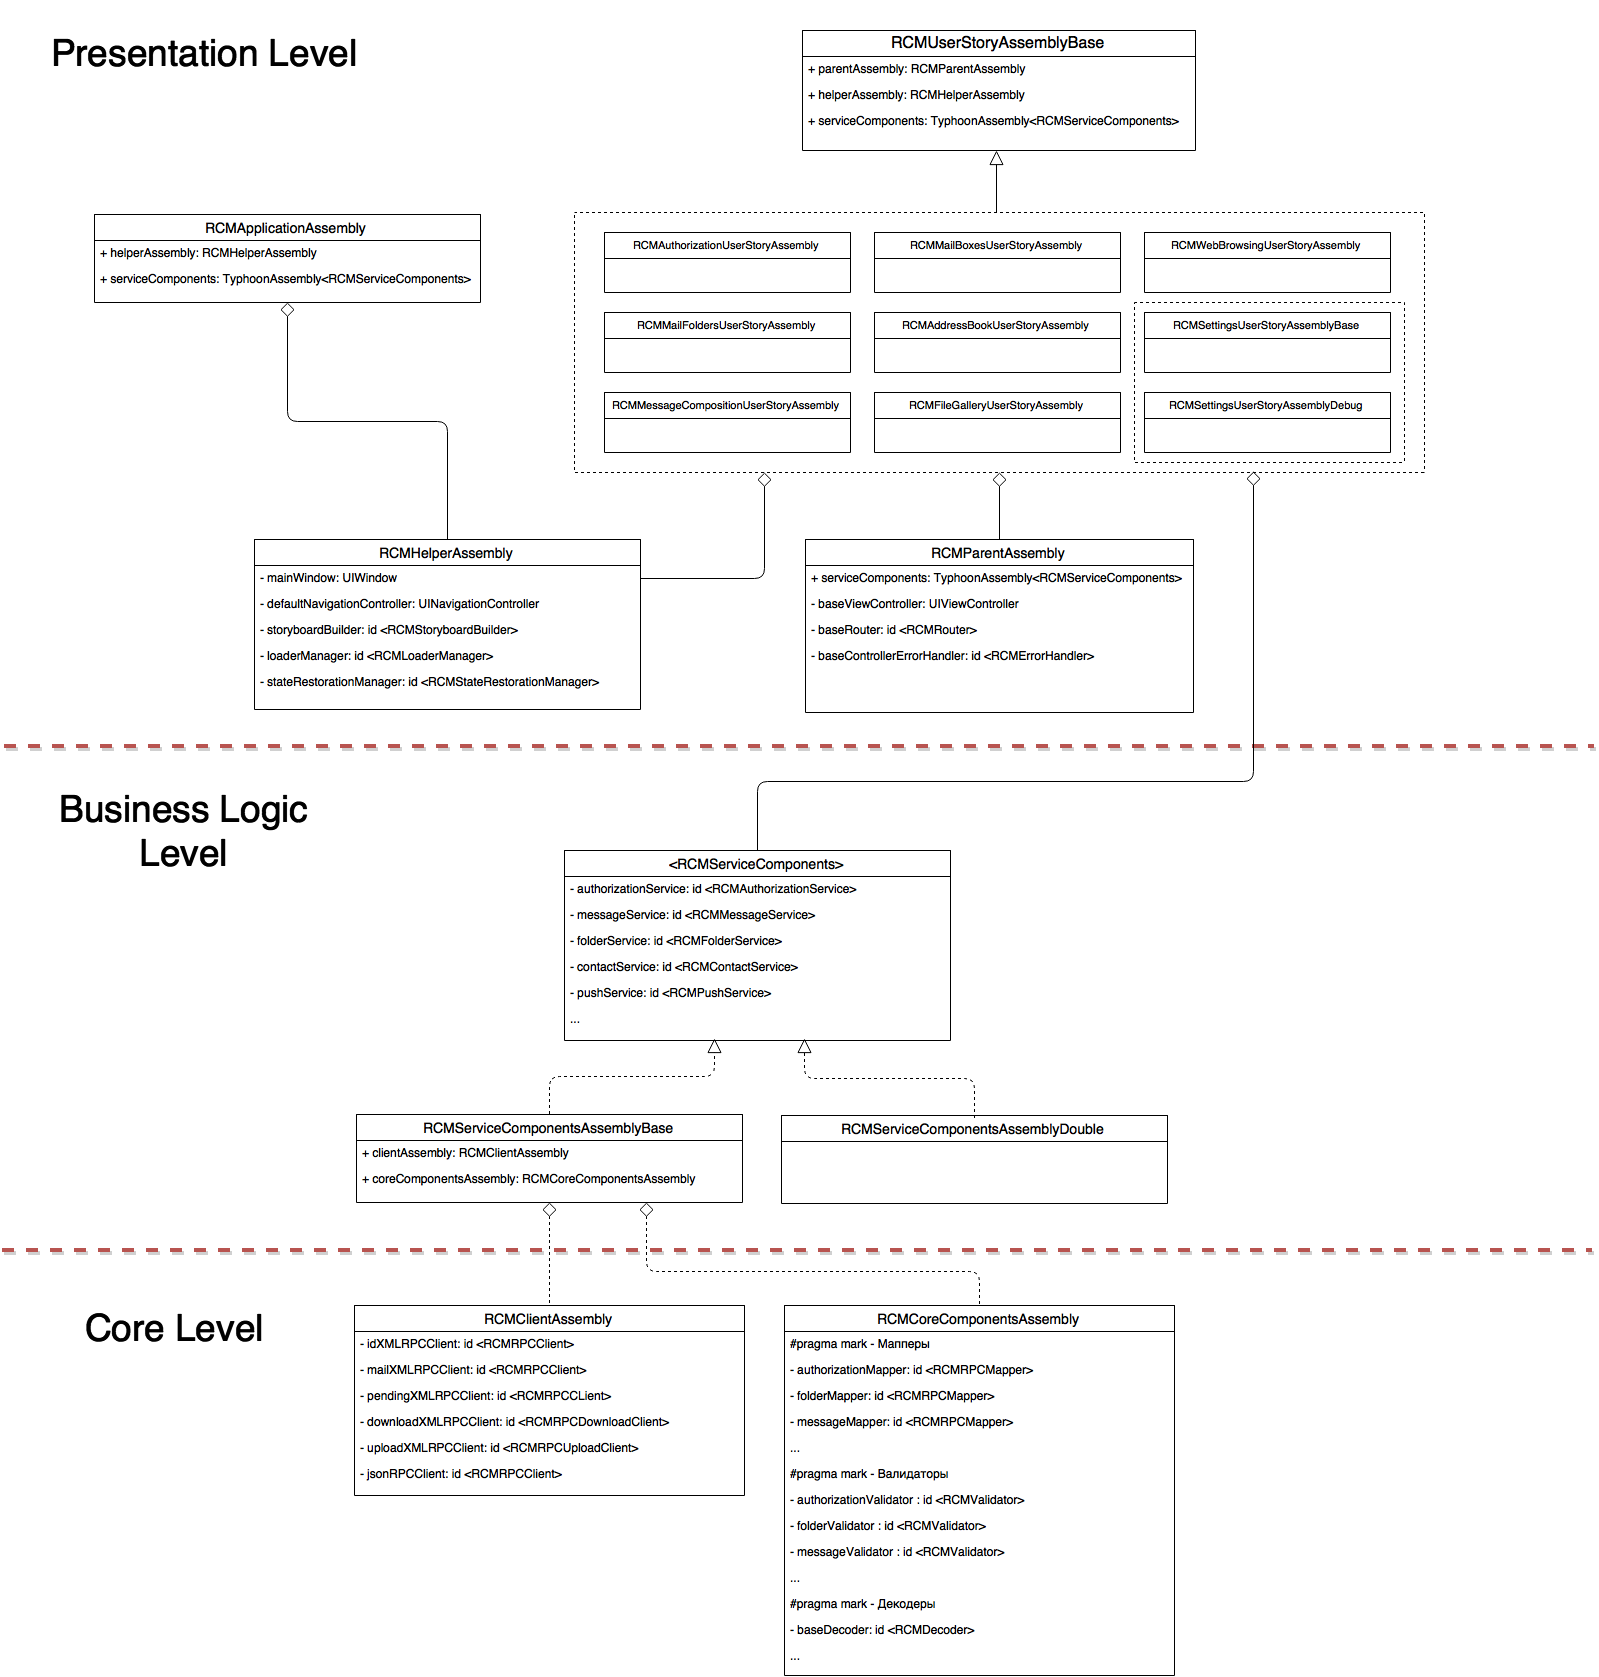
Let's run through all the Assembly:
- RCMApplicationAssembly . Responsible for creating application-level objects — AppDelegate , PushNotificationCenter , ApplicationConfigurator, and others. It depends on two other modules - helperAssembly and serviceComponents .
- RCMUserStoryAssembly . Each storyboard in Rambler. Mail has its own Assembly, inherited from RCMUserStoryAssemblyBase . These modules contain definitions for ViewControllers, routers, animators, view-models and other dependencies that are unique to this user story. It depends on helperAssembly , parentAssembly, and serviceComponents .
- RCMSettingsUserStoryAssemblyBase / RCMSettingsUserStoryAssemblyDebug . Depending on the selected build scheme ( Release / Debug ), different implementations of dependencies of the settings screen provide (more on this I will tell later). This approach makes it easy to add special features for testers to application settings, which will not be in the assembly for the App Store.
- RCMParentAssembly . Contains basic definitions for controllers, routers and error handlers. No real instance is able to generate (all marked as abstract ). Does not depend on anyone.
- RCMHelperAssembly . Contains definitions for various Presentation layer helpers required for components of several UserStoryAssembly . Does not depend on anyone.
- RCMServiceComponentsAssemblyBase . Contains definitions of all application services. It depends on two kernel-level modules - clientAssembly and coreComponentsAssembly .
- RCMServiceComponentsAssemblyDouble . Unlike the base assembly, it returns the fake implementations of all services for which no interaction with the Internet is required. Does not depend on anyone.
- RCMClientAssembly . Responsible for creating different customers. Does not depend on anyone.
- RCMCoreComponentsAssembly . Responsible for the creation of auxiliary components necessary for the operation of services. Does not depend on anyone.
In fact, no one bothers to additionally split RCMServiceComponents and RCMCoreComponents into several modules that are independent of each other - but this should be done as their code base increases.
Of course, all these modules need to be activated at the same time - it’s best to do this by adding the appropriate keys to Info.plist , but you can also manually, by implementing a special method in AppDelegate (details in the second part of the cycle ).
Assembly implementation substitution
Consider two typical situations:
- We are going to start working on the application, but the server team has not yet managed to roll out the API.
- Several developers are put on the development of a fairly large project - some of them plan to deal with the UI, and the other - with business logic, moreover, apart from each other.
Both scenarios connect the same thing - the need to start work on the top level of the application (in particular, on the UI) in the absence of the implementation of business logic. On the Assembly diagram in Rambler. Mail, the solution to this problem can be seen at the level of the business logic layer.
The protocol defining what methods the current module should implement is written, and its two implementations - the base one, which will be populated when the API and the service layer are ready, and the fake one containing the most basic implementations of services that work, for example, with in-memory database.
Let's see how to implement this using the preprocessing mechanism of the Info.plist file:
- Create two files - BaseHeader.h and DoubleHeader.h :
BaseHeader :#define SERVICE_COMPONENTS_ASSEMBLY RCMServiceComponentsAssemblyBase
DoubleHeader :#define SERVICE_COMPONENTS_ASSEMBLY RCMServiceComponentsAssemblyDouble - In the Info.plist file, in the TyphoonInitialAssemblies section , instead of the specific RCMServiceComponentsAssemblyBase class , specify the directive just specified - SERVICE_COMPONENTS_ASSEMBLY .
- In the Build Settings project, in the Packaging section, we look for the Info.plist Preprocessor Prefix File key, and for each of the build schemes we use, we set the corresponding header file. For example, Release - BaseHeader.h , Debug - DoubleHeader.h .
Now, depending on which build scheme is chosen to run the application, the corresponding Assembly will be connected, and either the combat services or their fake implementations will be used.
In some cases, it is not necessary to replace all objects with fake implementations, but only one dependency needs to be replaced. In this case, the use of the TyphoonDefinition + Option category, which I will discuss in more detail in the next article, will help.
Testing TyphoonAssembly Modules
Like any other component of the application, all TyphoonAssembly subclasses should be tested. Only with the full coverage of the Assembly tests, they can be used in integration testing.
First of all, you need to decide what you need to test:
- The method activated by TyphoonAssembly creates an object of the desired class,
- The created object contains all the necessary dependencies.
- All dependencies of the created object implement the required protocol / class.
To reduce the amount of boilerplate-code, I prepared a basic XCTestCase , which simplifies the testing of TyphoonAssembly :
@interface RCMAssemblyTestsBase: XCTestCase
@interface RCMAssemblyTestsBase : XCTestCase /** * @author Egor Tolstoy * * Assembly , * * : * - (id <RCMStoryboardBuilder>)storyboardBuilder { * return [TyphoonDefinition withClass:[RCMStoryboardBuilderBase class]]; * } * * @param targetDependency * @param targetClass , */ - (void)testTargetDependency:(id)targetDependency withClass:(Class)targetClass; /** * @author Egor Tolstoy * * Assembly , * * : * return [TyphoonDefinition withClass:[RCMContactsMapperBase class] * configuration:^(TyphoonDefinition *definition) { * [definition injectProperty:@selector(emailValidator) * with:[self mapperEmailValidator]]; * }]; * * @param targetDependency * @param targetClass , * @param dependencies property */ - (void)testTargetDependency:(id)targetDependency withClass:(Class)targetClass dependencies:(NSArray *)dependencies; /** * @author Egor Tolstoy * * Assembly , , , / * * @param targetDependency * @param targetClass , * @param dependenciesAndTypes , - property, - Class/Protocol. / , [NSNull class]. */ - (void)testTargetDependency:(id)targetDependency withClass:(Class)targetClass dependenciesAndTypes:(NSDictionary *)dependenciesAndTypes; @end Here is the test of one of the Assembly methods:
- (void) testThatAssemblyCreatesApplicationBadgeHandler
- (void)setUp { [super setUp]; self.applicationAssembly = [[RCMApplicationAssembly alloc] init]; [self.applicationAssembly activateWithCollaboratingAssemblies:@[[RCMHelperAssembly new], [RCMServiceComponentsAssemblyBase new], [RCMCoreComponentsAssembly new], [RCMClientAssembly new]]]; } - (void)testThatAssemblyCreatesApplicationBadgeHandler { // given Class targetClass = [RCMApplicationBadgeHandlerBase class]; NSDictionary *dependenciesAndTypes = @{ NSStringFromSelector(@selector(folderService)) : @protocol(RCMFolderService) }; // when id result = [self.applicationAssembly applicationBadgeHandler]; // then [self testTargetDependency:result withClass:targetClass dependenciesAndTypes:dependenciesAndTypes]; } In the case of Assembly, it is necessary to test not only public methods, but also private ones, since we have to check how well all dependencies are created in the application. Be prepared to create an extension _Testable for each of the selected modules.
I have to admit that even in this form, covering all methods of Assembly with tests is quite a laborious and tedious business, so you should not postpone it for the last stage of development. It is enough just to develop the habit of adding a new testcase when another definition appears in TyphoonAssembly .
Conclusion
In this article, we learned why it is necessary to split one large Assembly into several smaller modules, and how to do it correctly. The given scheme of breaking all modules into layers - Presentation , Business Logic and Core , in one form or another can be used in almost any project. In addition, with proper construction of the structure of the modules, it becomes possible to replace any of them with a fake implementation, which can be used as a stub in the process of working on the basic version.
TyphoonAssembly is one of the most important components of a project, on which all the coherence of components with each other rests - therefore, it must be thoroughly tested. This long and boring process will pay off many times over during the work on the project.
After reading this part of the cycle, you are fully ready to integrate Typhoon Framework into your project, regardless of the percentage of completion. In the next article, we will look at various Tips n 'Tricks in using Typhoon: Autowire, TyphoonConfig, TyphoonPatcher, features for working with several UIStoryboard and more.
Cycle "Manage dependencies in iOS applications correctly"
- Meet Typhoon
- Typhoon device
- Modularity Typhoon
- Typhoon Tips & Tricks
- Alternatives to Typhoon
- (Optional) Rambler.iOS # 3. Dependency Injection in iOS. Slides
- (Optional) Rambler.iOS # 3. Dependency Injection in iOS. Video
useful links
Source: https://habr.com/ru/post/261537/
All Articles