Backing up physical machines with Veeam Endpoint Backup FREE
We already told on Habré about the release of Veeam Endpoint Backup Free (a free backup tool for physical workstations, laptops and home computers). Today I want to talk about this product in more detail: about the architecture, basic settings of backup tasks, schedule settings, backup scheme, and integration with Veeam Backup & Replication v8 (if installed).

Veeam Endpoint Backup consists of two main components: a service that performs backup tasks and an application for setting it up. These components are installed locally on the machine you want to back up - this should be a machine running Windows 7 or higher (for a detailed description of the system requirements, see here ).
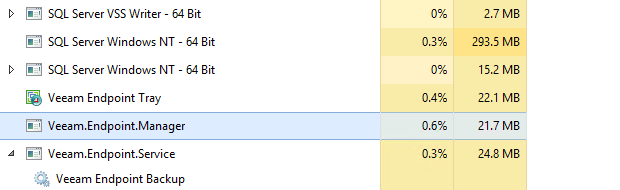
After the product installation is complete, the following components appear on the machine:
')
Veeam Endpoint Backup integrates with Veeam Backup & Replication v8 Update 2 and higher , which makes it possible to use the existing virtual machine backup repository for backup copies of physical machines. To save these backups to the repository, you need to configure the connection to the Veeam Backup & Replication infrastructure by registering the Veeam Backup server - in this case, the data will be saved to the repository directly, bypassing the server. But more on that later.
So, after installation (which, by the way, happens in “one click”), you can specify with what settings you will need to run the backup task. Commonly used default settings:
In the future, if necessary, these settings can be easily changed, as well as the settings of the Windows power plan (for example, if you need to wake up the backup machine regularly and then switch it back to sleep).
It is then recommended to create a bootable media that will be used to restore the active volume or restore it to “bare iron”.
You can use a DVD, a USB flash drive, an SD card, or just burn an ISO somewhere.
It is reasonable to create a bootable media immediately after installation and configuration, and place it in a safe place for storage - simply so that the head does not hurt about it; it usually has to be updated only in case of urgent need (for example, when replacing a network card or storage device).
In the UI, three modes appear to our attention (in fact, if you select the third one, you will have the opportunity to use another one, called Hybrid Backup, but more on that below).
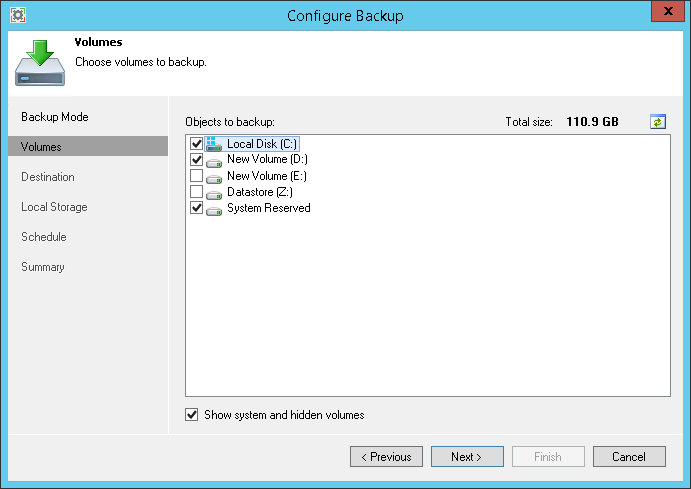
Entire computer — backup of the entire machine, including hidden system and recovery partitions. This is the recommended backup mode, because it allows you to perform both “bare metal” recovery and recovery at the volume, folder or file level - at your choice, from a single backup. This mode is quite effective, since after the first full backup, incremental “block” backups will be created; it also automatically excludes from the processing the already listed files and folders (recycle bin, etc.), which allows minimizing the size of the backup.
Volume level backup - backup at the volume level; analog of copying the entire machine, with the difference that you can select separate volumes as backup objects (for example, if you select a system volume, then the hidden partitions and system status data will be automatically included in the backup). Of course, you can include or exclude from the list of objects for backup those volumes that you consider necessary.
Remember, however, that there is always a chance that you will have to recover “on bare metal,” and it is necessary that the necessary files for this should be in the backup. This type of recovery is supported, as well as recovery at the volume level - for the volume that was saved. File level recovery is also supported.
File level backup - in this mode, only the folders and \ or files selected by you will be in the backup (you can specify which objects to include or exclude from the process by clicking the Advanced button). Naturally, in this case, restoration at the level of volume or “on bare iron” will not be supported.
Useful : If you use the file level backup mode, you can use the “hybrid backup” method - take a “volume” node for the entire backup (for example, the system one), and from another volume just the necessary folders and files:
Veeam offers several options from which you must make a selection in the Destination wizard step:
1) Local drive - select this option if you want to save backups to a local disk or to removable media (for example, USB or FireWare).
2) Shared Folder - backups will be saved to the share folder (ball). You can use a file server, NAS device, etc. If you need to provide a username and password for access, check the “This share requires access credentials” box and enter them. If this checkbox is not selected, then the account NT AUTHORITY \ SYSTEM will be used to access the folder. If the machine is in an Active Directory domain, you can give its account (DOMAIN \ COMPUTERNAME $) full rights (Full Control) to the desired folder and its included files.
After entering, the Populate button will become active - by pressing it, you can see how much free space is in the folder, and at the same time check the correctness of the specified password.
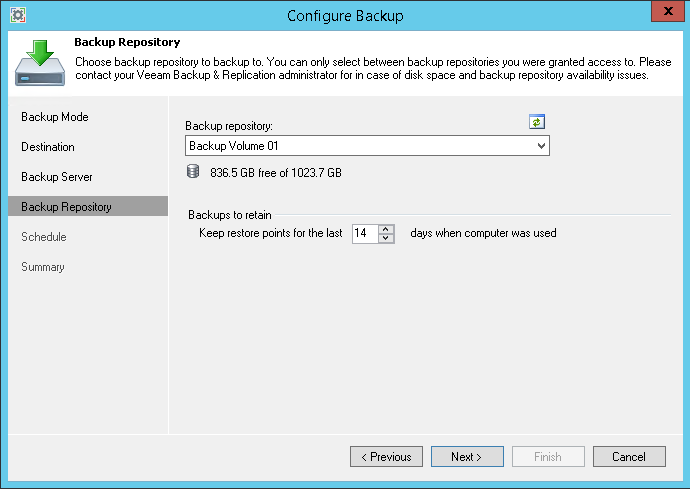
3) Veeam Backup & Replication repository - if Veeam Backup & Replication server is deployed in the infrastructure and you want to add backups of your physical machine to the backup repository, then this is your choice. Specify the appropriate server Veeam backup; if necessary, enter the username and password to access it. Then select the repository.
Important! To use the Veeam Backup & Replication repository, you need the product version Veeam Backup & Replication 8.0 Update 2 or higher. Access to the Default Backup Repository is given initially, but the rights to access the other repositories are given by the administrator of Veeam Backup & Replication in his console.
As already mentioned, integration is supported for Veeam Backup & Replication 8.0, starting from Update 2. It allows you to use Veeam Backup & Replication repository as a backup storage location for your physical machine. Consider a little more detail how to implement this feature.
1) Configure access rights to repositories . This is done in the Veeam Backup & Replication console. You can give access rights to user accounts, groups, or computers. The procedure is simple, all steps are described in detail here. I remind you that the default backup repository is initially configured for access by all (this is done for pilot deployments and testing) - but in production it is strongly recommended to change these settings.
Note: The cloud repository as a place to store backups of physical machines is not supported.
2) Customize the task . As already mentioned, in the backup settings of your physical machine in the Destination step, you need to specify Veeam Backup & Replication repository as a backup storage location, enter the IP address or DNS name of your Veeam backup server, as well as the name and password to connect to the repository .
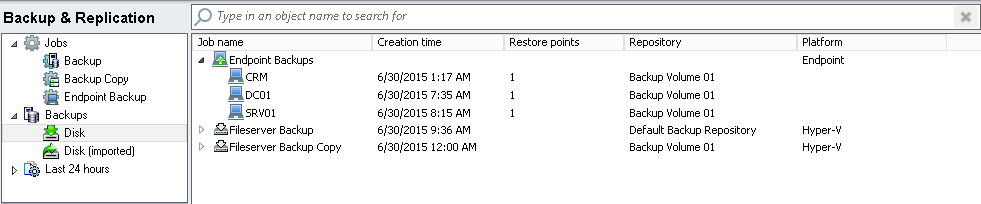
After the backup of your physical machine has been saved to the repository, it can be viewed in the Veeam Backup & Replication console: the Endpoint Backup node will appear under the Jobs node (by task type):

And under the Backup node you can see information about the corresponding backups, including the creation date, the storage location and the number of recovery points:
Now that the backup process of your physical machine has been configured to
repository, you can use, for example, such a useful feature as backup backup job jobs to a remote site, while WAN accelerators will be supported. With this functionality, you can also transfer backups to the cloud repository.
Important! If you plan to use the recovery options from the backup transferred and stored at the remote site, keep in mind that during the transfer the permissions are not saved, so either you will have to reassign them manually or grant administrative rights.
Archiving to a magnetic tape is also supported - create a task like Backup to tape, and it will take your backups from the repository to the tape.
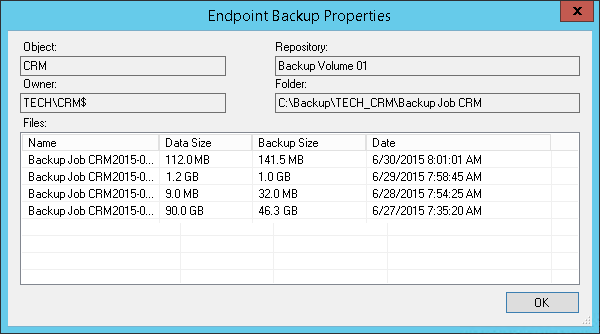
It is also convenient to use the Veeam Backup & Replication console to manage Endpoint backups backup tasks - for example, you can analyze statistics:
You can deactivate a task with the menu command, however with deletion everything is not so simple - even if you delete the Endpoint backup task from the console, it will appear there again as soon as it starts. Saved in the repository and backup. If you need to completely remove Endpoint backup, reconfigure permissions to the repository so that the task does not save backups to it.
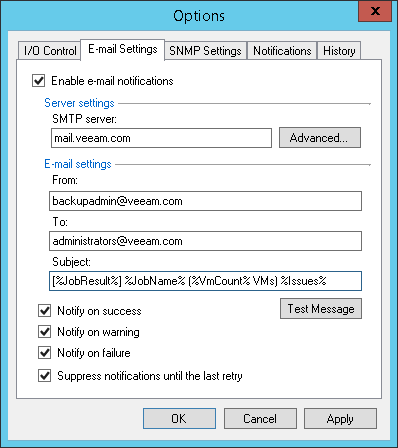
I also add that for the tasks of Endpoint backup, you can use the global settings for notifications and restrictions on data transmission over the network.
Veeam Endpoint Backup creates a full backup and an “infinite” chain of subsequent increments that are stored until the specified storage time is reached (let it be N days). On day N, the last increment of the chain is recorded, and the following run of the backup task will result in the following:


Over time, such an operation will be repeated time after time as new increments are added to the chain.
An animation illustrating the operation of this backup scheme can be found in the “ Forward Incremental - Animation of Method and Retention ” knowledge base article in the “Forward Incremental Backup Method” section.
It should be noted that this method was chosen as the only option in Veeam Endpoint Backup, since it is the most optimal from the point of view of minimizing the load created on the redundant system. This is due to the fact that, on average, each unit of backup data requires three disk I / O operations, two of which are performed on the storage, and not on the backup computer, which minimizes the load on the source disk. This leads to the fact that the redundant computer can be used intensively much faster than with other backup methods, so during the backup job the disk load is removed from it as soon as the incremental changes are read. If the backup goes to the home NAS, then the load is largely removed from the CPU.
If you never delete old backups, then after a while the free space will end on any storage, no matter how large it is. The end of disk space event may occur suddenly and lead to a failed situation. Worse, it may go unnoticed for a long time, as a result of which backups will not be created. We have already described on Habré an example of such a real case in the post “ Case in Pixar or again on the importance of testing backups ”. Therefore, it is important to immediately configure the backup storage policy in the repository (Backups to retain).

In Veeam Endpoint Backup, the retention period is as follows: the word “days” does not count calendar days, but those days when at least one backup was successfully created. For example, suppose you had “Store backups for 5 days” (option “Keep backups for computer for 5 days when computer was used”). At the same time, you had 3 successful backups for the first three days of the week - on Monday, Tuesday and Wednesday - and, say, on Thursday and Friday, the computer was turned off. Then on Saturday you turned it on again, and you had another 2 backups on Saturday and Sunday. It turns out that 5 backups were created in 7 days. Then Monday comes again, another backup is created, and the earliest backup is deleted as outdated. You have 5 backups again, as the policy prescribes.
Now let's see what the Schedule step offers us. There are two groups of options here - one allows you to specify the frequency of starting a backup, and the second - to bind the launch to a specific event.
1) Daily at (for example, at 2 am). I note that if the computer was in sleep mode, Veeam will wake it up, back up and then put the computer in the state you selected from the list (this could be Keep running, Sleep, Shutdown, or Hibernate).
Note : Translation to the selected state works only when the Daily at option is selected (that is, with regular automatic backup according to the schedule); after manual backup, such a transfer will not be performed. Also note the following:
2) Backup by event - there is a choice of when to start backup: after Lock (lock), Log off (exit from the system) and "When backup target is connected" (connect a USB flash drive, external USB drive, or network package with previously saved backups). The last option implies that the backup starts as soon as backup media becomes available.
Useful : Since such events can occur more than once during the day, you can avoid too frequent backups on them - for this we use the “Backup no more often than every” setting. As a result, the new backup will not start until the time elapsed since the previous backup has exceeded the specified one (even if a backup has been set up for the event that took place). You can, of course, combine these options.
For today, perhaps, it is enough - and in the near future I will talk about restoring information from backup copies created by Veeam Endpoint Backup. Download the product here: Veeam Endpoint Backup Free .
Architecture
Veeam Endpoint Backup consists of two main components: a service that performs backup tasks and an application for setting it up. These components are installed locally on the machine you want to back up - this should be a machine running Windows 7 or higher (for a detailed description of the system requirements, see here ).
After the product installation is complete, the following components appear on the machine:
- Veeam Endpoint Service is a Microsoft Windows service that, in fact, is responsible for backing up and restoring a machine from a backup. The service starts automatically and is constantly running in the background.
- Veeam Endpoint System Tray Application is an application for system tray, with which you can start the backup or restore process, monitor its status, and launch the product control panel.
- Microsoft SQL Server 2012 LocalDB is a “lightweight version” of SQL Server where configuration data is stored. It can be called an analogue of SQLite, which is often used to store operational data of web browsers or custom software — LocalDB also requires minimal resources; The main difference is that SQLite is usually built-in and running within the application itself, while LocalDB functions in a sub-process, launched by the Veeam Endpoint Service. When Veeam Endpoint Backup is in the idle state, the resource consumption (both the base and the program itself), one might say, tends to zero. Although, in general, and when performing backup, resource consumption is not so great, since the process is performed at low priority.
')
Veeam Endpoint Backup integrates with Veeam Backup & Replication v8 Update 2 and higher , which makes it possible to use the existing virtual machine backup repository for backup copies of physical machines. To save these backups to the repository, you need to configure the connection to the Veeam Backup & Replication infrastructure by registering the Veeam Backup server - in this case, the data will be saved to the repository directly, bypassing the server. But more on that later.
Beginning of work
So, after installation (which, by the way, happens in “one click”), you can specify with what settings you will need to run the backup task. Commonly used default settings:
- Backup scope (“scope”, i.e. what exactly needs to be backed up) is the default “whole machine”.
- Target destination (backup location) - a network folder with a repository or a USB device connected to this machine (remember that in this version the capacity of the device must be at least half the size of the machine that you will back up).
- Schedule (schedule, ie when to run a backup) - by default at 0 hours 30 minutes daily.
- Default exclusions (exceptions, i.e. that you do not need to back up) - the default is: a folder with temporary files, a recycle bin, files page and hibernate, as well as VSS snapshots files in the System Volume Information folder.
In the future, if necessary, these settings can be easily changed, as well as the settings of the Windows power plan (for example, if you need to wake up the backup machine regularly and then switch it back to sleep).
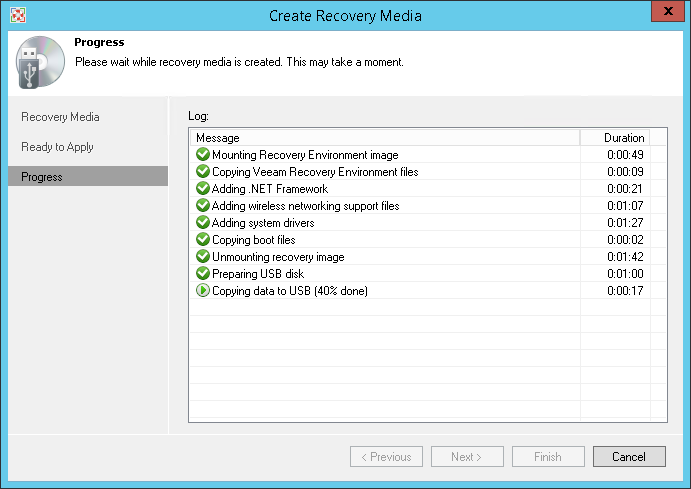
It is then recommended to create a bootable media that will be used to restore the active volume or restore it to “bare iron”.
Create a bootable media
You can use a DVD, a USB flash drive, an SD card, or just burn an ISO somewhere.
It is reasonable to create a bootable media immediately after installation and configuration, and place it in a safe place for storage - simply so that the head does not hurt about it; it usually has to be updated only in case of urgent need (for example, when replacing a network card or storage device).
- In the first step of the Recovery Media wizard, you need to specify the media type; The carriers of the above types, which are currently connected to the computer, are automatically recognized.
Important! The selected media will be reformatted as bootable, so that all data on it will be completely deleted!
There are two important checkboxes in this step: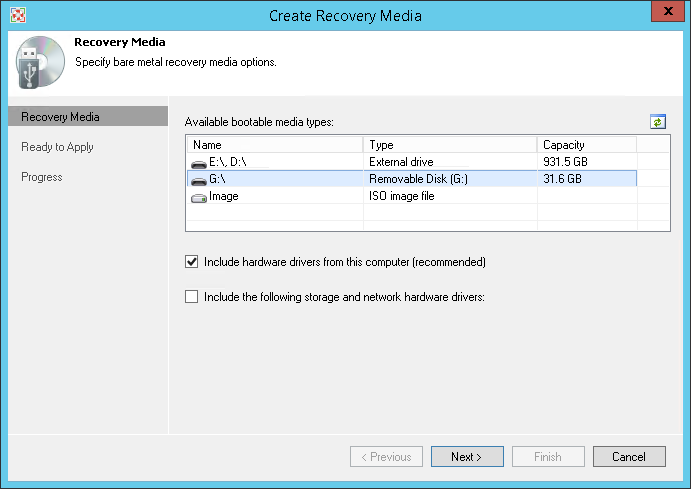
- Include hardware drivers from this computer (recommended) - if you select this option, then all network drivers, as well as storage and USB drivers on this machine will be placed on the media. It is recommended to check this box in order to load them when loading from our carrier.
- Include the following storage and network hardware drivers - you can use this option to additionally place on the media the network and storage drivers you need. Here you will need to specify the folder where all files of the required driver are stored (in CAT, INF and SYS format).
- Then follows the step “Ready to Apply” , where options are possible depending on what type of media we have chosen: for example, for the ISO you will need to specify the path (and, if necessary, enter the user name and password) to the folder.
- Step 3. We check all the settings and then monitor the process of creating our media:
Choose a backup mode
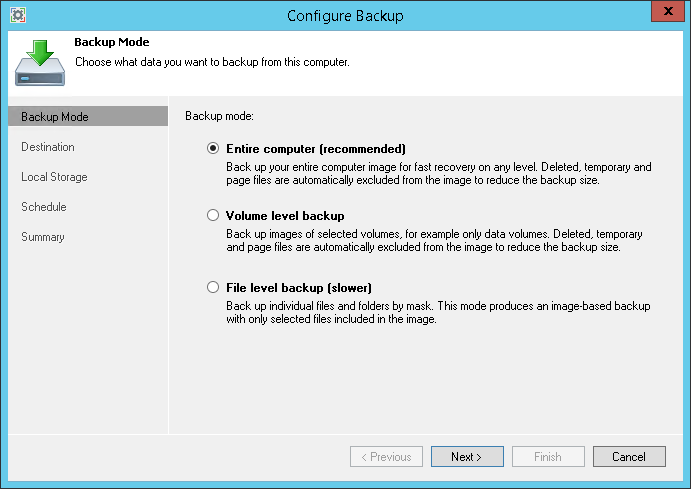
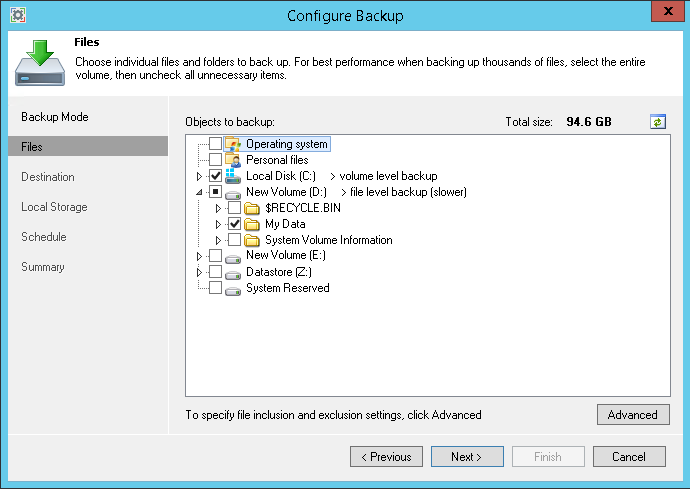
In the UI, three modes appear to our attention (in fact, if you select the third one, you will have the opportunity to use another one, called Hybrid Backup, but more on that below).
Entire computer — backup of the entire machine, including hidden system and recovery partitions. This is the recommended backup mode, because it allows you to perform both “bare metal” recovery and recovery at the volume, folder or file level - at your choice, from a single backup. This mode is quite effective, since after the first full backup, incremental “block” backups will be created; it also automatically excludes from the processing the already listed files and folders (recycle bin, etc.), which allows minimizing the size of the backup.
Volume level backup - backup at the volume level; analog of copying the entire machine, with the difference that you can select separate volumes as backup objects (for example, if you select a system volume, then the hidden partitions and system status data will be automatically included in the backup). Of course, you can include or exclude from the list of objects for backup those volumes that you consider necessary.
Remember, however, that there is always a chance that you will have to recover “on bare metal,” and it is necessary that the necessary files for this should be in the backup. This type of recovery is supported, as well as recovery at the volume level - for the volume that was saved. File level recovery is also supported.
File level backup - in this mode, only the folders and \ or files selected by you will be in the backup (you can specify which objects to include or exclude from the process by clicking the Advanced button). Naturally, in this case, restoration at the level of volume or “on bare iron” will not be supported.
Useful : If you use the file level backup mode, you can use the “hybrid backup” method - take a “volume” node for the entire backup (for example, the system one), and from another volume just the necessary folders and files:
Go ahead: choose a backup storage location
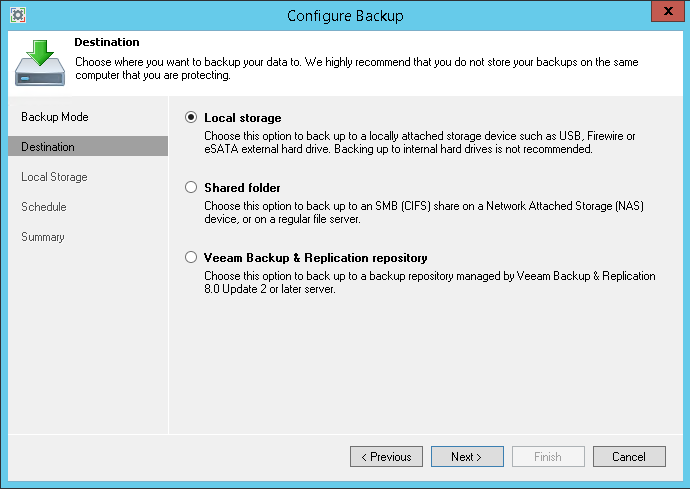
Veeam offers several options from which you must make a selection in the Destination wizard step:
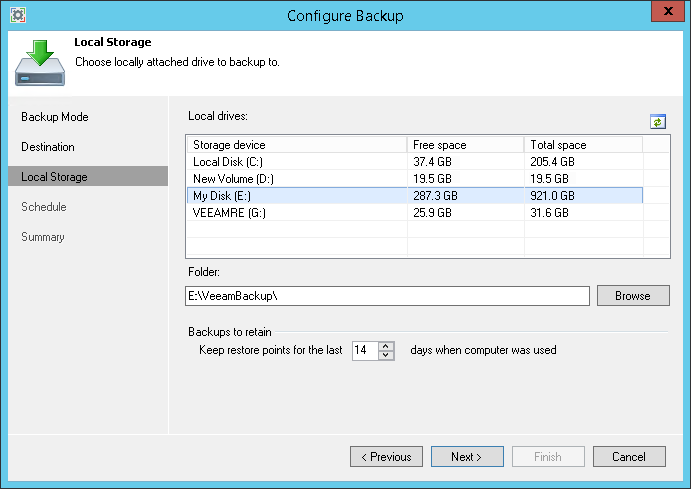
1) Local drive - select this option if you want to save backups to a local disk or to removable media (for example, USB or FireWare).
- It is clear that if you save to the built-in hard disk, then if you refuse it, you will remain at the “broken trough” (there will be neither backup copies nor the ability to recover). However, if you decide to backup files or volumes, and there is more than one disk in your machine, this option may be useful for you to back up from one disk to another.
- If you plan to use USB devices, you can make backups alternately to different ones so that you are always guaranteed to have a backup (even if one of the devices fails or the data on it is damaged, there will be a backup option for recovery). Here it is important to remember that in this case each device will have its own chain of backups, where one backup will be complete and the others incremental (about the chain a little later).
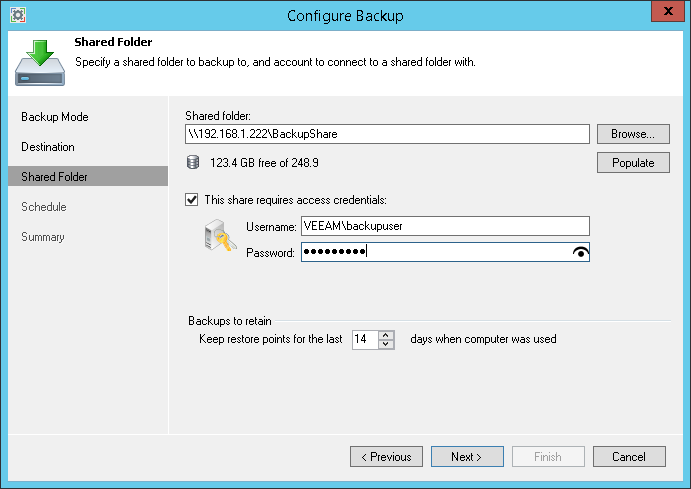
2) Shared Folder - backups will be saved to the share folder (ball). You can use a file server, NAS device, etc. If you need to provide a username and password for access, check the “This share requires access credentials” box and enter them. If this checkbox is not selected, then the account NT AUTHORITY \ SYSTEM will be used to access the folder. If the machine is in an Active Directory domain, you can give its account (DOMAIN \ COMPUTERNAME $) full rights (Full Control) to the desired folder and its included files.
After entering, the Populate button will become active - by pressing it, you can see how much free space is in the folder, and at the same time check the correctness of the specified password.
3) Veeam Backup & Replication repository - if Veeam Backup & Replication server is deployed in the infrastructure and you want to add backups of your physical machine to the backup repository, then this is your choice. Specify the appropriate server Veeam backup; if necessary, enter the username and password to access it. Then select the repository.
Important! To use the Veeam Backup & Replication repository, you need the product version Veeam Backup & Replication 8.0 Update 2 or higher. Access to the Default Backup Repository is given initially, but the rights to access the other repositories are given by the administrator of Veeam Backup & Replication in his console.
Integration with Veeam Backup & Replication
As already mentioned, integration is supported for Veeam Backup & Replication 8.0, starting from Update 2. It allows you to use Veeam Backup & Replication repository as a backup storage location for your physical machine. Consider a little more detail how to implement this feature.
1) Configure access rights to repositories . This is done in the Veeam Backup & Replication console. You can give access rights to user accounts, groups, or computers. The procedure is simple, all steps are described in detail here. I remind you that the default backup repository is initially configured for access by all (this is done for pilot deployments and testing) - but in production it is strongly recommended to change these settings.
Note: The cloud repository as a place to store backups of physical machines is not supported.
2) Customize the task . As already mentioned, in the backup settings of your physical machine in the Destination step, you need to specify Veeam Backup & Replication repository as a backup storage location, enter the IP address or DNS name of your Veeam backup server, as well as the name and password to connect to the repository .
After the backup of your physical machine has been saved to the repository, it can be viewed in the Veeam Backup & Replication console: the Endpoint Backup node will appear under the Jobs node (by task type):
And under the Backup node you can see information about the corresponding backups, including the creation date, the storage location and the number of recovery points:
Now that the backup process of your physical machine has been configured to
repository, you can use, for example, such a useful feature as backup backup job jobs to a remote site, while WAN accelerators will be supported. With this functionality, you can also transfer backups to the cloud repository.
Important! If you plan to use the recovery options from the backup transferred and stored at the remote site, keep in mind that during the transfer the permissions are not saved, so either you will have to reassign them manually or grant administrative rights.
Archiving to a magnetic tape is also supported - create a task like Backup to tape, and it will take your backups from the repository to the tape.
It is also convenient to use the Veeam Backup & Replication console to manage Endpoint backups backup tasks - for example, you can analyze statistics:
You can deactivate a task with the menu command, however with deletion everything is not so simple - even if you delete the Endpoint backup task from the console, it will appear there again as soon as it starts. Saved in the repository and backup. If you need to completely remove Endpoint backup, reconfigure permissions to the repository so that the task does not save backups to it.
I also add that for the tasks of Endpoint backup, you can use the global settings for notifications and restrictions on data transmission over the network.
Backup scheme
Veeam Endpoint Backup creates a full backup and an “infinite” chain of subsequent increments that are stored until the specified storage time is reached (let it be N days). On day N, the last increment of the chain is recorded, and the following run of the backup task will result in the following:
- The next increment is recorded as the newest restore point in the chain (using a single read / write cycle, as in the direct incremental version). At the same time, the backup program will automatically determine that the number of recovery points exceeds by 1 the set limit;
- Next, the program will establish that the oldest file is a full backup saved at the beginning of chain creation, and the oldest increment is the second in turn in the chain after the initial full backup (newer than full backup, for 1 lap of the specified backup cycle) ;
- The oldest increment in the chain will be embedded in the full backup file, replacing the corresponding obsolete data blocks. This will require 2 read / write operations: one to read the data from the increment and the second to write this data to the full backup file;
- The increment file will be removed from the chain and an updated full backup will take its place. It can be said that the oldest full copy will gradually “absorb” increments that have expired.
Over time, such an operation will be repeated time after time as new increments are added to the chain.
An animation illustrating the operation of this backup scheme can be found in the “ Forward Incremental - Animation of Method and Retention ” knowledge base article in the “Forward Incremental Backup Method” section.
It should be noted that this method was chosen as the only option in Veeam Endpoint Backup, since it is the most optimal from the point of view of minimizing the load created on the redundant system. This is due to the fact that, on average, each unit of backup data requires three disk I / O operations, two of which are performed on the storage, and not on the backup computer, which minimizes the load on the source disk. This leads to the fact that the redundant computer can be used intensively much faster than with other backup methods, so during the backup job the disk load is removed from it as soon as the incremental changes are read. If the backup goes to the home NAS, then the load is largely removed from the CPU.
Backup Period
If you never delete old backups, then after a while the free space will end on any storage, no matter how large it is. The end of disk space event may occur suddenly and lead to a failed situation. Worse, it may go unnoticed for a long time, as a result of which backups will not be created. We have already described on Habré an example of such a real case in the post “ Case in Pixar or again on the importance of testing backups ”. Therefore, it is important to immediately configure the backup storage policy in the repository (Backups to retain).
In Veeam Endpoint Backup, the retention period is as follows: the word “days” does not count calendar days, but those days when at least one backup was successfully created. For example, suppose you had “Store backups for 5 days” (option “Keep backups for computer for 5 days when computer was used”). At the same time, you had 3 successful backups for the first three days of the week - on Monday, Tuesday and Wednesday - and, say, on Thursday and Friday, the computer was turned off. Then on Saturday you turned it on again, and you had another 2 backups on Saturday and Sunday. It turns out that 5 backups were created in 7 days. Then Monday comes again, another backup is created, and the earliest backup is deleted as outdated. You have 5 backups again, as the policy prescribes.
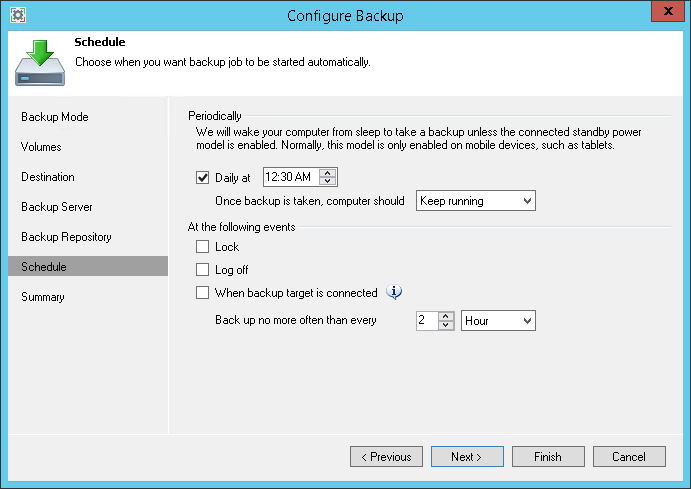
schedule
Now let's see what the Schedule step offers us. There are two groups of options here - one allows you to specify the frequency of starting a backup, and the second - to bind the launch to a specific event.
1) Daily at (for example, at 2 am). I note that if the computer was in sleep mode, Veeam will wake it up, back up and then put the computer in the state you selected from the list (this could be Keep running, Sleep, Shutdown, or Hibernate).
Note : Translation to the selected state works only when the Daily at option is selected (that is, with regular automatic backup according to the schedule); after manual backup, such a transfer will not be performed. Also note the following:
- If the power plan installed in Windows on a stationary computer does not allow it to “wake up”, then Veeam Backup will suggest correcting it.
- On tablets, Connected Standby is often installed by default - automatic “waking up” will not work for it either.
2) Backup by event - there is a choice of when to start backup: after Lock (lock), Log off (exit from the system) and "When backup target is connected" (connect a USB flash drive, external USB drive, or network package with previously saved backups). The last option implies that the backup starts as soon as backup media becomes available.
Useful : Since such events can occur more than once during the day, you can avoid too frequent backups on them - for this we use the “Backup no more often than every” setting. As a result, the new backup will not start until the time elapsed since the previous backup has exceeded the specified one (even if a backup has been set up for the event that took place). You can, of course, combine these options.
******
For today, perhaps, it is enough - and in the near future I will talk about restoring information from backup copies created by Veeam Endpoint Backup. Download the product here: Veeam Endpoint Backup Free .
Source: https://habr.com/ru/post/261481/
All Articles