Automate routine operations between Excel and AutoCAD using VBA
It is not the first year that I have met on profile forums that VBA for AutoCAD is dying out, and AutoDesk will not include it in future releases in the distribution, and in general, true Padawans use lisp, C # and other things, but not VBA.
I am an HVAC design engineer, not a programmer. And I do not want, and there is no time, to delve into serious programming. Most often there is a situation that you need to somehow automate the routine here and now. Simple VBA language comes to the rescue.
Next, I will show you how to do it yourself without any special worries for what the serious guys take not bad money. Namely, the transfer of data from Excel to AutoCAD and back. Interested please under the cat.
We will program on the Excel side - it's easier for me. To connect, you must enter the developer mode: Alt + F8 Or you can open the "developer" tab from the ribbon settings.
')
In the VBA developer window, enter the top menu: Tools / References. In this window, you need to tick your version of AutoCAD
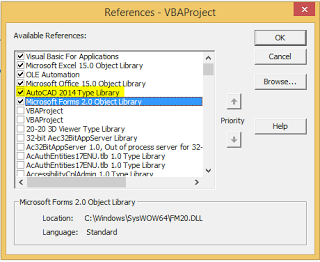
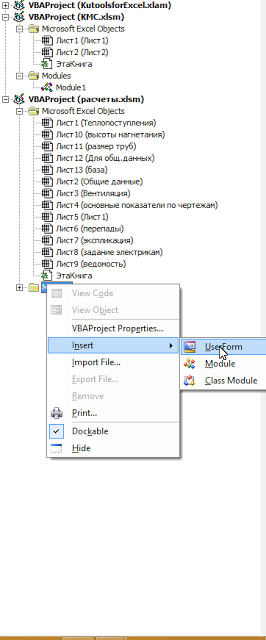
In my case, this is the AutoCAD 2014 Type Library. Next you need in the left window to create a module in your book, as in the screenshot (Module)
And insert the code below into the module:
In a similar way, you can create blocks with attributes in which you can insert text from cells.
It is necessary to make changes to the top code like:
The update code for the text on the handle is written below: 'we get the handle from the cell into which we wrote the code above.
entHandle = ActiveCell.Offset (0, 3) .Value 'got our block by handle
Set blockObj = acadDoc.HandleToObject (entHandle)
And then do the same thing as above.
In order to clarify a little how it works live - recorded video:
As you can see, the code is minimum, but on large sites I save a few hours of work. And the risk of error is reduced. Since Usually it looks like this for designers - two windows are opened on different screens, and either manually, or through the clipboard, the filling of callouts or blocks in the drawing begins.
Again, what is good about VBA is that it is always at hand :) Excel is the main tool of the engineer.
I am an HVAC design engineer, not a programmer. And I do not want, and there is no time, to delve into serious programming. Most often there is a situation that you need to somehow automate the routine here and now. Simple VBA language comes to the rescue.
Next, I will show you how to do it yourself without any special worries for what the serious guys take not bad money. Namely, the transfer of data from Excel to AutoCAD and back. Interested please under the cat.
We will program on the Excel side - it's easier for me. To connect, you must enter the developer mode: Alt + F8 Or you can open the "developer" tab from the ribbon settings.
')
In the VBA developer window, enter the top menu: Tools / References. In this window, you need to tick your version of AutoCAD
In my case, this is the AutoCAD 2014 Type Library. Next you need in the left window to create a module in your book, as in the screenshot (Module)
And insert the code below into the module:
Sub DrawMLeader() ' Dim acadApp As AcadApplication Dim acadDoc As AcadDocument Application.DisplayAlerts = False ' ' On Error Resume Next Set acadApp = GetObject(, "AutoCAD.Application") On Error GoTo 0 ' , If acadApp Is Nothing Then Set acadApp = New AcadApplication acadApp.Visible = True End If ' On Error Resume Next Set acadDoc = acadApp.ActiveDocument On Error GoTo 0 ' - If acadDoc Is Nothing Then Set acadDoc = acadApp.Documents.Add acadApp.Visible = True End If Dim AML As AcadMLeader Dim xx As Long Dim ss As String ActiveCell.Cells.Activate ' ss = ActiveCell.Cells.Value ' Dim points(0 To 5) As Double ' Dim startPnt As Variant, endPnt As Variant Dim prompt1 As String, prompt2 As String prompt1 = vbCrLf & " : " prompt2 = vbCrLf & " : " startPnt = acadDoc.Utility.GetPoint(, prompt1) ' endPnt = acadDoc.Utility.GetPoint(startPnt, prompt2) ' ' MLeader points(0) = startPnt(0) points(1) = startPnt(1) points(2) = 0 points(3) = endPnt(0) points(4) = endPnt(1) points(5) = 0 Set AML = acadDoc.ModelSpace.AddMLeader(points, xx) ' AML.TextString = ss AML.ArrowheadType = acArrowNone ' - , Mleader AutoCAD AML.TextHeight = 250 AML.TextLeftAttachmentType = acAttachmentBottomOfTopLine AML.TextRightAttachmentType = acAttachmentBottomOfTopLine AML.LandingGap = 2 Dim entHandle As String entHandle = AML.Handle ' , , ActiveCell.Offset(0, 1).Value = entHandle acadDoc.Application.Update ' , , , . ActiveCell.Cells.Interior.ColorIndex = 6 End Sub In a similar way, you can create blocks with attributes in which you can insert text from cells.
It is necessary to make changes to the top code like:
Dim blockObj As Object ' ' , - , : ' , -, Set blockObj = acadDoc.ModelSpace.InsertBlock(startPnt, " ", 1, 1, 1, 0, []) ' , -, , - ( ) Dim varAttributes As Variant varAttributes = blockObj.GetAttributes varAttributes(0).TextString = ss1 ' varAttributes(1).TextString = ss2 ' varAttributes(2).TextString = ss ' Dim entHandle As String ' , , Excel AutoCAD. entHandle = blockObj.Handle ActiveCell.Offset(0, 3).Value = entHandle The update code for the text on the handle is written below: 'we get the handle from the cell into which we wrote the code above.
entHandle = ActiveCell.Offset (0, 3) .Value 'got our block by handle
Set blockObj = acadDoc.HandleToObject (entHandle)
And then do the same thing as above.
In order to clarify a little how it works live - recorded video:
As you can see, the code is minimum, but on large sites I save a few hours of work. And the risk of error is reduced. Since Usually it looks like this for designers - two windows are opened on different screens, and either manually, or through the clipboard, the filling of callouts or blocks in the drawing begins.
Again, what is good about VBA is that it is always at hand :) Excel is the main tool of the engineer.
Source: https://habr.com/ru/post/261461/
All Articles