As Asterisk opened barriers for me

Good afternoon, residents of Habra.
I want to share an interesting, in my opinion, use of Asterisk.
')
Preface : the client has two parking lots, the entrance to which is regulated by barriers with gsm-modules. That is, the owner of the parking space dials the number of the SIM card installed in the module and enters the territory. But, as you know, if the number knows one - everyone knows it, so paid parking is randomly turning into free. The feature of the gsm-module is that the call passes without lifting the handset, respectively, the telecom operator cannot provide call detailing by number.
Here I had to work with such initial data, what came out of it - under the cut.
After thinking about the implementation options, I once again realized that here Asterisk will help solve this problem. What is ultimately required by the client:
- The ability to "hide" the number of the SIM card installed in the barrier
- Forming a "white list" of numbers that can open the barrier
- The ability to add / delete / view the base of numbers of the "white" list as simply as possible
- Reporting on the opening of the barrier and calls from numbers that are not in the list
The project implementation scheme is the following:
- In the barrier changing SIM cards
- The SIP-provider buys numbers that the owners of parking spaces will call, thus we add a new level of abstraction: no one knows the SIM-card numbers (and since the SIM in the barrier doesn’t answer (), then charge money for calls from the provider with we will not)
- We implement the white list function, that is, we get the second step of protection: first, you need to know the sip number to call, and secondly, your number should be allowed to call on the SIM card
- We realize the ability to manipulate the "white" list through a simple web interface
- Every morning we send the employee responsible for controlling access to reports by e-mail
So, let's proceed directly to the description of the configuration process:
LAMP installation
Described many times, you can see for example here
Assembling and configuring Asterisk with ODBC support
There are a lot of Asterisk installation manuals, we will not repeat, I’ll just note that Asterisk must be built with odbc support (the installation is described for Ubuntu Server 14.04), for this we need to install the necessary libraries:
sudo aptitude install unixodbc unixodbc-dev libmyodbc And collect Asterisk, not forgetting to put a checkmark in the menuselect opposite res_odbc, func_odbc. Next, you need to register the loading of the odbc module:
vim /etc/asterisk/modules.conf load => res_odbc.so ;; [modules] In the file /etc/odbcinst.ini we write the paths for the drivers:
[MySQL] Description = MySQL driver Driver = /usr/lib/x86_64-linux-gnu/odbc/libmyodbc.so Setup = /usr/lib/x86_64-linux-gnu/odbc/libodbcmyS.so CPTimeout = CPReuse = In the /etc/odbc.ini file we describe the odbc connection parameters:
[asterisk-barrier] Driver = MySQL Description = Connector/ODBC 3.51 Driver DSN Server = localhost Port = 3306 User = root Password = VeryStrongPassword Database = barrier Socket = /var/run/mysqld/mysqld.sock Charset = utf8 In the /etc/asterisk/res_odbc.conf file, describe the odbc connection parameters:
[asterisk-barrier] enabled => yes dsn => asterisk-barrier username => root password => VeryStrongPassword pooling => no limit => 1 pre-connect => yes To display Russian characters correctly, uncomment the line in /etc/php5/apache2/php.ini:
default_charset = "UTF-8" Next, in MySQL, we create the base and table we need:
mysql -uroot -pVeryStrongPassword create database barrier; use barrier; CREATE TABLE `numbers` ( `id` int(11) NOT NULL AUTO_INCREMENT, `phone` varchar(30) NOT NULL, `name` varchar(30) NOT NULL, PRIMARY KEY (`id`) ) ENGINE=InnoDB AUTO_INCREMENT=1 DEFAULT CHARSET=utf8 ; Add to the created plate our “white” list of numbers:
INSERT INTO `numbers` (`phone`, `name`) VALUES ('79260000000',' '), ('79261111111',' '); After that, restart Asterisk:
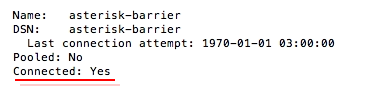
/etc/init.d/asterisk restart And we check the correctness of the odbc settings, for this we write in the asterisk console:
odbc show all If everything is correct, then we should see something like this:
Next, set up providers in sip.conf:
;; , register => login:password@sip.provider.com/74990000000 register => login:password@sip.provider.com/74991111111 [prov1] accept_outofcall_messages=no host=sip.provider.com type=peer secret=YourPass defaultuser=YourLogin fromdomain=sip.provider.com fromuser=YourLogin canreinvite=no jbenable=no faxdetect=yes t38pt_udptl=yes,fec,maxdatagram=400 context=from-trunk dtmfmode=auto port=5060 disallow=all allow=g722 allow=ulaw allow=alaw insecure=port,invite qualify=yes sendrpid=yes [prov2] accept_outofcall_messages=no host=sip.provider.com type=peer secret=YourPass defaultuser=YourLogin fromdomain=sip.provider.com fromuser=YourLogin canreinvite=no jbenable=no faxdetect=yes t38pt_udptl=yes,fec,maxdatagram=400 context=from-trunk dtmfmode=auto port=5060 disallow=all allow=g722 allow=ulaw allow=alaw insecure=port,invite qualify=yes sendrpid=yes In func_odbc.conf, we write a function that will look up the caller's number in MySQL and return its name to us
[MOBILE] dsn=asterisk-barrier readsql=SELECT name FROM numbers WHERE phone = '${CALLER}' In extensions.conf we write a dialplan, according to which, if the number is in the database, we will redirect the call to the number of the SIM card of the barrier, otherwise - hang up
[from-trunk] ;; exten => 74990000000,1,NoOp(Incoming call from ${CALLERID(num)} to prov1) same => n,Set(CALLER=${CALLERID(num)}) ;; CALLER, func_odbc same => n,Set(result=${ODBC_MOBILE()}) ;; sql-, same => n,Set(foo=${ISNULL(${result})}) ;; , ISNULL 0, - 1 same => n,GotoIf($["${foo}" = "0"]?6:7) ;; , 0 - 6, 1 - 7 same => n,GoTo(barrier1,s,1) ;; - same =>n,Hangup() ;; , ;; exten => 74991111111,1,NoOp(Incoming call from ${CALLERID(num)} to prov2) same => n,Set(CALLER=${CALLERID(num)}) same => n,Set(result=${ODBC_MOBILE()}) same => n,Set(foo=${ISNULL(${result})}) same => n,GotoIf($["${foo}" = "0"]?6:7) same => n,GoTo(barrier2,s,1) same => n,Hangup() exten => h,1,System(echo " ${CALLERID(NUM)} ${STRFTIME(${EPOCH},,%d.%m.%Y %H:%M)}" >> /tmp/FAIL.txt) ;; , , , [barrier1] exten => s,1,Dial(SIP/prov1/79150000000) ;; , - same => n,Hangup() exten => h,1,System(echo " ${CALLERID(NUM)} ${result} ${STRFTIME(${EPOCH},,%d.%m.%Y %H:%M)}" >> /tmp/SUCCESS.txt) ;; , [barrier2] ;; - exten => s,1,Dial(SIP/prov2/7915111111) same => n,Hangup() exten => h,1,System(echo " ${CALLERID(NUM)} ${result} ${STRFTIME(${EPOCH},,%d.%m.%Y %H:%M)}" >> /tmp/SUCCESS.txt) Sending reports to e-mail
To implement the sending of reports, we will use the mutt mail client due to the fact that it can attach files to the mail. Install mutt:
sudo aptitude install mutt And in cron, we add actions to send the reporting files (I do this at 9 am and at 9.01 am deleting them so that only fresh data is recorded in the reporting day)
sudo crontab -e 0 9 * * * echo "C. " | mutt -a "/tmp/FAIL.txt" -s " " -e "set from="asterisk@domen.ru"" -e "set realname='Asterisk'" -- recipient@client.ru 1 9 * * * rm -rf /tmp/FAIL.txt 0 9 * * * echo ". " | mutt -a "/tmp/SUCCESS.txt" -s " " -e "set from="asterisk@domen.ru"" -e "set realname='Asterisk'" -- recipient@client.ru 1 9 * * * rm -rf /tmp/SUCCESS.txt As a result, the client receives mail reports of the following type:

Now let's implement the ability to manipulate the white list. Yes, there certainly is phpmyadmin, but the task was to implement the simplest interface, not overloaded with extra fields that could “scare” the operator. To do this, several simple forms were written in php that allow you to view the numbers in the database, delete and add them (I don’t pretend to the correct code, I don’t know how to code php a bit more than completely). What came of it is in the screenshots below:
Home page
Add a number to the database
Delete a number from the database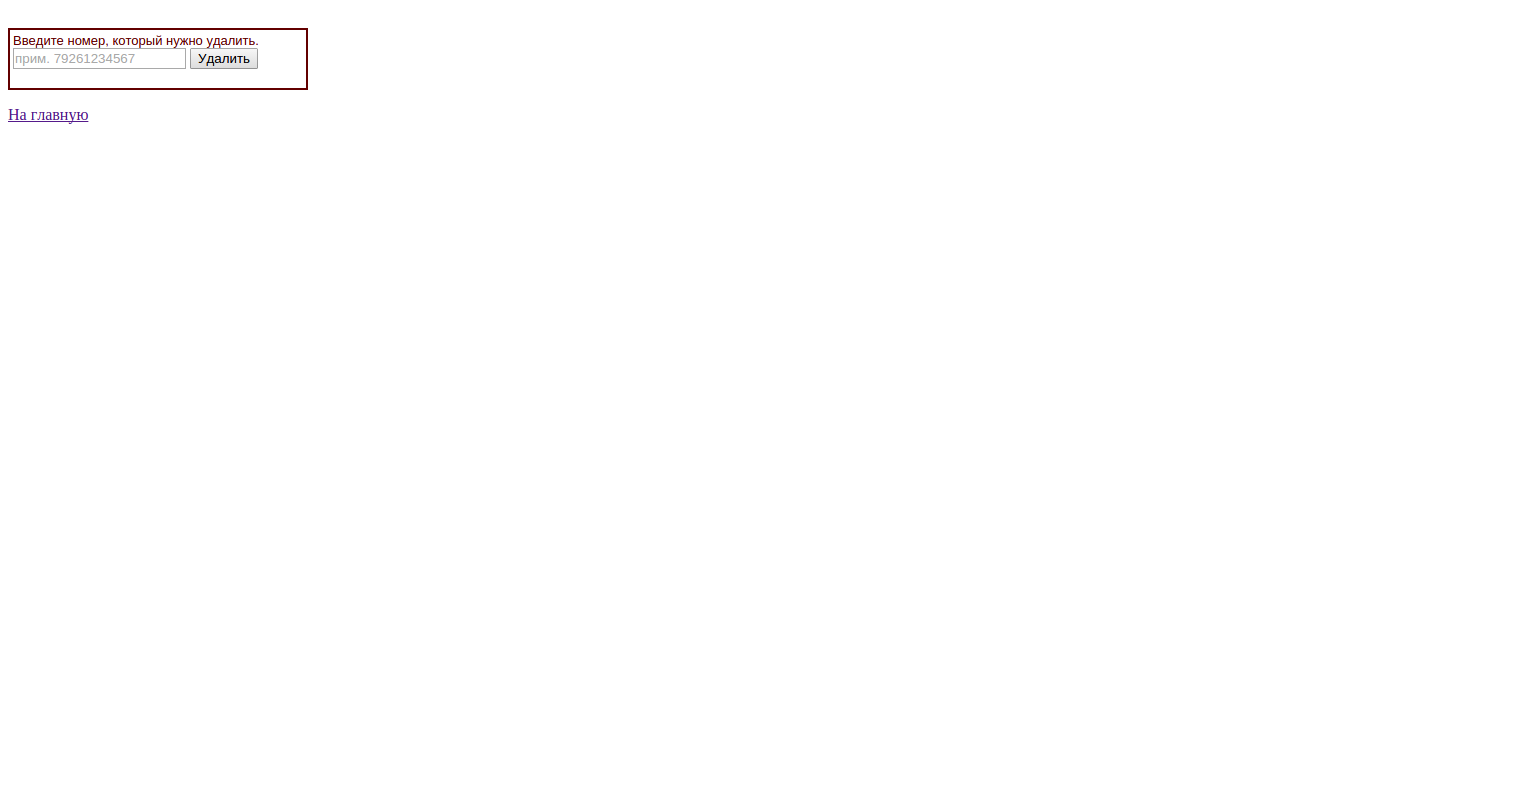
View a list of numbers in the database
And the code itself:
index.php
<!DOCTYPE HTML> <html> <head> <meta charset="utf-8"> <title> </title> </head> <body> <p><a href="add_form.php"> </a></p> <p><a href="remove_form.php"> </a></p> <p><a href="show.php"> </a></p> </body> </html> add_form.php
<p> <table width="300" border="1" bordercolor="#630000" cellpadding="3" cellspacing="0"> <tr><td> <font size="2" face="verdana,arial,georgia" color="#630000"> .</font> <form action="insert.php" method="post"> <input type="text" placeholder=". " name="phonee" value="" /> <input type="text" placeholder=". 79261234567" name="namee" value="" /> <input type="submit" name="send" value="" /> </form> </td></tr> </table> </p> <p><a href="index.php"> </a></p> insert.php
<?PHP $host = "localhost"; $user = "root"; $database = "barrier"; $pass = "mahapharata"; $name = $_POST["namee"]; $phone = $_POST["phonee"]; // $connect = mysql_connect($host, $user, $pass); mysql_select_db($database); mysql_set_charset( 'utf8' ); mysql_query("INSERT INTO `numbers` (`phone`, `name`) VALUES ('".$name."','".$phone."')"); mysql_close($connect); ?> <input type="button" value="" onclick="history.back()"> remove_form.php
<p> <table width="300" border="1" bordercolor="#630000" cellpadding="3" cellspacing="0"> <tr><td> <font size="2" face="verdana,arial,georgia" color="#630000"> , .</font> <form action="delete.php" method="post"> <input type="text" placeholder=". 79261234567" name="phonedel" value="" /> <input type="submit" name="send" value="" /> </form> </td></tr> </table> </p> <p><a href="index.php"> </a></p> delete.php
<?php $servername = "localhost"; $username = "root"; $password = "mahapharata"; $dbname = "barrier"; $phone = $_POST["phonedel"]; // Create connection $conn = new mysqli($servername, $username, $password, $dbname); // Check connection if ($conn->connect_error) { die("Connection failed: " . $conn->connect_error); } // sql to delete a record $sql = "DELETE FROM numbers WHERE phone='".$phone."'"; if ($conn->query($sql) === TRUE) { echo " \r\n"; } else { echo " : " . $conn->error; } $conn->close(); ?> <input type="button" value="" onclick="history.back()"> show.php
<?php $servername = "localhost"; $username = "root"; $password = "mahapharata"; $dbname = "barrier"; // Create connection $conn = new mysqli($servername, $username, $password, $dbname); $conn->set_charset("utf8"); // Check connection if ($conn->connect_error) { die("Connection failed: " . $conn->connect_error); }. $sql = "SELECT id, phone, name FROM numbers"; $result = $conn->query($sql); if ($result->num_rows > 0) { // output data of each row while($row = $result->fetch_assoc()) { echo " " . $row["name"]. " " . $row["phone"]. "<br>"; } } else { echo " "; } $conn->close(); ?> <p><a href="index.php"> </a></p> Do not forget to fasten authorization using htaccess:
htpasswd -c passwordfile username Enter the password in the dialog that htpasswd offers and get the file “passwordfile” with the username “username” and the generated encrypted password.
In my opinion, it turned out to be a good implementation, in which Asterisk is used not as a standard IP PBX, but as a kind of access control system. It was interesting to work on the project, and considering the popularity of such barriers, it may be useful to someone :)
Source: https://habr.com/ru/post/261391/
All Articles