Caution, Modern UI

Every developer of Windows Store applications should know the guidelines.
Guideline translated from English - recommendations, guidelines. In order for an application to go to the Store, it is not necessary to follow the recommendations, but it is desirable to follow them. There are several features, or a foreign feature (feature), which each application should have. I decided to consider these features, and at the same time create a C # / XAML template for the Windows Store application from which to start development. After all, one way or another, you often have to go to previously developed applications or MSDN to copy the snippet code for a specific function.
The features described below will not only make your application relevant guidelines, but also decorate it with additional functionality that attracts the attention of users, as well as help in promotion.
Contract Share
In order for a user to send an e-mail to friends or share information about an application / game on a social network, you need to add a share contract to the application code. In order to do this, follow the following steps.
Add a namespace:
using Windows.ApplicationModel.DataTransfer; And in the page class we add the declaration of the variable:
private DataTransferManager dataTransferManager; Next, override the entry and exit events on the page:
protected override void OnNavigatedTo(NavigationEventArgs e) { // share this.dataTransferManager = DataTransferManager.GetForCurrentView(); this.dataTransferManager.DataRequested += new TypedEventHandler<DataTransferManager, DataRequestedEventArgs>(this.DataRequested); } protected override void OnNavigatedFrom(NavigationEventArgs e) { // this.dataTransferManager.DataRequested -= new TypedEventHandler<DataTransferManager, DataRequestedEventArgs>(this.DataRequested); } The simplest version of the content that can be shared is the title, text and link:
private void DataRequested(DataTransferManager sender, DataRequestedEventArgs e) { Uri dataPackageUri = new Uri("http://apps.microsoft.com/windows/ru-ru/app/mp3/0122ffd9-585f-4b3d-a2ad-571f74231d14"); DataPackage requestData = e.Request.Data; requestData.Properties.Title = " "; requestData.SetWebLink(dataPackageUri); requestData.Properties.Description = " - . , ."; } You can also send a file or image. There is an option in which a message can be sent in HTML format.
You can share from Windows 8.1 by calling the magic charm panel and selecting this icon in it:

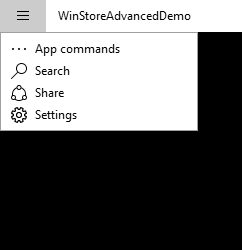
In Windows 10, you can share content by clicking the same icon in the upper left corner of the application:
In order to open the window programmatically from the code, you can use the following line:
Windows.ApplicationModel.DataTransfer.DataTransferManager.ShowShareUI(); The official manual is available at the link:
Quick Start Guide: Sharing Content (XAML)
Live tile
Surely you have noticed that some of the tiles on the start screen change over time. Take, for example, the tiles of news sites or the Finance application tile, which itself updates the bulletins. Some tiles change every few seconds, attracting the attention of the user. These are the so-called "live" tiles / tiles.
In order for the application to change the tile, you can send a push notification to it , but you can update the tile from the application itself.
In order to update the tile from the application, first of all you need to add a namespace
using Windows.UI.Notifications; Next, we will write a simple method that will change the type and text of the tile:
void UpdateTileWithText() { // # var tileXml = TileUpdateManager.GetTemplateContent(TileTemplateType.TileSquare150x150Text04); var tileAttributes = tileXml.GetElementsByTagName("text"); string tiletext = " - "; tileAttributes[0].AppendChild(tileXml.CreateTextNode(tiletext)); var tileNotification = new TileNotification(tileXml); tileNotification.ExpirationTime = DateTimeOffset.UtcNow.AddHours(1); TileUpdateManager.CreateTileUpdaterForApplication().Update(tileNotification); } In the example, a four-line Tile is used as a template. All templates are available at the link: Tile Template Catalog
According to the guidelines, it is highly recommended that the application have tiles that are both square and wide, therefore it is desirable to duplicate the same code, specifying a wide pattern as a tile template. That is, in the example, replace TileTemplateType.TileSquare150x150Text04 with TileTemplateType.TileWide310x150Text04 .
')
In my application, I updated the tile at the App_Suspending event, in order to remind users where they left off, but you can do it at any other time.
If you need to clear the changes that were made and return the tile to its original form, you can do this from the code with the line:
TileUpdateManager.CreateTileUpdaterForApplication().Clear(); The official, albeit brief, but slightly more complete instruction is available at the link:
Quick Start Guide: Submitting a Tile Update (XAML)
Rate and review
It is recommended to gently suggest users evaluate your application. Good ratings and reviews will help increase the popularity of your offer. In addition, user feedback allows you to make timely changes to the functionality and design of the application. In order to open the Windows Store window with a rating, it is enough to create and open a URI. Two lines are enough for this:
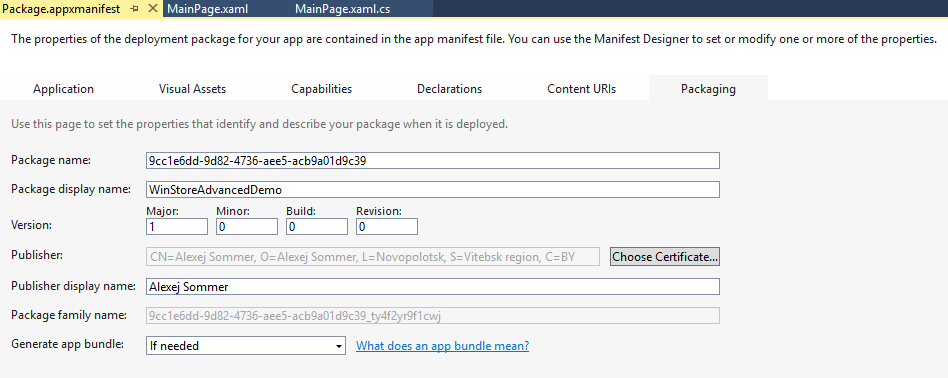
var uri = new Uri("ms-windows-store:Review?PFN=9cc1e6dd-9d82-4736-aee5-acb9a01d9c39_1dv79ndb6c382"); await Windows.System.Launcher.LaunchUriAsync(uri); Note that the page is opened asynchronously using await. If so, then the async predicate will need to be added to the button click procedure.
Generating a URI is relatively simple. To the text "ms-windows-store: Review? PFN =" you need to add the Package Family Name or PFN for short. Its value can be found by opening the application manifest.
Link to the official guide how to create a link to the application in the Store:
Linking to your app
He indicated the link in English, since the Russian translation also translated the keywords by mistake.
Since the template we write under 8.1 and not under 10, then there is one small confusion. The way URI generation for WP 8.1 is slightly different from the URI generation method for Windows Store applications. For WP 8.1, the URI looks like this:
ms-windows-store: reviewapp? appid = cq23k522-7u59-1193-h4aa-3t56e4633c24
Official guide (in Russian):
Link to your app in the Store
A good way to get a rating and user feedback is to rate the application after a certain number of launches. We assume that once a user has launched an application, say, 5 times, then he has something to say about the application.
The number of application launches can be saved using the application settings. At the same time, we will also understand how to save the settings.
Settings
A simple snippet with which you can count how many times an application has been launched:
In the variable declarations add:
int appRunCount = 0; Windows.Storage.ApplicationDataContainer localSettings = Windows.Storage.ApplicationData.Current.LocalSettings; In the page class constructor after this.InitializeComponent (); add:
try { appRunCount = (int)localSettings.Values["AppRunCount"]; } catch { } appRunCount++; try { localSettings.Values["AppRunCount"] = appRunCount; } catch { } Thus, we will get in the appRunCount variable the number of application launches.
Instead of Windows.Storage.ApplicationData.Current.LocalSettings we can use Windows.Storage.ApplicationData.Current.RoamingSettings. If we do this, then we will be able to save the settings not roaming on the device, but in roaming online. They are stored in a Microsoft user account. RoamingSettings will be available from any device that was logged on from the same account.
A simple code that is issued a message if the application is launched for the 5th time and if the user agrees to rate the store window opens with a proposal to leave a review:
if (appRunCount == 5) { var messageDialog = new Windows.UI.Popups.MessageDialog(", , ", " !"); // / messageDialog.Commands.Add(new Windows.UI.Popups.UICommand(" ", new Windows.UI.Popups.UICommandInvokedHandler(CommandHandler))); messageDialog.Commands.Add(new Windows.UI.Popups.UICommand(" ", new Windows.UI.Popups.UICommandInvokedHandler(CommandHandler))); messageDialog.Commands.Add(new Windows.UI.Popups.UICommand(" ", new Windows.UI.Popups.UICommandInvokedHandler(CommandHandler))); messageDialog.DefaultCommandIndex = 0; messageDialog.CancelCommandIndex = 2; await messageDialog.ShowAsync(); } private async void CommandHandler(IUICommand command) { if (command.Label==" ") { var uri = new Uri("ms-windows-store:PDP?PFN=9cc1e6dd-9d82-4736-aee5-acb9a01d9c39_1dv79ndb6c382"); await Windows.System.Launcher.LaunchUriAsync(uri); } } A window with a question looks standard and too ordinary. Ideally, it is better to make your PopUp, which will have a design that fits into the design of the application. But this is already beyond the scope of this article.
How to save the settings of the application we figured out.
Here is where you can read the official manual:
Loading and saving parameters
In order for the user to change some settings in Modern UI applications, it is possible to create a “flying out” socket - Flyout
Settings Flyout
This feature is only available for Windows 8.1 and 10 applications. In Windows 8, if you wanted to create a similar socket, it was possible, but you had to create your own user control.
In order to add a “flying out” panel to the application with settings, you need to add a new control called Settings Flyout (in the Russian version “Pop-up parameter element”). The procedure is as follows. Go to the menu:
Project - Add New Item ... - Visual C # - XAML - Settings Flyout
or
Project - Add New Item - Visual C # - XAML - Parameter Popup
Let's name a new item, for example, like this: CustomSettingsFlyout.xaml
Add to the App.xaml.cs application references to namespaces:
using Windows.UI.ApplicationSettings; using Windows.UI.Popups; And the following code:
protected override void OnWindowCreated(WindowCreatedEventArgs args) { SettingsPane.GetForCurrentView().CommandsRequested += OnCommandsRequested; } private void OnCommandsRequested(SettingsPane sender, SettingsPaneCommandsRequestedEventArgs args) { SettingsCommand settingsCommand = new SettingsCommand("SettingsPage", "Open settings",new UICommandInvokedHandler(onSettingsCommand)); args.Request.ApplicationCommands.Add(settingsCommand); } private void onSettingsCommand(IUICommand command) { CustomSettingsFlyout settingsFlyout = new CustomSettingsFlyout(); settingsFlyout.Show(); } Now when we call up the application settings, we will have our window displayed. We can edit the XAML and C # code of our CustomSettingsFlyout element as we need.
We have just learned how to save settings using the Windows.Storage.ApplicationData.Current.LocalSettings class
Official manual:
Quick Start: Adding Application Parameters (XAML)
Pop up notifications
In order to notify the user about something, you can display a toast notification. This is a small rectangle with a picture and text that floats to the right, like Flyout. Toast notification does not block the application interface, unlike MessageBox. It will be quite convenient if in our code the call for notification is enclosed in a separate method. Add 2 more namespaces:
using Windows.Data.Xml.Dom; using Windows.UI.Notifications; And we add the method itself, after calling which with the text as a parameter, we will receive a notification:
void ShowToast(string whattext) { XmlDocument toastXml = ToastNotificationManager.GetTemplateContent(ToastTemplateType.ToastText01); XmlNodeList stringElements = toastXml.GetElementsByTagName("text"); stringElements[0].AppendChild(toastXml.CreateTextNode(whattext)); ToastNotification toast = new ToastNotification(toastXml); toast.Activated += ToastActivated; toast.Dismissed += ToastDismissed; toast.Failed += ToastFailed; ToastNotificationManager.CreateToastNotifier().Show(toast); } The first line we set is xml template ToastText01. This is a fairly simple template that contains only text that occupies 3 lines.
All possible templates are here: Popup Notification Template Catalog
You can also notice that we subscribe to 3 events: activation of the notification, hiding the notification and error notification. Now, you definitely need to implement handlers for these events (even if without code):
private void ToastFailed(ToastNotification sender, ToastFailedEventArgs args) { } private void ToastDismissed(ToastNotification sender, ToastDismissedEventArgs args) { } private void ToastActivated(ToastNotification sender, object args) { } Official Guide:
Quick Start Guide: Sending a Popup Notification (XAML)
AppBar and CommandBar
Finally, add a panel with standard controls to the application.
The panel can be top or bottom. Buttons of commands and tools are usually placed on the bottom panel.
The panel can be created in XAML with the following tags:
<Page.TopAppBar> <!-- content --> </Page.TopAppBar> Or
<Page.BottomAppBar> <!-- content --> </Page.BottomAppBar> The content of the panel can be an AppBar element (for various controls that your little soul wishes to place) or a CommandBar element (only for buttons — the XAML AppBarButton, AppBarToggleButton and AppBarSeparator elements). For an ordinary application, conventional buttons are quite sufficient, so we restrict ourselves to the CommandBar. The code is:
<Page.BottomAppBar> <CommandBar IsOpen="True"> <AppBarButton Label=" Vote and review" Icon="Like" Click="ReviewButton_Click"/> <AppBarButton x:Name="btnSecTile" Label="Add to Start" Click="btnSecTile_Click" Icon="Pin"/> <CommandBar.SecondaryCommands> <AppBarButton Label="Share" Icon="OtherUser" Click="ShareButton_Click"/> </CommandBar.SecondaryCommands> </CommandBar> </Page.BottomAppBar> Note the attribute IsOpen = ”True” . When opening an application, it is advisable to display a panel so that the user is aware of its presence and, accordingly, knows what features the application has. You may also notice the nested tag CommandBar.SecondaryCommands which contains buttons that will be reflected on the left panel. They are minor.
Official Guide:
Quick Start: Adding Application Dashboards (XAML)
Secondary tile
It is possible to allow the user to attach the auxiliary tile / tile to the Windows startup screen. By clicking on this tile, the application can open with certain parameters, the auxiliary tile can also be “live” (ie, a live tile) and display any special alerts.
First, to add a secondary tile, we add the required missing namespace:
using Windows.UI.StartScreen; in the page constructor after InitializeComponent (); add a method call with a parameter:
ToggleAppBarButton(!SecondaryTile.Exists("MyUnicTileID")); Here MyUnicTileID is a unique identifier of the tile
Next, we need to add the ToggleAppBarButton method itself, which will display an icon to attach or detach depending on the current state of the auxiliary tile.
public void ToggleAppBarButton(bool showPinButton) { if (showPinButton) { btnSecTile.Label = ""; btnSecTile.Icon = new SymbolIcon(Symbol.Pin); } else { btnSecTile.Label = ""; btnSecTile.Icon = new SymbolIcon(Symbol.UnPin); } this.btnSecTile.UpdateLayout(); } Here, showPinButton is a boolean variable that stores the value passed by! SecondaryTile.Exists (“MyUnicTileID”), i.e. whether an auxiliary application tile is attached to the start screen or not.
Now add the code to the button press event. This code will attach the tile to the initial screen or detach it:
private async void btnSecTile_Click(object sender, RoutedEventArgs e) { Windows.Foundation.Rect rect = GetElementRect((FrameworkElement)sender); if (SecondaryTile.Exists("MyUnicTileID")) { SecondaryTile secondaryTile = new SecondaryTile("MyUnicTileID"); bool isUnpinned = await secondaryTile.RequestDeleteForSelectionAsync(rect, Windows.UI.Popups.Placement.Above); ToggleAppBarButton(isUnpinned); } else { // Pin Uri square150x150Logo = new Uri("ms-appx:///Assets/Logo.scale-100.png"); string tileActivationArguments = "Secondary tile was pinned at = " + DateTime.Now.ToLocalTime().ToString(); string displayName = "Application name"; TileSize newTileDesiredSize = TileSize.Square150x150; SecondaryTile secondaryTile = new SecondaryTile("MyUnicTileID", displayName, tileActivationArguments, square150x150Logo, newTileDesiredSize); secondaryTile.VisualElements.Square30x30Logo = new Uri("ms-appx:///Assets/SmallLogo.scale-100.png"); secondaryTile.VisualElements.ShowNameOnSquare150x150Logo = true; secondaryTile.VisualElements.ForegroundText = ForegroundText.Light; bool isPinned = await secondaryTile.RequestCreateForSelectionAsync(rect, Windows.UI.Popups.Placement.Above); ToggleAppBarButton(!isPinned); } } Also you need to add a function
public static Rect GetElementRect(FrameworkElement element) { GeneralTransform buttonTransform = element.TransformToVisual(null); Point point = buttonTransform.TransformPoint(new Point()); return new Rect(point, new Size(element.ActualWidth, element.ActualHeight)); } Something like this is a warning you should receive when you pin the tile to the initial screen:
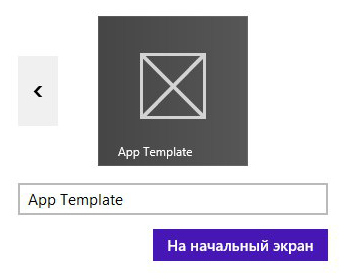
“App Template” is the name of the application. You can either fix the tile or refuse by clicking anywhere on the application and closing the pop-up.
As usual, the link to the official manual:
Quick Start Guide. Anchoring auxiliary tiles (XAML)
These were some of the features of the Windows Store apps. Highly recommend using them.
You can download the resulting template from the link from GitHub:
https://github.com/programmersommer/WindowsStoreAppTemplate
or as a zip archive (version with Russian comments):
Onedrive
Source: https://habr.com/ru/post/261199/
All Articles