The electronic teacher for blind on Arduino

As a result of communication with teachers from the Chelyabinsk correctional school No. 127 for blind and visually impaired children, we, the forblind.org community, learned that in order to speed up the process of teaching Braille children, it would be useful to create a device capable, as much as possible, to replace the teacher and allow the child to study independently, including outside of school. We set ourselves the task of making available and inexpensive components to implement a device that will allow us to form and voice one character of the Braille alphabet, supporting several languages and groups of characters.
Braille is a tactile reading system for the blind, in which characters are represented as embossed points (bumps) placed in a special cell. In each cell for placing points there are six numbered positions located in the cells of the 3x2 matrix. There are also eight-point braille characters, which are mainly used in braille displays when working with PCs.

')
The Braille alphabet to the characters natural for a person (or in the general case of any other) language matches Braille characters. Having mastered the Braille alphabet, the blind and visually impaired can quickly read not only fiction, but also special literature containing notes, mathematical or any other generally accepted symbols.
A limited number of hours is allocated to mastering Braille for blind children in specialized educational institutions. There are not many braille teachers, and every child needs individual lessons. Thus, it would be useful to develop a device designed to speed up and simplify the process of learning Braille, allowing you to enter one Braille character and play it through a speaker or headphone.
In the first approximation, the task is divided into two main ones: the organization of tactile input of the Braille symbol and its voicing.
We took the modular principle as a basis: all the main nodes are taken in the form of ready-made functional modules. Volumetric installation, minimum soldering, availability of components, open circuits and source codes - all this allows you to quickly and inexpensively reproduce the device to anyone with minimal knowledge of electronics and soldering skills.
As a control board, we traditionally use the Arduino Pro Mini, a fairly compact solution for such uncomplicated devices.
Electrical schematic diagram of the developed device is presented below.

Braille character input mechanism
The first thing that occurred to me when implementing the Braille symbol input mechanism was to use latching buttons: pressed - no point, pressed - there is a point. A test layout of such a device is shown in the figure:

Of course, this method has the right to exist, only it has two drawbacks. First, as it was discovered in the process of testing the idea, the buttons, even when depressed, slightly protrude above the input field, which makes tactile perception difficult. Secondly, such an implementation does not imitate the actual writing of braille characters on special paper, when the points are squeezed out from the back of the page, as in the children's composition presented below.

Of course, you can "drown" buttons so that they do not protrude outside the field, but in this case it will be almost impossible to press and fix them with your finger, since For the latch to operate, the button must be given a greater stroke than its latching position. The prospect of using a special stylus to work with buttons recessed into the body did not suit us.
Without thinking twice, we decided to make the buttons pass-through, according to the “back and forth” principle: pressed on one side — climbed on the other. Toggle switches were taken as switching elements, arranged sideways in two rows, attached to each rod and assembled into a body cut from PVC. The resulting input device completely imitates the use of braille characters on special paper used by the blind. So we got the first prototype of the device:

Sound reproduction
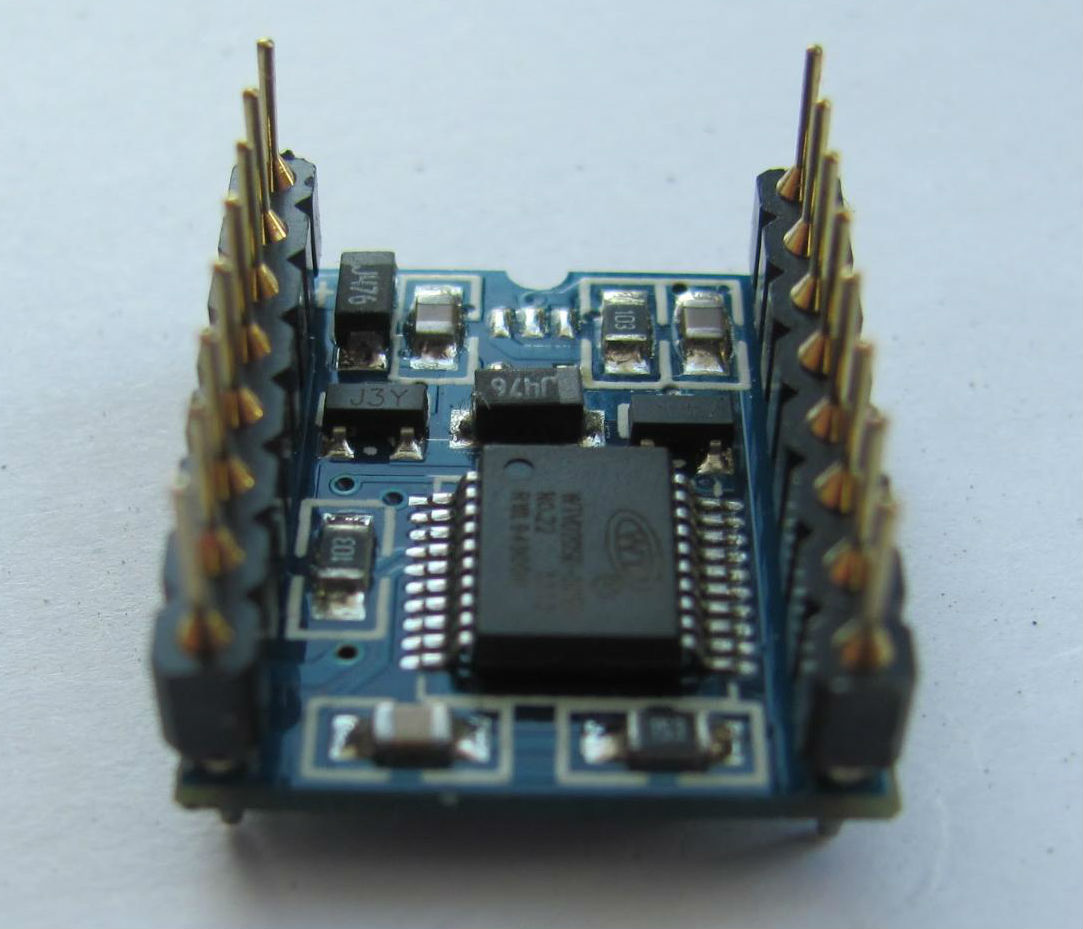
Making the Arduino play audio files can be, for example, using PWM. There is even an Arduino-like “Carduino” board, which has an open collector transistor on the D11 pin for direct connection of the speaker. The main problem when using “Carduino” is that the reproduced fragments of sounds in the * .wav format must first be converted into header files * .h connected to the project with a special converter, and then recorded directly into the microcontroller’s memory, with the firmware not great Alternatively, one could try to read and play files from an SD card. We decided not to reinvent the wheel, but to look for a ready-made solution, which became the module WTV020-SD, which allows you to play wav-files.
WTV020-SD is a completely ready-to-use solution with low cost and compact dimensions (22 x 19 mm). The advantages of the WTV020-SD can also be attributed to a simple switching scheme, the ability to control playback via the serial interface, and the convenient change of a set of sound files by replacing or rewriting a memory card.
For WTV020-SD to work, it is necessary to provide a supply voltage of 2.5-3.6 V. The module reproduces files of the * .wav and * .ad4 formats with microSD or SPI-flash memory cards, supporting up to 512 different files on the memory card. Playback control is performed using the “Play / Pause”, “Stop”, “Next”, “Previous”, “Volume +”, “Volume-” and “Play / Pause” commands (indicating the file address in interval 0..511), “Stop”, “Volume +”, “Volume-”.

To output sound, the WTV020-SD module uses a PWM output with direct speaker connection with an output power of 0.25 / 0.5W and a DAC output for connecting an external amplifier.
Pitfalls when working with the module WTV020-SD
1. Information carriers
Although the datasheet on WTV020-SD states that the microcircuit supports memory cards with a capacity of up to 1 GB, in fact, as it turned out, the WTV020-SD can work fine with 2 GB memory cards and may not start up with a 512 MB card of memory. Unaware of this, in addition to the modules of the WTV020-SD modules on AliExpress 10 128 MB memory cards were ordered. Not earned any.
As a result, we had to buy cards from different manufacturers at random, upholstering the thresholds of the station stalls for selling used phones in the hope that at least one purchased memory card would work. Of the 10 cards received in half from friends, from different stalls, repair shops, it turned out to run only half. In addition to this, in the process of experimenting with the modes of operation of the WTV020-SD, several memory cards were corrupted.
The reasons for this selectivity have not been established.
2. File system
The module works only with memory cards formatted in FAT16, regardless of their capacity.
3. File format
WTV020-SD supports on all wav files. Before writing files to a memory card, you need to make sure that they pass by bit depth (bit rate) and sample rate (sample rate). The datasheet states that for wav files the sampling rate should be in the range of 6 to 16 kHz.
We tried to get the files of a suitable format using two AIMP Audio Recorder programs (when recording directly from an audio stream) and Audacity (by converting existing files).
Experimentally it was revealed that wav-files should have the following attributes: 11025 Hz, 16 bit, mono, PCM.
The playback quality of * .wav suits us perfectly, so we didn’t begin to deal with the conversion to * .ad4 format, although using * .ad4 could improve the playback quality (increase the sampling rate to 36 kHz).
The address space of the module allows you to work with 512 files, which should have names from 0000 to 0511. The presence of third-party files on the drive does not affect the operation of the module with target files.
4. Power module.
On the upper side of the WTV020-SD board, there is a jumper-power switch of 5 - 3.3 V, closed with a fat drop of solder at 3.3 V.

When moving the jumper from 3.3 to 5 V, the module will not work, although it will not fail. At least, it was so in the modules that we got. Most likely, the module was supposed to use a 3.3 V stabilizer when powered from 5 V, as evidenced by an empty seat on the reverse side of the module, on which such a stabilizer can be located.
Thus, to provide power to the module, either use an additional 3.3 V stabilizer, as was done in our project, or use the 3.3 V output when using the Arduino Nano instead of the Arduino Pro Mini.
Since digital lines WTV020-SD are tolerant to five-volt signals, it is possible not to perform their level matching with Arduino.
5. Serial Control
To control the module via the serial interface, it is enough to use two communication lines - DATA (data line) and CLK (sync pulses). Synchronization of data exchange with the module is performed on the front. You can also use the RESET input and the BUSY output (pressed to the ground while playback is in progress).
There are ready-made libraries for working in the Arduino IDE, but we did not use them. A third-party library is always a black box. You never know how it was implemented, what peripherals were used. We didn’t understand it, but to have an unmanaged piece of code in the project is fraught with conflicts when using the same periphery (for example, timers).
Actually, sending data to WTV020-SD itself is a sequence of 16 bits, which in binary format transmits the file number of the playback (0 - 511 or 0x00 - 0x200) or the command (0xFFF0 - 0xFFF7 - volume, 0xFFFE - play / pause, 0xFFFF - Stop).
The module is sensitive to the timing indicated on the timing diagram.

Minor deviations of timings from recommended values are allowed. In the case of a strong change in timings, both upwards and downwards, the module ceases to respond to sending data.
It is not necessary to do a reset before sending the data, as shown in the diagram. You can send parcels in a row. If the module has accepted the file number, and the playback of the previous file is not completed, the module will interrupt the current playback and begin to play the new file. You can track the completion of playback of a running file on the BUSY line.
To send data packages, we wrote a small function that works in interrupting a timer, to which a decimal number is sent - the file address or command.
Receive sound files and multilingual
After we stocked up with several working memory cards and dealt with the file format and module management, we were faced with the task of recording a library of sounds.
For high-quality recording of sounds, good diction and an expensive sound card are necessary. We did not have such resources, so we decided to use the speech synthesizer provided by the Google Translate service. To automate the process of writing, we wrote a script that converts a text file with a set of letters / words / phrases into a set of wav files, voicing the required words and letters. As a result, we not only managed to save time on writing Russian letters, but without attracting translators and native speakers, to make the device multilingual.
To select a language, they made a separate button, when clicked, the languages cycle through and their names are reproduced.
Despite the fact that today, thanks to Google Translate, about 40 languages are available to us, it will not work to accommodate more than 5-8 languages per memory card due to the restriction of the module to work with files. Actually, this is not necessary.
Braille alphabet in all languages consists of the same combinations of points, but not always the same letter in different languages has the same point representation, although in most cases this is true. In addition, there are letters peculiar only to this or that language. Full coincidence is observed only in numbers, in mathematical and in most punctuation signs.
In Braille, there is another feature - the same Braille symbol can mean different: letter, symbol, number or sign, depending on the preceding symbol.
To account for special prefixes in our single-character keyboard, we initially implemented the preservation of the previous character. Each entered character was voiced with regard to the previous one, which was not very convenient, and we decided to add another button, in some way similar to the “Shift” key on the computer keyboard. The mode change button works according to the same principle as the language switch button, cycling through the three modes: alphabet, numbers and mat. characters, punctuation. The installation of the new mode is accompanied by voicing of its name in the current language.
For the first prototype, we have prepared a library of three languages: Russian, English, German. Alphabets, numbers, mathematical signs and punctuation marks of these three languages took about 200 files, despite the fact that only the most basic symbols of mathematics and punctuation were involved.
Conclusion
As a result, we had a device with a six-point input field, three “Play”, “Language”, “Mode” control buttons and a power button. When the state of a point changes, its number is sounded in the selected language. When you click the Play button, a six-point Braille code is mapped to a letter in the selected language. If a letter is found, the device plays it through the headphone output. In the absence of a letter in the selected alphabet, the device generates an audible warning with a "beep" signal.

In the latest implementation, we tried to minimize the dimensions of the device, equipped it with a lithium-ion battery and a micro-usb charging module, and also eliminated all comments received from teachers of the correctional school for the blind and visually impaired: added a beveled corner, made a frame for Braille cells, replaced the large rectangular buttons in the Braille cell with buttons in the form of raised points. Our only flaw is that at the moment we have not picked up a convenient case for the device.
In the manufacture of the second prototype, the following components were used:
- Adruino Pro Mini control board.
- Sound module WTV020-SD.
- Rechargeable battery 3.7 V 300 mAh.
- DC / DC boost converter module 0.9V ~ 5V to 5V 600 mA.
- Li-Ion charging module 5V to V 1 A.
- Charger 220 - 5V LA-520W.
- LM317 linear stabilizer chip.
- Button PB-22E60.
- Clock buttons (3 pcs.).
- Switches slide 2-position or toggle switches (6 pcs.).
- Universal Breadboard S7NF.
- Connector Audio-jack 3.5 for connecting headphones.
- Headphones or speaker.
- Resistors (5 pcs.).
Disassembled, the second prototype of the device is as follows:

At the moment we did not bring the development of the device to a logical end, since, according to teachers of the correctional school, the Braille display would be much more popular. I hope in the future we will present to your attention a similar device.
Finally, here is a link to the source code for the Arduino and the sound set for the WTV020-SD; a photo illustrating all the stages of development, and videos showing the work with the prototypes we created.

See also: Budget device based on Arduino for the blind (open hardware) .
Source: https://habr.com/ru/post/261117/
All Articles