Practice using Laurent modules. Part 2: changing the WEB interface
Hi Habr! This is the second article on the practical application of Laurent's Ethernet management modules (here is the first part ) and, as you like, it will be about programming, or, more precisely, about fitting the WEB interface to your interests. It can be useful for system integrators in order to provide customers with a product with their own corporate look, and it will be more convenient for a private user to operate with buttons with clear names, without unnecessary strapping on the screen. In addition, some functional change is also available.
So…
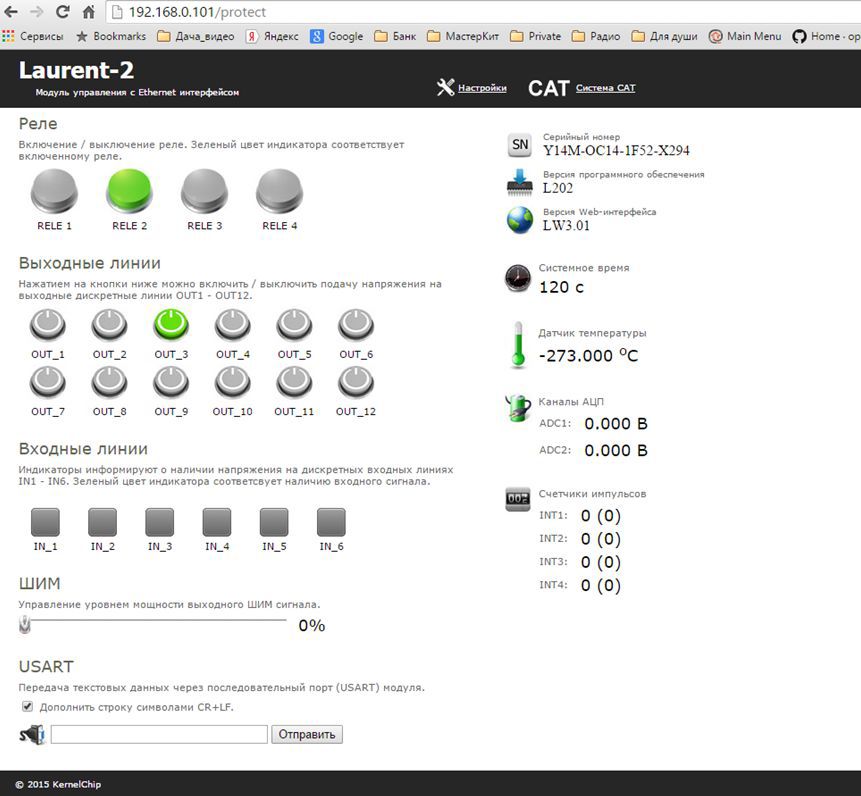
In the original, we have a start-up control screen:
Consider an example of modifying the Laurent-2 web interface. As a practical task, the following operations are proposed:
')
So, the first step is to download the web interface SDK. The SDK is the original project of the Web interface (the same as that used in the standard delivery of the module) and the compiler, with which you can build an image of the interface for subsequent loading into the nonvolatile memory of the module.
The initial project is based on the use of various Web-languages and technologies: HTML, JavaScript, AJAX, XML. Since all the code is open, we can make any changes and develop a specialized interface specifically for specific tasks.
Go to the \ Laurent-2_WebSDK_v.2 \ Laurent_Web \ protect directory, which contains the main page of the Web interface. The main page, on which the access password entry fields are located, is located in the root directory. Those HTML documents that are located in the \ protect subdirectory will require that you specify an access password.
In the index.html file (we are now in the \ protect subdirectory) we will find the code segment responsible for displaying the images of the relay buttons:
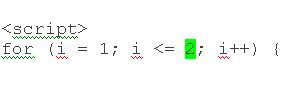
For example, let's make it so that only the first two buttons of the relay are displayed, the corresponding relays RELE_1 and RELE_2.
To do this, firstly, you need to change the parameters of the cycle for creating new buttons and write down this way (the green changes mark the changes made):
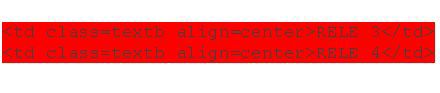
Additionally, you should delete the lines with the signatures of the relay, which will no longer exist, namely (the red indicates what should be deleted):
Now the script will create only two relay buttons. However, it is necessary to modify another section of the code, namely, the block for tracking changes in the relay state. The web interface is designed in such a way that a web page with a certain period sends requests to the module about the current state of its hardware resources (for example, whether the relay is on or off, etc.) - see the keweb_Laurent.js file. After receiving the answer, the script saves the new values and calls the functions responsible for updating the information on the page.
Since we have just “removed” two buttons, and the update script doesn’t know anything about it, when you try to launch the page, there will be a malfunction, because The script will attempt to access non-existent elements. To avoid this, you need to modify the JavaScript content update function UpdateInformation ()
In the function body there are lines related to the relay:
It is necessary to modify the cycle by changing the number 4 to 2, because now we need to track the status of only the first two relays:
Now our web interface works only with the first two relays of the module, and does not use the remaining two.
The next step is to modify the relay buttons so that they begin to work in non-latching mode (click off again as soon as the left mouse button is released or the mouse leaves the image of the button).
We will have to noticeably modify the code of the button creation script, since now it is necessary to track the facts of clicking, releasing the mouse button and going beyond the limits of the button image. We make a new modification in the script code for creating and placing relay elements on the page:
Instead of the HTML tag, we assigned the same JsClickRele () function to the handling of a button click, but clearly by the mouse-click event (without releasing). Additionally, they assigned the function ReleOnMouseUp () - as a handler for the release of the left mouse button button, and the function ReleOnMouseOut () - as the handler for the mouse exit event beyond the element to track when the mouse button is displayed outside the relay image. As an argument, the digital identifier of the relay number is passed to the functions (indexing starts from zero).
Let's make small modifications in the function called when the relay button is pressed.
We will create a special global variable to track the state of the mouse click that we need in the future. If the button is pressed, we raise the variable. The function of changing the state of the relay itself works according to the switching principle: each new access to it (SetRele ()) changes the state of the relay to the opposite.
Next, create a function for releasing the mouse. If the mouse was pressed (we track it using the MouseSave variable), then we set the opposite state of the relay (ie, turn it off).
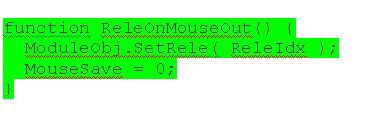
If the mouse was pressed, not released, and went beyond the relay image - we will also catch this situation with the help of our handler ReleOnMouseOut ():
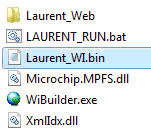
Now you can begin to build the interface. To do this, run the executive BAT file LAURENT_RUN.bat located in the root of the SDK directory.
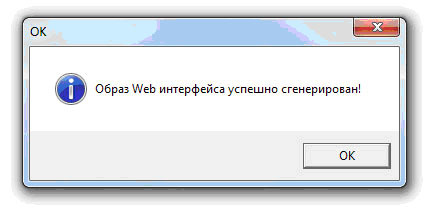
Run it. We receive a message about the successfully generated interface image:
Laurent_WI.bin interface file is created in the root directory.
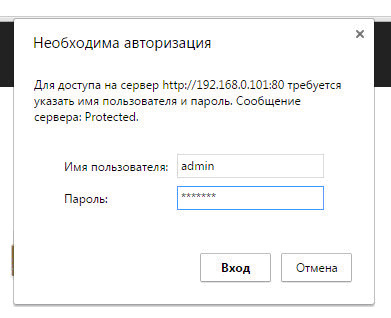
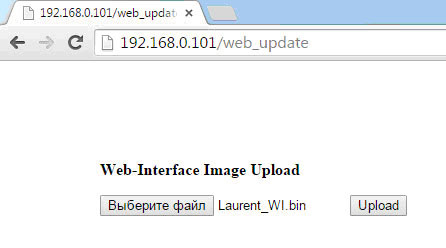
It's time to load it into the module's memory. We connect the module to the network, go through the browser at the address (if you changed the IP address of the module - you should use its current address):
http://192.168.0.101/web_update
Enter login / password (by default admin / Laurent)
Select the Laurent_WI.bin file and click the Upload button.
The boot process takes 30-60 seconds. Upon its completion we will see a message of the form:
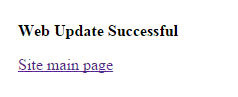
Go to the main page of the module. Do not forget to refresh the page. The browser can cache the old version of the page, and we will not see our changes.
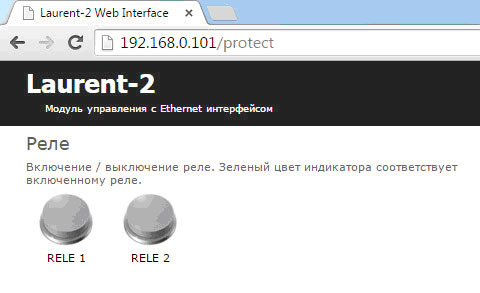
Now we see two relays in the interface, and they work as we have programmed: in non-latching mode (the relay snaps back as soon as the left mouse button is pressed or out of the relay button image):
If you have any questions about the modified code - the original SDK project with the modifications made is attached to the article.
to be continued…
So…
In the original, we have a start-up control screen:
Consider an example of modifying the Laurent-2 web interface. As a practical task, the following operations are proposed:
')
- Change the number of displayed relay buttons in the web interface
- For the relay buttons, we will make it possible to work in the non-latching mode (the button will click off as soon as the left mouse button is released)
So, the first step is to download the web interface SDK. The SDK is the original project of the Web interface (the same as that used in the standard delivery of the module) and the compiler, with which you can build an image of the interface for subsequent loading into the nonvolatile memory of the module.
The initial project is based on the use of various Web-languages and technologies: HTML, JavaScript, AJAX, XML. Since all the code is open, we can make any changes and develop a specialized interface specifically for specific tasks.
Go to the \ Laurent-2_WebSDK_v.2 \ Laurent_Web \ protect directory, which contains the main page of the Web interface. The main page, on which the access password entry fields are located, is located in the root directory. Those HTML documents that are located in the \ protect subdirectory will require that you specify an access password.
In the index.html file (we are now in the \ protect subdirectory) we will find the code segment responsible for displaying the images of the relay buttons:
<table width=500> <tr ><td ><p class=texts> / . .</p> </td></tr> </table> <table> <tr> <script> for (i = 1; i <= 4; i++) { inTxt = "<td width=80 align=center><a href='javascript: JsClickRele(" + i + ")'><img src='Rele_Gray.jpg' border=0 id='Rele_Pic" + i + "'></a></td>"; document.write(inTxt); } </script> </tr> <tr> <td class=textb align=center>RELE 1</td> <td class=textb align=center>RELE 2</td> <td class=textb align=center>RELE 3</td> <td class=textb align=center>RELE 4</td> </tr> </table> For example, let's make it so that only the first two buttons of the relay are displayed, the corresponding relays RELE_1 and RELE_2.
To do this, firstly, you need to change the parameters of the cycle for creating new buttons and write down this way (the green changes mark the changes made):
Additionally, you should delete the lines with the signatures of the relay, which will no longer exist, namely (the red indicates what should be deleted):
Now the script will create only two relay buttons. However, it is necessary to modify another section of the code, namely, the block for tracking changes in the relay state. The web interface is designed in such a way that a web page with a certain period sends requests to the module about the current state of its hardware resources (for example, whether the relay is on or off, etc.) - see the keweb_Laurent.js file. After receiving the answer, the script saves the new values and calls the functions responsible for updating the information on the page.
Since we have just “removed” two buttons, and the update script doesn’t know anything about it, when you try to launch the page, there will be a malfunction, because The script will attempt to access non-existent elements. To avoid this, you need to modify the JavaScript content update function UpdateInformation ()
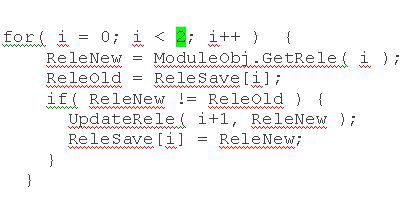
In the function body there are lines related to the relay:
for( i = 0; i < 4; i++ ) { ReleNew = ModuleObj.GetRele( i ); ReleOld = ReleSave[i]; if( ReleNew != ReleOld ) { UpdateRele( i+1, ReleNew ); ReleSave[i] = ReleNew; } } It is necessary to modify the cycle by changing the number 4 to 2, because now we need to track the status of only the first two relays:
Now our web interface works only with the first two relays of the module, and does not use the remaining two.
The next step is to modify the relay buttons so that they begin to work in non-latching mode (click off again as soon as the left mouse button is released or the mouse leaves the image of the button).
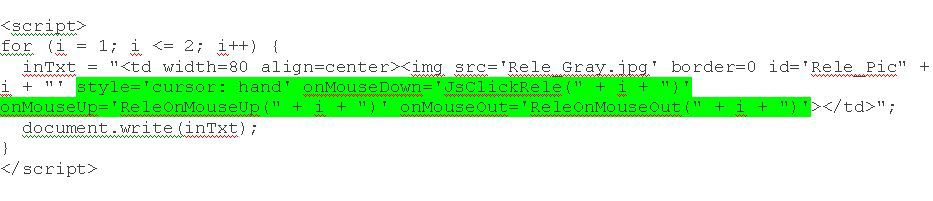
We will have to noticeably modify the code of the button creation script, since now it is necessary to track the facts of clicking, releasing the mouse button and going beyond the limits of the button image. We make a new modification in the script code for creating and placing relay elements on the page:
Instead of the HTML tag, we assigned the same JsClickRele () function to the handling of a button click, but clearly by the mouse-click event (without releasing). Additionally, they assigned the function ReleOnMouseUp () - as a handler for the release of the left mouse button button, and the function ReleOnMouseOut () - as the handler for the mouse exit event beyond the element to track when the mouse button is displayed outside the relay image. As an argument, the digital identifier of the relay number is passed to the functions (indexing starts from zero).
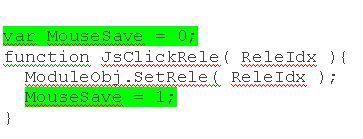
Let's make small modifications in the function called when the relay button is pressed.
We will create a special global variable to track the state of the mouse click that we need in the future. If the button is pressed, we raise the variable. The function of changing the state of the relay itself works according to the switching principle: each new access to it (SetRele ()) changes the state of the relay to the opposite.
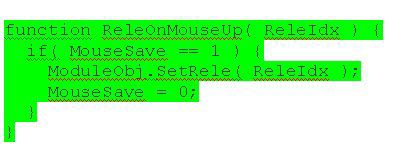
Next, create a function for releasing the mouse. If the mouse was pressed (we track it using the MouseSave variable), then we set the opposite state of the relay (ie, turn it off).
If the mouse was pressed, not released, and went beyond the relay image - we will also catch this situation with the help of our handler ReleOnMouseOut ():
Now you can begin to build the interface. To do this, run the executive BAT file LAURENT_RUN.bat located in the root of the SDK directory.
Run it. We receive a message about the successfully generated interface image:
Laurent_WI.bin interface file is created in the root directory.
It's time to load it into the module's memory. We connect the module to the network, go through the browser at the address (if you changed the IP address of the module - you should use its current address):
http://192.168.0.101/web_update
Enter login / password (by default admin / Laurent)
Select the Laurent_WI.bin file and click the Upload button.
The boot process takes 30-60 seconds. Upon its completion we will see a message of the form:
Go to the main page of the module. Do not forget to refresh the page. The browser can cache the old version of the page, and we will not see our changes.
Now we see two relays in the interface, and they work as we have programmed: in non-latching mode (the relay snaps back as soon as the left mouse button is pressed or out of the relay button image):
If you have any questions about the modified code - the original SDK project with the modifications made is attached to the article.
to be continued…
Source: https://habr.com/ru/post/261057/
All Articles