Unity 5 uNet is a new network subsystem. Study on authoritarian architecture
An example of implementing a network architecture in Unity3D with an authoritarian server
Due to the fact that:
a) the old Unity3D networking principles, as they say, are outdated;
b) I still did not understand how that witch had worked for me.
c) an intrusive new method appeared and began jumping into the eyes with each launch of Unity.
I decided that it was necessary to sort out the network exchange more closely and eliminate the “here be dragons” area.
I started punching the track in one direction - the authoritarian server. This means that gaming events, from turning to causing grave insults that are not compatible with virginity, are solved and executed exclusively by the server. The player has the right to only order the execution of his intentions from the server. This approach allows you to cut off many cheaters and hackers at once, who reversely engineer the client code and interfere with it. Of course, there are many other ways of cheating, but this is outside the scope of the study.
Task:
Form a sketch that implements an authoritarian architecture.Limitations:
In this study, I do not organize connection sessions - there are Unity3D “for dummies” methods for this.In this sketch, I will not name which keys to press. A reader who does not know how to do these actions in Unity3D is not really a ready reader for this article.
In this study, I will not solve the physics of the process, calculate aerodynamics, and so on. Here, only the order of interaction of network participants.
Required result:
The output should be an executable example in which you can see how the client interacts with the server, in detail and transparently.For this, I had to develop my own terminology. Without terminology, the problem was never given to me.
Terms:
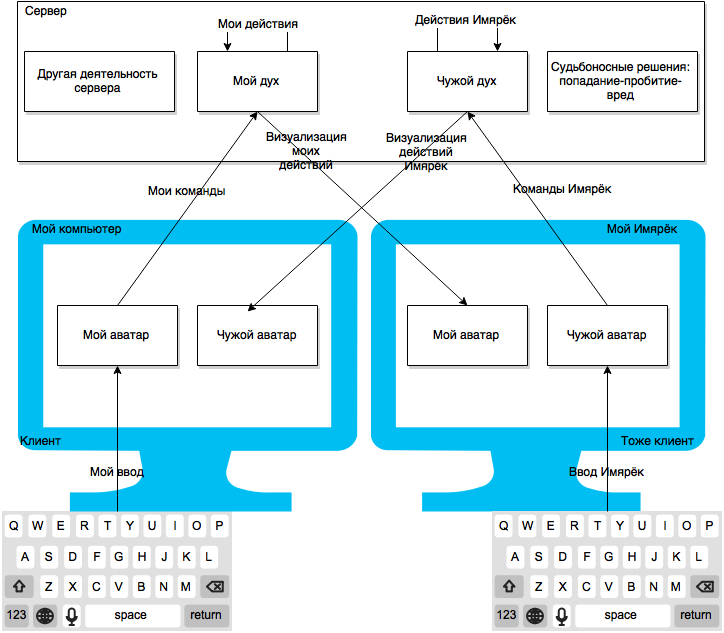
A server is a platform where code is executed that serves other people. Usually the person does not physically touch his console.The host is the platform where the server code is executed, however, one of the players simultaneously plays on it. Specifically, this mode is not considered, so the understanding of this mode is the sum of the understanding of how the server and the client work.
The client is the platform on which the code is executed, accountable to a specific player. Roughly speaking, your computer.
A unit is a game unit that represents a player in the game space, enchantment, character and so on.
The architecture of Unity3D is such that it is more understandable to try to write one control script for one unit, rather than try to write three different scripts: for my control, for the server view of my game personality, for foreign players on my computer. It is quite possible to write these three scripts, but this will entail subtleties that novice beginners need to learn (and I have not won them yet).
Therefore, the same module should be executed in three versions and copies, on my server and for someone else's player on my computer.
“I”, “my” - a code that perceives my intentions directly through the console, joystick, etc. (Display is optional ;-))
“Duh” is the code that is executed on the server, and only it can implement gaming solutions.
"My spirit" - the code on the server that translates my intentions into actions on the gaming scene.
"Alien spirit" - respectively, the code that implements the actions of others on the server.
“Avatar” is a code that reflects the actions of a player on my (or someone else’s) screen.
“My avatar” is a code that reflects the actions of my “Spirit”. “I” am “my avatar” to myself.
We will write a single script that satisfies these roles. Why the same script? Yes, simply because we leave on the same or comparable tanks. You do not force me to write one code for T-34, another for Panzer 4, the third for Sherman Mk.IVAY ?!
Forgive me for the invention of such a bike, but the annual lazy scrolling through the themes of the development of multiplayer showed that such terminology does not exist at all, and people try to explain in previously existing terms rather hard.
If this terminology is unpleasant for you, toss the minuses into karma and calmly disperse.
Here you go. As I said earlier, I decided to write in Unity3D a single script for me, my spirit and my avatar. And at the same time and "that guy." As, actually, universally recommends documentation Unity3D.
Fuh ... Ready?
Started.
1) Open Untiy3D, add land, for example, Plane. Scale the floor to 1000 * 1 * 1000.
2) Create a Material, paint it in the color RBG = 64: 80: 40. Assign it as a floor material. Just so that the white color does not blind us by default. I called it Ground.
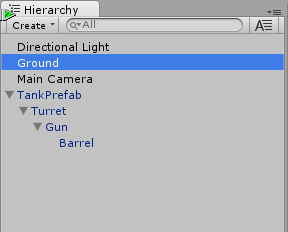
3) Add Cube to the scene. To it we add the RigidBody component, the mass of which we indicate 30 tons. Normal for an average tank. Rename Cube to Tank. Tank scale is set at (3: 2: 6). Raise it above the floor, indicating the Y coordinate equal to 1.1. At the same time, I advise you to leave X and Z zero.
4) Add Cube to the scene. Specify the scale (1.5: 1: 2). Call it Turret. Coordinates (0: 2.4: 1).
5) Add Cube to the scene. Indicate the scale (0.2: 0.2: 4) and coordinates (0: 2.5: 4). Let's call Barrel.
6) Add an empty GameObject to the stage, call Gun. Coordinates (0: 2.4: 2), the scale does not touch.
7) Attach the Turret object to the Tank object. Insert a Gun object into a Turret object. Insert the Barrel object into the Gun object.
8) I assigned Khaki material with color to parts of the tank (64:96:32). Just.
As a result, we get some kind of tank. If you ask why you need to invest Barrel in the Gun, I will answer - if you rotate the Barrel along the X axis, then the axis will not be there. And if you rotate the gun on the X axis, then ... in an acceptable range, the picture does not cause rabies. In fact, you will work with normal graphic models, in which the centers of rotation are specified correctly in the graphical editor, and you should not have such problems.
We go further.
We will focus on the article docs.unity3d.com/Manual/UNetConverting.html , but only to navigate. We will deviate from the article.
9) Create a GameObject on the stage and call it NetworkCommander. We add two components to it: NetworkManager and NetworkmanagerHUD. You need to make sure that the ShowRuntimeUI checkbox is enabled for the NetworkManagerHUD component. NetworkManager implements general network session management. For the simplicity of the players / developers, the NetworkManagerHUD component draws a simple menu on the screen, which contains the basic network actions - to serve the game, host the game, join the game.
10) Add the NetworkIdentity component to the Tank object. However, do not enable the LocalPlayerAuthority checkbox. We do not need this for an authoritarian architecture, and still it doesn’t make sense to us.
11) Make a Prefab from the tank - that is, copy it from the scene to the resources. Call TankPrefab.
12) In the NetworkCommander object in the SpawInfo section, paste TankPrefab into the PlayerPrefab field.
13) Create a C # ArmourDrive.cs script. We do not need the Start () procedure at this time. We only need Update ().
14) Enable the UnityEngine.Networking namespace. This will allow us to use the network functions of uNet.
15) Change ArmourDrive class from MonoBehaviour to NetworkBehaviour. This class extends the usual logic by adding network functions to it.
16) Create fields in the ArmourDrive class:
float veloMyMax = 10, veloMyCurr = 0; //, . , /. float veloSvrMax = 10, veloSvrCurr = 0; //, . , /. float periodSvrRpc = 0.02f; // , . float timeSvrRpcLast = 0; // 17) The current script will be executed at once in three places: I have to read my intentions (“I”), on the server to receive intentions and turn them into actions (“my spirit”), and on the computer of the guy for whom the actions will be draw ("my avatar"). We can distinguish these three incarnations with two variables.
The variable isServer means that this copy of the script is executed on the server and, in this case, is “my spirit”.
The variable isClient means that this copy of the script is executed on the client and, in this case, is “someone's avatar”.
The variable isLocalPlayer means that this is “my avatar”.
18) Let's form intentions inside the Update function:
if (this.isLocalPlayer) // { // float veloMyNew = 0; veloMyNew += Input.GetKey(KeyCode.W) ? veloMyMax : 0; veloMyNew += Input.GetKey(KeyCode.S) ? -veloMyMax : 0; if (veloMyCurr != veloMyNew) // , { CmdDrive(veloMyCurr = veloMyNew); } } 19) In order to send my intentions to the server, the programmer must: a) start the function name with the letters “Cmd”, b) when describing the function, mark it as executable on the server at the request of the client. Here is its text:
[Command(channel = 0)] void CmdDrive(float veloSvrNew) { if (this.isServer) // . { // . veloSvrNew = Mathf.Clamp(veloSvrNew, -veloSvrMax, veloSvrMax); // . veloSvrCurr = veloSvrNew; // . } } 20) Now the server should authoritatively move my tank. This can be done in the mentioned Update () function. However, the authors of Unity3D recommend physical calculations to be performed inside FixdUpdate (). We are not cool physics, but follow the advice:
void FixedUpdate() { if (this.isServer) // { // this.transform.Translate(0, 0, veloSvrCurr * Time.deltaTime, Space.Self); if (timeSvrRpcLast + periodSvrRpc < Time.time) // , { RpcUpdateUnitPosition(this.transform.position); RpcUpdateUnitOrientation(this.transform.rotation); timeSvrRpcLast = Time.time; } } } 21) Inversely, functions like Cmd are executed by Rpc functions — they are called by the server, and are executed on client machines. There are also syntax requirements here: the function must be marked [ClientRpc], and the name must begin with the letters “Rpc”. The server sent us new coordinates that came out of our speed requirement, and we need to move our unit to a new location.
[ClientRpc(channel = 0)] void RpcUpdateUnitPosition(Vector3 posNew) { if (this.isClient) // . { this.transform.position = posNew; } } Here one could insert a smooth approximation to these coordinates in order to avoid tank jerks on the display, but we will not be distracted by this.
22) Since the tank can randomly turn around (with a bump, etc.) during a linear movement, we should also set a new orientation for the tank
[ClientRpc(channel = 0)] void RpcUpdateUnitOrientation(Quaternion oriNew) { if (this.isClient) // . { this.transform.rotation = oriNew; } } 23) This script must be added to the tank prefab
24) Now we are almost ready to start the game. But there is a problem - it is usually more convenient to work with a game object on the stage, to configure it, to develop it. But at the start of the network game of this object on the scene should not be. Usually, various teachers on youtube erase this object from the stage before starting a game. But it is more convenient for me to turn it off, not to delete it. Turn off the Tank object on the stage or delete it (make sure the prefab exists!)
25) Now we are exactly ready to launch the game. Let's use the "Host" mode to create and enter the game quickly without any problems with running additional copies. Start and click in the dialog that NetworkManagerHud provides, the LAN (Host) button.
26) Op-pa. Tank drowned in the ground on the tower. This is because NetworkManager defaults the player at zero height, so that the bottom of the tank is already underground. With respawn players we can figure out later, and now for educational purposes, let us allow ourselves one crutch. Because we are now analyzing not the respawn, but the network movement. We write:
void Awake() { //: 110 , //TODO . this.transform.position = new Vector3(0, 1.1f, 0); } 27) Run the game again and again select the Host mode. Everything is normal, the tank moves forward and backward when pressed.

28) Now let's build Standalone so that we can run multiple copies of the game. Call Build Settings and Player options. Be sure to turn on the Run in Background checkbox - this will allow us to run several instances on the same computer without most of them hibernating. Also, let's turn off Default is Full Screen for the time being and set up a fine resolution of 400 * 300 for clarity. Since we no longer need more, turn off the Display Resolution Dialog to Disabled. Then run Build again and create the executable file.
29) We can run executable files several times.
30) We can include them in any combination - a host and two clients, or a server and two clients. Here is an example of a server and two clients.

Result
We can make sure that both tanks drive normally, the smoothness of synchronization for such an etude is more than acceptable.
But you can say, “Wait! After all, only forward-backward movement is realized! And where is the turn of the tank and the tower ?! ”
To this I have an answer like this:
Turning a tank, turret and cannon can be implemented absolutely analogous to moving back and forth.
Why did I implement network sharing exactly this way, and why do I throw this craft on Habr?
That's precisely because the tutorials on the new uNet network system are still scarce, scanty in quantity, and the methods that they instruct cannot turn parts of the tank, only the entire tank.
And here we considered (I hope) the intelligible logic of the network, which is valid for the movement of tank parts, for smoke, and for damage, and, in general, the shots themselves.
So it goes.
')
Source: https://habr.com/ru/post/261017/
All Articles