Ansible and ChatOps or how to manage 100+ servers from the chat
Updated: February 21, 2017
ChatOps is still fresh and rare in the DevOps world when working with infrastructure is transferred to a general chat. You can run commands directly from the chat, while the developers / system administrators see what is happening in real time, they can view the change history, run their teams, maintain communication around work, and even share experiences. Thus, information and workflow belong to the whole team - and this has many advantages.
You can think of such things as deploying code or deploying servers from a chat, viewing monitoring schedules, sending SMS, managing clusters, or simply launching shell commands. ChatOps can be a high-level view of your really complex CI / CD system, bringing simplicity with a command in a chat like this:! Deploy
')
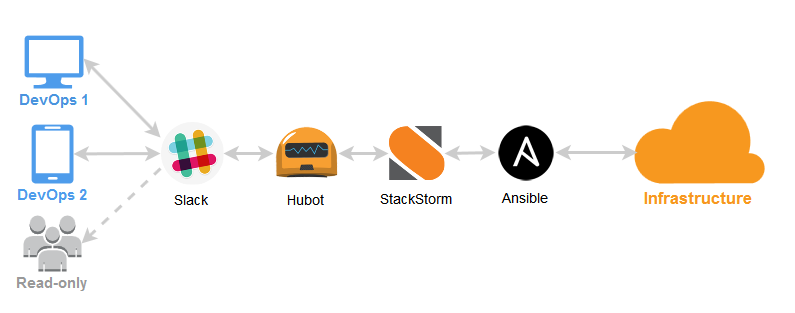
StackStorm - OpenSource project with special attention to automation and ChatOps. The platform connects a huge number of existing DevOps tools like configuration management, monitoring, graphs, alerts, and so on. together, allowing everyone to rule from a single checkpoint. And this is ideal from the point of view of ChatOps - you can create and automate imaginable and inconceivable workflows, controlling any set of tools directly from the chat.
In StackStorm there is Ansible integration and starting with <1.0 versions, even more ChatOps features in 1.2 and 1.4 releases are added, which opens the way for real use of ChatOps, not just posting photos of funny cats using a bot. In this article we will explain how to make ChatOps and Ansible work using the StackStorm platform.
First, we are going to install a control machine that will run under Ubuntu 14. Then we will configure the StackStorm platform on it, including the Ansible management packs and the Hubot framework ChatOps. Finally, we will connect the entire system to the Slack chat, and show some simple but real examples of interactive use of Ansible.
Let's start, and at the same time, we will check how far we have come and come the technological singularity , giving root access to some chat bots and allowing them to manage our 100+ servers or even data centers (by the way, RackSpace works with ChatOps).
As already mentioned, we will use Slack.com as a chat platform (although other integrations are available). Sign up for a Slack account if you don’t have one yet. Enable the integration of Hubot in the settings.

As a result, Slack will give you an API token like:
Next, we set up the StackStorm platform, show real examples of usage, and of course, tell you how to create your own ChatOps commands.
But wait, there is an easy way!
For those who are lazy (most DevOps developers are), there is a specially prepared repository from Vagrant that installs everything you need using the simplest bash scripts, taking you from the start line right to the finish line, allowing you to immediately start ChatOps commands from the Slack chat showcase after the automatic installation -ansible-chatops :
For those who are interested in the details - switch from automatic to manual mode and go through all the steps. Just keep in mind if something goes wrong - check out examples from the ansible & chatops demo repository .
Installation is simple. Total 1 team:
The idea of integration packs (plug-ins) in StackStorm is that they connect the system with other tools and external services.
So, we need Ansible pack, install:
Ansible C will be available in Python virtualenv:
Now you need to configure the
After the changes, do not forget to restart the service:
At this stage, the Stanley bot should be online in the chat. To invite him to a certain Slack room:
Get a list of available commands:
Surely you will like shipit :
Having played enough with the existing teams, we will deal with really serious things.
One of the features of StackStorm is the ability to create simple aliases / wrappers around commands, making it easier to work with ChatOps. Instead of typing a long command, you can simply bind it into something more friendly and light, syntactic sugar.
So, create your own StackStorm pack that will contain the commands we need. Forknite StackStorm template pack on GitHub. Our first action alias
Send changes to the newly created GitHub repository and you can install our pack. For this, there is already a ChatOps alias:
Now you can run simple Ansible ad-hoc commands directly from the Slack chat:

At a low level, this is the same as:
But let's look at more useful examples of interactive ChatOps.
Ansible has a ping module that connects to hosts and returns
To do this, create an
Action
Action alias
Make sure you add the necessary hosts to the Ansible inventory file:
After sending the code to the repository, do not forget to reload your pack from the chat:
It is very convenient that we can store all our ChatOps settings in the form of a st2 pack and pick up changes from the repository - infrastructure as a code.
The result of the newly created Slack team:
This is really convenient, even your CEO can see the status without having access to the servers! With this approach, communication, deployment and work around the infrastructure can occur right in the chat: whether you are in the office or working remotely (some of us can work directly from the beach).
Has it ever happened to you that a simple restart of the service helped? Not an ideal way, but often a quick fix is a must. Let's create a ChatOps command that would overload the specified service on certain servers.
The task to get this design:
To do this, in the existing st2 package, create the
ChatOps
Result:
And you know what? Thanks to the Slack mobile app, you can restart services right from your phone!
We want to create a simple Slack command that displays a list of executed SQL queries on the MySQL server:
Action
Action alias for ChatOps:
Note that we made the
Your DBA will be happy!
We want to get an array of HTTP status codes from the nginx log, sort them according to the number and display them nicely in the chat in order to understand how many
To do this, create an action that runs the shell command,
Alias

More and more, it looks like aflight control control center. You can run entire chains of commands on servers directly from the chat and everyone can see the result in real time. Fine!
Imagine that you urgently need to eliminate another critical vulnerability like Shellshock . To do this, you need to update
It can be seen that the playbook variables
Action alias, which makes it possible to launch the playbook as a simple ChatOps command,
Here she is:

An important part of DevOps engineer work is process improvement, making the work of developers easier, team communication is better, problem diagnosis is faster through automation and the use of the right tools — all to make the company more successful.
ChatOps helps solve these problems in a completely new, effective way!
As you know, Ansible
Install the utility for starters:
Action
Alias
Call Sacred ChatOps Cow:
These were simple but combat examples of use. More complex things when several DevOps tools are connected to a dynamic workflow will be shown in the following articles. Here StackStorm demonstrates all its power, making decisions depending on the situation: this is called event-oriented architecture like self-restoring systems after the incident.
Thank you for your attention, I hope it turned out to highlight the features of this fairly new approach in the world of DevOps.
And for what cases would you use ChatOps? Please share ideas and stories (we love stories).
What is ChatOps?
ChatOps is still fresh and rare in the DevOps world when working with infrastructure is transferred to a general chat. You can run commands directly from the chat, while the developers / system administrators see what is happening in real time, they can view the change history, run their teams, maintain communication around work, and even share experiences. Thus, information and workflow belong to the whole team - and this has many advantages.
You can think of such things as deploying code or deploying servers from a chat, viewing monitoring schedules, sending SMS, managing clusters, or simply launching shell commands. ChatOps can be a high-level view of your really complex CI / CD system, bringing simplicity with a command in a chat like this:! Deploy
!deploy that thing . This approach does wonders for improving visibility and reducing complexity around the deployment process.')
Superior ChatOps
StackStorm - OpenSource project with special attention to automation and ChatOps. The platform connects a huge number of existing DevOps tools like configuration management, monitoring, graphs, alerts, and so on. together, allowing everyone to rule from a single checkpoint. And this is ideal from the point of view of ChatOps - you can create and automate imaginable and inconceivable workflows, controlling any set of tools directly from the chat.
In StackStorm there is Ansible integration and starting with <1.0 versions, even more ChatOps features in 1.2 and 1.4 releases are added, which opens the way for real use of ChatOps, not just posting photos of funny cats using a bot. In this article we will explain how to make ChatOps and Ansible work using the StackStorm platform.
By the way, StackStorm, like Ansible, is declarative, written in Python and uses Yaml + Jinja, which will make it easier for you to figure it out.
Plan
First, we are going to install a control machine that will run under Ubuntu 14. Then we will configure the StackStorm platform on it, including the Ansible management packs and the Hubot framework ChatOps. Finally, we will connect the entire system to the Slack chat, and show some simple but real examples of interactive use of Ansible.
Let's start, and at the same time, we will check how far we have come and come the technological singularity , giving root access to some chat bots and allowing them to manage our 100+ servers or even data centers (by the way, RackSpace works with ChatOps).
Step 0. Preparing Slack
As already mentioned, we will use Slack.com as a chat platform (although other integrations are available). Sign up for a Slack account if you don’t have one yet. Enable the integration of Hubot in the settings.
Hubot - bot framework from GitHub, created specifically for ChatOps
As a result, Slack will give you an API token like:
HUBOT_SLACK_TOKEN=xoxb-5187818172-I7wLh4oqzhAScwXZtPcHyxCu Next, we set up the StackStorm platform, show real examples of usage, and of course, tell you how to create your own ChatOps commands.
But wait, there is an easy way!
For the most lazy
For those who are lazy (most DevOps developers are), there is a specially prepared repository from Vagrant that installs everything you need using the simplest bash scripts, taking you from the start line right to the finish line, allowing you to immediately start ChatOps commands from the Slack chat showcase after the automatic installation -ansible-chatops :
# export HUBOT_SLACK_TOKEN=xoxb-5187818172-I7wLh4oqzhAScwXZtPcHyxCu git clone https://github.com/StackStorm/showcase-ansible-chatops.git cd showcase-ansible-chatops vagrant up For those who are interested in the details - switch from automatic to manual mode and go through all the steps. Just keep in mind if something goes wrong - check out examples from the ansible & chatops demo repository .
Step 1. Install StackStorm
Installation is simple. Total 1 team:
curl -sSL https://stackstorm.com/packages/install.sh | sudo bash -- --user=demo --password=demo Keep in mind, this is for demonstration purposes. When deploying production, use Ansible playbooks , verify signatures and do not trust the installation commands on one line! Installation details are described in the documentation: docs.stackstorm.com/install/deb.html
Step 2. Install the StackStorm plugin: Ansible
The idea of integration packs (plug-ins) in StackStorm is that they connect the system with other tools and external services.
So, we need Ansible pack, install:
st2 pack install ansible Ansible C will be available in Python virtualenv:
/opt/stackstorm/virtualenvs/ansibleA complete list of integrations: exchange.stackstorm.org , among them:AWS,GitHub,RabbitMQ,Pagerduty,Jenkins,Nagios,Docker, - more than 100+ in total!
Step 3. Configure ChatOps
Now you need to configure the
/opt/stackstorm/chatops/st2chatops.env file with environment variables. This is how it looked for a Slack bot named stanley : # Bot name export HUBOT_NAME=stanley export HUBOT_ALIAS='!' # StackStorm API key # Use: `st2 apikey create -k` to generate # Replace with your key (!) export ST2_API_KEY="123randomstring789" # ST2 AUTH credentials # Replace with your username/password (!) export ST2_AUTH_USERNAME="demo" export ST2_AUTH_PASSWORD="demo" # Configure Hubot to use Slack export HUBOT_ADAPTER="slack" # Replace with your token (!) export HUBOT_SLACK_TOKEN="xoxb-5187818172-I7wLh4oqzhAScwXZtPcHyxCu" After the changes, do not forget to restart the service:
sudo service st2chatops restart Step 4. First ChatOps experience
At this stage, the Stanley bot should be online in the chat. To invite him to a certain Slack room:
/invite @stanley Get a list of available commands:
!help Surely you will like shipit :
!ship it Having played enough with the existing teams, we will deal with really serious things.
Step 5. Creating your own ChatOps commands
One of the features of StackStorm is the ability to create simple aliases / wrappers around commands, making it easier to work with ChatOps. Instead of typing a long command, you can simply bind it into something more friendly and light, syntactic sugar.
So, create your own StackStorm pack that will contain the commands we need. Forknite StackStorm template pack on GitHub. Our first action alias
aliases/ansible.yaml : --- name: "chatops.ansible_local" action_ref: "ansible.command_local" description: "Run Ansible command on local machine" formats: - display: "ansible <command>" representation: - "ansible {{ args }}" result: format: | Ansible command `{{ execution.parameters.args }}` result: {~} {% if execution.result.stderr %}*Stdout:* {% endif %} ```{{ execution.result.stdout }}``` {% if execution.result.stderr %}*Stderr:* ```{{ execution.result.stderr }}```{% endif %} extra: slack: color: "{% if execution.result.succeeded %}good{% else %}danger{% endif %}" For reference: the above alias uses ansible st2 integration pack
Send changes to the newly created GitHub repository and you can install our pack. For this, there is already a ChatOps alias:
!pack install https://github.com/armab/st2_chatops_aliases Now you can run simple Ansible ad-hoc commands directly from the Slack chat:
!ansible "uname -a" At a low level, this is the same as:
/opt/stackstorm/virtualenvs/ansible/bin/ansible all --connection=local --args='uname -a' --inventory-file='127.0.0.1,' But let's look at more useful examples of interactive ChatOps.
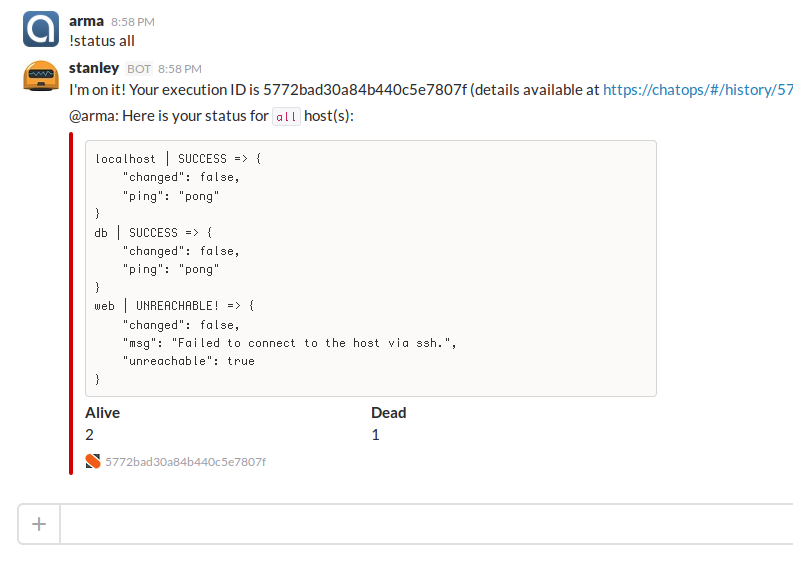
Example 1. We get the status of servers
Ansible has a ping module that connects to hosts and returns
pong if successful. A simple but powerful example that allows you to understand the status of servers directly from the chat in a matter of seconds without the need to enter the terminal.To do this, create an
action in our pack that launches the real command and action alias , which is syntactic sugar for the action and allows you to create such a ChatOps structure: !status 'web' Action
actions/server-status.yaml : --- name: server_status description: Show server status by running ansible ping ad-hoc command runner_type: local-shell-cmd entry_point: "" enabled: true parameters: sudo: description: "Run command with sudo" type: boolean immutable: true default: true kwarg_op: immutable: true cmd: description: "Command to run" type: string immutable: true default: "/opt/stackstorm/virtualenvs/ansible/bin/ansible {{hosts}} --module-name=ping" hosts: description: "Ansible hosts to ping" type: string required: true By the way, in addition tobashscripts, Action can work with the Python runner, or in general with any binary that can returnjson, here is all the flexibility of use.
Action alias
aliases/server_status.yaml : --- name: chatops.ansible_server_status action_ref: st2_chatops_aliases.server_status description: Show status for hosts (ansible ping module) formats: - display: "status <hosts>" representation: - "status {{ hosts }}" - "ping {{ hosts }}" result: format: | Here is your status for `{{ execution.parameters.hosts }}` host(s): {~} ```{{ execution.result.stdout }}``` extra: slack: color: "{% if execution.result.succeeded %}good{% else %}danger{% endif %}" fields: - title: Alive value: "{{ execution.result.stdout|regex_replace('(?!SUCCESS).', '')|wordcount }}" short: true - title: Dead value: "{{ execution.result.stdout|regex_replace('(?!UNREACHABLE).', '')|wordcount }}" short: true footer: "{{ execution.id }}" footer_icon: "https://stackstorm.com/wp/wp-content/uploads/2015/01/favicon.png" Make sure you add the necessary hosts to the Ansible inventory file:
/etc/ansible/hostsAfter sending the code to the repository, do not forget to reload your pack from the chat:
!pack install armab/st2_chatops_aliases It is very convenient that we can store all our ChatOps settings in the form of a st2 pack and pick up changes from the repository - infrastructure as a code.
The result of the newly created Slack team:
This is really convenient, even your CEO can see the status without having access to the servers! With this approach, communication, deployment and work around the infrastructure can occur right in the chat: whether you are in the office or working remotely (some of us can work directly from the beach).
Example 2. Restarting services
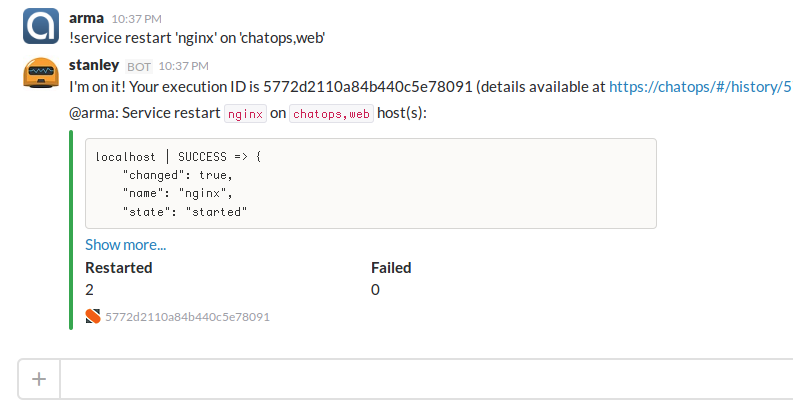
Has it ever happened to you that a simple restart of the service helped? Not an ideal way, but often a quick fix is a must. Let's create a ChatOps command that would overload the specified service on certain servers.
The task to get this design:
!service restart "rabbitmq-server" on "mq-01" To do this, in the existing st2 package, create the
actions/service_restart.yaml : --- name: service_restart description: Restart service on remote hosts runner_type: local-shell-cmd entry_point: "" enabled: true parameters: sudo: description: "Run command with sudo" type: boolean immutable: true default: true kwarg_op: immutable: true cmd: description: "Command to run" type: string immutable: true default: "/opt/stackstorm/virtualenvs/ansible/bin/ansible {{hosts}} --become --module-name=service --args='name={{service_name}} state=restarted'" hosts: description: "Ansible hosts" type: string required: true service_name: description: "Service to restart" type: string required: true ChatOps
aliases/service_restart.yaml alias: --- name: chatops.ansible_service_restart action_ref: st2_chatops_aliases.service_restart description: Restart service on remote hosts formats: - display: "service restart <service_name> on <hosts>" representation: - "service restart {{ service_name }} on {{ hosts }}" result: format: | Service restart `{{ execution.parameters.service_name }}` on `{{ execution.parameters.hosts }}` host(s): {~} {% if execution.result.stderr %} *Exit Status*: `{{ execution.result.return_code }}` *Stderr:* ```{{ execution.result.stderr }}``` *Stdout:* {% endif %} ```{{ execution.result.stdout }}``` extra: slack: color: "{% if execution.result.succeeded %}good{% else %}danger{% endif %}" fields: - title: Restarted value: "{{ execution.result.stdout|regex_replace('(?!SUCCESS).', '')|wordcount }}" short: true - title: Failed value: "{{ execution.result.stdout|regex_replace('(?!(FAILED|UNREACHABLE)!).', '')|wordcount }}" short: true footer: "{{ execution.id }}" footer_icon: "https://stackstorm.com/wp/wp-content/uploads/2015/01/favicon.png" Result:
And you know what? Thanks to the Slack mobile app, you can restart services right from your phone!
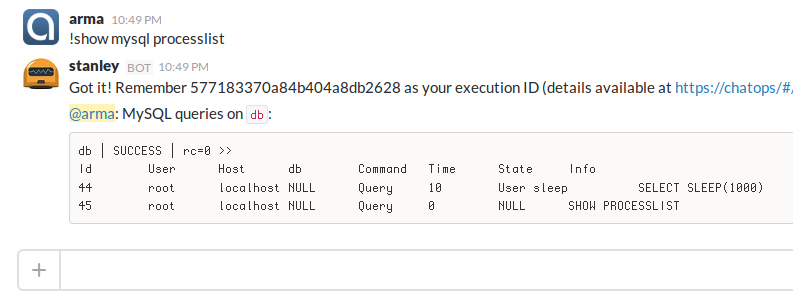
Example 3. MySQL processlist
We want to create a simple Slack command that displays a list of executed SQL queries on the MySQL server:
!show mysql processlist Action
actions/mysql_processlist.yaml : --- name: mysql_processlist description: Show MySQL processlist runner_type: local-shell-cmd entry_point: "" enabled: true parameters: sudo: immutable: true default: true kwarg_op: immutable: true cmd: description: "Command to run" type: string immutable: true default: "/opt/stackstorm/virtualenvs/ansible/bin/ansible {{ hosts }} --become --become-user=root -m shell -a \"mysql --execute='SHOW PROCESSLIST;' | expand -t 10\"" hosts: description: "Ansible hosts" type: string default: db Action alias for ChatOps:
aliases/mysql_processlist.yaml : --- name: chatops.mysql_processlist action_ref: st2_chatops_aliases.mysql_processlist description: Show MySQL processlist formats: - display: "show mysql processlist <hosts=db>" representation: - "show mysql processlist {{ hosts=db }}" - "show mysql processlist on {{ hosts=db }}" result: format: | {% if execution.status == 'succeeded' %}MySQL queries on `{{ execution.parameters.hosts }}`: ```{{ execution.result.stdout }}```{~}{% else %} *Exit Code:* `{{ execution.result.return_code }}` *Stderr:* ```{{ execution.result.stderr }}``` *Stdout:* ```{{ execution.result.stdout }}``` {% endif %} Note that we made the
hosts parameter optional ( db by default), so these two commands are equivalent: !show mysql processlist !show mysql processlist 'db' Your DBA will be happy!
Example 4. Get HTTP statistics from nginx
We want to get an array of HTTP status codes from the nginx log, sort them according to the number and display them nicely in the chat in order to understand how many
200 or 50x errors 50x on the web servers, whether they are normal or not: !show nginx stats on 'web' To do this, create an action that runs the shell command,
actions/http_status_codes.yaml : --- name: http_status_codes description: Show sorted http status codes from nginx logs runner_type: local-shell-cmd entry_point: "" enabled: true parameters: sudo: immutable: true default: true kwarg_op: immutable: true cmd: description: "Command to run" type: string immutable: true default: "/opt/stackstorm/virtualenvs/ansible/bin/ansible {{ hosts }} --become -m shell -a \"awk '{print \\$9}' /var/log/nginx/access.log|sort |uniq -c |sort -k1,1nr 2>/dev/null|column -t\"" hosts: description: "Ansible hosts" type: string required: true Alias
aliases/http_status_codes.yaml : --- name: chatops.http_status_codes action_ref: st2_chatops_aliases.http_status_codes description: Show sorted http status codes from nginx on hosts formats: - display: "show nginx stats on <hosts>" representation: - "show nginx stats on {{ hosts }}" result: format: "```{{ execution.result.stdout }}```" Thanks to Brian Coca , Ansible core developer for a great idea!
More and more, it looks like a
Example 5. Security patching
Imagine that you urgently need to eliminate another critical vulnerability like Shellshock . To do this, you need to update
bash on all servers. Ansible perhaps the perfect tool for such atomic operations. But instead of running a single-line ansible command, let's create a good playbook:playbooks/update_package.yaml : --- - name: Update package on remote hosts, run on 25% of servers at a time hosts: "{{ hosts }}" serial: "25%" become: True become_user: root tasks: - name: Check if Package is installed command: dpkg-query -l {{ package }} register: is_installed failed_when: is_installed.rc > 1 changed_when: no - name: Update Package only if installed apt: name={{ package }} state=latest update_cache=yes cache_valid_time=600 when: is_installed.rc == 0 Playbook update the package only if it is already installed, the operation is performed on 20% of the hosts at a time, those in 5 steps. It is useful when you need to update something more serious like nginx on a really large number of servers. Thus, we do not send the entire web cluster to down. Additionally, you can add disconnection from the load balancer groups. An example from real life.It can be seen that the playbook variables
{{hosts}} and {{package}} come from somewhere outside, namely from the action in our StackStorm actions/update_package.yaml : --- name: update_package description: Update package on remote hosts runner_type: local-shell-cmd entry_point: "" enabled: true parameters: sudo: immutable: true default: true kwarg_op: immutable: true timeout: default: 6000 cmd: description: "Command to run" immutable: true # default: "/opt/stackstorm/virtualenvs/ansible/bin/ansible-playbook /opt/stackstorm/packs/${ST2_ACTION_PACK_NAME}/playbooks/update_package.yaml --extra-vars='hosts={{ hosts }} package={{ package }}'" hosts: description: "Ansible hosts" type: string required: true package: description: "Package to upgrade" type: string required: true Action alias, which makes it possible to launch the playbook as a simple ChatOps command,
aliases/update_package.yaml : --- name: chatops.ansible_package_update action_ref: st2_chatops_aliases.update_package description: Update package on remote hosts formats: - display: "update <package> on <hosts>" representation: - "update {{ package }} on {{ hosts }}" - "upgrade {{ package }} on {{ hosts }}" result: format: | Update package `{{ execution.parameters.package }}` on `{{ execution.parameters.hosts }}` host(s): {~} {% if execution.result.stderr %} *Exit Status*: `{{ execution.result.return_code }}` *Stderr:* ```{{ execution.result.stderr }}``` *Stdout:* {% endif %} ```{{ execution.result.stdout }}``` extra: slack: color: "{% if execution.result.succeeded %}good{% else %}danger{% endif %}" fields: - title: Updated nodes value: "{{ execution.result.stdout|regex_replace('(?!changed=1).', '')|wordcount }}" short: true - title: Executed in value: ":timer_clock: {{ execution.elapsed_seconds | to_human_time_from_seconds }}" short: true footer: "{{ execution.id }}" footer_icon: "https://stackstorm.com/wp/wp-content/uploads/2015/01/favicon.png" Here she is:
!update 'bash' on 'all' An important part of DevOps engineer work is process improvement, making the work of developers easier, team communication is better, problem diagnosis is faster through automation and the use of the right tools — all to make the company more successful.
ChatOps helps solve these problems in a completely new, effective way!
In conclusion. Holy cow
As you know, Ansible
cowsay . Let's transfer it to ChatOps!Install the utility for starters:
sudo apt-get install cowsay Action
actions/cowsay.yaml : --- name: cowsay description: Draws a cow that says what you want runner_type: local-shell-cmd entry_point: "" enabled: true parameters: sudo: immutable: true kwarg_op: immutable: true cmd: description: "Command to run" type: string immutable: true default: "/usr/games/cowsay {{message}}" message: description: "Message to say" type: string required: true Alias
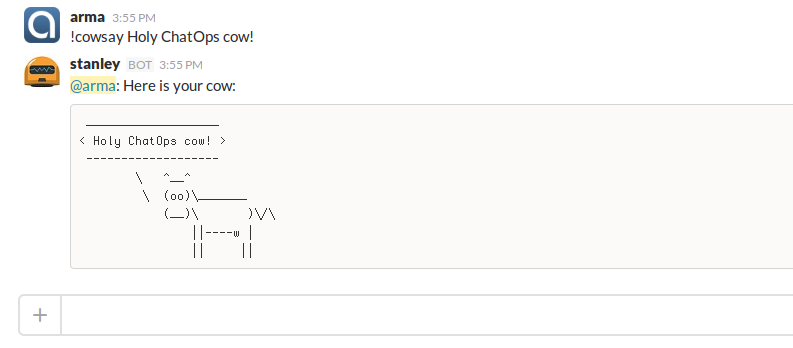
aliases/cowsay.yaml : --- name: chatops.cowsay action_ref: st2_chatops_aliases.cowsay description: Draws a cow that says what you want formats: - display: "cowsay <message>" representation: - "cowsay {{ message }}" ack: enabled: false result: format: | {% if execution.status == 'succeeded' %}Here is your cow: ```{{ execution.result.stdout }}``` {~}{% else %} Sorry, no cows this time {~} Exit Code: `{{ execution.result.return_code }}` Stderr: ```{{ execution.result.stderr }}``` Hint: Make sure `cowsay` utility is installed. {% endif %} Call Sacred ChatOps Cow:
!cowsay 'Holy ChatOps Cow!' For reference: All the results of command execution can be viewed in the StackStorm control panel.
https: // chatops / login:demopassword:demo
(replace hostname with IP if you haven’t used the Vagrant demo )
Do not stop there!
These were simple but combat examples of use. More complex things when several DevOps tools are connected to a dynamic workflow will be shown in the following articles. Here StackStorm demonstrates all its power, making decisions depending on the situation: this is called event-oriented architecture like self-restoring systems after the incident.
If you did not find the required functionality in StackStorm, suggest an idea or add a Pull Request to GitHub (Python is our main language). There is also a community where you can ask a question or share your experience: a public Slack channel (with a pre-installed demo bot) and IRC:#StackStormon freenode.net .
Thank you for your attention, I hope it turned out to highlight the features of this fairly new approach in the world of DevOps.
And for what cases would you use ChatOps? Please share ideas and stories (we love stories).
Source: https://habr.com/ru/post/260917/
All Articles