Quick Start Template for Arduino Due at QtCreator
This is already the 3rd year as I can’t rejoice at Qt. I find only virtues in it. It allows almost everything. And that does not allow, but it is very necessary - you can add and use. It happened this time.
For some reason, I had an attitude to Arduino like a toy. Until I came across an Arduino Due. Hooked the line in the description of the module that it is built on the controller ATSAM3X8E (core Cortex M3). The fact is that I am familiar with this controller (or rather, with its younger version) firsthand.
')
The second - and this made him already buy - this is the price. I have experience developing iron on a similar controller (I developed a car tracker), and this experience persistently whispered that the price for a module with delivery of $ 15 at the cost of only the controller on the DJ at 12 $ is very profitable. The bonus was an integrated power supply with an input voltage range from 18V to 7V, 2 USB (Programming and Native).
The module came quickly enough. Then the dancing began.
The fact is that when I was my own design engineer, the main IDE for me was IAR, and the system was Windows. Now the main work is connected with writing applications for Linux. That is, Qt and Ubuntu respectively. Going along the path of least resistance, I installed an IDE from Arduino. I started and immediately realized that this was not for me. The overall impression is a notebook.
I decided to develop something in Qt Creator. Having researched the Internet on the topic “it can be and can be applied at home,” I realized: a lot of information regarding Arduino is written for AVR-based modules. According to the Arduino Due information the cat wept. A necessary and not at all. This is one of the reasons why I am writing this article. Disappointed, he began to dig in the direction of Qt - Cortex-M3 / M4. Having adopted the articles "We program microcontrollers in QtCreator" and "We program stm32 microcontrollers with QtCreator" . Began to create. I will say right away - the articles asked only the direction.
Like any programmer, I'm a little lazy. Therefore, I decided to make a template for Qt so that I was always at hand.
First, install Qt Creator and Arduino IDE. How to set - information the sea. I will not stop.
In the Arduino IDE install support modules Arduino Due. In the future I will lead the story for Linux. Sapienti sat, as they say. For some reason, it is installed in the hidden folder [home_path] /. Arduino15. We correct this defect - we copy (or transfer - as you like) the [home_path] /. Arduino15 / packages / arduino / hardware / sam / 1.6.4 folder to the [arduino_path] / hardware / sam folder,
the [home_path] /. arduino15 / packages / arduino / tools folder in the [arduino_path] / hardware / tools folder
. In the [arduino_path] / hardware / arduino / sam / cores / arduino folder, delete (rename) the main.cpp file. If necessary, download the FreeRTOS port and put it in the [arduino_path] / libraries folder. Next, we drag the templates from the githaba and copy them to the [qt_path] / Tools / QtCreator / share / qtcreator / templates / wizards folder . At this training is over.
Using
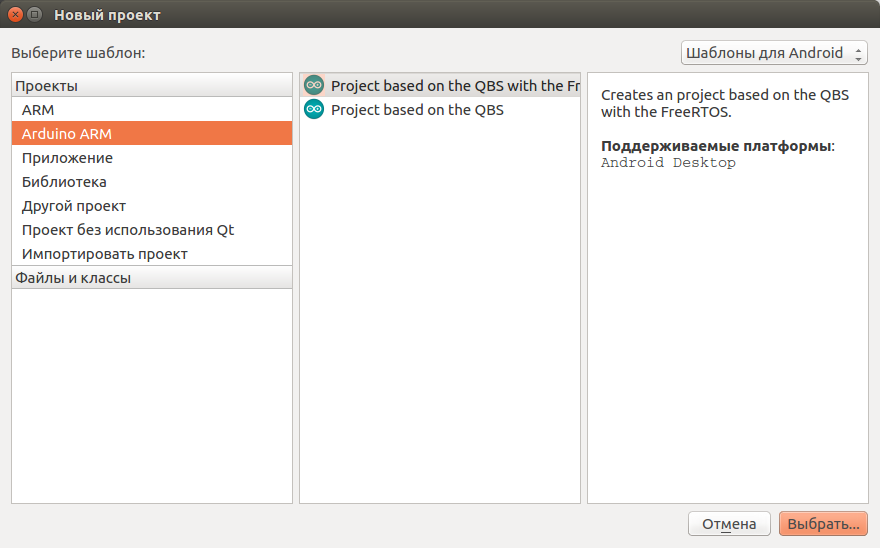
We join Arduino Due through the Programming Port (through the Native Port, you will need to manually erase and reset the chip). We start QtCreator. Click "New project" and see on the left a new menu item "Arduino ARM" (see the top screen). Select the desired item and click "Select ...":
Further:
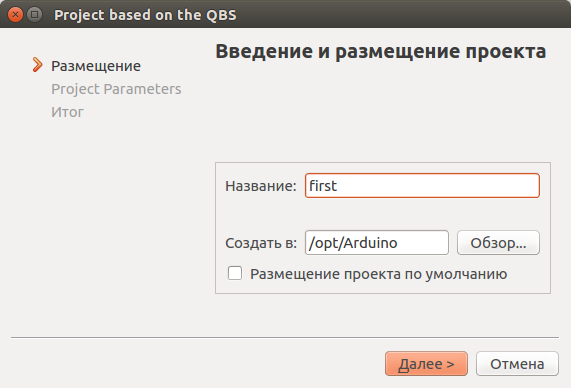
Here we prescribe the path:
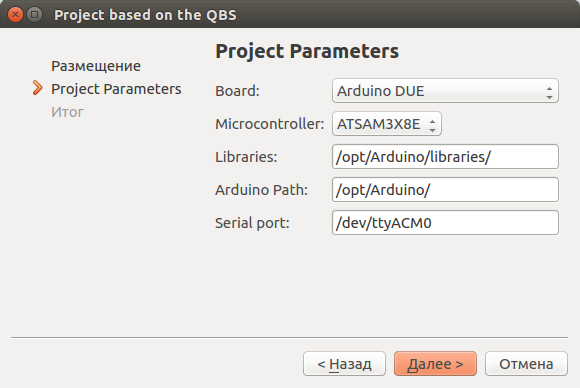
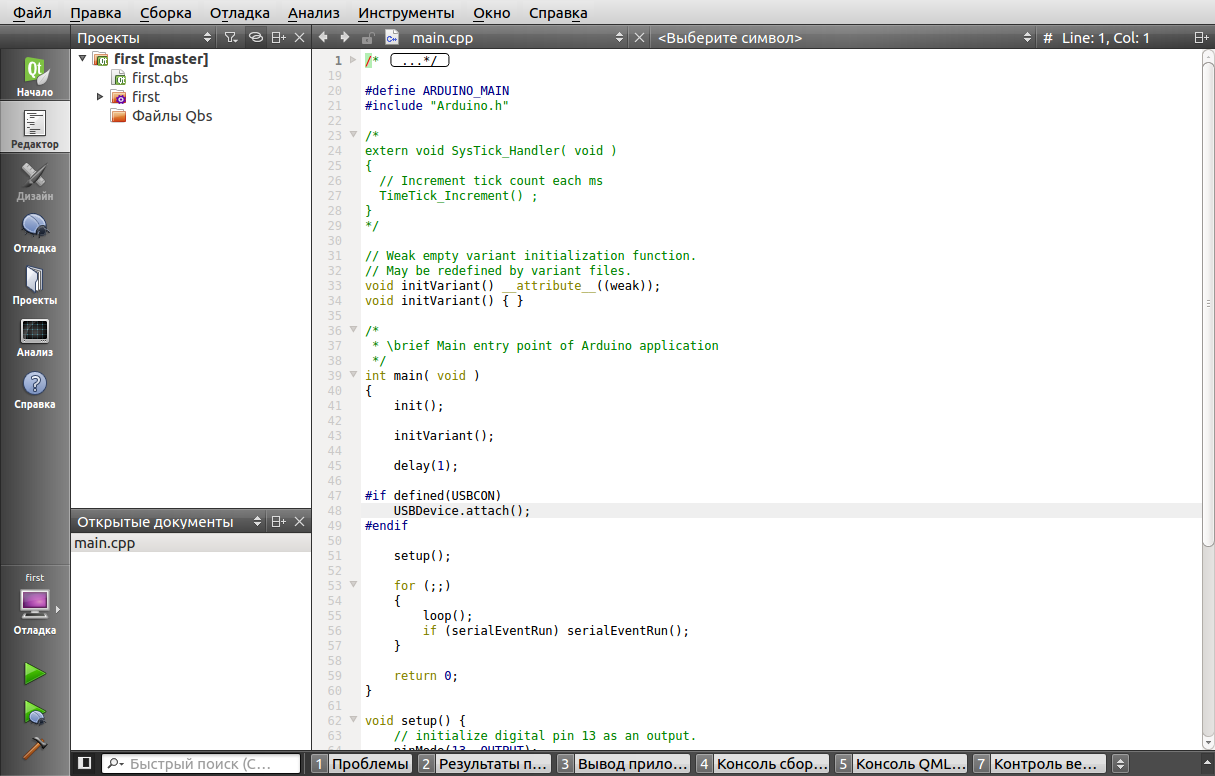
We get the project:
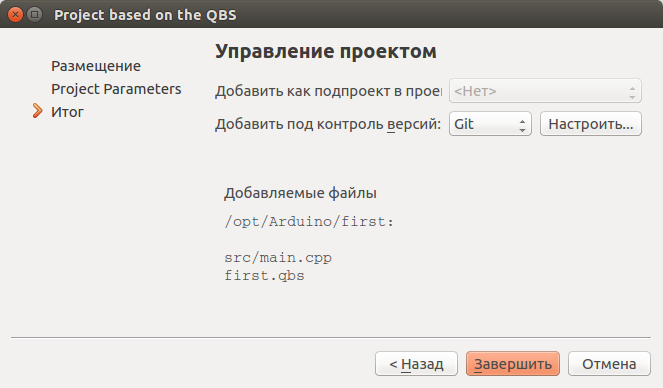
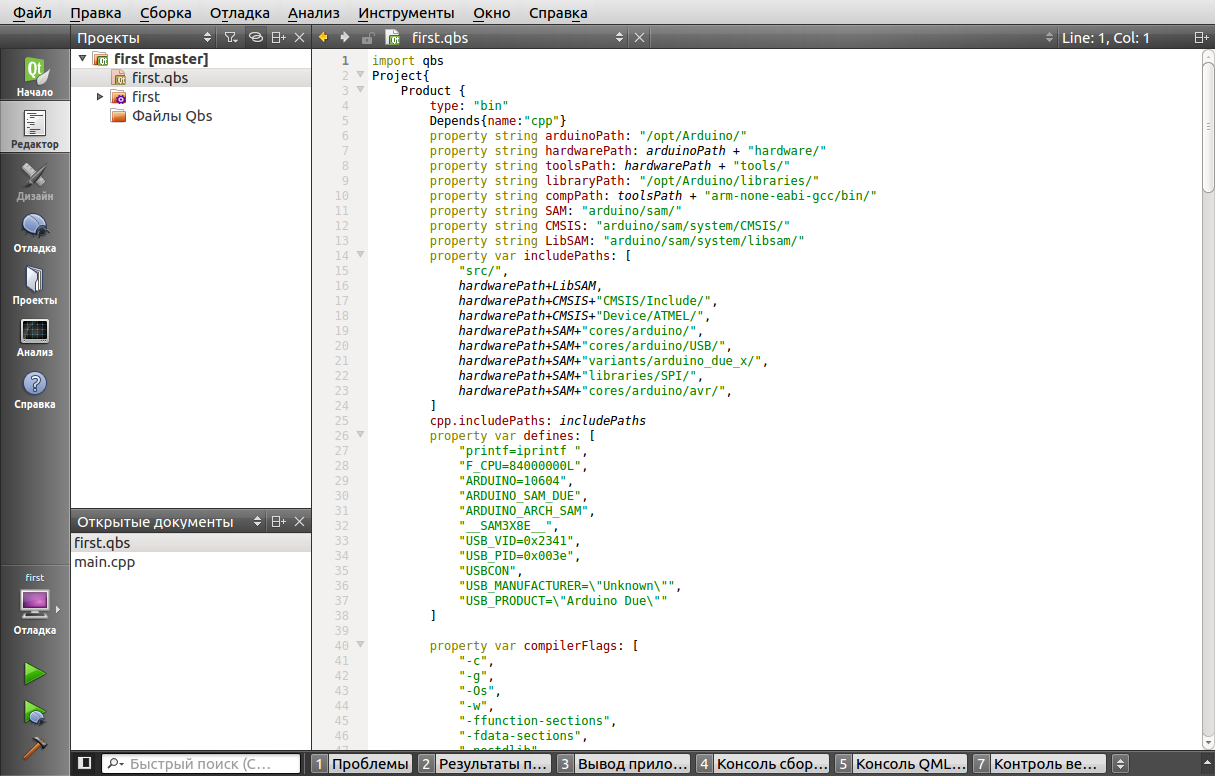
Open the qbs-file and check the paths. In principle, if everything was done as it was said at the previous stages, everything should be in order. But it is better to double-check:
Next, go to the "Projects" tab "Launch" of the current set:
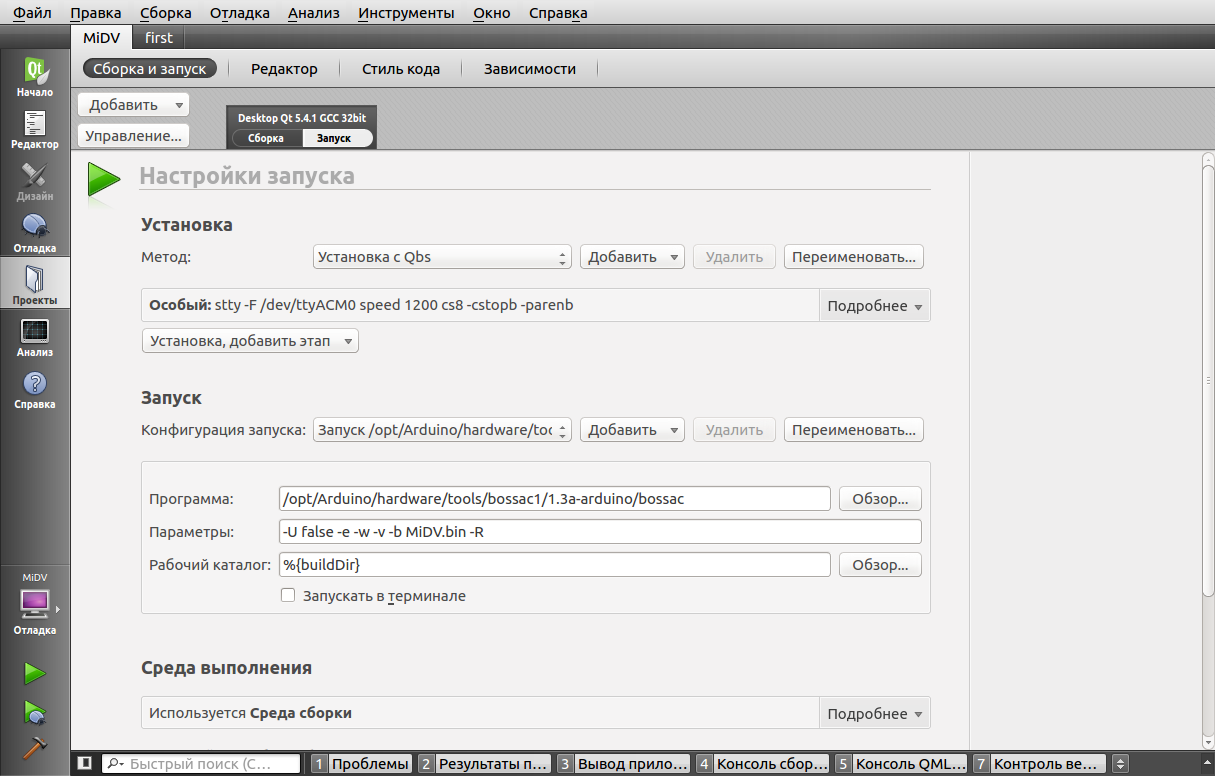
In the “Installation” stage, we clear the current method and click “Installation, add stage”. Select “Special” and write stty in the “Command” line. In the line “Parameters” -F your_port speed 1200 cs8 -cstopb -parenb , where instead of your_port we substitute our port.
Moving on to the “Launch” stage. In the line "Team" choose the program bossac . In the line “Parameters” -U false -e -w -v -b your_progect_name.bin -R , where instead of your_progect_name we substitute the name of the project.
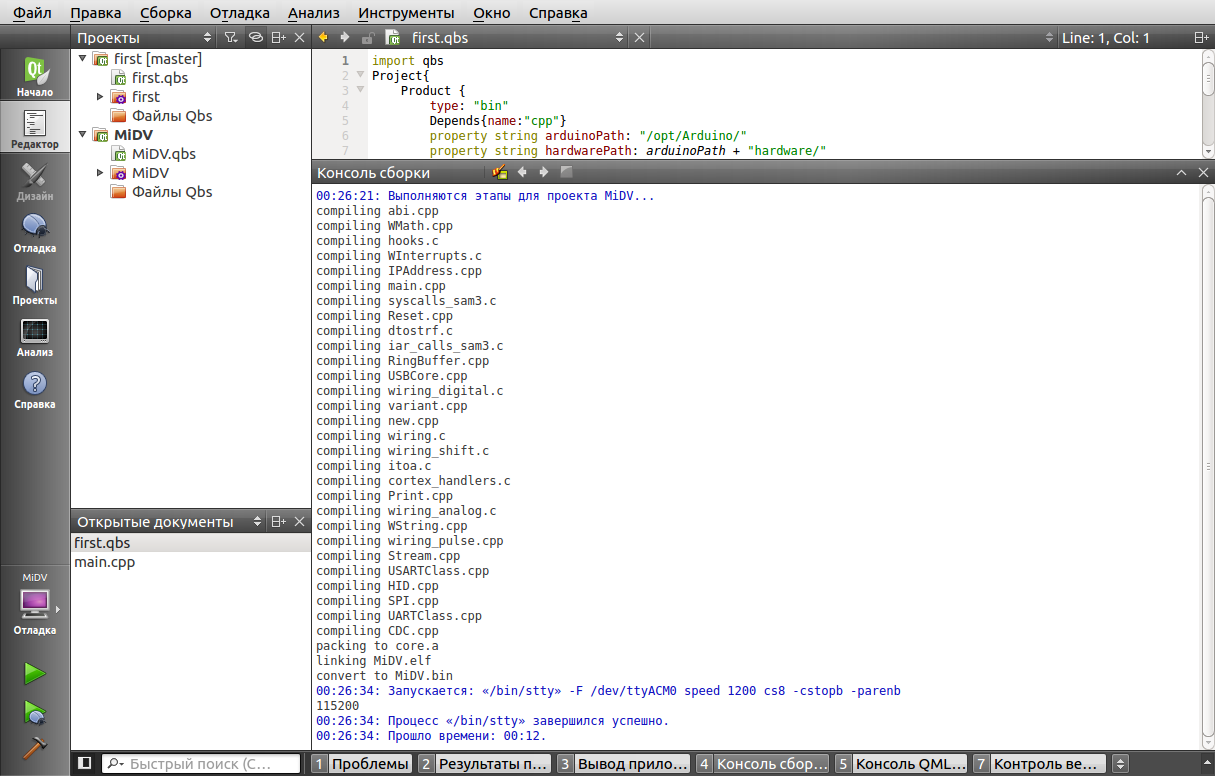
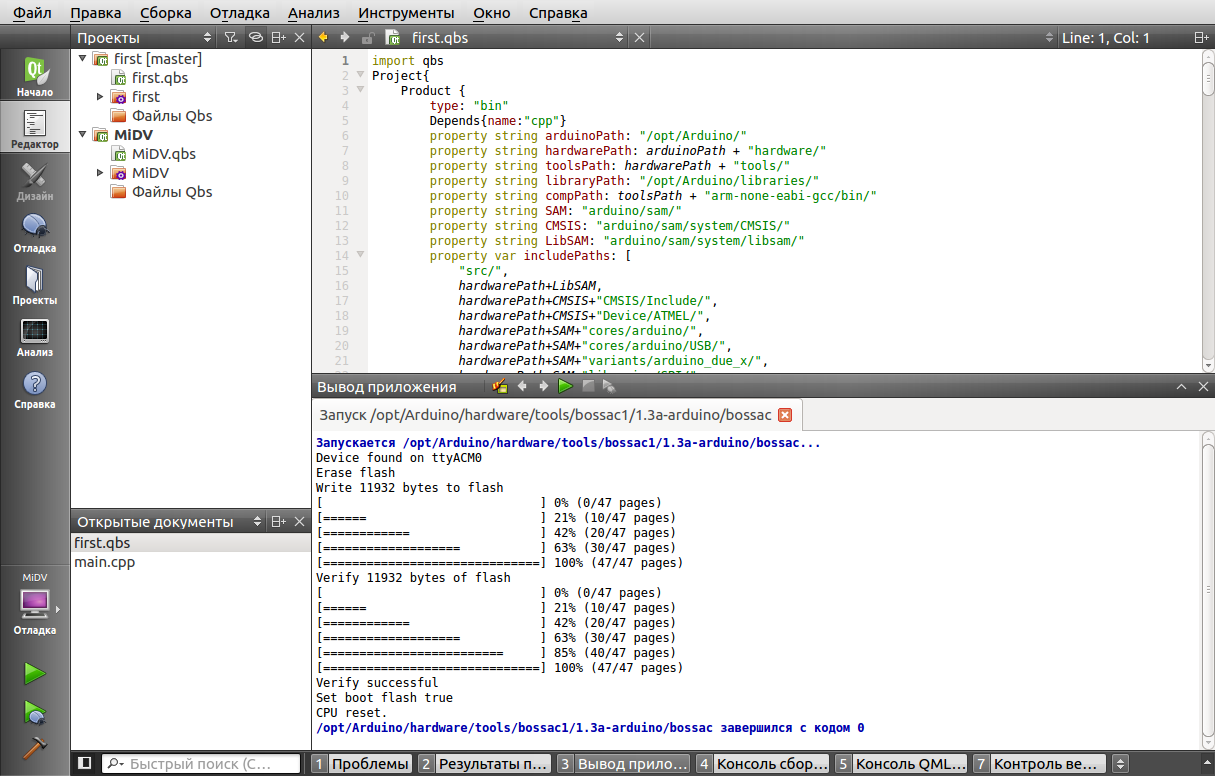
This completes the preparation for use. You can click on the "Run":
And enjoy the flashing LED.
Prehistory
For some reason, I had an attitude to Arduino like a toy. Until I came across an Arduino Due. Hooked the line in the description of the module that it is built on the controller ATSAM3X8E (core Cortex M3). The fact is that I am familiar with this controller (or rather, with its younger version) firsthand.
')
The second - and this made him already buy - this is the price. I have experience developing iron on a similar controller (I developed a car tracker), and this experience persistently whispered that the price for a module with delivery of $ 15 at the cost of only the controller on the DJ at 12 $ is very profitable. The bonus was an integrated power supply with an input voltage range from 18V to 7V, 2 USB (Programming and Native).
Formulation of the problem
The module came quickly enough. Then the dancing began.
The fact is that when I was my own design engineer, the main IDE for me was IAR, and the system was Windows. Now the main work is connected with writing applications for Linux. That is, Qt and Ubuntu respectively. Going along the path of least resistance, I installed an IDE from Arduino. I started and immediately realized that this was not for me. The overall impression is a notebook.
I decided to develop something in Qt Creator. Having researched the Internet on the topic “it can be and can be applied at home,” I realized: a lot of information regarding Arduino is written for AVR-based modules. According to the Arduino Due information the cat wept. A necessary and not at all. This is one of the reasons why I am writing this article. Disappointed, he began to dig in the direction of Qt - Cortex-M3 / M4. Having adopted the articles "We program microcontrollers in QtCreator" and "We program stm32 microcontrollers with QtCreator" . Began to create. I will say right away - the articles asked only the direction.
Like any programmer, I'm a little lazy. Therefore, I decided to make a template for Qt so that I was always at hand.
Decision
Training
First, install Qt Creator and Arduino IDE. How to set - information the sea. I will not stop.
In the Arduino IDE install support modules Arduino Due. In the future I will lead the story for Linux. Sapienti sat, as they say. For some reason, it is installed in the hidden folder [home_path] /. Arduino15. We correct this defect - we copy (or transfer - as you like) the [home_path] /. Arduino15 / packages / arduino / hardware / sam / 1.6.4 folder to the [arduino_path] / hardware / sam folder,
the [home_path] /. arduino15 / packages / arduino / tools folder in the [arduino_path] / hardware / tools folder
. In the [arduino_path] / hardware / arduino / sam / cores / arduino folder, delete (rename) the main.cpp file. If necessary, download the FreeRTOS port and put it in the [arduino_path] / libraries folder. Next, we drag the templates from the githaba and copy them to the [qt_path] / Tools / QtCreator / share / qtcreator / templates / wizards folder . At this training is over.
Using
We join Arduino Due through the Programming Port (through the Native Port, you will need to manually erase and reset the chip). We start QtCreator. Click "New project" and see on the left a new menu item "Arduino ARM" (see the top screen). Select the desired item and click "Select ...":
Further:
Here we prescribe the path:
We get the project:
Open the qbs-file and check the paths. In principle, if everything was done as it was said at the previous stages, everything should be in order. But it is better to double-check:
Next, go to the "Projects" tab "Launch" of the current set:
In the “Installation” stage, we clear the current method and click “Installation, add stage”. Select “Special” and write stty in the “Command” line. In the line “Parameters” -F your_port speed 1200 cs8 -cstopb -parenb , where instead of your_port we substitute our port.
Moving on to the “Launch” stage. In the line "Team" choose the program bossac . In the line “Parameters” -U false -e -w -v -b your_progect_name.bin -R , where instead of your_progect_name we substitute the name of the project.
This completes the preparation for use. You can click on the "Run":
And enjoy the flashing LED.
Source: https://habr.com/ru/post/260717/
All Articles