Cloud WLAN from Cisco Meraki: what it is and what it is eaten with
Good afternoon friends!
This summer, our company has planned a strong expansion of the WLAN infrastructure, and therefore considered various options for organizing this expansion: both classic AP-Controller solutions from Cisco, and new items, one of which is Cisco Meraki.
A small background to the question of what Meraki is, where it came from and why it is needed, you can learn from this article: “A cloud-based way of organizing a VPN to connect networks” .
')
Without further ado, I went to the Meraki website and ordered a set of access points for trial use (4 access points MR32 AP and more expensive MR34 AP). Initially, the company offered 14 days of trial, but quite easily managed to extend this period by half, therefore, it is possible to drive the device in distantly close to combat conditions.
The process of obtaining trial devices was quite simple: I left a request on the Meraki website, I was contacted by an annoying manager who sent me a link to the trial order form, and then hedged for two weeks with calls “well, when, well, when?”.
In the end, I gave up, filled out the order form and waited for the delivery of devices to our company address.
On the same day, all the equipment was sent by UPS from the Netherlands, from the warehouse of Meraki’s partner, to Hamburg, and while the package was flying to us, it was proposed to establish its network in the control panel.
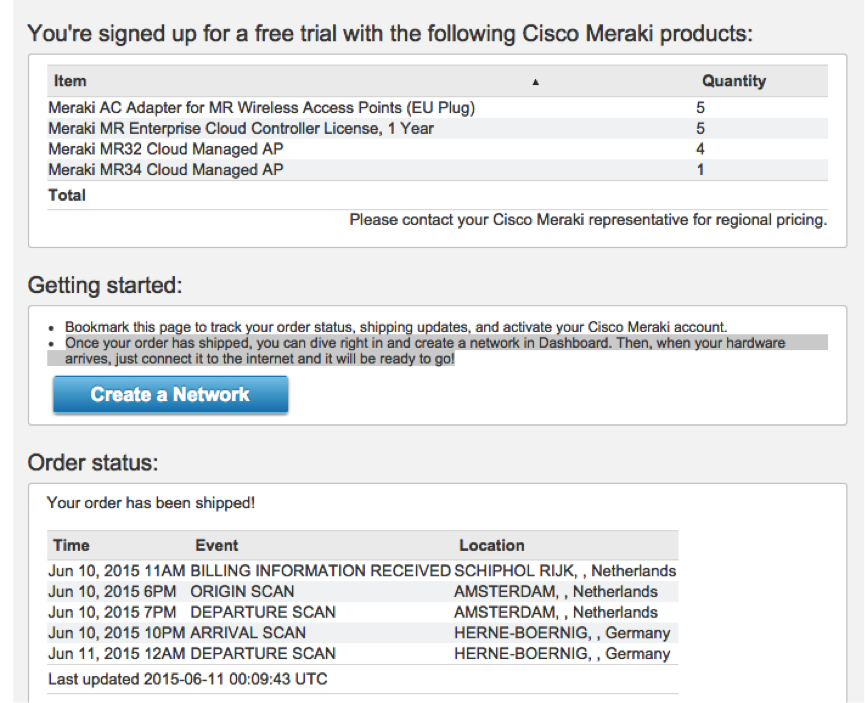
I ran ahead saying that there was no need to start any networks, caring managers of Meraki did everything for me. It was necessary only to kill their default grid and make their own by moving the devices there. But first things first.
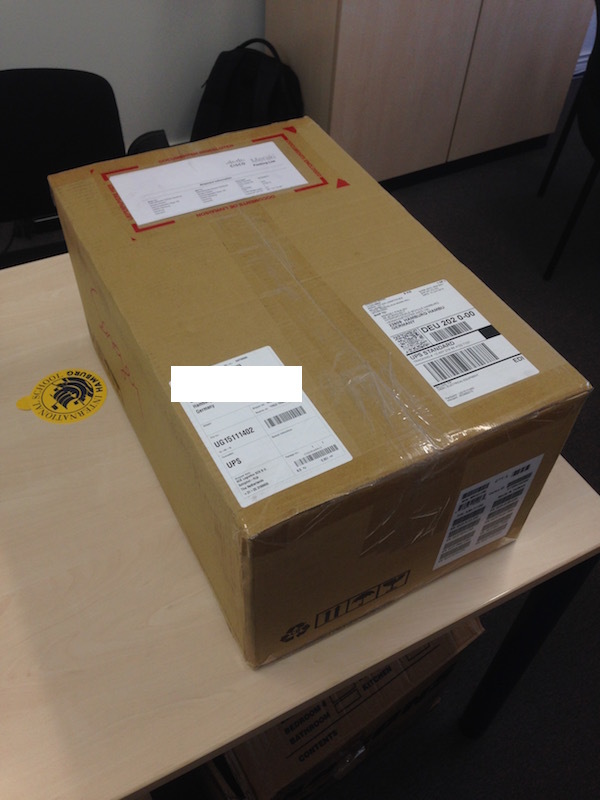
In just a couple of days, DPD delivered the package.
Hooray, open!

There were 5 subboxes in the box and a small instruction with 10 tips from Meraki.
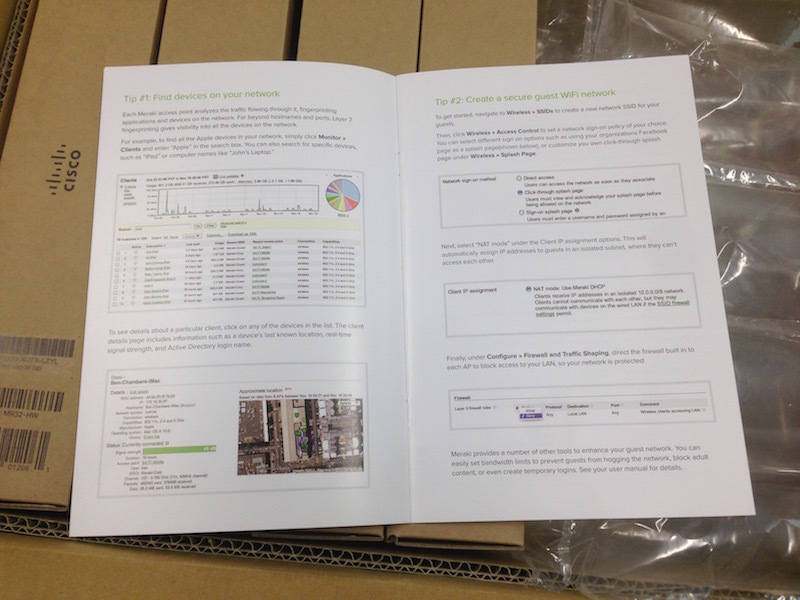
Tips that we did not ask, we do not like, because we postpone the book. Unpacking the subboxes:
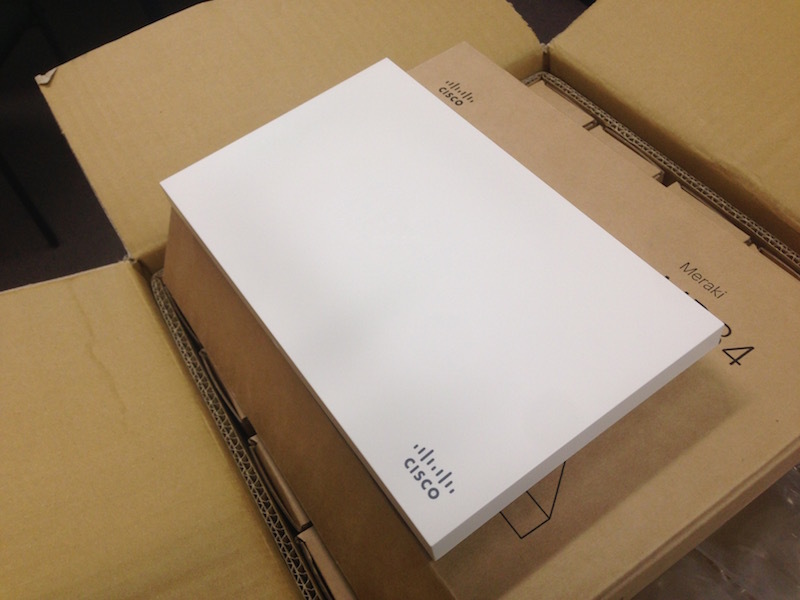
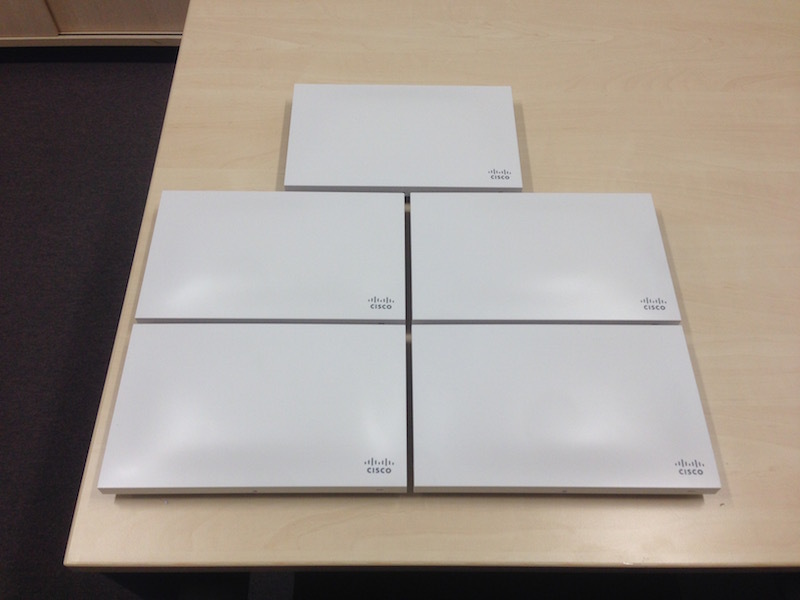
As you can see, the models cannot be distinguished from each other, the devices look quite stylish, but discreet. Personally, I seem to like Cisco APs much more, but the appearance of access points is the last thing to compare.
We take the access point, connect it to the Ethernet socket ... voila! An open and unprotected grid with my login in Meraki is broadcast to the whole district!
We connect to it and get the IP from the preset range via DHCP:
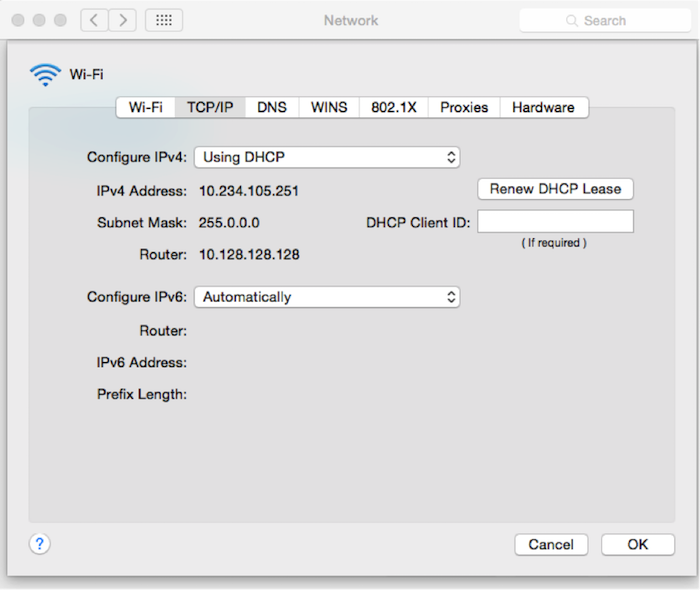
Great, now we know the possible IP address of the access point itself.
We climb on HTTPS on 10.128.128.128 ... She, darling!
In the web-access point of the access points, you can specify a number of settings (VLAN, WiFi broadcast channels and power, as well as a proxy, which could be useful if we had a firewall on UDP)
Meraki equipment is managed using the administration panel, whichis located in the US state of California, is hosted on the Internet, and tricky and incomprehensible mechanisms that allow you to manage devices. Consequently, Meraki devices must have access to the external network using the following protocols:
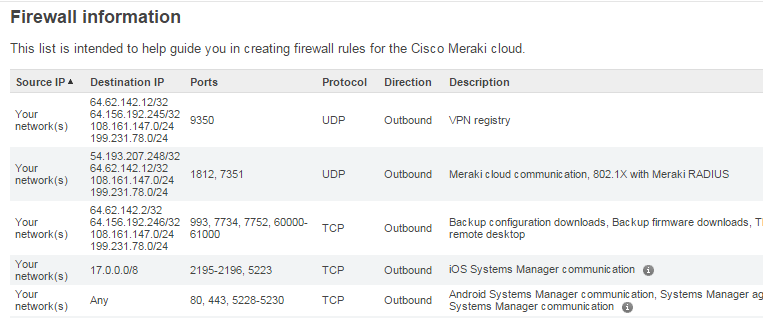
Okay, let's open the necessary ports for tests, see what happens.
Login to the Meraki Management Console:

and we see that the caring staff of Meraki have already created for me all the default wIreless infrastructure with no specific parameters. As I already wrote, I was not satisfied with this radically, I took everything down and began to do it from scratch, removing all APs from the test WLAN network.
Delete ...
... and create a new network to which we add access points:
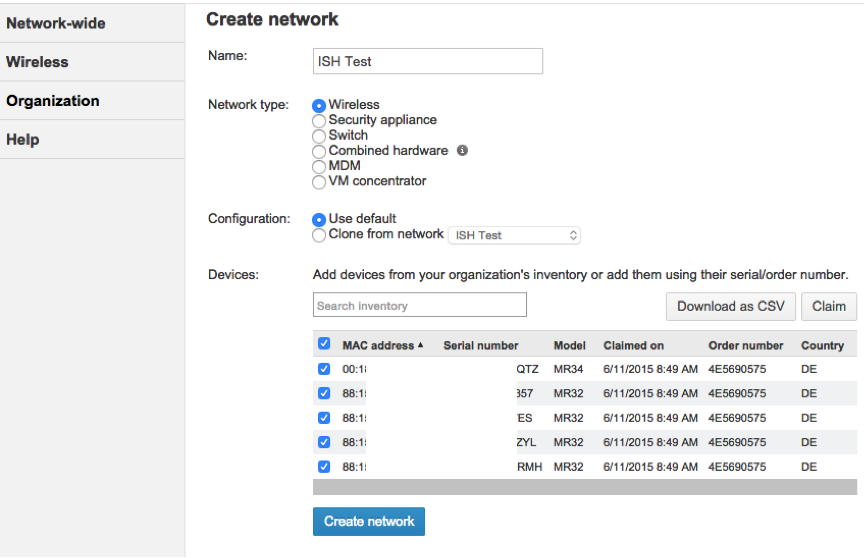
Access points for tens of seconds received a new config and began to distribute the SSID "ISH Test".
Let's configure our cloud infrastructure so that everything looks a bit more serious: we will install encryption, a network key.
Go to the section Wireless - SSIDs:

There can be up to 15 SSIDs per wireless network.
Tyrka in edit settings for the first SSID, go to its settings:

As you can see from the screenshot, the set of possibilities for authentication is complete.
Key Access (WPA2 / WEP)
Access based on the MAC address table
WPA2-Enterprise with the ability to use both an internal RADIUS server and a Meraki server. In the case of using Meraki, authentication is performed using credentials with which you need to log into the network control panel.
In addition, you can choose the type of WPA encryption: WPA1 and WPA2 or only WPA2.
Next comes the parameter Splash page - the page that is displayed after authorization in the WIFI network (this mechanism is often used in public networks - at airports, hotels, cafes ...). We list the possibilities by points:
The primary authentication options are of little interest, we do not use it in the RADIUS network. Open access from the Splash page will test later, so far choose Meraki Radius. In order to use Meraki RADIUS, you need to create users in the admin panel, passwords for them, specify their email (users can receive their credentials by mail automatically) and set an option that includes user access to the SSID.
Connect to the network with the credentials, look - everything works
Go back to the open network, see options Splash Page.
That's all the options for additional authentication through Splash Page.
We should also note that it is possible to restrict access to the network from certain platforms (Android, BlackBerry, Chrome OS, iPad, iPhone, iPod, MacOS, Windows, Windows Phone, B & N Nook, other OS), as well as to limit the possibility of using one and the same same login on multiple devices at the same time.
Meraki WLAN access points support 5 types of addressing:
WIFI settings.
Here you can select the frequency at which the access point will operate. Possible options:
Meraki allows you to cut traffic on the 3rd and on the 7th OSI levels.
This is what the settings window looks like:

And here is what Meraki can do:
Additional features:
At this point, the possibility of setting up a cloud WIFI network ends.
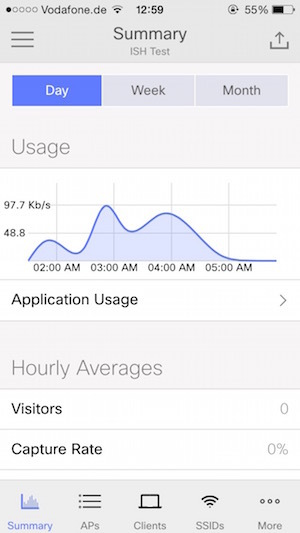
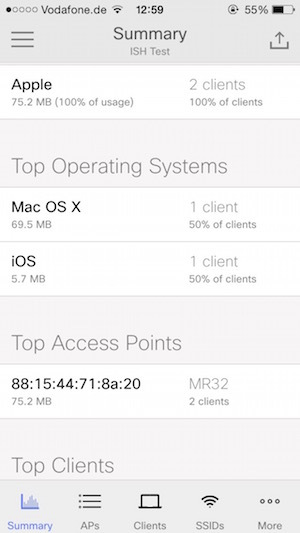
Let's see what data can be viewed in the network monitoring
Meraki has released mobile applications for iOS and Android, the possibilities are rather scarce, but you can monitor traffic using them:

Next comes only my IMHO.
The devices that Meraki want to implement around the world, and along with them, Cisco, turned out to be quite interesting. Scope of application where similar devices could be useful is quite wide. This includes university campuses, restaurants, hotels, maybe libraries, concert halls and other crowded places that need access to the Internet.
These devices are good because they can be configured quite easily, they can be geographically distributed as you like. If I were the owner of any restaurant chain (or IT director or administrator), I would consider these devices on a priority basis.
On the other hand, I would not use such devices in a typical business, especially if there is a place to work with highly private data. It is not cool at one point to understand that it is not known when in the past an attacker got access to the management console of your WLAN and used it for his own selfish purposes. It’s not very cool to know at one point that all traffic that goes from access points to Meraki servers and back is intercepted by unknowns.
Maybe I'm too cautious and conservative, but for our purposes, covered in the beginning of the article, we still chose the classic version with WLAN Controller and access points from Cisco.
Access points are very similar in characteristics. Here are the common ones:
3 radios: 2.4 and 5 GHz, dual-band WIDS / WIPS
2-stream 802.11ac and 802.11n, up to 1.2 Gbps
Integrated bluetooth low energy radio
Gigabit ethernet port
PoE: Full functionality with 802.3af
AC adapter available
Cloud management
Network-wide visibility and control
Self-provisioning for rapid deployment
Automatic reporting
Seamless firmware updates
Enterprise security
802.1X and native Active Directory integration
Air Marshal: real-time WIPS with forensics
Stateful Layer 3-7 firewall
Identity-based group policies
Built-in antivirus scan (NAC)
MR34, unlike MR32, can distribute a network up to 1. 75Gbps and requires PoE + for full functionality.
Supplier Meraki in our region put such a price:
430 € for each MR32
750 € for MR34
€ 160 for a 5 year Enterprise Cloud Controller license for each device.
Overall, not bad. The price is good for the devices themselves (comparable to the price of the AP 16XX and 36XX from Cisco), the price for the license is also not that high.
The access points will be at my disposal for at least another couple of weeks, because if you have any questions, requests and desire to hear some details (which test can be done) - write in the comments, if possible, I will definitely do it.
This summer, our company has planned a strong expansion of the WLAN infrastructure, and therefore considered various options for organizing this expansion: both classic AP-Controller solutions from Cisco, and new items, one of which is Cisco Meraki.
A small background to the question of what Meraki is, where it came from and why it is needed, you can learn from this article: “A cloud-based way of organizing a VPN to connect networks” .
')
Without further ado, I went to the Meraki website and ordered a set of access points for trial use (4 access points MR32 AP and more expensive MR34 AP). Initially, the company offered 14 days of trial, but quite easily managed to extend this period by half, therefore, it is possible to drive the device in distantly close to combat conditions.
Device request
The process of obtaining trial devices was quite simple: I left a request on the Meraki website, I was contacted by an annoying manager who sent me a link to the trial order form, and then hedged for two weeks with calls “well, when, well, when?”.
In the end, I gave up, filled out the order form and waited for the delivery of devices to our company address.
On the same day, all the equipment was sent by UPS from the Netherlands, from the warehouse of Meraki’s partner, to Hamburg, and while the package was flying to us, it was proposed to establish its network in the control panel.
I ran ahead saying that there was no need to start any networks, caring managers of Meraki did everything for me. It was necessary only to kill their default grid and make their own by moving the devices there. But first things first.
My dears have arrived!
In just a couple of days, DPD delivered the package.
Hooray, open!
There were 5 subboxes in the box and a small instruction with 10 tips from Meraki.
Tips that we did not ask, we do not like, because we postpone the book. Unpacking the subboxes:
As you can see, the models cannot be distinguished from each other, the devices look quite stylish, but discreet. Personally, I seem to like Cisco APs much more, but the appearance of access points is the last thing to compare.
Connection and first look
We take the access point, connect it to the Ethernet socket ... voila! An open and unprotected grid with my login in Meraki is broadcast to the whole district!
We connect to it and get the IP from the preset range via DHCP:
Great, now we know the possible IP address of the access point itself.
We climb on HTTPS on 10.128.128.128 ... She, darling!
In the web-access point of the access points, you can specify a number of settings (VLAN, WiFi broadcast channels and power, as well as a proxy, which could be useful if we had a firewall on UDP)
Meraki equipment is managed using the administration panel, which
Okay, let's open the necessary ports for tests, see what happens.
Management console and all-all
Login to the Meraki Management Console:
and we see that the caring staff of Meraki have already created for me all the default wIreless infrastructure with no specific parameters. As I already wrote, I was not satisfied with this radically, I took everything down and began to do it from scratch, removing all APs from the test WLAN network.
Delete ...
... and create a new network to which we add access points:
Access points for tens of seconds received a new config and began to distribute the SSID "ISH Test".
Let's configure our cloud infrastructure so that everything looks a bit more serious: we will install encryption, a network key.
Go to the section Wireless - SSIDs:
There can be up to 15 SSIDs per wireless network.
Tyrka in edit settings for the first SSID, go to its settings:
As you can see from the screenshot, the set of possibilities for authentication is complete.
Key Access (WPA2 / WEP)
Access based on the MAC address table
WPA2-Enterprise with the ability to use both an internal RADIUS server and a Meraki server. In the case of using Meraki, authentication is performed using credentials with which you need to log into the network control panel.
In addition, you can choose the type of WPA encryption: WPA1 and WPA2 or only WPA2.
Next comes the parameter Splash page - the page that is displayed after authorization in the WIFI network (this mechanism is often used in public networks - at airports, hotels, cafes ...). We list the possibilities by points:
- Direct access - by default - disable Splash page
- Click-through - clients should poke a button on the page that the access point gives them. You can apply, for example, in order to get users to read the Terms of Use of the network and accept them
- Additional authentication with
- server meraki
- RADIUS
- Ldap
- Active Directory
- Facebook Wi-Fi
- 3rd party credentials (only Google authentication is currently available)
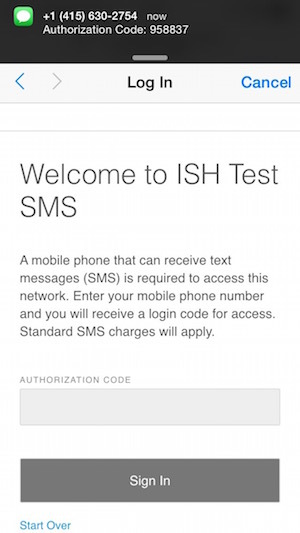
- Authentication by entering SMS code. The first 15 messages are free, then you need to register on Twilio service, buy a subscription and pay money for messages (for example, in Germany $ 0.07 for SMS)
- Billing (paid access) - the option is compatible only with open access, without authorization in the first paragraph.
- Available in the future, the Systems Manager Entry - option is the System Manager Sentry Splash for Android (OS) or Windows devices.
The primary authentication options are of little interest, we do not use it in the RADIUS network. Open access from the Splash page will test later, so far choose Meraki Radius. In order to use Meraki RADIUS, you need to create users in the admin panel, passwords for them, specify their email (users can receive their credentials by mail automatically) and set an option that includes user access to the SSID.
Connect to the network with the credentials, look - everything works
Go back to the open network, see options Splash Page.
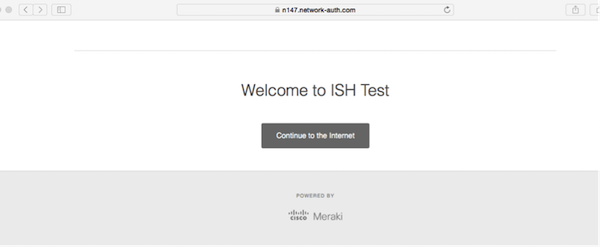
- Direct Access - everything is clear, no pages are issued, we immediately get into the network
- Click through - connect, in the browser we see an offer to click the button and get on the Internet:
- Using additional authentication. Configuring access to a domain controller:
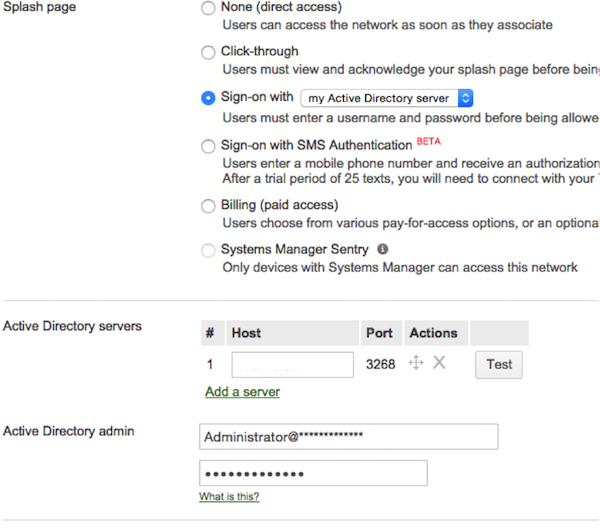
We test the ability to authenticate using the Test button (enter the username and password of a user in AD - the test is successful). Let's try to authenticate in WIFI with such settings:
One of the other interesting authentication options is through Facebook WIFI. In order to activate Facebook WIFI authentication, you need to have a Local Business Page organization.
Go to Facebook WIFI settings, set the following: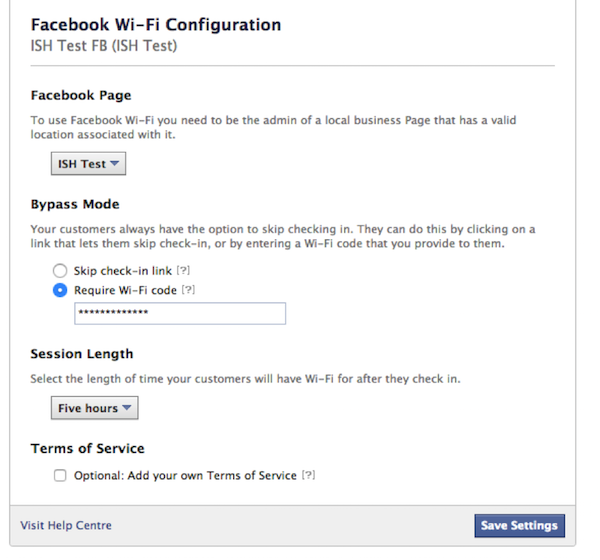
We are trying to connect to WiFi, we get to the authentication page: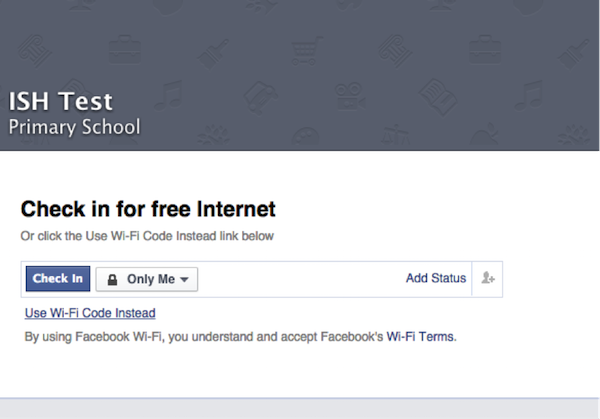
Voila! The user has access to the Internet, the organization page on the FB received a check-in. Everyone is happy. - SMS authentication:
- Paid access.
Enable the option "Billing (paid access)", set up Billing plans:
And try to connect: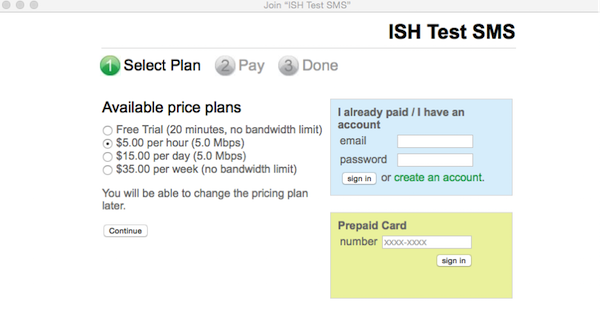
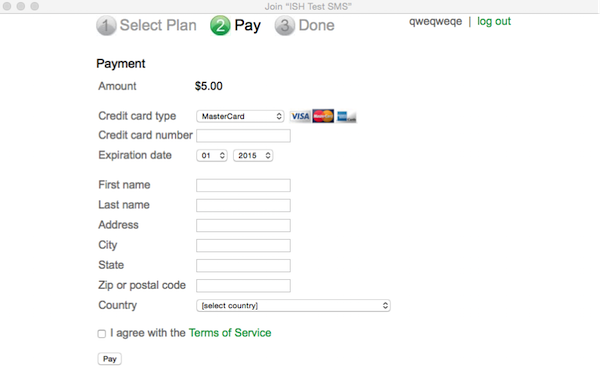
We pay from the card, we get access. You can not imagine what the temptation was to make WiFI paid for employees and students.
That's all the options for additional authentication through Splash Page.
We should also note that it is possible to restrict access to the network from certain platforms (Android, BlackBerry, Chrome OS, iPad, iPhone, iPod, MacOS, Windows, Windows Phone, B & N Nook, other OS), as well as to limit the possibility of using one and the same same login on multiple devices at the same time.
Routing and traffic
Meraki WLAN access points support 5 types of addressing:
- NAT mode, clients will receive IP from a range of 10.0.0.0/8, will not be able to contact each other. In this mode, you can enable content filtering, which can work in two modes: blocking adult content or specifying your DNS, which is assigned this blocking function.
- Bridge mode, clients work on the subnet to which the access point is connected. VLAN tags are supported. Bonjour forwarding and disabling is supported.
- Roaming Layer 3, - this mode is still in the BETA stage - similar to the Bridge mode, but in this case, clients will keep their IP when switching from one access point to another (if the access points work on the same subnet). VLAN tags are supported. Bonjour forwarding and disabling is supported.
- Roaming Layer 3 with a hub - customers go to the network through a Meraki hub, which is a separate device. I, unfortunately, did not order it
- VPN: tunnel data to a concentrator. Same as 4), only data is encrypted and goes through an encrypted VPN connection between the AP and the hub.
WIFI settings.
Here you can select the frequency at which the access point will operate. Possible options:
- 2.4 and 5Ghz in parallel
- 5 Ghz only
- 2.4 and 5Ghz in parallel with the forced switching of devices that support 5Ghz at this frequency
Firewall and traffic restriction
Meraki allows you to cut traffic on the 3rd and on the 7th OSI levels.
This is what the settings window looks like:
And here is what Meraki can do:
- Allow or deny traffic at the 3rd level to certain nodes and certain TCP and UDP ports
- Forbid traffic at the 7th level of the following types:
- Blogging (all, blogger, wordpress)
- Email (all, gmail, host-based imap or pop or smtp, hotmail, web-based email, yahoo, outlook, hotmail)
- File sharing (all, dropbox, skydrive, icloud, windows file sharing)
- Gaming (on the choice of a list of game servers like battle.net)
- News (CNN, NYT, Gizmodo, etc)
- Online-backup
- P2P
- Social Web (FB, Twitter ... Vkontakte does not know how to block so far)
- Software and antivirus updates
- Sport news
- Video and music streaming (ie Youtube and Vimeo)
- VoIP
- Web file sharing (Rapishare and so on)
- Arbitrary HTTP host
- Arbitrary port
- IP address range
- The range of IP addresses and the port for them.
- Restrict channel for clients (down, up, all)
- Restrict access point channel
- Restrict the channel for certain applications (all those that can be blocked in step 2)
Additional features:
- Arbitrary view of the Splash page
- SSID broadcast for all access points / each individual, scheduled broadcast
- Channel planning with the possibility of automatic signal attenuation or operation is always at 100% power, switching on / off DFS channels. Configure channels on each of the access points separately
- Enable / Disable SNMP v2c and v3
- SAML support
- Various security settings for access to the Meraki admin panel
- Certificate Generation for Apple MDM
- Configure various alerts when access points are unavailable, Rogue AP is found, changes are made to the config
- Setting up sending logs to syslog server
- Automatic firmware update (as scheduled)
At this point, the possibility of setting up a cloud WIFI network ends.
Monitoring
Let's see what data can be viewed in the network monitoring
- General information about the access point with data on MAC, IP (external and internal), address, number of configured SSID, number of clients at the moment, channel, VLAN'ah, using a channel with schedules.

- Channel load at point location:

- View ARP Access Point Tables
- Ping & Traceroute.
- You can flash a light bulb or reboot the AP
- You can see the login attempts of different users.
Meraki has released mobile applications for iOS and Android, the possibilities are rather scarce, but you can monitor traffic using them:
Personal impressions
Next comes only my IMHO.
The devices that Meraki want to implement around the world, and along with them, Cisco, turned out to be quite interesting. Scope of application where similar devices could be useful is quite wide. This includes university campuses, restaurants, hotels, maybe libraries, concert halls and other crowded places that need access to the Internet.
These devices are good because they can be configured quite easily, they can be geographically distributed as you like. If I were the owner of any restaurant chain (or IT director or administrator), I would consider these devices on a priority basis.
On the other hand, I would not use such devices in a typical business, especially if there is a place to work with highly private data. It is not cool at one point to understand that it is not known when in the past an attacker got access to the management console of your WLAN and used it for his own selfish purposes. It’s not very cool to know at one point that all traffic that goes from access points to Meraki servers and back is intercepted by unknowns.
Maybe I'm too cautious and conservative, but for our purposes, covered in the beginning of the article, we still chose the classic version with WLAN Controller and access points from Cisco.
Technical characteristics of access points
Access points are very similar in characteristics. Here are the common ones:
3 radios: 2.4 and 5 GHz, dual-band WIDS / WIPS
2-stream 802.11ac and 802.11n, up to 1.2 Gbps
Integrated bluetooth low energy radio
Gigabit ethernet port
PoE: Full functionality with 802.3af
AC adapter available
Cloud management
Network-wide visibility and control
Self-provisioning for rapid deployment
Automatic reporting
Seamless firmware updates
Enterprise security
802.1X and native Active Directory integration
Air Marshal: real-time WIPS with forensics
Stateful Layer 3-7 firewall
Identity-based group policies
Built-in antivirus scan (NAC)
MR34, unlike MR32, can distribute a network up to 1. 75Gbps and requires PoE + for full functionality.
Price
Supplier Meraki in our region put such a price:
430 € for each MR32
750 € for MR34
€ 160 for a 5 year Enterprise Cloud Controller license for each device.
Overall, not bad. The price is good for the devices themselves (comparable to the price of the AP 16XX and 36XX from Cisco), the price for the license is also not that high.
Afterword
The access points will be at my disposal for at least another couple of weeks, because if you have any questions, requests and desire to hear some details (which test can be done) - write in the comments, if possible, I will definitely do it.
Source: https://habr.com/ru/post/260699/
All Articles