Home server from scratch
When the capabilities of the staff router with “openwrt” on board were completely depleted and the processor load began to affect the stability of the network, it was decided to relieve the hard worker by transferring the functionality to the home server. In view of the fact that the piece of iron will be several orders of magnitude more powerful, it was decided to provide it with a bunch of additional features that the old man never even dreamed of. The hull was also decided to do it yourself.
The list of tasks that the home server performs:
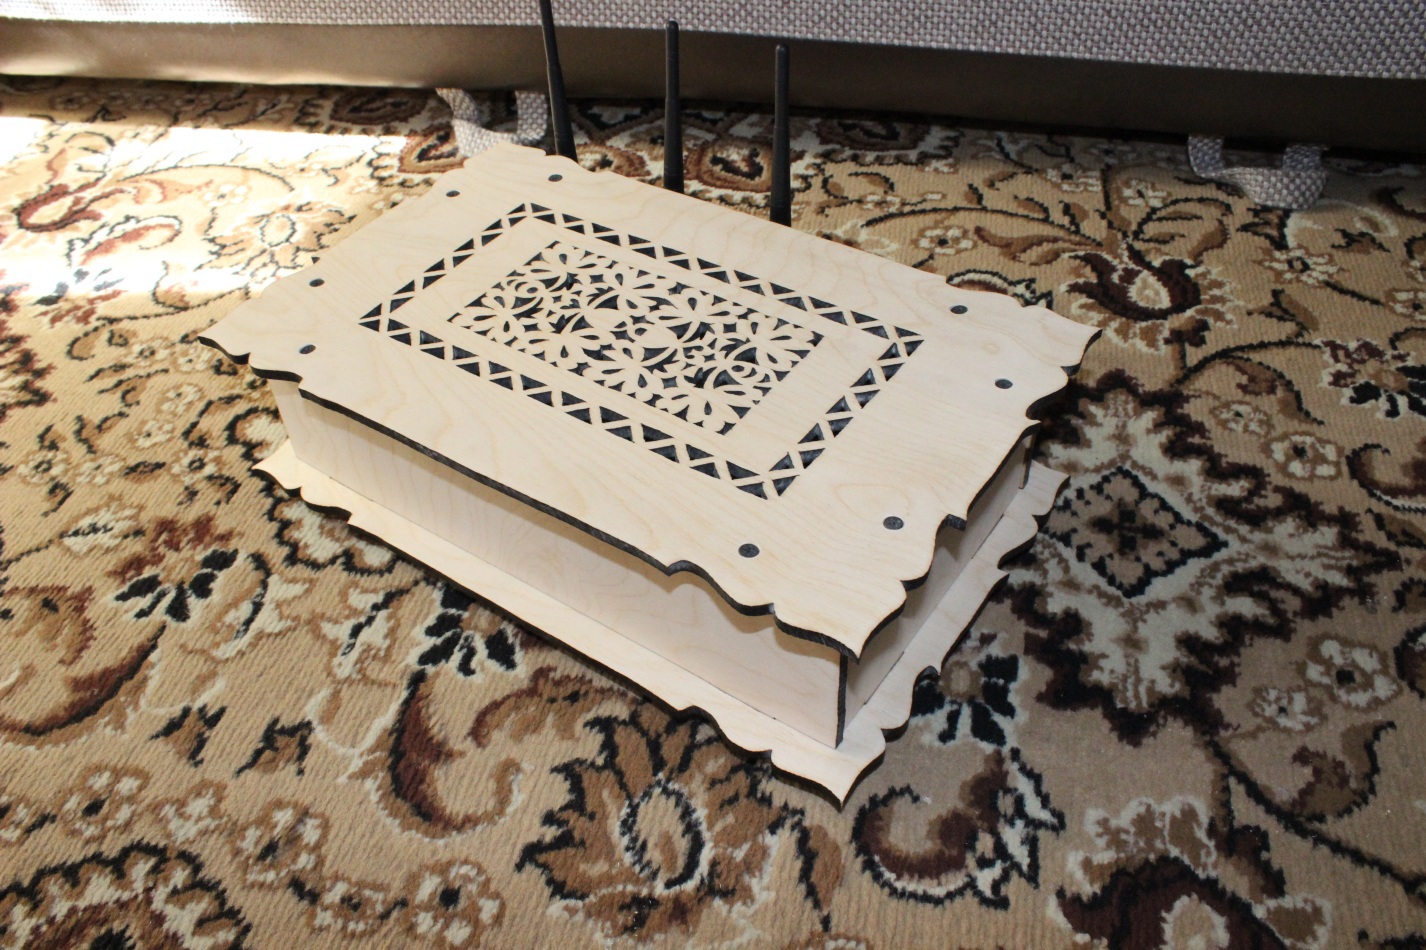
Photos to attract attention:
')
The main functionality described, proceed to the selection of iron for the whole of this economy.
After much deliberation and a couple of tests, the following components were purchased:
After evaluating the dimensions, it was time to make a new house for them, I did not consider buying a case, because I don’t buy what I want in the city, and it’s interesting to do it myself.
Unfortunately, there are no photos of the process of creating the case, but I will briefly describe the process. After the creation of the drawing was completed, it was transferred to plywood 6 mm thick and cut with a cutter assembled on the knee from an old transformer and nichrome thread. How to make this yourself, you can see here .
With the iron part sorted out, now it's time to start configuring the functionality. The 64-bit “Debian 7 netinstall” was chosen as the OS, and during the installation the disks were merged into software RAID0. Anticipating a holivar, on the topic of fault tolerance, all the important data lies in the clouds, so if a disk fails, the system can be deployed from a backup copy rather quickly.
The system is installed, proceed to the implementation of the above plan.
To maximize the use of iron resources, you will need to install a virtualization server; in this case, the virtualbox software package is used.
We proceed to the design of the home network, in the general concept of the network is as follows:
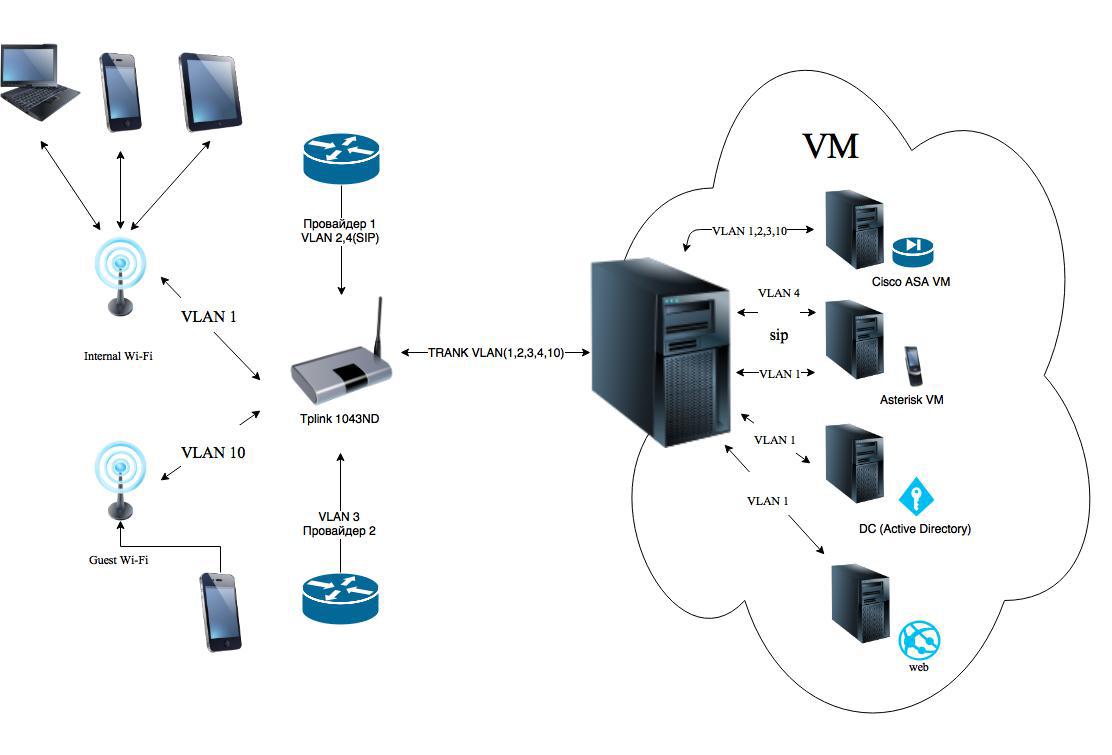
It is necessary to reconfigure the router a little. In the “openwrt” settings, we create the required number of VLANs and distribute the ports on them, since this motherboard has only one ethernet port, then we make it trunked and we start all VLAN with tags to it.
We re-configure network adapters on our server, before this you need to install a package to support vlan: apt-get install vlan .
As a firewall, I chose the implementation of "cisco ASA" on a virtual machine. I will not argue: the decision is strange, incredibly crutch, but due to the need to connect to the working networks of several companies via the “IPsec site to site vpn” with similar pieces of hardware, but in a normal design.
Immediately I wanted to note that it has been working stably for 4 months, there are no problems, the link is stable, the connection speed for this implementation turned out to be ~ 20 Mbit / s, which is quite good, given that the amount of data transferred is small. In my implementation, this virtual machine manages all incoming and outgoing connections in all VLANs of the home network, the total system load does not exceed 12%.
Downloading the image of the Cisco ASA 8.4 for vmware virtual machine, I will not give links since the first link in the search engine will most likely lead you to it. We load on our server, and we import our car in virtualbox. Along the way, we change all adapters to “PCnet-PCI II” and after import we distribute from in bridge mode over the created VLANs. Also in the settings of the serial port we create pipe / tmp / tts0 by means of which we will carry out the initial configuration of our undercisco .
Further configuration is quite specific and depends on your tasks; in my opinion, it is meaningless to bring the ASA configuration file, since the settings of interfaces, access lists, NAT, VPN and other things are better read separately, since this is not one or even a dozen articles. . I will describe only the basic things that I use. First of all, routing, since all networks are established in it, and it is also the default gateway for the home network, and for the guest network. Secondly, it will deploy "anyconnect" to access the home network via VPN. The “Cisco ASA” basic settings can be found in the “Hands Reached : Continuing About ASA” article of the Fedia Hubrauser , the rest can be found on the network as needed.
The first provider is the main one; the configuration implements the switching mechanism to the second provider in the event that the first is not available so that the second one does not get bored at this time, the free open guest access point is set to it. Based on the workload of the second channel, the neighbors are very pleased with this gift of fate.
About the description of the settings of this functionality is not broken a small number of keyboards, but still describe the setting here for the heap, so to speak.
After configuring samba, you can install the workhorse to download torrents.
Calls are not cheap, especially when working frequently and in different countries, even though there are vpn-tunnels before work — it would be strange to say, not to deploy a telephony server. Based on the above mentioned scheme, we are raising a new virtual machine and starting its network interfaces into the VLANs we need. The asterisk + freepbx installation itself will not be described as, before me, siv237 did a great job with this task and described everything in the publication Easy installation of Asterisk + FreePBX for beginners .
After installation, we start the necessary trunks in the FreePBX interface, set up a dial plan, create a user, and enjoy life. Due to a miraculous expiration of circumstances, my main provider provides a city number via sip, which in fact was the main reason for the deployment of this server.
A mobile phone, when I'm at home, is always connected to Wi-Fi, which is why it has become my main sip phone. When unavailable, the server redirects to my mobile phone via the city line. After connecting the Wi-Fi antenna located on the roof of the house, I can go for bread without any problems, without missing an important call and without paying for either the Internet or in minutes with the redirection.
In the near future we plan to buy several USB modems that support the voice transfer function and configure the output to mobile networks. Save as full.
If you honestly forgot about this very convenient function, it used to be redundant for me, and then just flew out of my head. Somehow after the next viewing of my beloved Habra I came across a publication “Boot server - like a bootable USB flash drive, only a server and over the network” , written by Romanenko_Eugene , with a description of all this. Better than him, I probably won't be able to describe, so I'll leave this part behind him. On the basis of this article, the distributives I needed were compiled and I forgot what a bootable USB flash drive is.
After several clients for cloud services have appeared on the phone, thoughts involuntarily begin to appear, how to unite the whole economy. As a result, it was decided to build your own cloud, create directories in it to synchronize with other clouds and enjoy life.
“Owncloud” was chosen as a platform, and I use box.com, dropbox, google drive, yandex disk, onedrive as external cloud providers. The list is extensive, but the idea is simple. To begin with, we put clients on the machine and set them up for synchronization in the directory previously created for each cloud, then put “owncloud” on top of this farm.
There is no sense to rewrite the client installation guide, they can be found on specialized sites. And all that concerns the installation of "owncloud" described BlackIce13 in the publication "Experience installing ownCloud 6 on Debian 7 wheezy . " It remains for us to think about what and where to synchronize in order to sleep peacefully, having a server with RAID 0.
After the next disconnection of cable television for the delay in payment, the search for alternatives was started, which were found very quickly - TorrentTV. The only negative is that you need the acestrem client to view.
To keep the 750 watt monster on to distribute television directly to the television is quite wasteful. After a brief search, a solution was found - a proxy that transforms the torrent stream into http. The problem was solved rather quickly, now for 60 rubles a month you can watch a mountain of channels.
The only negative is the rather slow channel switching.
That's all, it remains only to create a playlist of your own taste and enjoy watching your favorite channels.
As for hosting, everything is ready with us. Apache is for php lovers, everything is ready too, but I love Flask, but that's not the point, but in the green lock in the address bar. Which pleases the eye so much when recruiting the cherished https: // thanks to an article written by the user SLY_G . Just a couple of minutes you can please your eyes, seeing in the address bar a green miracle, receiving a free ssl certificate.
I thought about buying a domain for a long time. And there is a static, and a desire, but to give blood for a domain that does not please, for all the good names have already been bought, or I have no imagination. But in general, it was decided to create an ssl certificate for the domain name from ddns. Free and angry, but friends will not see a terrible warning about the insecurity of my cloud when I send links to various files from my repository. Yes, and most constantly do not have to see these windows. In general, I advise you to use the freebie.
Having spent on equipment about 4 thousand rubles, you can get quite a lot of functionality and use iron almost to the fullest extent. Currently, the average processor load is ~ 60% with rare peaks. RAM is used almost completely by 80%, but these are consequences of virtualization. The host and machines in the swap have not yet been.
The server covers 90% of my desires. Most pleased that such a modest iron works at 100% with low power consumption. So, the electricity bill after switching from a router to such a server has not changed significantly.
PS I ask in case of detection of errors and inaccuracies to report in the LAN. This is my first article on Habr.
PPS Dear community, this article is not a configuration guide or a benchmark for correct configurations. This is just another article about what can be done with your old iron for the benefit of home LAN.
PPPS I would be very grateful for feedback and new ideas on this topic.
The list of tasks that the home server performs:
- Virtualbox server based on virtualbox c WebGUI;
- Firewall;
- A torrent rocking chair based on the transmission and a file server;
- Telephony server based on Asterisk;
- TFTP server for network booting and configuration of various equipment;
- Private cloud to store files based on "owncloud";
- HTTP proxy Ace Stream for viewing TorrentTV;
- Hosting for a home site with access via https;
Photos to attract attention:
')
Chapter 1. Build, Build
The main functionality described, proceed to the selection of iron for the whole of this economy.
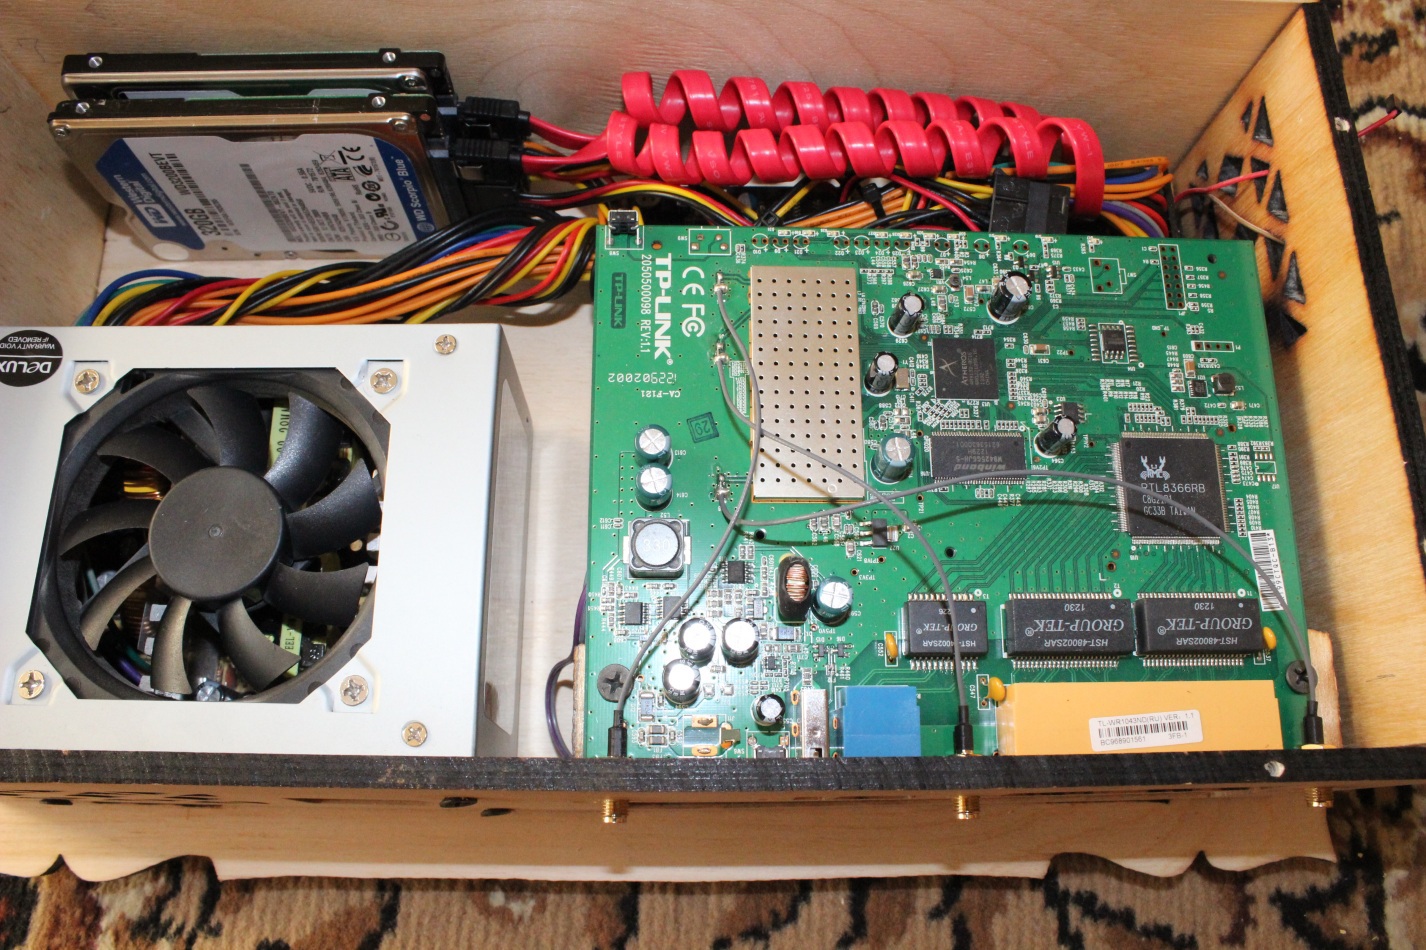
After much deliberation and a couple of tests, the following components were purchased:
- Motherboard msi j1800i format Mini-ITX;
- 2 levels of DDR3 memory for 2 GB each;
- 230 watt power supply;
- 2 2.5 'hard drives for 320 GB were available;
- The tp-link 1043ND router was available (It was a shame to throw it away);
After evaluating the dimensions, it was time to make a new house for them, I did not consider buying a case, because I don’t buy what I want in the city, and it’s interesting to do it myself.
Unfortunately, there are no photos of the process of creating the case, but I will briefly describe the process. After the creation of the drawing was completed, it was transferred to plywood 6 mm thick and cut with a cutter assembled on the knee from an old transformer and nichrome thread. How to make this yourself, you can see here .
The result was the following


Chapter II Customization
With the iron part sorted out, now it's time to start configuring the functionality. The 64-bit “Debian 7 netinstall” was chosen as the OS, and during the installation the disks were merged into software RAID0. Anticipating a holivar, on the topic of fault tolerance, all the important data lies in the clouds, so if a disk fails, the system can be deployed from a backup copy rather quickly.
The system is installed, proceed to the implementation of the above plan.
2.1 Virtualbox server based on virtualbox c WebGUI
To maximize the use of iron resources, you will need to install a virtualization server; in this case, the virtualbox software package is used.
Install virtualbox + phpvirtualbox
Install the virtualbox server virtualization, on our server, first we will add the repository and the keys to it:
Update the repository and run the virtualbox installation:
Install the extension for virtualbox:
Reboot the vboxweb-service service with the commands:
For Virtualbox to work, you need to create a user under which virtual machines will run.
Add a vbox user:
First, install apache and php:
Download phpvirtualbox:
Unpack the contents of the phpvirtualbox-4.3-2.zip archive into the web server folder:
Rebooting the web server:
Go to the directory phpvirtualbox in the web server folder and create a configuration file:
We make some edits:
Edit the virtualbox configuration file:
Restart virtualbox:
Open in the browser the address of our server:
http: // IP Address of this machine / phpvirtualbox /
login: admin
password: admin
The web interface is almost the same as the desktop version of Virtualbox.
deb http://download.virtualbox.org/virtualbox/debian wheezy contrib non-free wget -q http://download.virtualbox.org/virtualbox/debian/oracle_vbox.asc -O- | apt-key add – Update the repository and run the virtualbox installation:
aptitude update aptitude install virtualbox-4.3 Install the extension for virtualbox:
wget http://download.virtualbox.org/virtualbox/4.3.14/Oracle_VM_VirtualBox_Extension_Pack-4.3.14.vbox-extpack VBoxManage extpack install Oracle_VM_VirtualBox_Extension_Pack-4.3.12.vbox-extpack Reboot the vboxweb-service service with the commands:
/etc/init.d/vboxweb-service stop /etc/init.d/vboxweb-service start For Virtualbox to work, you need to create a user under which virtual machines will run.
Add a vbox user:
adduser vbox Install phpvirtualbox
First, install apache and php:
apt-get install apache php Download phpvirtualbox:
wget -c -t0 http://optimate.dl.sourceforge.net/project/phpvirtualbox/phpvirtualbox-4.3-2.zip Unpack the contents of the phpvirtualbox-4.3-2.zip archive into the web server folder:
unzip phpvirtualbox-4.3-2.zip Rebooting the web server:
/etc/init.d/apache2 restart Go to the directory phpvirtualbox in the web server folder and create a configuration file:
mv config.php-example config.php We make some edits:
nano config.php var $username = 'vbox'; var $password = ' vbox'; var $location = 'http://IP :18083/'; var $consoleHost = 'IP '; Edit the virtualbox configuration file:
echo 'VBOXWEB_USER=vbox VBOXWEB_HOST= IP VBOXWEB_PORT=18083 ' > /etc/default/virtualbox Restart virtualbox:
/etc/init.d/vboxweb-service restart Open in the browser the address of our server:
http: // IP Address of this machine / phpvirtualbox /
login: admin
password: admin
The web interface is almost the same as the desktop version of Virtualbox.
2.2 Firewall
We proceed to the design of the home network, in the general concept of the network is as follows:
It is necessary to reconfigure the router a little. In the “openwrt” settings, we create the required number of VLANs and distribute the ports on them, since this motherboard has only one ethernet port, then we make it trunked and we start all VLAN with tags to it.
We re-configure network adapters on our server, before this you need to install a package to support vlan: apt-get install vlan .
Network setting on the server
# The loopback network interface auto lo iface lo inet loopback #NATIVE VLAN NETWORK auto eth0.1 iface eth0.1 inet static address 192.168.1.3 netmask 255.255.255.0 gateway 192.168.1.1 vlan_raw_device eth0 up ifconfig eth0.1 up #PROVIDER1 VLAN auto eth0.2 iface eth0.2 inet manual vlan_raw_device eth0 up ifconfig eth0.2 up #PROVIDER2 VLAN auto eth0.3 iface eth0.3 inet manual vlan_raw_device eth0 up ifconfig eth0.3 up #SIP VLAN auto eth0.4 iface eth0.4 inet manual vlan_raw_device eth0 up ifconfig eth0.4 up # GUEST NETWORK auto eth0.10 iface eth0.10 inet manual vlan_raw_device eth0 up ifconfig eth0.10 up As a firewall, I chose the implementation of "cisco ASA" on a virtual machine. I will not argue: the decision is strange, incredibly crutch, but due to the need to connect to the working networks of several companies via the “IPsec site to site vpn” with similar pieces of hardware, but in a normal design.
Immediately I wanted to note that it has been working stably for 4 months, there are no problems, the link is stable, the connection speed for this implementation turned out to be ~ 20 Mbit / s, which is quite good, given that the amount of data transferred is small. In my implementation, this virtual machine manages all incoming and outgoing connections in all VLANs of the home network, the total system load does not exceed 12%.
Downloading the image of the Cisco ASA 8.4 for vmware virtual machine, I will not give links since the first link in the search engine will most likely lead you to it. We load on our server, and we import our car in virtualbox. Along the way, we change all adapters to “PCnet-PCI II” and after import we distribute from in bridge mode over the created VLANs. Also in the settings of the serial port we create pipe / tmp / tts0 by means of which we will carry out the initial configuration of our undercisco .
Further configuration is quite specific and depends on your tasks; in my opinion, it is meaningless to bring the ASA configuration file, since the settings of interfaces, access lists, NAT, VPN and other things are better read separately, since this is not one or even a dozen articles. . I will describe only the basic things that I use. First of all, routing, since all networks are established in it, and it is also the default gateway for the home network, and for the guest network. Secondly, it will deploy "anyconnect" to access the home network via VPN. The “Cisco ASA” basic settings can be found in the “Hands Reached : Continuing About ASA” article of the Fedia Hubrauser , the rest can be found on the network as needed.
The first provider is the main one; the configuration implements the switching mechanism to the second provider in the event that the first is not available so that the second one does not get bored at this time, the free open guest access point is set to it. Based on the workload of the second channel, the neighbors are very pleased with this gift of fate.
2.3 transmission torrent rocking chair and file server
About the description of the settings of this functionality is not broken a small number of keyboards, but still describe the setting here for the heap, so to speak.
Of course, you will have your own Samba configuration, but I’ll give you my own example.
First, install the Samba server with the command:
And edit the configuration file /etc/samba/smb.conf:
apt-get install samba And edit the configuration file /etc/samba/smb.conf:
[global] workgroup = WORKGROUP netbios name = NAS server string = NAS File Server log level = 1 security = share unix charset = UTF-8 dos charset = cp1251 store dos attributes = yes max log size = 10 [NAS] comment = NAS SERVER FOLDER path = /home/NAS create mask = 0777 directory mask = 0777 public = yes writable = yes printable = no guest ok = yes read only = no [Share] comment = NAS SHARE FOLDER path = /home/NAS/Share create mask = 0777 directory mask = 0777 public = yes writable = yes printable = no guest ok = yes read only = no [cloud] comment = OWNCLOUD FOLDER path = /home/NAS/owncloud/ create mask = 0777 directory mask = 0777 public = yes writable = yes printable = no guest ok = yes read only = no [torrents] comment = TORRENTS FOLDER path = /home/NAS/torrents create mask = 0777 directory mask = 0777 public = yes writable = yes printable = no guest ok = yes read only = no [VM] comment = VIRTUAL MACHINES FOLDER path = /home/NAS/VM create mask = 0777 directory mask = 0777 public = yes writable = yes printable = no guest ok = yes read only = no [media] comment = MEDIA FOLDER path = /home/NAS/media create mask = 0777 directory mask = 0777 public = yes writable = yes printable = no guest ok = yes read only = no After configuring samba, you can install the workhorse to download torrents.
It’s time to do Transmission
Install:
Configure the transmission-daemon /etc/transmission-daemon/settings.json:
apt-get install transmission-daemon Configure the transmission-daemon /etc/transmission-daemon/settings.json:
{ "alt-speed-down": 50, "alt-speed-enabled": false, "alt-speed-time-begin": 540, "alt-speed-time-day": 127, "alt-speed-time-enabled": false, "alt-speed-time-end": 1020, "alt-speed-up": 50, "bind-address-ipv4": "0.0.0.0", "bind-address-ipv6": "::", "blocklist-enabled": true, "blocklist-url": "", "cache-size-mb": 2, "dht-enabled": true, "download-dir": "/home/NAS/torrents/Downloads", "download-limit": 100, "download-limit-enabled": 0, "encryption": 1, "idle-seeding-limit": 30, "idle-seeding-limit-enabled": false, "incomplete-dir": "/home/NAS/torrents/Downloading", "incomplete-dir-enabled": false, "lazy-bitfield-enabled": true, "lpd-enabled": true, "max-peers-global": 200, "message-level": 2, "open-file-limit": 32, "peer-limit-global": 200, "peer-limit-per-torrent": 60, "peer-port": 11523, "peer-port-random-high": 65535, "peer-port-random-low": 49152, "peer-port-random-on-start": false, "peer-socket-tos": 0, "pex-enabled": true, "port-forwarding-enabled": true, "preallocation": 2, "ratio-limit": 1, "ratio-limit-enabled": true, "rename-partial-files": true, "rpc-authentication-required": true, "rpc-bind-address": "0.0.0.0", "rpc-enabled": true, "rpc-password": "**********", "rpc-port": 9091, "rpc-username": "transmission", "rpc-whitelist": "127.0.0.1,192.168.0.100", "rpc-whitelist-enabled": false, "script-torrent-done-enabled": false, "script-torrent-done-filename": "", "speed-limit-down": 900, "speed-limit-down-enabled": true, "speed-limit-up": 100, "speed-limit-up-enabled": false, "start-added-torrents": true, "trash-original-torrent-files": true, "umask": 0, "upload-limit": 100, "upload-limit-enabled": 0, "upload-slots-per-torrent": 14 } 2.4 Server telephony based on Asterisk + FreePBX
Calls are not cheap, especially when working frequently and in different countries, even though there are vpn-tunnels before work — it would be strange to say, not to deploy a telephony server. Based on the above mentioned scheme, we are raising a new virtual machine and starting its network interfaces into the VLANs we need. The asterisk + freepbx installation itself will not be described as, before me, siv237 did a great job with this task and described everything in the publication Easy installation of Asterisk + FreePBX for beginners .
After installation, we start the necessary trunks in the FreePBX interface, set up a dial plan, create a user, and enjoy life. Due to a miraculous expiration of circumstances, my main provider provides a city number via sip, which in fact was the main reason for the deployment of this server.
A mobile phone, when I'm at home, is always connected to Wi-Fi, which is why it has become my main sip phone. When unavailable, the server redirects to my mobile phone via the city line. After connecting the Wi-Fi antenna located on the roof of the house, I can go for bread without any problems, without missing an important call and without paying for either the Internet or in minutes with the redirection.
In the near future we plan to buy several USB modems that support the voice transfer function and configure the output to mobile networks. Save as full.
2.5 TFTP server for network booting and configuration of various equipment;
If you honestly forgot about this very convenient function, it used to be redundant for me, and then just flew out of my head. Somehow after the next viewing of my beloved Habra I came across a publication “Boot server - like a bootable USB flash drive, only a server and over the network” , written by Romanenko_Eugene , with a description of all this. Better than him, I probably won't be able to describe, so I'll leave this part behind him. On the basis of this article, the distributives I needed were compiled and I forgot what a bootable USB flash drive is.
2.6 Private cloud for storing files based on "owncloud"
After several clients for cloud services have appeared on the phone, thoughts involuntarily begin to appear, how to unite the whole economy. As a result, it was decided to build your own cloud, create directories in it to synchronize with other clouds and enjoy life.
“Owncloud” was chosen as a platform, and I use box.com, dropbox, google drive, yandex disk, onedrive as external cloud providers. The list is extensive, but the idea is simple. To begin with, we put clients on the machine and set them up for synchronization in the directory previously created for each cloud, then put “owncloud” on top of this farm.
There is no sense to rewrite the client installation guide, they can be found on specialized sites. And all that concerns the installation of "owncloud" described BlackIce13 in the publication "Experience installing ownCloud 6 on Debian 7 wheezy . " It remains for us to think about what and where to synchronize in order to sleep peacefully, having a server with RAID 0.
2.7 HTTP proxy Ace Stream for viewing TorrentTV
After the next disconnection of cable television for the delay in payment, the search for alternatives was started, which were found very quickly - TorrentTV. The only negative is that you need the acestrem client to view.
To keep the 750 watt monster on to distribute television directly to the television is quite wasteful. After a brief search, a solution was found - a proxy that transforms the torrent stream into http. The problem was solved rather quickly, now for 60 rubles a month you can watch a mountain of channels.
The only negative is the rather slow channel switching.
Installation
First, install the vlc:
Download aceproxy and acestream and put them in one directory:
Create next several directories:
Create several scripts in the ./scripts directory:
Go to the directory above and create scripts to start and stop the broadcast:
Edit the aceproxy configuration according to the wiki
[ Wiki ]
Let's launch the broadcast channels ./start.sh
apt-get install vlc Download aceproxy and acestream and put them in one directory:
wget https://github.com/ValdikSS/aceproxy/archive/master.zip wget http://dl.acestream.org/debian/7/acestream_3.0.5.1_debian_7.4_x86_64.tar.gz Create next several directories:
mkdir logs mkdir scripts Create several scripts in the ./scripts directory:
cd ./scripts nano aceproxy.sh #!/bin/sh python ./aceproxy/acehttp.py > ./logs/acehttp.log 2>&1 & nano acestream.sh #!/bin/sh ./acestream/acestreamengine --lib-path ./acestream --client-console > ./logs/acestream.log 2>&1 & nano vlc.sh #!/bin/sh vlc -I telnet --clock-jitter -1 --network-caching -1 --sout-mux-caching 2000 --telnet-password admin > ./logs/acevlc.log 2>&1 & Go to the directory above and create scripts to start and stop the broadcast:
cd ../ nano start.sh #!/bin/bash /bin/kill -9 `/bin/ps ax |/bin/grep acestream |/usr/bin/awk {'print $1'}` ./scripts/acestream.sh echo "Start acestream" sleep 1 /bin/kill -9 `/bin/ps ax |/bin/grep vlc |/usr/bin/awk {'print $1'}` ./scripts/vlc.sh echo "Start VLC" sleep 1 /bin/kill -9 `/bin/ps ax |/bin/grep acehttp |/usr/bin/awk {'print $1'}` ./scripts/aceproxy.sh echo "Start aceproxy" nano stop.sh #!/bin/bash /bin/kill -9 `/bin/ps ax |/bin/grep acestream |/usr/bin/awk {'print $1'}` echo "Stop acestream" sleep 1 /bin/kill -9 `/bin/ps ax |/bin/grep vlc |/usr/bin/awk {'print $1'}` echo "Stop VLC" sleep 1 /bin/kill -9 `/bin/ps ax |/bin/grep acehttp |/usr/bin/awk {'print $1'}` echo "Stop aceproxy" Edit the aceproxy configuration according to the wiki
[ Wiki ]
Let's launch the broadcast channels ./start.sh
That's all, it remains only to create a playlist of your own taste and enjoy watching your favorite channels.
2.8 Hosting for a home site with access via https
As for hosting, everything is ready with us. Apache is for php lovers, everything is ready too, but I love Flask, but that's not the point, but in the green lock in the address bar. Which pleases the eye so much when recruiting the cherished https: // thanks to an article written by the user SLY_G . Just a couple of minutes you can please your eyes, seeing in the address bar a green miracle, receiving a free ssl certificate.
I thought about buying a domain for a long time. And there is a static, and a desire, but to give blood for a domain that does not please, for all the good names have already been bought, or I have no imagination. But in general, it was decided to create an ssl certificate for the domain name from ddns. Free and angry, but friends will not see a terrible warning about the insecurity of my cloud when I send links to various files from my repository. Yes, and most constantly do not have to see these windows. In general, I advise you to use the freebie.
findings
Having spent on equipment about 4 thousand rubles, you can get quite a lot of functionality and use iron almost to the fullest extent. Currently, the average processor load is ~ 60% with rare peaks. RAM is used almost completely by 80%, but these are consequences of virtualization. The host and machines in the swap have not yet been.
The server covers 90% of my desires. Most pleased that such a modest iron works at 100% with low power consumption. So, the electricity bill after switching from a router to such a server has not changed significantly.
PS I ask in case of detection of errors and inaccuracies to report in the LAN. This is my first article on Habr.
PPS Dear community, this article is not a configuration guide or a benchmark for correct configurations. This is just another article about what can be done with your old iron for the benefit of home LAN.
PPPS I would be very grateful for feedback and new ideas on this topic.
Source: https://habr.com/ru/post/260617/
All Articles