Tin - the basis of circuitry in your home
Kubotronic is actively developing. In addition to mechanical parts, he acquired additional panels, and we also developed the ability to connect Kubotronic units into electrical circuits. They printed all sorts of symbols of radio elements and even planned to make the game “CIRCUIT” to study the basics of this circuit design itself.

For electronic cubes, paradoxically, multiplicity is also important, and therefore a new stage in the development of Kubotronika was devoted specifically to this task.
The magnetic lock from the previous post yesterday, after repeated redesigning and reprinting all the elements to get the “best” connection, had an attractive appearance, but also had a flaw - lack of rigidity, which does not allow to assemble circuits with a complex topology.
')
In addition, you cannot attach these collected circuits to other cubes, since multiplicity violated.
The solution we offer today is elegant, fully printed on a 3D printer , solves these problems, although it looks a bit more cumbersome, but this is the price of multiplicity. Yes, by the way, and you do not need to buy magnets, only a 3D printer and a little tin. Tin need tinned.
Since the multiplicity must be respected, and the cubes are small, a new constructive element CONTACT-DELIVERY has appeared. The tasks of this unit are to ensure that what the magnet provided in the previous solution. The peculiarity of this element in its design and symmetrical contact made of tin. There were several options designed and printed, but the best turned out to be with a square hole in the center.
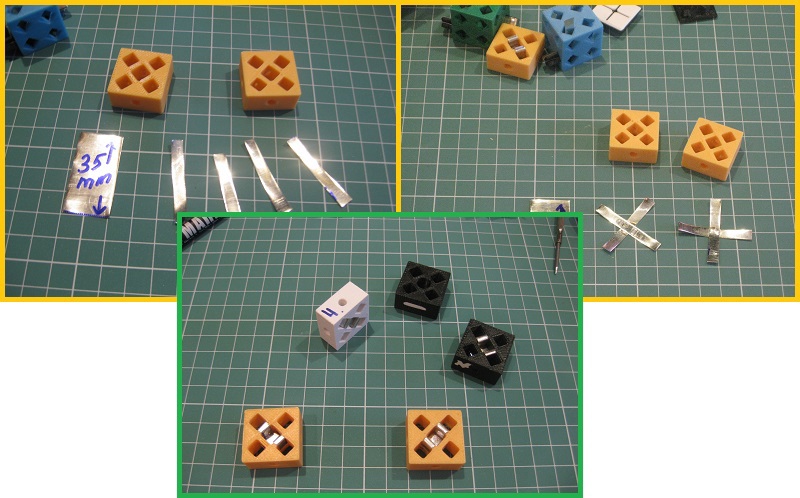
The tin is cut into narrow strips 5 mm wide and 35 mm long. Further, using a soldering iron, we attach strips EXACTLY in the middle at a right angle. Then the strips are bent in different directions relative to the junction. Such a symmetrical design, placed in the middle of the block, is fastened by extending the petals along peripheral holes.
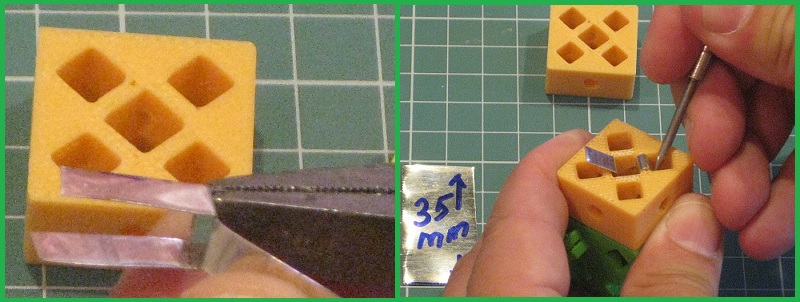
The middle of this “bent cross”, where the ration should be, should exactly fit in the middle of the Kubotronic block. You can check this through 4 small holes located on the edges.
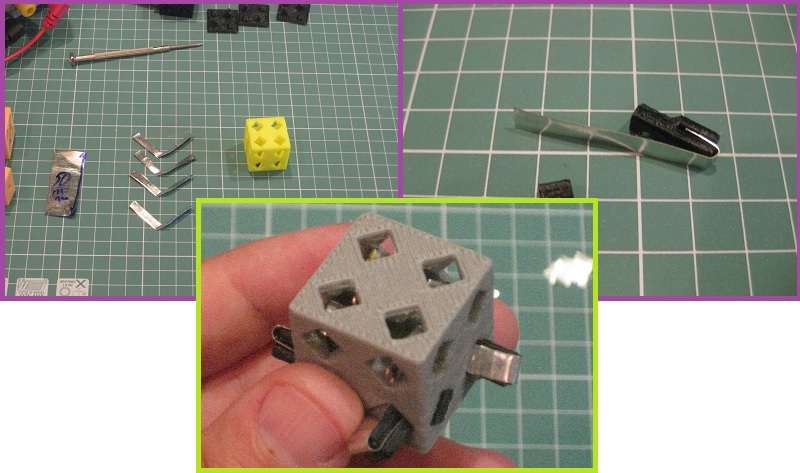
Now back to the device of the contact itself. As blanks, you must again take the scissors in your hands and cut strips of 5 mm wide and 50 mm long from tin. Initially, corner elements were used on the tests, but then they decided that it was possible to simply bend. We use the “regular” Kubotronic lock as a plug, but we modify it a little with sandpaper or a small file. This is necessary to reduce the cross section of the block lock, so that it moves freely inside the block and allows to place a contact made of tin.
Here is a small video on the method and sequence of manufacturing the contact itself for the Kubotronic unit:
The overall process of cramming contact is clear, there are nuances that are decided in place, but everything turned out quite technologically. Before switching contacts, they are cut to the surface. One of the options provided for forming the shorter upper parts at once and arching them on the sides in order to more easily solder, but this question is not yet closed.
Directly, the radio and electronic components are placed in the upper cells of the block, and the legs are soldered through the holes. Then the tin contacts are folded down to make room for the top panel latches.
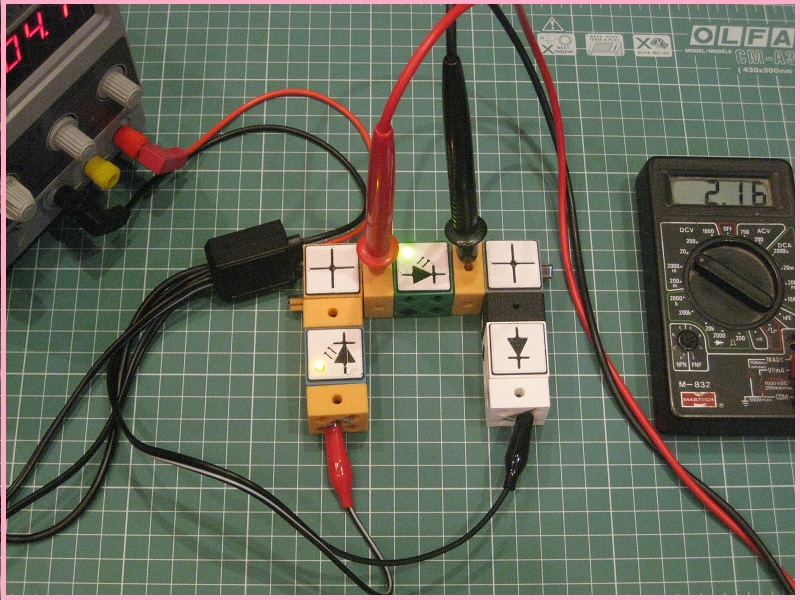
Pay attention to the photo of the assembled scheme, where you can see how convenient it is to make measurements on sections of the chains through the holes, since each such CONTACT-EXTENSION has an opening under the probe. Please write to us here or to the post office, with which radio elements we need to make panels, taking into account that there can be no more than 4 conclusions.
Files for printing all elements of magnetic or mechanical contact are attached.
We also offer you panels with letters of the English alphabet for installation on Kubotronic units.
For electronic cubes, paradoxically, multiplicity is also important, and therefore a new stage in the development of Kubotronika was devoted specifically to this task.
The magnetic lock from the previous post yesterday, after repeated redesigning and reprinting all the elements to get the “best” connection, had an attractive appearance, but also had a flaw - lack of rigidity, which does not allow to assemble circuits with a complex topology.
')
In addition, you cannot attach these collected circuits to other cubes, since multiplicity violated.
The solution we offer today is elegant, fully printed on a 3D printer , solves these problems, although it looks a bit more cumbersome, but this is the price of multiplicity. Yes, by the way, and you do not need to buy magnets, only a 3D printer and a little tin. Tin need tinned.
Since the multiplicity must be respected, and the cubes are small, a new constructive element CONTACT-DELIVERY has appeared. The tasks of this unit are to ensure that what the magnet provided in the previous solution. The peculiarity of this element in its design and symmetrical contact made of tin. There were several options designed and printed, but the best turned out to be with a square hole in the center.
The tin is cut into narrow strips 5 mm wide and 35 mm long. Further, using a soldering iron, we attach strips EXACTLY in the middle at a right angle. Then the strips are bent in different directions relative to the junction. Such a symmetrical design, placed in the middle of the block, is fastened by extending the petals along peripheral holes.
The middle of this “bent cross”, where the ration should be, should exactly fit in the middle of the Kubotronic block. You can check this through 4 small holes located on the edges.
Now back to the device of the contact itself. As blanks, you must again take the scissors in your hands and cut strips of 5 mm wide and 50 mm long from tin. Initially, corner elements were used on the tests, but then they decided that it was possible to simply bend. We use the “regular” Kubotronic lock as a plug, but we modify it a little with sandpaper or a small file. This is necessary to reduce the cross section of the block lock, so that it moves freely inside the block and allows to place a contact made of tin.
Here is a small video on the method and sequence of manufacturing the contact itself for the Kubotronic unit:
The overall process of cramming contact is clear, there are nuances that are decided in place, but everything turned out quite technologically. Before switching contacts, they are cut to the surface. One of the options provided for forming the shorter upper parts at once and arching them on the sides in order to more easily solder, but this question is not yet closed.
Directly, the radio and electronic components are placed in the upper cells of the block, and the legs are soldered through the holes. Then the tin contacts are folded down to make room for the top panel latches.
Pay attention to the photo of the assembled scheme, where you can see how convenient it is to make measurements on sections of the chains through the holes, since each such CONTACT-EXTENSION has an opening under the probe. Please write to us here or to the post office, with which radio elements we need to make panels, taking into account that there can be no more than 4 conclusions.
Files for printing all elements of magnetic or mechanical contact are attached.
We also offer you panels with letters of the English alphabet for installation on Kubotronic units.
Source: https://habr.com/ru/post/260425/
All Articles