Blend4Web vs Unity. Battle of the Internet
When friends asked me why I became interested in Blend4Web and began to study it, there was no definite answer. Yes, I use Unity and this is my main tool. He has enough opportunities with his head to implement any ideas. But I love Blender, as I have been working with it for many years. All the models, animations, cinematic scenes I do exclusively in it. A Blend4Web looks like a very decent real-time engine for WebGL.
And at one point, I wondered if Blend4Web could compete with such a popular Unity, and if so, in what areas ...

')
The story of acquaintance with Blend4Web was unusual and began with a simple video on YouTube. There was a kind of emotional chain: the focus of attention on the watched video, interest after visiting the site of developers and the delight of studying. So my article appeared on Habré: “ Blend4Web: review of the news of the domestic soft industry ”. I advise you to familiarize yourself with it, if you do not know what Blend4Web is.
For those who do not want to once again click the mouse, I literally retell the conclusions of the review article. And do not forget, all this is a subjective opinion!
Of course, not everything is so smooth. In the course of working with the engine, I also found certain problems: a primitive logic constructor, a complicated system of settings, an API intricacy. In general, anyone interested - read the first article , and I turn to the main topic.
An attempt to compare such unlike tools as Unity and Blend4Web , arose even before writing a review. The first acquaintance was not enough and I continued to study the latter. And now, perhaps, I am ready to pit these “beasts” amongst ourselves.
Weight categories of both “wrestlers” are clearly not the same. Unity is a super-popular cross-platform gaming environment that has a solid life span, a large community, and a huge number of released projects. Blend4Web is an actively developing technology with interesting makings, but very young. Therefore, an honest battle in terms of igrostroy until I see it impossible. I decided to stop on that activity in which Unity is strong and, as it seems to me, Blend4Web. The conversation will be about an interactive presentation on WebGL. In this article I will try to show the strengths and weaknesses of both engines in the development of virtual presentations and the export of the latest in WebGL.
The task was the following - to create a demonstration model of an aircraft engine, with a demonstration of the work of the main units and a brief annotation to them. Work was carried out simultaneously for Unity and Blend4Web. The same models, the same goals, but very different performance. Looking ahead, I will say that I had to throw out some interesting chips, both for Unity and for Blend4Web, mainly because of the time limit I set. And also, I am not an aviation designer or engineer. The engine layout used was taken from Wikipedia. It is likely that inaccuracies may lie somewhere.
Thinking over this stage of work, I leafed through the documentation for Blend4Web (I have long known the possibilities of Unity). In the set of visual effects came across some very interesting features, which I just tried to scratch my hands. I had to develop such a visual scheme that would be simple to perform, universal for both engines and optimal for presentation. The result was the following set:
First, three-dimensional models of the main components of the turbofan engine were created (Fig. 2).
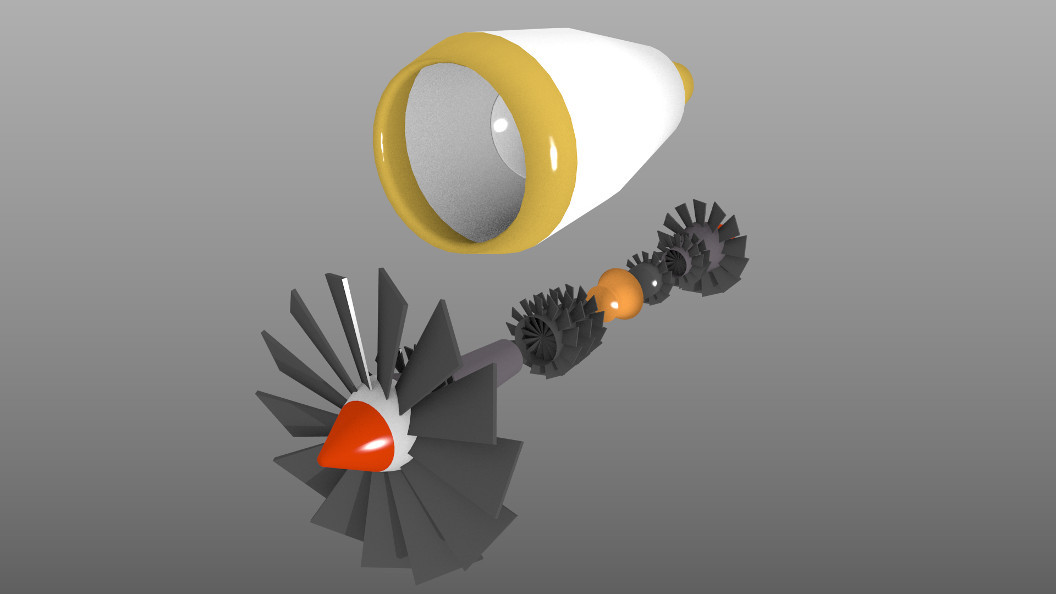
Fig. 2
The initial modeling for both engines can be performed in any three-dimensional editor. Naturally, for Blend4Web it is optimal to create models in Blender itself, but nothing prevents to import them from the side. As for Unity, the de facto standard for it is the FBX format (you can use the original blend file, which is also directly imported by the engine).
Blend4Web allows you to use standard Blender shaders on a “as-is” basis. Therefore, I chose the simplest way to visualize metal parts - I just installed a hard radiation in the reflective shader WardIso. The picture was quite decent. However, when comparing the results of Blender rendering and finished exporting the scene in the browser, it turned out that something was missing - there were no shadows. This is the first negative I put Blend4Web. Despite the excellent “understanding” of Blender's scene settings, the Blend4Web engine requires certain features to be enabled. And this seems like a mockery, because I have already included shadows in Blender materials, so why should I tick off somewhere else?
So, to enable shadows in Blend4Web, you need to activate the global Render Shadows feature in the Scene panels, and also individually enable the Shadows (Cast and Receive) options for each object. In Figure 3, I have marked the corresponding items. This completes the configuration of the models for Blend4Web and now we are moving on to Unity.
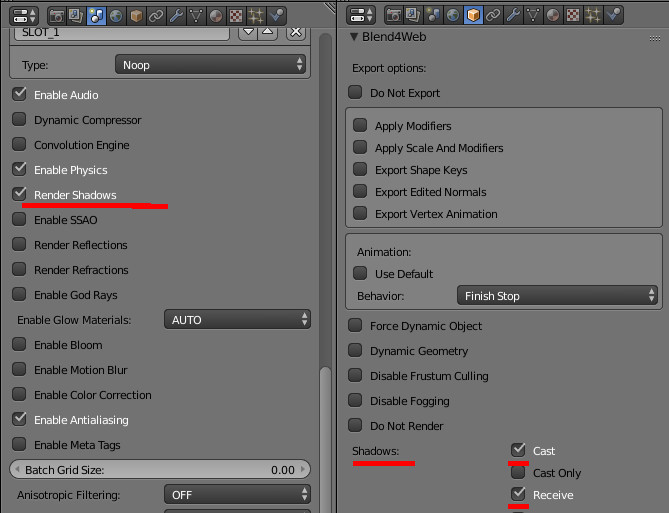
Fig. 3
Normally, Unity seamlessly imports models made in Blender. This time the normals were confused. Well, you probably met this unpleasant effect when the light and shade on the object are interchanged. This is treated either by recalculating the normals in Blender (group of options Mesh -> Normals in edit mode), or in the Unity import settings ( Normals & Tangents ). The most interesting thing is that there were no problems with the same object in Blender, both in the normal rendering and after exporting Blend4Web.
Otherwise, everything went well. Unity automatically created the necessary materials and it was enough to adjust them a bit. The Unity physical shader was up to par and allowed for a much needed metallic sheen. As for the shadows, they are automatically included when importing objects.
The next step was setting up the environment. Now I will be the first to consider the features of Unity.
Since in this experiment I fundamentally refused to texture, the option of using the Skybox did not fit. Initially, I intended to set the gradient as a background, but Unity out of the box offers either a solid color or a procedural Skybox (was I looking bad?). Alas, the latter does not look very good in the working scene due to the sharp boundary between the lower and upper hemispheres. So I had to stop at a primitive fill.
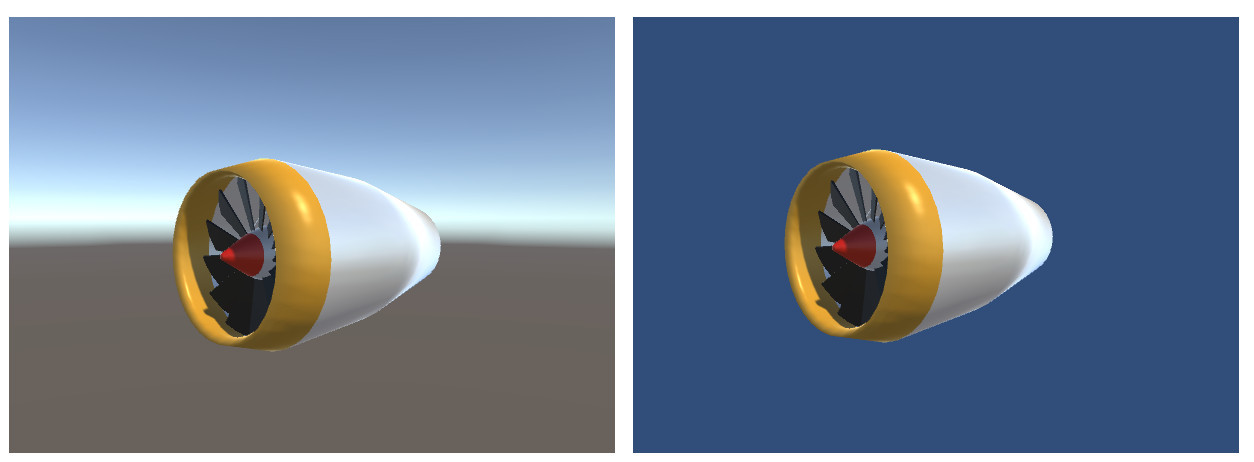
Fig. four
The light source was already in the scene by default, just as ambient light was turned on. As a matter of fact, on this the settings in Unity have been completed.
As for Blend4Web, here I discovered a much richer setting of the surrounding world. I don’t need most of them in this scene, but it’s still nice. Firstly, there is no problem using the standard Blender background. You want a solid color, and you want a gradient in different variants - in any case, the engine correctly picked up the settings of the World panel. This also applied to other parameters of the scene, such as the Environment light.
Secondly, Blend4Web offers a better procedural Skydome with fine settings. In general, there were no problems with Blend4Web.
I will summarize the work with the visual part.
Unity, I think, is more loyal to the inexperienced user. The basic scene functions are already enabled by default. Objects have shadows, correctly configured ambient light, procedural Skybox - this immediately shows the object without any additional settings. There were no special problems with the import of models, except for the “inverted” normals, but here, probably, I screwed up somewhere.
Blend4Web requires manual configuration of the same parameters, but it offers out of the box much more options. For example, in my scene I did not use post effects (bloom, blur, sun rays, etc.), but you could turn them on with a few mouse clicks. Of course, Unity also has its own set of post-effects, but for this you need to install and deal with them.
And, of course, the “two in one” system greatly facilitates the work on the project. Knowing Blender, you will create a scene without problems exported to WebGL.
Studying the demo and documentation of Blend4Web, I came to the conclusion that this engine can be very convenient for creating virtual content for sites for two reasons. Firstly, integration with Blender and secondly, the ability to work with it is not a programmer. Therefore, it was decided not to use the API, but to work only with what is available in the Blender panels.
So what should have been done:
Isn't it easy? That's just the result was different for the engines ...
In my review article about Blend4Web, I already wrote about a convenient player that is automatically embedded when exporting a scene in html. As a result, the user can freely view the object from all sides and even share information in popular social networks. Moreover, on the part of the designer, it will be necessary to make minimal gestures to obtain this effect and without a single line of code, since all settings are in the Blender panels.
And it really makes it easier to work on the presentation! Actually, here I did not do anything, because everything was already ready to solve the first task.
Now we turn to Unity. Unlike Blend4Web, the finished player is not offered here and needs to be created independently. There is no visual editor of logic out of the box either - everything is done on scripts. Of course, in the Asset Store you can choose the appropriate logic editor or ready-made code blanks, but for the purity of the experiment we will limit ourselves only to the basic configuration. I believe that in this part Blend4Web deliberately furnished Unity!
The implementation of the next task put me in a dead end. I supposed to make a few buttons, when clicked, some part of the model became transparent, and the necessary one was highlighted. The first problem is the complete absence of the Blend4Web GUI system.
Of course, the urge to make tricks is cunning and I immediately “stuck” the planes with inscriptions to the camera, but when the size of the browser window was changed, all the buttons “left” outside the working space. I could not find any object bindings to the borders of the screen in the settings of the plugin, so I had to do with half measures. I placed the control buttons at the bottom of the camera and so they remained in view, regardless of the size of the window.
Having safely resolved this issue, I went to the event handler. The developers of Blend4Web suggest using NLA sequences and the so-called slots they added to create the logic (NLA is the visual editor for non-linear animation Blender). You can enable and configure them in the Scene panel (Fig. 5).
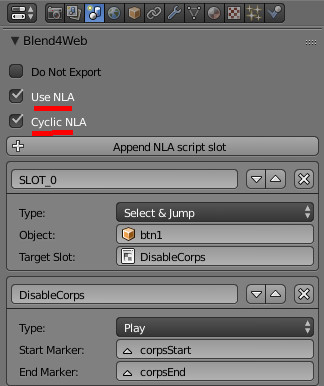
Fig. five
Each slot is a unique operation selected from the drop-down menu. With their help, you can track the selection of an object in the scene, control the animation, perform conditional or unconditional transitions, simple mathematical calculations, show and hide an object, and use several functions related to web links. And it's all.
There are not a lot of blanks, but they allow you to set up simple logic. It's not even a limited set, but rather the inconvenience of using it, because all these slots are put in one column without viewing the hierarchy. Really get confused.
Remembering that Blend4Web supports most of the Blender animations, I concocted a small logical chain: track click on the button -> start the animation. As an animation, I made a smooth change in the transparency of the part material. As expected, Blender easily allowed this, but not Blend4Web.
Alas, in an hour or two, nothing could be done. The loss of time was too big and I had to change the concept itself. Now the screen was asked to click on the engine cover, and after that it became transparent (in fact, there is a change of objects of different transparency. Not the best solution).
Afflicted by such a carelessly resolved task, I began with caution to implement the display of contextual information in parts of the model. However, there was a pleasant surprise from the developers. It turned out that it is enough to add Empty objects (auxiliary dummy) to the right place of the scene and fill in the necessary text fields in the panels. After exporting, short labels appear on the screen. If you click on them with the mouse, they open the context help (Fig. 6).
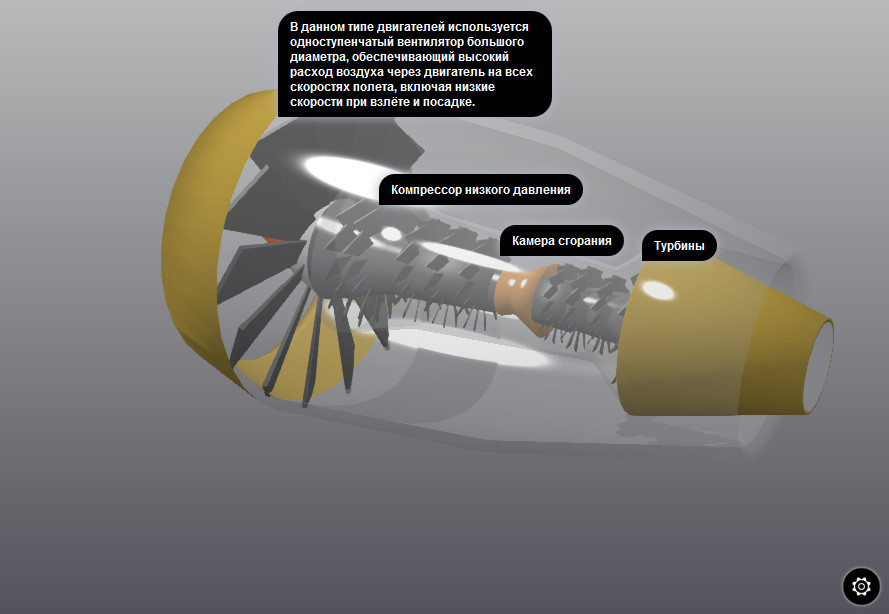
Fig. 6
As for Unity, then there is not so simple. There is a full-fledged GUI, the ability to write any logic of unthinkable complexity, but there are no special blanks to simplify the creation of a typical presentation. Therefore, I will not go into the jungle of scripts, but go to the final - export to HTML.
So, Blend4Web allows you to collect the entire scene, the control code and yourself in one HTML file. The test scene is assembled quickly (no more than 1 second) and literally with one click. Its size is 1.8 MB.
Now let's move on to Unity. I left all the default WebGL export settings and started processing. What is happening now (at the time of writing these words) is simply indescribable! I walked around the room, drank tea, spat at the ceiling, and everything is exported. Not less than five minutes this disgrace took place (compare with the second in Blend4Web). But most of all I was killed by the size of the folder with ready-made export files - 140 Megabytes !!! I have no words…
Update : A knowledgeable person suggested, as well as a more thorough study of the Unity manual, that the real size of the demo is not 140 meters, but about 19. The point is that Unity creates two folders with data - compressed and uncompressed (Release). I understand that at the discretion of the server, what to give.
/ Update :
To be honest, I don’t want to write, after such a stunning result in Unity. Export to WebGL appeared in it relatively recently and is still positioned as a preview version (at the time of writing this article, I had Unity 5.0.1 installed). Perhaps in the future everything will change, but at the moment the result of the export of Blend4Web is immeasurably better than the same for Unity.
Summarize the final result.
I had the opinion that the Blend4Web plugin is a more convenient and thoughtful tool for creating virtual presentations and here is why:
Detected cons when using Blend4Web:
Separately, I would like to go through the documentation engine. There are lessons, official guidelines, test projects, and this is good. But I did not find specific, small examples on the use of many possibilities, and official information is often limited to a dry listing. It makes wasting time on experiments.
As for Unity, in this comparison, it suffered a clear fiasco. Despite his friendliness and the ability to develop any complexity of projects, in this area he cannot offer fast and effective tools for creating presentations. Yes, and export to WebGL still wants to be the best.
For those who want to see:
Presentation on Blend4Web (1,8Mb)
Presentation on Unity (142 Mb)
And at one point, I wondered if Blend4Web could compete with such a popular Unity, and if so, in what areas ...
')
The story of acquaintance with Blend4Web was unusual and began with a simple video on YouTube. There was a kind of emotional chain: the focus of attention on the watched video, interest after visiting the site of developers and the delight of studying. So my article appeared on Habré: “ Blend4Web: review of the news of the domestic soft industry ”. I advise you to familiarize yourself with it, if you do not know what Blend4Web is.
For those who do not want to once again click the mouse, I literally retell the conclusions of the review article. And do not forget, all this is a subjective opinion!
- Full integration with Blender. After installing the Blend4Web plug-in or SDK, new options appear that complement, but do not overlap, the main functions of the program. Thus, the entire creative part is carried out in Blender.
- Simple export in real time. Optionally, you can get a single HTML file containing the code, graphics, and all the necessary dependencies to run. However, there are more complex ways of outputting and integrating executable code with a web page.
- Ready player for playing the scene with the already existing buttons for control, settings and sharing in popular social networks.
- Great opportunities to create interactivity without programming. For more complex tasks, it is possible to write scripts in JavaScript using the Blend4Web API.
- Domestic development. Documentation, lessons and forum in Russian (there is an English equivalent).
- Open Sources licensed under the GPL. Engine developers actively collaborate with the Blender team and participate in the development of the editor. For commercial purposes, the engine must be licensed.
- Active development. New release - every month. It seems that this is a kind of bar for developers.
Of course, not everything is so smooth. In the course of working with the engine, I also found certain problems: a primitive logic constructor, a complicated system of settings, an API intricacy. In general, anyone interested - read the first article , and I turn to the main topic.
An attempt to compare such unlike tools as Unity and Blend4Web , arose even before writing a review. The first acquaintance was not enough and I continued to study the latter. And now, perhaps, I am ready to pit these “beasts” amongst ourselves.
Weight categories of both “wrestlers” are clearly not the same. Unity is a super-popular cross-platform gaming environment that has a solid life span, a large community, and a huge number of released projects. Blend4Web is an actively developing technology with interesting makings, but very young. Therefore, an honest battle in terms of igrostroy until I see it impossible. I decided to stop on that activity in which Unity is strong and, as it seems to me, Blend4Web. The conversation will be about an interactive presentation on WebGL. In this article I will try to show the strengths and weaknesses of both engines in the development of virtual presentations and the export of the latest in WebGL.
The task was the following - to create a demonstration model of an aircraft engine, with a demonstration of the work of the main units and a brief annotation to them. Work was carried out simultaneously for Unity and Blend4Web. The same models, the same goals, but very different performance. Looking ahead, I will say that I had to throw out some interesting chips, both for Unity and for Blend4Web, mainly because of the time limit I set. And also, I am not an aviation designer or engineer. The engine layout used was taken from Wikipedia. It is likely that inaccuracies may lie somewhere.
Visual part
Thinking over this stage of work, I leafed through the documentation for Blend4Web (I have long known the possibilities of Unity). In the set of visual effects came across some very interesting features, which I just tried to scratch my hands. I had to develop such a visual scheme that would be simple to perform, universal for both engines and optimal for presentation. The result was the following set:
- Simple models without textures. Attractiveness only due to standard shaders.
- Gradient Background. I refused textures! A monochrome fill is too primitive.
- One directional light source, shadows and ambient light.
- No particles. It is clear that with their help you can significantly improve the picture, and the visibility of the process. But I did not want to waste time.
First, three-dimensional models of the main components of the turbofan engine were created (Fig. 2).
Fig. 2
The initial modeling for both engines can be performed in any three-dimensional editor. Naturally, for Blend4Web it is optimal to create models in Blender itself, but nothing prevents to import them from the side. As for Unity, the de facto standard for it is the FBX format (you can use the original blend file, which is also directly imported by the engine).
Blend4Web allows you to use standard Blender shaders on a “as-is” basis. Therefore, I chose the simplest way to visualize metal parts - I just installed a hard radiation in the reflective shader WardIso. The picture was quite decent. However, when comparing the results of Blender rendering and finished exporting the scene in the browser, it turned out that something was missing - there were no shadows. This is the first negative I put Blend4Web. Despite the excellent “understanding” of Blender's scene settings, the Blend4Web engine requires certain features to be enabled. And this seems like a mockery, because I have already included shadows in Blender materials, so why should I tick off somewhere else?
So, to enable shadows in Blend4Web, you need to activate the global Render Shadows feature in the Scene panels, and also individually enable the Shadows (Cast and Receive) options for each object. In Figure 3, I have marked the corresponding items. This completes the configuration of the models for Blend4Web and now we are moving on to Unity.
Fig. 3
Normally, Unity seamlessly imports models made in Blender. This time the normals were confused. Well, you probably met this unpleasant effect when the light and shade on the object are interchanged. This is treated either by recalculating the normals in Blender (group of options Mesh -> Normals in edit mode), or in the Unity import settings ( Normals & Tangents ). The most interesting thing is that there were no problems with the same object in Blender, both in the normal rendering and after exporting Blend4Web.
Otherwise, everything went well. Unity automatically created the necessary materials and it was enough to adjust them a bit. The Unity physical shader was up to par and allowed for a much needed metallic sheen. As for the shadows, they are automatically included when importing objects.
The next step was setting up the environment. Now I will be the first to consider the features of Unity.
Since in this experiment I fundamentally refused to texture, the option of using the Skybox did not fit. Initially, I intended to set the gradient as a background, but Unity out of the box offers either a solid color or a procedural Skybox (was I looking bad?). Alas, the latter does not look very good in the working scene due to the sharp boundary between the lower and upper hemispheres. So I had to stop at a primitive fill.
Fig. four
The light source was already in the scene by default, just as ambient light was turned on. As a matter of fact, on this the settings in Unity have been completed.
As for Blend4Web, here I discovered a much richer setting of the surrounding world. I don’t need most of them in this scene, but it’s still nice. Firstly, there is no problem using the standard Blender background. You want a solid color, and you want a gradient in different variants - in any case, the engine correctly picked up the settings of the World panel. This also applied to other parameters of the scene, such as the Environment light.
Secondly, Blend4Web offers a better procedural Skydome with fine settings. In general, there were no problems with Blend4Web.
I will summarize the work with the visual part.
Unity, I think, is more loyal to the inexperienced user. The basic scene functions are already enabled by default. Objects have shadows, correctly configured ambient light, procedural Skybox - this immediately shows the object without any additional settings. There were no special problems with the import of models, except for the “inverted” normals, but here, probably, I screwed up somewhere.
Blend4Web requires manual configuration of the same parameters, but it offers out of the box much more options. For example, in my scene I did not use post effects (bloom, blur, sun rays, etc.), but you could turn them on with a few mouse clicks. Of course, Unity also has its own set of post-effects, but for this you need to install and deal with them.
And, of course, the “two in one” system greatly facilitates the work on the project. Knowing Blender, you will create a scene without problems exported to WebGL.
Logical part
Studying the demo and documentation of Blend4Web, I came to the conclusion that this engine can be very convenient for creating virtual content for sites for two reasons. Firstly, integration with Blender and secondly, the ability to work with it is not a programmer. Therefore, it was decided not to use the API, but to work only with what is available in the Blender panels.
So what should have been done:
- Global viewing of the scene from different sides, as well as zooming and panning.
- Highlighting the selected part of the model with information about it.
Isn't it easy? That's just the result was different for the engines ...
In my review article about Blend4Web, I already wrote about a convenient player that is automatically embedded when exporting a scene in html. As a result, the user can freely view the object from all sides and even share information in popular social networks. Moreover, on the part of the designer, it will be necessary to make minimal gestures to obtain this effect and without a single line of code, since all settings are in the Blender panels.
And it really makes it easier to work on the presentation! Actually, here I did not do anything, because everything was already ready to solve the first task.
Now we turn to Unity. Unlike Blend4Web, the finished player is not offered here and needs to be created independently. There is no visual editor of logic out of the box either - everything is done on scripts. Of course, in the Asset Store you can choose the appropriate logic editor or ready-made code blanks, but for the purity of the experiment we will limit ourselves only to the basic configuration. I believe that in this part Blend4Web deliberately furnished Unity!
The implementation of the next task put me in a dead end. I supposed to make a few buttons, when clicked, some part of the model became transparent, and the necessary one was highlighted. The first problem is the complete absence of the Blend4Web GUI system.
Of course, the urge to make tricks is cunning and I immediately “stuck” the planes with inscriptions to the camera, but when the size of the browser window was changed, all the buttons “left” outside the working space. I could not find any object bindings to the borders of the screen in the settings of the plugin, so I had to do with half measures. I placed the control buttons at the bottom of the camera and so they remained in view, regardless of the size of the window.
Having safely resolved this issue, I went to the event handler. The developers of Blend4Web suggest using NLA sequences and the so-called slots they added to create the logic (NLA is the visual editor for non-linear animation Blender). You can enable and configure them in the Scene panel (Fig. 5).
Fig. five
Each slot is a unique operation selected from the drop-down menu. With their help, you can track the selection of an object in the scene, control the animation, perform conditional or unconditional transitions, simple mathematical calculations, show and hide an object, and use several functions related to web links. And it's all.
There are not a lot of blanks, but they allow you to set up simple logic. It's not even a limited set, but rather the inconvenience of using it, because all these slots are put in one column without viewing the hierarchy. Really get confused.
Remembering that Blend4Web supports most of the Blender animations, I concocted a small logical chain: track click on the button -> start the animation. As an animation, I made a smooth change in the transparency of the part material. As expected, Blender easily allowed this, but not Blend4Web.
Alas, in an hour or two, nothing could be done. The loss of time was too big and I had to change the concept itself. Now the screen was asked to click on the engine cover, and after that it became transparent (in fact, there is a change of objects of different transparency. Not the best solution).
Afflicted by such a carelessly resolved task, I began with caution to implement the display of contextual information in parts of the model. However, there was a pleasant surprise from the developers. It turned out that it is enough to add Empty objects (auxiliary dummy) to the right place of the scene and fill in the necessary text fields in the panels. After exporting, short labels appear on the screen. If you click on them with the mouse, they open the context help (Fig. 6).
Fig. 6
As for Unity, then there is not so simple. There is a full-fledged GUI, the ability to write any logic of unthinkable complexity, but there are no special blanks to simplify the creation of a typical presentation. Therefore, I will not go into the jungle of scripts, but go to the final - export to HTML.
So, Blend4Web allows you to collect the entire scene, the control code and yourself in one HTML file. The test scene is assembled quickly (no more than 1 second) and literally with one click. Its size is 1.8 MB.
Now let's move on to Unity. I left all the default WebGL export settings and started processing. What is happening now (at the time of writing these words) is simply indescribable! I walked around the room, drank tea, spat at the ceiling, and everything is exported. Not less than five minutes this disgrace took place (compare with the second in Blend4Web). But most of all I was killed by the size of the folder with ready-made export files - 140 Megabytes !!! I have no words…
Update : A knowledgeable person suggested, as well as a more thorough study of the Unity manual, that the real size of the demo is not 140 meters, but about 19. The point is that Unity creates two folders with data - compressed and uncompressed (Release). I understand that at the discretion of the server, what to give.
/ Update :
Final comparison
To be honest, I don’t want to write, after such a stunning result in Unity. Export to WebGL appeared in it relatively recently and is still positioned as a preview version (at the time of writing this article, I had Unity 5.0.1 installed). Perhaps in the future everything will change, but at the moment the result of the export of Blend4Web is immeasurably better than the same for Unity.
Summarize the final result.
I had the opinion that the Blend4Web plugin is a more convenient and thoughtful tool for creating virtual presentations and here is why:
- Solid visual rendering capabilities. I considered only those that I needed to create a test scene. Check out the Blend4Web documentation and see a lot of interesting things.
- Blanks for setting the scene, the behavior of objects and logic. Without programming, I was able to make the main logic of the application, create context-sensitive help, highlight objects when selected, arrange the scene.
- Fast export and small in size ready file.
Detected cons when using Blend4Web:
- No GUI
- Primitive and inconvenient logic editor.
Separately, I would like to go through the documentation engine. There are lessons, official guidelines, test projects, and this is good. But I did not find specific, small examples on the use of many possibilities, and official information is often limited to a dry listing. It makes wasting time on experiments.
As for Unity, in this comparison, it suffered a clear fiasco. Despite his friendliness and the ability to develop any complexity of projects, in this area he cannot offer fast and effective tools for creating presentations. Yes, and export to WebGL still wants to be the best.
For those who want to see:
Presentation on Blend4Web (1,8Mb)
Presentation on Unity (142 Mb)
Source: https://habr.com/ru/post/260391/
All Articles