We are struggling with Status 7. How does the OTA update mechanism work and why does it fail

Quite often, users who are accustomed to rutting firmware, installing various kinds of system software, changing kernels and differently making fun of firmware, find that it is impossible to install an OTA update. It simply does not rise, swearing at the changed system files, wrong digital keys, and everything else. In this article I will talk about the mechanics of the update itself, the causes of problems, and how to solve them.
How it works
The first new versions of Android traditionally receive the latest of the Nexus devices. When the new version of the firmware is ready for the general public, the full image is posted to developers.google.com/android/nexus/images. Soon after, the distribution of the firmware through the air begins. As one of Google developers Dan Morrill tells (Dan Morrill), at first OTA is sent to 1% of devices. This happens randomly, regardless of the region or place of purchase of the phone / tablet. At this time, bugs are caught, which allows you to suspend the update in the presence of critical errors among a large number of users.
Then within a couple of weeks, the update is distributed for 25, 50, 100% of users. That is, in the first stage, the chance to receive an update has one device out of a hundred. If the update is not received, the device drops out of the list and repeated repeated clicking on the button “Check for updates” automatically transfers the device to the end of the list. When a new distribution stage is launched, clicking on the button gives the next chance to receive an update already 25%. Since the device itself checks for updates once a day (or when rebooting), then pressing the button can “shoot” before it happens by itself. But again, there will be a check only once. Further clicks will not help. This is not the situation when "who first clicked, he first received." In any case, the air update will come to everyone within a couple of weeks. The most impatient can update the update with their hands (see below).
')

Update Notification
We force update
There are two ways to speed up getting updates. The first is to clear the Google Services Framework data and then reboot the device. Extremely not recommended method which even Google engineers condemn . This method causes many negative effects, the main of which is the change of identifier for GCM (Google Cloud Messenger). This identifier is needed in all Google programs and many other applications that use push notifications. And if in some programs it is relatively easy to overcome the effects, for many others the consequences may be more sad. All applications will simply stop accepting GCM-based push notifications until they receive a new identifier. Some applications check frequently, some rarely. For the part, cleaning the application data will help. And those applications that use GCM ID as an identifier on their servers may have deeper problems.

Stock recovery
The second is to install the update by hand through the recovery console. Shortly after the launch of the OTA, files like.signed-hammerhead-LRX21O-from-KTU84P.c1a33561. which one with which). On a computer, you must have a folder with utilities ADB and fastboot. I am using the latest versions of the Android SDK. In the same folder you need to put the downloaded archive with the OTA-update. It is also necessary to have properly installed drivers for the device, which may conflict with previously installed drivers for other devices.
The device itself should be put into recovery mode. To do this, with the device turned off, we simultaneously hold down the <Power + VolDown> buttons and enter the bootloader, select Recovery mode with the volume button, enter the Power button with it. A recumbent Android will appear with an exclamation point. This is not a mistake, you should not be afraid. It is necessary on this screen to briefly press <Power + VolUp>, after which the stock recovery will load. In it, you must select the apply update from ADB button with the volume buttons and confirm with the power button. Next, you need to connect your phone / tablet to your computer. Start the console, go to the folder with the ADB and the update archive and enter the following command (for the file above):
$ adb sideload .signed-hammerhead-LRX21O-from-KTU84P.c1a33561.zip After that, the phone will install OTA and it will reboot.
Inset block: How to download the update via the cellular network
Notification of the availability of OTA can come when the device is not connected to Wi-Fi. At that, a note will appear that the file is available for download via Wi-Fi before a certain date (about a week), and the Download button itself will be inactive. This is done to save user money. If a Wi-Fi connection is not foreseen in the near future, you can fool the phone and download the update via 3G / 4G, simply by moving the date in the phone forward, later than the date specified in the notification, and rebooting the device.
INFO
Stock (stock - from the store) firmware is understood to be the presence of a factory kernel, recovery, and the absence of modifications, including those obtained with the help of root.
Modified firmware
If your bootloader is unlocked, custom recovery is installed, root is obtained, which various programs are actively using, and various modifications are applied, then with a 99% probability the update will not be installed. Even when the stock recovery is returned when flashing via ADB, the Status 7 error will be issued. The custom recovery will also write an error, cursing the changed files. You can overcome this problem by returning the smartphone to the factory firmware, but this is not our method. We will deal with it, picking up the update file, find out where the installation stumbles, and fix the problem. And all this is based on the example of the largest Nexus 5 update - from version 4.4.4 (KTU84P) to 5.0 (LRX21O).
OTA mechanics
So, the update from 4.4.4 to 5.0 was the largest one recently, with an archive weight of 491 MB. In connection with the change of Dalvik to ART, almost all of the code has been modified. So what does the archive contain? As can be seen in the screenshot “Files from the archive with the upgrade to 5.0”, inside the archive are images of the bootloader (various sections), META-INF, patch and system directories.
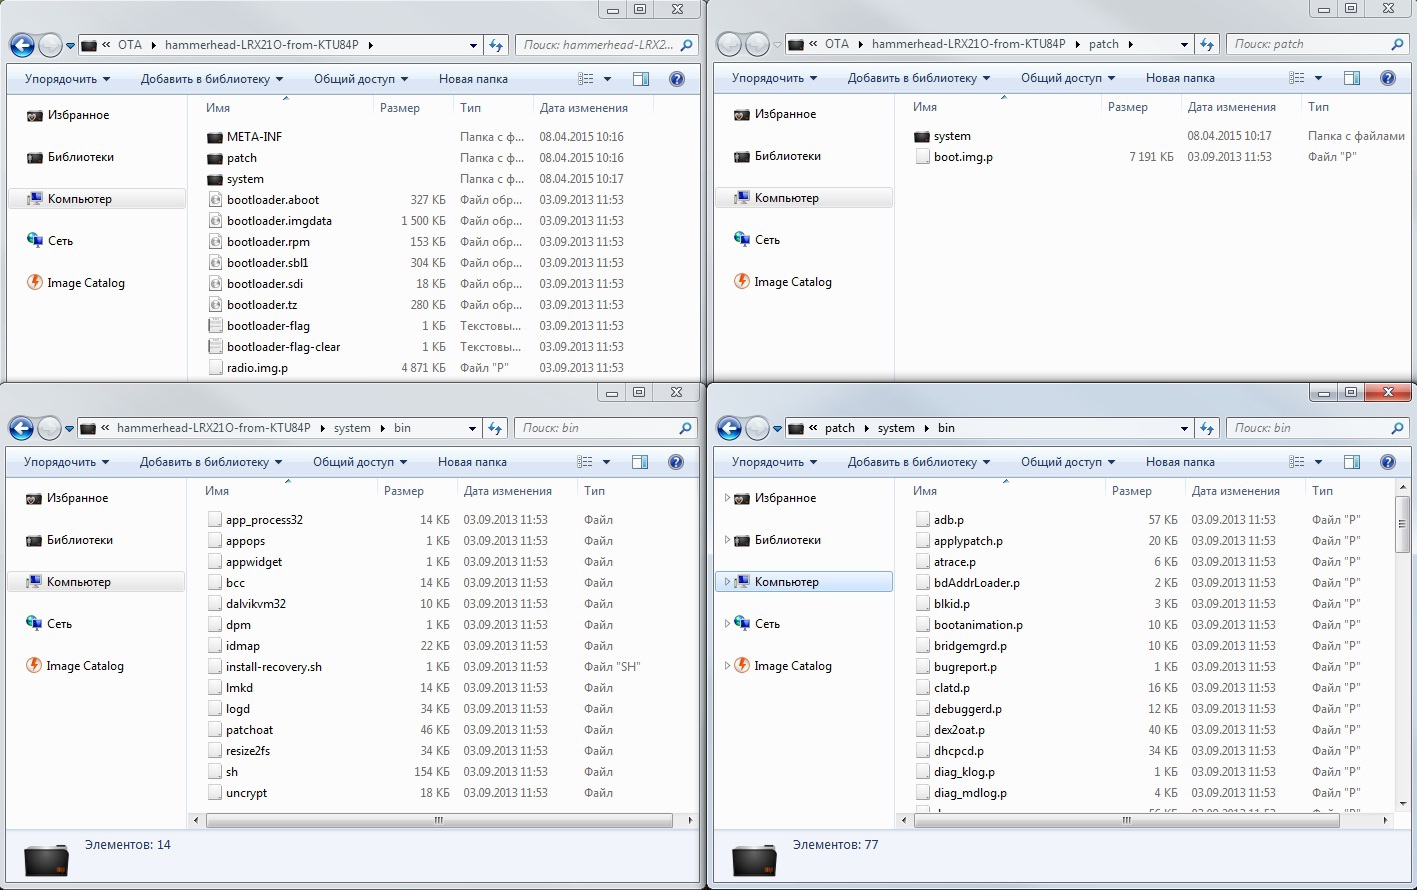
Files from archive with updating to 5.0
To minimize the amount of traffic and reduce server load, as well as to reduce the end-user costs, the update structure is structured so that files with a large number of changes or written from scratch are located in the system directory and are changed entirely. And files with small changes by Google’s standards are not replaced, but patched, that is, pieces of code inside the file change. These files are located inside the patch directory and have the extension .p. This is clearly seen when comparing files in / system / bin and / patch / system / bin. At the same time, the bsdiff, well-known to Unixoids, is used to create a patch, which allows you to get a delta (a file with a difference between the files) from two binaries.
The very same magic occurs at the will of updater-script, which is located in / META-INF / com / google / android. That is what we consider in more detail. The file itself weighs 463 KB and contains lines of code responsible for the process of applying the OTA update (in fact, it is the script language Edify, the interpreter of which is located in the same directory and has the name update-binary. - Ed.). This is what it contains in our case. First, the / system partition is mounted (the standard mount line for Linux is quite similar to those found in / etc / fstab):
mount("ext4", "EMMC", "/dev/block/platform/msm_sdcc.1/by-name/system", "/system", "max_batch_time=0,commit=1,data=ordered,barrier=1,errors=panic,nodelalloc"); Next, the script checks the device model and firmware version by reading the ro.build.fingerprint system variable (note that it does not take it from the /system/build.prop file, but requests the recovery itself, so the updates cannot be installed using the custom console recovery, although up to 5.0 it was possible). Hereinafter, the ellipsis is abbreviated lines:
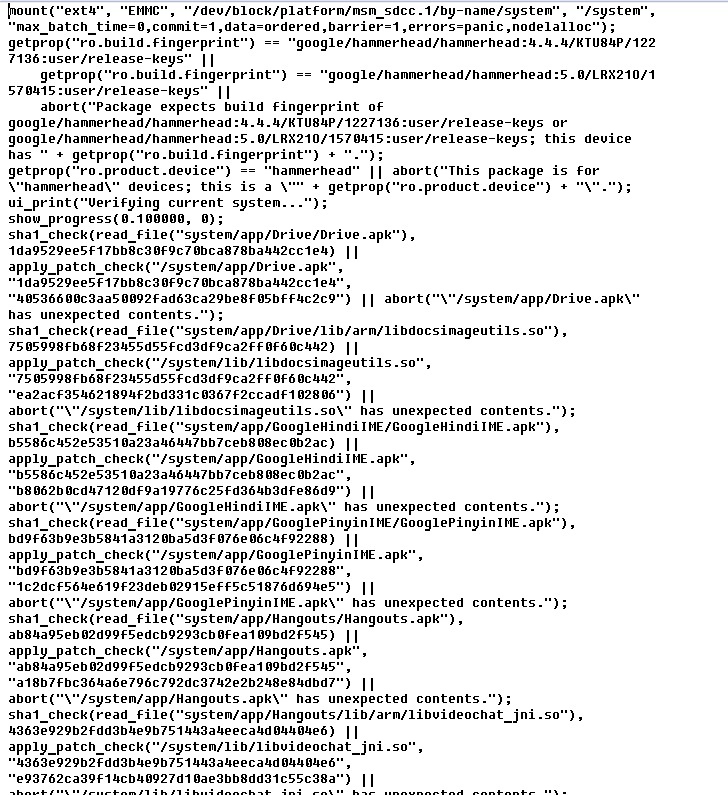
getprop("ro.build.fingerprint") == "google/hammerhead/hammerhead:4.4.4/KTU84P/1227136:user/release-keys" || getprop("ro.build.fingerprint") == "google/hammerhead/hammerhead:5.0/LRX21O/1570415:user/release-keys" || abort("Package expects build fingerprint of google/hammerhead/hammerhead:4.4.4 ..."); getprop("ro.product.device") == "hammerhead" || abort("This package is for \"hammerhead\" devices ..."); As can be seen above, the update will not be added to the “non-native” device, but it can be re-rolled to version 5.0. The script also checks if the firmware is signed with official Google keys (release-keys). Because of this, many users have problems. Next begins checking the availability and integrity of individual files using the SHA-1 hash check. Two functions are used for this: sha1_check (), which takes as its arguments the file name and hash, and apply_patch_check (), which takes three arguments: the file name, and two hashes. The first one is used simply to check the integrity of the file, the second one checks whether the file has already been patched. For simplicity, the long hashes in the code below are replaced by ellipsis:
sha1_check(read_file ("system/app/Drive/Drive.apk"), ...) || apply_patch_check("/system/app/Drive.apk", ...) || abort("\"/system/app/Drive.apk\" has unexpected contents."); sha1_check(read_file("system/app/Drive/lib/arm/libdocsimageutils.so"), ...) || apply_patch_check("/system/lib/libdocsimageutils.so", ...) || abort ("\"/system/lib/libdocsimageutils.so\" has unexpected contents."); For example, only two checks are shown. In fact, all files that are to be replaced or modified by the patch are checked. The code shows that the update will generate an error if, for example, the file /system/app/Drive.apk has been changed or deleted. At the end of the check block, the script checks the kernel, the available space in / system and radio:
apply_patch_check("EMMC:/dev/block/platform/msm_sdcc.1/by-name/boot:8908800:...") || abort("..."); apply_patch_space(23999236) || abort("Not enough free space on /system to apply patches."); apply_patch_check("EMMC:/dev/block/platform/msm_sdcc.1/by-name/modem:46499328:...") || abort("..."); That is, this update will not arise if there is a custom core or a radio modification. The next step is to delete old files from the device before replacing them with new ones and deleting files that are not needed on the new firmware:
delete("/system/app/BasicDreams/", "/system/app/BasicDreams/arm/", ...); Then all the necessary files are patched with a preliminary check of the SHA-1 hash. Patching is performed using the apply_patch () function, which accepts file names for patching and several hashes: the original hash, patch hash and result hash. The final argument is the name of the file with the patch. As before, all the hashes in the code below are reduced to a dot:
sha1_check(read_file("system/app/Drive/Drive.apk"), ...) || apply_patch("/system/app/Drive.apk", "-", ..., package_extract_file("patch/system/app/Drive.apk.p")); The latest patches are the kernel and RAM disk:
apply_patch("EMMC:/dev/block/platform/msm_sdcc.1/by-name/boot:..., package_extract_file("patch/boot.img.p")); The next block transfers to the device files that are not under the patch and must be replaced entirely. Some of them then move:
package_extract_dir("system", "/system"); rename("system/app/KoreanIME.apk", "system/app/KoreanIME/KoreanIME.apk"); rename("system/framework/wm.odex", "system/framework/arm/wm.odex"); ... Unnecessary files are deleted, symlinks, access rights and flags are placed (here the access rights and flags are replaced with ellipsis):
delete("/system/etc/firmware/wcd9320/wcd9320_mbhc.bin", ...); symlink("/data/misc/audio/mbhc.bin", "/system/etc/firmware/wcd9320/wcd9320_mbhc.bin"); symlink("/data/misc/audio/wcd9320_anc.bin", "/system/etc/firmware/wcd9320/wcd9320_anc.bin"); ... set_metadata_recursive("/system/bin", ...); set_metadata("/system/bin/app_process32", ...); The bootloader and related sections are stitched:
package_extract_file("bootloader-flag.txt", "/dev/block/platform/msm_sdcc.1/by-name/misc"); package_extract_file("bootloader.aboot.img", "/dev/block/platform/msm_sdcc.1/by-name/aboot"); package_extract_file("bootloader.rpm.img", "/dev/block/platform/msm_sdcc.1/by-name/rpm"); ... Patches radio / modem:
apply_patch("EMMC:/dev/block/platform/msm_sdcc.1/by-name/modem:..., package_extract_file("radio.img.p")); The latest change is build.prop, which is recorded including the new firmware version. This is done so that when an error occurs at the very last stage, when almost all files have been transferred, interrupt the update and save the current firmware version number in a file on the device. Then, when you click the Check for Update button, you can run it again.
apply_patch("/system/build.prop", "-", ..., package_extract_file("patch/system/build.prop.p")); set_metadata("/system/build.prop", ...); At the end of the script, the / system partition is unmounted, and verification of the application update starts, the SHA-1 hash of the new files is checked and / system is unmounted:
unmount("/system"); mount("ext4", "EMMC", "/dev/block/platform/msm_sdcc.1/by-name/system", "/system", ""); assert(sha1_check(read_file("/system/app/CalendarGooglePrebuilt/CalendarGooglePrebuilt.apk"), ...)); assert(sha1_check(read_file("/system/app/CaptivePortalLogin/CaptivePortalLogin.apk"), ...)); ... unmount("/system"); After that, the device is rebooted into a new system.
Updater script as it is
Custom recovery
Until recently, it was possible to flash the OTA update archive in most cases (if there was no recovery check to replace it) from the custom recovery by simply uploading the file to the device and selecting install zip. But starting with the script for update 5.0, the script has changed. Previous versions checked the /system/build.prop file:file_getprop("/system/build.prop", "ro.build.fingerprint")
Current scripts check not the file, but the value of the system variable directly, requesting it from recovery:getprop("ro.build.fingerprint")
And if you disassemble custom recovery (for example TWRP version 2.8.0.0), then you can see the following lines:ro.build.description=omni_hammerhead-eng 4.4.4 KTU84P eng.dees_troy.20140910.125240 test-keys ro.build.fingerprint=Android/omni_hammerhead/hammerhead:4.4.4/KTU84P/eng.dees_troy.20140910.125240:eng/test-keys
Version TWRP 2.8.6.1 has the following lines in the code (pay attention to the word omni in the second line, the developer of TWRP with the nickname Dees Troy is also one of the active OmniROM developers):ro.build.id=LRX22G ro.build.display.id=omni_hammerhead-eng 5.0.2 LRX22G eng.dees_troy.20150403.145211 test-keys ro.build.version.incremental=eng.dees_troy.20150403.145211
And the latest versions of CWM Touch and Philz are signed like this:ro.build.description=hammerhead-user 4.4 KRT16M 893803 release-keys ro.build.fingerprint=google/hammerhead/hammerhead:4.4/KRT16M/893803:user/release-keys
It is these values that the script returns when checking, interrupting the update at the very beginning and giving an error about the non-compliance of the Android version on the device.
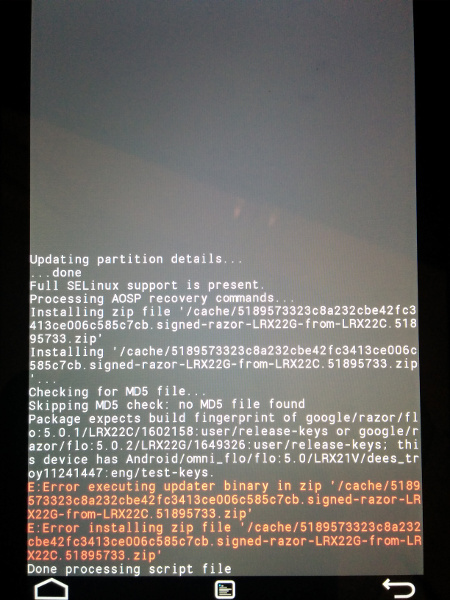
Here's the answer you get when trying to install update 5.0.2 on Nexus 7 from custom recovery
Updates 4.4.3–4.4.4
For comparison, you can bring the previous update from version KTU84M to KTU84P. The update is small and weighs only 2.5 MB. Mainly related to security enhancements. If you open the archive, you can see that only a small number of system files and the radio are patched, respectively, the script and only checks them. This update was normally installed with the root, the custom kernel and the working Xposed Framework, as this is not checked for any changes.
Update for Nexus 6 and Nexus 9
The latest Google devices have a different script structure. For these and (apparently) subsequent Nexus devices, Google has added a block-by-block generation function to the build script that forms the OTA update. Such an update checks and updates not individual files, but blocks in the / system file system. Further in the example “66, ..., 524256” are the long lists of block addresses:
if range_sha1("/dev/block/platform/msm_sdcc.1/by-name/system", "66,...,524256") == "..." then block_image_update("/dev/block/platform/msm_sdcc.1/by-name/system", package_extract_file("system.transfer.list"), "system.new.dat", "system.patch.dat"); This allowed Google engineers to significantly simplify and speed up the use of the OTA update for the end devices, and the updater script itself now takes only 5 Kb. But it turned into a headache for advanced users. After all, now any changes in the system partition will cause a crash. Including extra files. Even the fact that the system is mounted as R / W will lead to a change in the hash of the superblock FS.
Conclusion
Summing up the article, we can draw the following conclusions:
- Superuser rights do not in themselves affect the success of an update. The changes that the user and programs make to the system, having these rights, affect. Often these changes cannot be tracked and returned.
- Whether root and changes made to the system will affect a successful update depends every time on what exactly changes in the system during the update and what files the script checks. If the system changed, unnecessary system applications were frozen / disconnected via Titanium Backup, kernels were changed, custom recovery, Xposed Framework, Lucky Patcher, freedom, franco.Kernel updater, dialer mods and all sorts of improvements for sound, other boot animation, system fonts and so on were set Further. All this may affect the update.
- When modifying the system, always leave the original files for backup if you want to update via OTA. Copy to the cloud, rename as you like. You can make a Nandroid backup of the / system partition (read about the Nandroid in the previous issue).
- If you remember that you have changed in the system, you can almost always roll back. Recovery always writes an error, what the update curses. Googling the name of the file in the error, you can sometimes find which program changes it. For example, / system / bin / thermal-engines-hh and /system/lib/power.msm8974.so replaces franco.Kernel updater and does not return it even when flashing the stock kernel and demolishing the application itself.
- For successful application of OTA, it is necessary to return the original files to the system. The surest way is to flash the system.img, the stock kernel and recovery before installing the update (data and applications will not be lost).
- Well, the main conclusion. If there is a root and many modifications - do not suffer, but immediately complete the full image of the new firmware by deleting the -w key in flash-all.bat to save the data. Starting with the upgrade to version 5.0, there remains a very small chance to deceive the script. Yes, and the next update may have a “block” structure, which implies the presence of only a full flow for use.
A couple of words from the editor
Until recently, OTA-updates in custom firmware (CyanogenMod, Paranoid) always came in the form of a zip with the full firmware version and it was absolutely unimportant what changes were made to the system before. The firmware has always been reinstalled (preserving user data and gapps, of course), but in CyanogenMod 11 there was an incremental update feature, but much simpler than Google’s. The update simply checks the integrity of the firmware and replaces those files that have changed from the previous version (usually the nightly build), without any patches. Moreover, if you miss one of the updates, the next one in the old manner will come in the form of a full update. Simple and convenient.
A more interesting method is used in OmniROM. It uses binary patches to update, but not at all the way Google does. The first OTA update is always downloaded completely, after which it is saved on the memory card, stitched, but not deleted from the card. The next OTA-update already comes in the form of a single binary patch, after which the patch is superimposed on the update saved last time on the memory card and it is already being stitched. The highlight of this method is that the patch is not superimposed on the system, but on the file with the last update and the smartphone is flashed from zero every time (but with preservation of data and settings). Almost perfect method - traffic is saved, and you don’t need to worry about conflicts with the modified system.
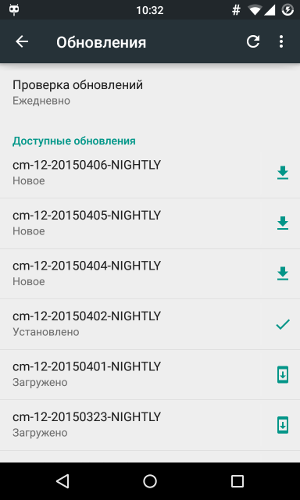
Update Installation Screen in CyanogenMod 12

First published in Hacker Magazine # 196.
Posted by: Dmitry «BRADA» Podkopaev
Subscribe to "Hacker"
Source: https://habr.com/ru/post/260379/
All Articles