Creating native Android applications using the Intel C ++ Compiler compiler in Android Studio 1.0.1
 At the time of this writing, the current version of Android Studio was version 1.0.1. The Intel C ++ Compiler for Android compiler, being part of the Intel Integrated Native Developer Experience (Intel INDE), supports Android Studio 1.0.1 in Intel INDE 2015 Update 1. Because Android Studio 1.0.1 does not support Android NDK, this article describes the steps to create a native Android application using the Android NDK r10d and the Intel C ++ Compiler Compiler for Android. Go!
Android Studio uses Gradle as a build system. At the time of writing, Gradle called the NDK system during the build process. In Android NDK r10 and later, after installing Intel INDE, the Intel C ++ Compiler for Android (ICC) compiler is no longer the default compiler in the NDK build system.
The steps below provide a general description of how to prepare, build, and run a native application in Android Studio 1.0.1.
If you are using Android Studio 0.8.6, read the article " Building native Android applications using the Intel C ++ Compiler compiler in Android Studio ", which describes the use of the Intel C ++ Compiler.
')
Required software tools
Successful installation of INDE 2015 Update 1 with Android Studio Integration ensures that you have all the necessary software. Detailed software and system requirements are described in Intel C ++ Compiler Release Notes for Intel Integrated Native Developer Experience 2015 .
The instructions in this article suggest using the following software for the IA-32 and Intel-64 architecture:
- Oracle JDK 7 (native Intel-64 JDK for Windows x64 systems)
- Android SDK 20 or older
- NDK r10d (installation is supposed in [ndk-dir])
- Android Studio 1.0.1
Make sure that the following Android NDK directories have been added to the PATH environment variable (if not, add them):
- C: \ Intel \ INDE \ IDEintegration \ NDK \ build \ tools
- C: \ Intel \ INDE \ IDEintegration \ NDK
Using the Intel C ++ Compiler compiler in Android Studio 1.0.1
After installing Intel C ++ Compiler 15.0 for Android, the following items are installed in the [ndk-dir] \ toolchains folder (the default directory is “C: \ Intel \ INDE \ IDEintegration \ android-ndk-r10d \ toolchains”):
- x86-icc
- x86-icc15.0.X.YYY
- x86_64-icc (if NDK supports 64-bit targets)
- x86_64-icc15.0.X.YYY (if NDK supports 64-bit targets)
For NDK before r9d: after installation, the native C / C ++ compiler will be the Intel C ++ Compiler. No additional steps are required to use Intel C ++ Compiler with Android Studio. If you want to use GNU gc to build native code, follow the instructions in " Replacing the default compiler from the Intel C ++ Compiler to GCC for target x86 applications ."
For NDK r10 - r10d: the Intel C ++ compiler after installation is not the default compiler. To use the Intel C ++ Compiler from Android Studio, follow steps 3, 4, 5 below.
If you have several Android NDKs installed, follow the instructions in the article " Integration of Intel C ++ Compiler for Android with several Android NDKs ".
Now we will create a new Android project for Intel-64 with a native function call, thereby demonstrating the use of the Intel C ++ Compiler:
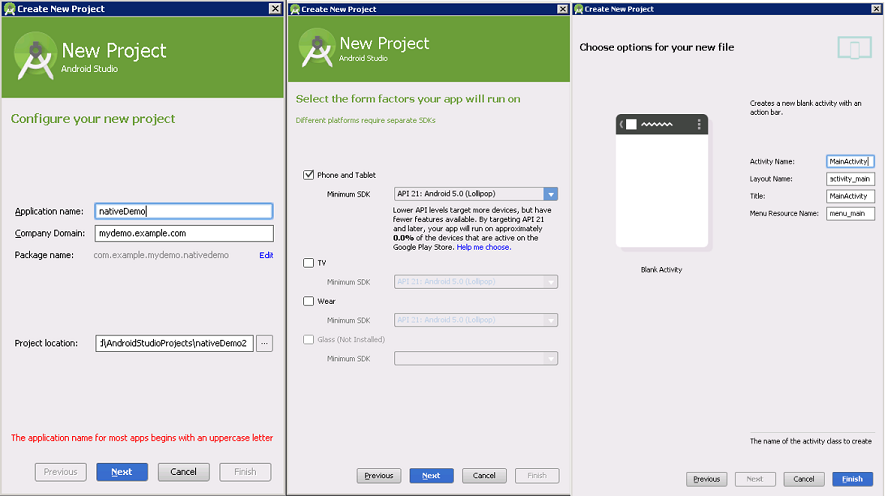
1. Creating a new Android project with a native interface:
1. Open Android Studio, create a new Android project “nativeDemo” with default parameters, for example:
2. Open “app \ src \ main \ java \ MainActivity.java” and add the native function to the end of the “MainActivity” class as shown below:
public native String getStringFromNative(); It should look like this:

3. To create the “nativeDemo” project, select: “Build> Make Project”, after which you can use “javah”.
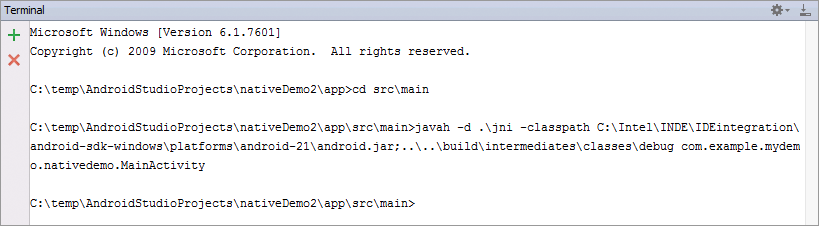
4. In “View> Tools Windows> Terminal”, open a terminal window and follow the steps below to launch “javah” and create a jni header:
a) In the terminal window, go to the “src \ main” subfolder:
cd src\main b) To create “com_example_nativedemo_app_MainActivit.h” in the src \ main \ jni folder, run the following command “javah” cmd:
javah -d .\jni -classpath C:\Intel\INDE\IDEintegration\android-sdk-windows\platforms\android-21\android.jar;..\..\build\intermediates\classes\debug com.example.mydemo.nativedemo.MainActivity Example:
5. In the Project window, change the view to Project, right-click on the “src” folder and select “Synchronize 'src”. Now you can see the header file “com_example_mydemo_nativedemo_MainActivity.h” in the “src \ main \ jni” folder.
2. Add native source code: main.c
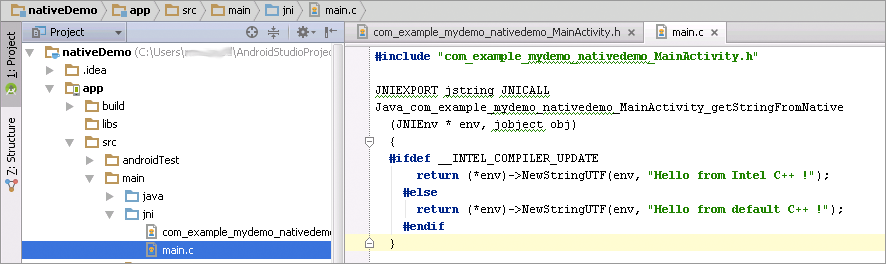
1. Create “main.c”: select the file “com_example_mydemo_nativedemo_MainActivity.h”, use the magic copy / paste keys to create a new “main.c” with the following code:
#include "com_example_mydemo_nativedemo_MainActivity.h" JNIEXPORT jstring JNICALL Java_com_example_mydemo_nativedemo_MainActivity_getStringFromNative (JNIEnv * env, jobject obj) { #ifdef __INTEL_COMPILER_UPDATE return (*env)->NewStringUTF(env, "Hello from Intel C++ !"); #else return (*env)->NewStringUTF(env, "Hello from default C++ !"); #endif } 2. Save changes
3. Now in the jni folder you have two files: com_example_mydemo_nativedemo_MainActivity.h and main.c
3. Adding a makefile: Android.mk
1. Right-click on the jni folder, select New> File.
2. Type "Android.mk" and click on "OK"
3. Add the following lines to this file (note that the line LOCAL_SRC_FILES should contain the source files that are in the jni folder):
LOCAL_PATH := $(call my-dir) include $(CLEAR_VARS) LOCAL_MODULE := nativeDemo LOCAL_SRC_FILES := main.c include $(BUILD_SHARED_LIBRARY) 4. Adding a makefile: Application.mk
1. Right-click on the jni folder, select New> File.
2. Type "Application.mk" and click on "OK"
3. Add the following lines to this file:
# For IA-32 #APP_ABI:=x86 #NDK_TOOLCHAIN:=x86-icc #include $(BUILD_SHARED_LIBRARY) # For Intel-64 APP_ABI:=x86_64 NDK_TOOLCHAIN:=x86_64-icc include $(BUILD_SHARED_LIBRARY) 4. [Optional] To change the compiler settings, use the following:
APP_CFLAGS := -O3 5. Configure your application to run ndk-build with makefiles.
1. Open the file "app \ build.gradle"
2. Add the following import to the beginning of the file:
import com.android.build.gradle.tasks.NdkCompile import org.apache.tools.ant.taskdefs.condition.Os 3. And these lines after the section "defaultConfig":
sourceSets.main { jniLibs.srcDir 'src/main/libs' //set .so files location to libs } tasks.withType(NdkCompile) { // disable automatic ndk-build call compileTask -> compileTask.enabled = false } task ndkBuild(type: Exec) { // call ndk-build(.cmd) script if (Os.isFamily(Os.FAMILY_WINDOWS)) { commandLine 'cmd', '/c', 'ndk-build.cmd', '-C', file('src/main').absolutePath } else { commandLine 'ndk-build', '-C', file('src/main').absolutePath } } tasks.withType(JavaCompile) { compileTask -> compileTask.dependsOn ndkBuild } 4. And the following lines - at the end of the file:
dependencies { compile fileTree(dir: 'libs', include: ['*.jar']) } 5. Save changes
6. Now create the project: select [Build> Make Project]. You will see all the output folders and files "libmain.so" in the folders "main \ libs" and "main \ obj \ local".
6. Add the ID “hello_textview” to the textview widget
Open “res \ layout \ activity_main.xml” and modify the “textview” widget as shown below:
<TextView android:text="@string/hello_world" android:layout_width="wrap_content" android:layout_height="wrap_content" android:id="@+id/hello_textview" /> 7. Update “MainActivity.java” to make the UI textview call the native library:
public class MainActivity extends Activity { static { // load the native library "nativeDemo" System.loadLibrary("nativeDemo"); } @Override protected void onCreate(Bundle savedInstanceState) { super.onCreate(savedInstanceState); setContentView(R.layout.activity_main); // get the text string from native API, and display on the UI TextView tv = (TextView)findViewById(R.id.hello_textview); tv.setText(this.getStringFromNative()); } To import a TextView widget and save the changes, press ALT + Enter.
8. Start the “Intel-Nexus 7 x64” Android Virtual Machine virtual machine and run the application by clicking the “Run” button.
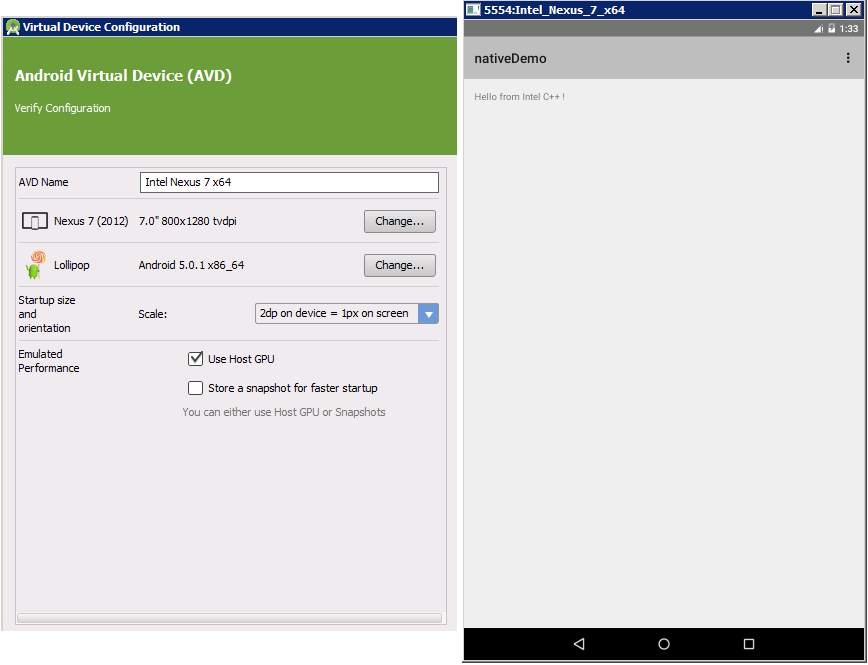
This means that the Intel C ++ Compiler for Android was used.
The end
Now you know how to create a native Android application using the Intel C ++ Compiler in Android Studio. Try running it and let us know what it does.
Source: https://habr.com/ru/post/260003/
All Articles