java.js for Java developers: first steps

An experienced programmer, faced with a new technology to solve a specific applied problem, immediately raises many practical questions. How to install the platform correctly? Where and what will lie after installation? How to create a project framework, how will it be structured? How to break the code into modules? How to add a library to a project? Where do you get a ready-made library that does what you need? How to debug the code? How to write a unit test?
Answers to these questions can be easily found online if you wish, but you will have to re-read a dozen articles, and most likely there will be several answers to each question. Some time ago I needed to write a small tutorial on node.js, which would allow us to quickly launch development and introduce new programmers in the project to this technology. It is designed for experienced Java developers who also know JavaScript well, but node.js is a new backend platform for them.
')
I think that this article will be useful not only to developers from the world of Java, but also to everyone who starts working with the node.js platform.

Installation and Setup
Install node and npm
Windows
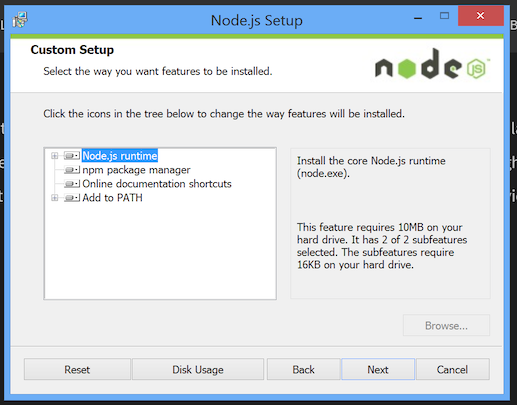
Installing node.js for Windows is done using the msi-installer. To download it, go to https://nodejs.org and click “Install”. After downloading the installer (a file with the name of the form node-v0.12.4-install.msi), you must run it and follow the installation instructions.

By default, under Windows, node.js is installed in the c: \ Program Files \ nodejs folder. Also, all components are installed by default (actually node.js, package manager npm, a link to the documentation; in addition, the path to node and npm is written to the PATH environment variable). It is advisable to ensure that all components of the installation are selected.
OS X
In OS X, the easiest way to install node is through the brew package manager. To do this, run the command:
> brew install node Node will be installed in the / usr / local / Cellar / <version> / node folder with the permanent uslink / local / opt / node / folder.
Ubuntu (x64)
To install the latest branch (0.12) it is better to download the distribution package from the site:
wget http://nodejs.org/dist/v0.12.4/node-v0.12.4-linux-x64.tar.gz sudo tar -C /usr/local --strip-components 1 -xzf node-v0.12.4-linux-x64.tar.gz The distribution is unpacked into the / usr / local folder in the bin, include, lib, and share subfolders.
Installation check
To verify the installation is correct, you can run node and npm in the command line with the --version parameter:
> node --version v0.12.4 > npm --version 2.10.1 Installing the plugin in IntelliJ IDEA
Run IntelliJ IDEA, go into the settings.

Find the Plugins section and click on "Install JetBrains Plugin ..."

Find NodeJS plugin in the list, click on the “Install Plugin” button. When the download is complete, the button will turn into “Restart IntelliJ IDEA” - click it to restart the environment.

After rebooting, go to the settings and find the section Languages & Frameworks -> Node.js and NPM. Make sure that the “Node interpreter” section contains a link to the installed node executable file.

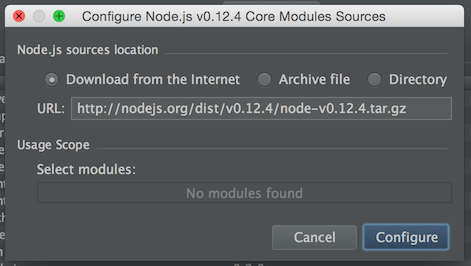
In the “Sources of node.js Core Modules” section, click the “Configure” button. In the window that appears, select “Download from the Internet” and click “Configure”, and the node.js sources will be downloaded and indexed. This will allow you to view the source code during development.
The packages section displays globally installed packages (see the Global Packages section). In this window, you can add, remove and update these packages. If a blue arrow is displayed next to the package name, an update is available. Globally it is better to install only utility packages.
The first steps
Writing "Hello World"
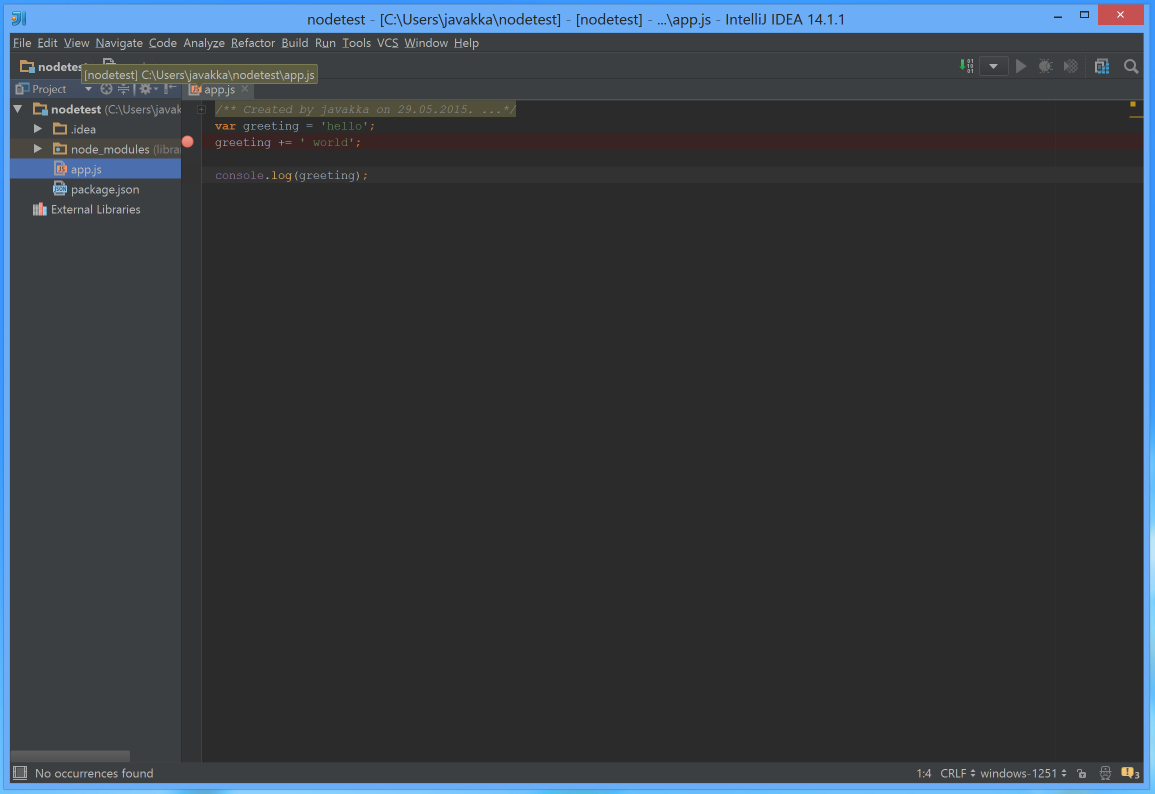
Create an app.js file that generates and outputs the corresponding line to the console:
// app.js var greeting = 'hello'; greeting += ' world!'; console.log(greeting); Run it with the command:
> node app.js hello world! Use REPL
By running the node command with no arguments, you can get into the REPL loop, similar to the browser JS console. You can execute and check code fragments in it:
> node > console.log('hello world!') hello world! undefined > [1, 2, 3].reduce(function(sum, item){return sum + item}, 0) 6 Each completed line has a return result, which is also output to the console. The console.log () function does not return a result, so after calling it in the console, the output was “undefined”.
In the REPL console, autocompletion works by pressing the Tab key. For example, if you write “console.” And press Tab, a list of attributes and functions of the console object will be displayed.
> console. console.__defineGetter__ console.__defineSetter__ console.__lookupGetter__ console.__lookupSetter__ console.__proto__ console.constructor console.hasOwnProperty console.isPrototypeOf console.propertyIsEnumerable console.toLocaleString console.toString console.valueOf console.assert console.dir console.error console.info console.log console.time console.timeEnd console.trace console.warn console.Console console._stderr console._stdout console._times > console. To exit the console, you can press Ctrl + D.
Work with npm
Project Initialization
To initialize the project, we will execute the npm init command in the future project directory and enter the necessary data interactively (you can simply press Enter, as distinct default settings are offered):
> npm init This utility will walk you through creating a package.json file. It only covers the most common items, and tries to guess sensible defaults. See `npm help json` for definitive documentation on these fields and exactly what they do. Use `npm install <pkg> --save` afterwards to install a package and save it as a dependency in the package.json file. Press ^C at any time to quit. name: (nodetest) version: (1.0.0) description: my first node application entry point: (index.js) app.js test command: git repository: keywords: author: license: (ISC) About to write to ***\package.json: { "name": "nodetest", "version": "1.0.0", "description": "my first node application", "main": "app.js", "scripts": { "test": "echo \"Error: no test specified\" && exit 1" }, "author": "", "license": "ISC" } Is this ok? (yes) Upon completion of the utility, a package.json file will be created in the current directory, describing the project configuration. It will also store information about project dependencies.
Adding package dependencies to a project
To install a dependency in a project, use the npm install command. In this case, the node_modules folder will be created in the current directory where the downloaded package will be placed. The key - save means that information about this dependency will also be added to package.json. For example, install the log4js package for logging:
> npm install --save log4js log4js@0.6.25 node_modules/log4js ├── async@0.2.10 ├── underscore@1.8.2 ├── semver@4.3.4 └── readable-stream@1.0.33 (isarray@0.0.1, inherits@2.0.1, string_decoder@0.10.31, core-util-is@1.0.1) After executing this command, we find that the node_modules \ open folder has appeared in the current directory, and an entry has been added to the package.json file:
"dependencies": { "log4js": "0.6.25" } A dependency record can be added to the package.json file manually, but after that you need to run npm install in order to load the specified dependency into the node_modules directory.
Global packages
Packages can be installed both in the project directory and globally, then they will be visible for all projects. As a rule, only packages that are utilities are installed globally, for example, the bower dependency management utility, gulp and grunt builders, the Express express-generator project generator, etc.
Global packages are installed:
- In Windows 8, in% USERPROFILE% \ AppData \ Roaming \ npm \ node_modules,
- In OS X, in / usr / local / lib / node_modules,
- In Ubuntu, to / usr / local / lib / node_modules.
To install the package globally, the npm command is executed with the -g switch:
npm install -g grunt Jobs at IntelliJ IDEA
Project opening
To open a project on node.js, just open the folder containing package.json.
Launch configuration
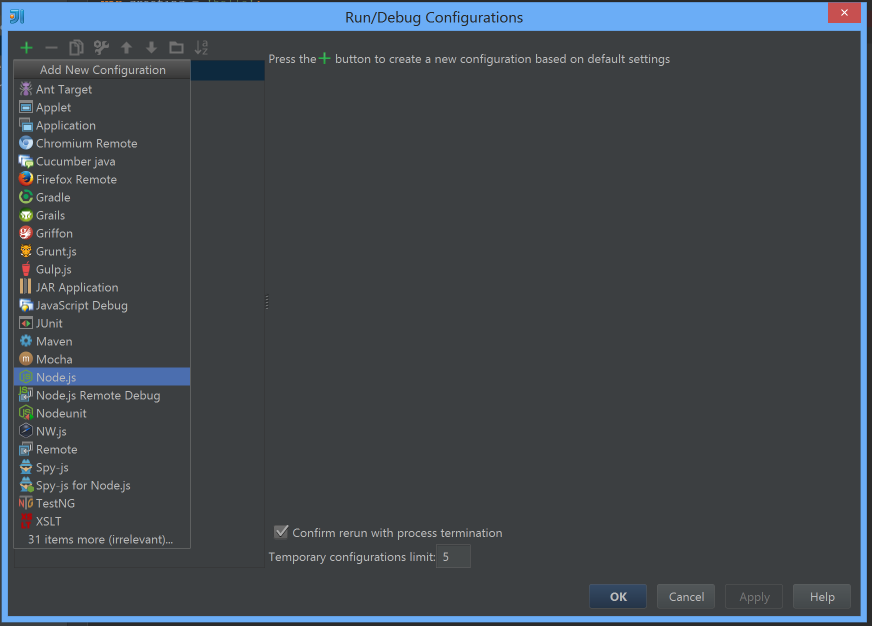
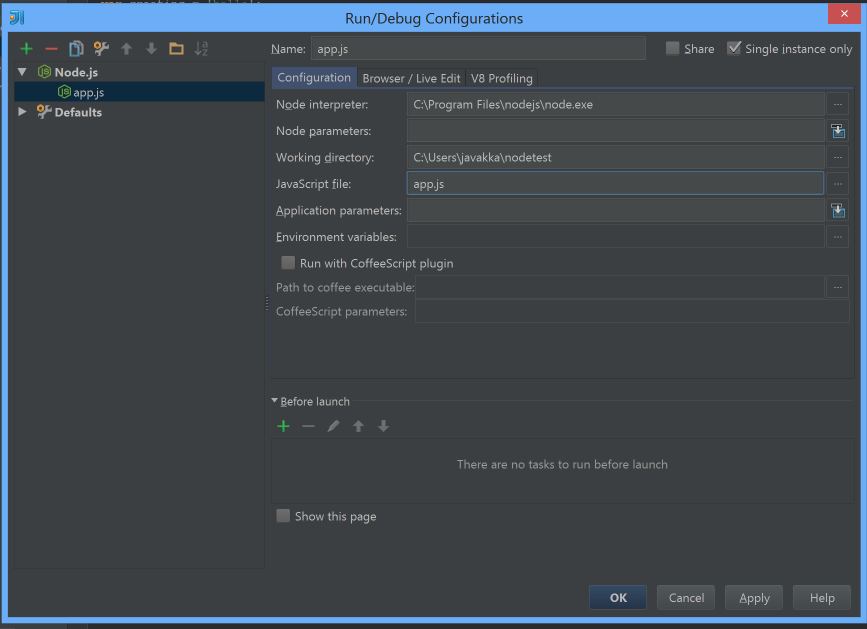
To run and debug in IntelliJ IDEA, you must create a launch configuration. To do this, go to Run -> Run Configurations, click the plus sign in the upper left corner and select node.js:
Fill in the Name and JavaScript File fields:
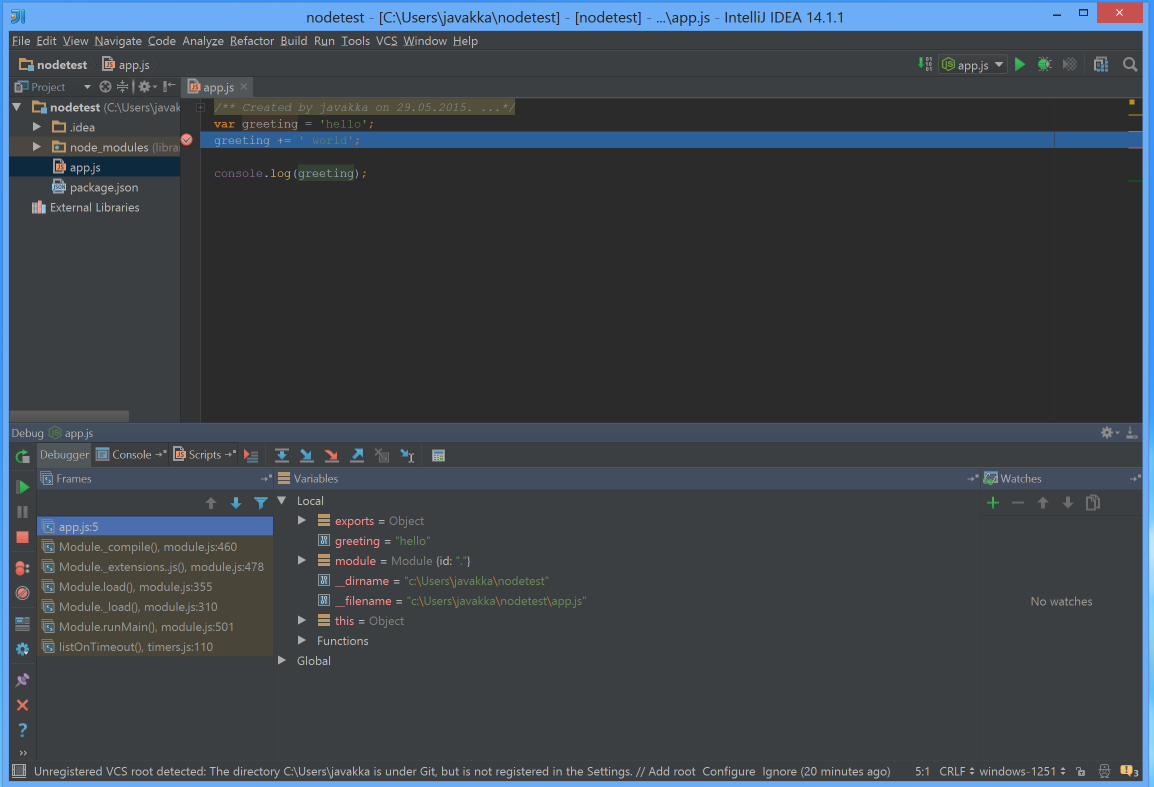
Now you can run the script in normal mode and in debug mode using the corresponding buttons on the toolbar:

Debugging
To debug, you need to run the created configuration in Debug mode. At the same time, you can breakpoints on lines, “step” in lines, look at the contents of the call stack, the values of variables in the current context, and do everything else that is expected from the debugging mode.
Modularity in node.js
In Java, modularity units are packages and classes. The unit of modularity in node.js is the file. To import one module into another, the module-local (that is, implicitly defined in each module) function require () is used. Standard modules or packages installed in node_modules can be imported by simple name:
var http = require('http'); An object that was exported by the http module will be placed in the http variable.
If you want to import not a standard module, but one of the project's modules into another, then the argument for the require () function should contain the location of the module relative to the current module (not counting the .js extension), for example:
// myproject/somedir/mymodule1.js mymodule2 = require('../anotherdir/mymodule2'); mymodule2.fun(); // myproject/anotherdir/mymodule2.js module.exports.fun = function() { console.log('hello world!'); } Everything that is declared in the module file is visible only inside it - except for the fact that we explicitly export. For example, unlike JavaScript in a browser, the scope of a variable declared at the top level is limited to the module in which it is declared:
// mymodule.js var enterprise = 'bloody'; The enterprise variable will only be visible inside the mymodule.js module.
To export something from a module, you can use the module.exports attribute available in any module, which by default contains an empty object. You can also use an abbreviated reference to it — the module-local variable exports. The require () function, which is passed the name of our module, will return what we put in module.exports. Accordingly, if we place such an object there:
// mymodule.js module.exports = { fun: function() { console.log('hello world!'); } } That will be returned by the require function, when called in another module:
// mymodule-client.js mymodule = require('./mymodule'); mymodule.fun(); The resulting mymodule object is the same object with the fun function that was assigned to the module.exports attribute in our module.
However, in a similar way to do the export will not work:
// mymodule.js exports = { fun: function() { console.log('hello world!'); } } This is due to the fact that the module.exports attribute is always exported from the module. Replacing the shortened exports link to another object, we did not change this attribute. The shortened exports link can only be used to export certain individual functions or attributes:
// mymodule.js exports.fun = function() { console.log('hello world!'); } // mymodule-client.js require('./mymodule').fun(); Testing
Mocha
To add unit testing to a project, it’s best to start with the Mocha framework. It is installed as a global npm module:
npm install -g mocha Test the module with the simplest function:
// mymodule.js exports.fun = function(name) { return ', ' + name + '!'; } By default, mocha tests are located in the test subfolder:
// test/mymodule-test.js var assert = require('assert'); var mymodule = require('../mymodule'); describe('mymodule', function() { describe('#fun()', function() { it(' , ', function() { assert.equal(mymodule.fun(''), ', !'); }); }); }); The first argument of the describe function is a human-readable description of the behavior of the function or module being tested, which will be displayed in the console when the tests are run. Here it is desirable to adhere to some structural agreements - for example, in the first describe the module name is specified, in the nested - the name of the function being tested. Run mocha and make sure that the test of our function passes:
> mocha mymodule #fun() ✓ , 1 passing (7ms) Using Mocha in IntelliJ IDEA
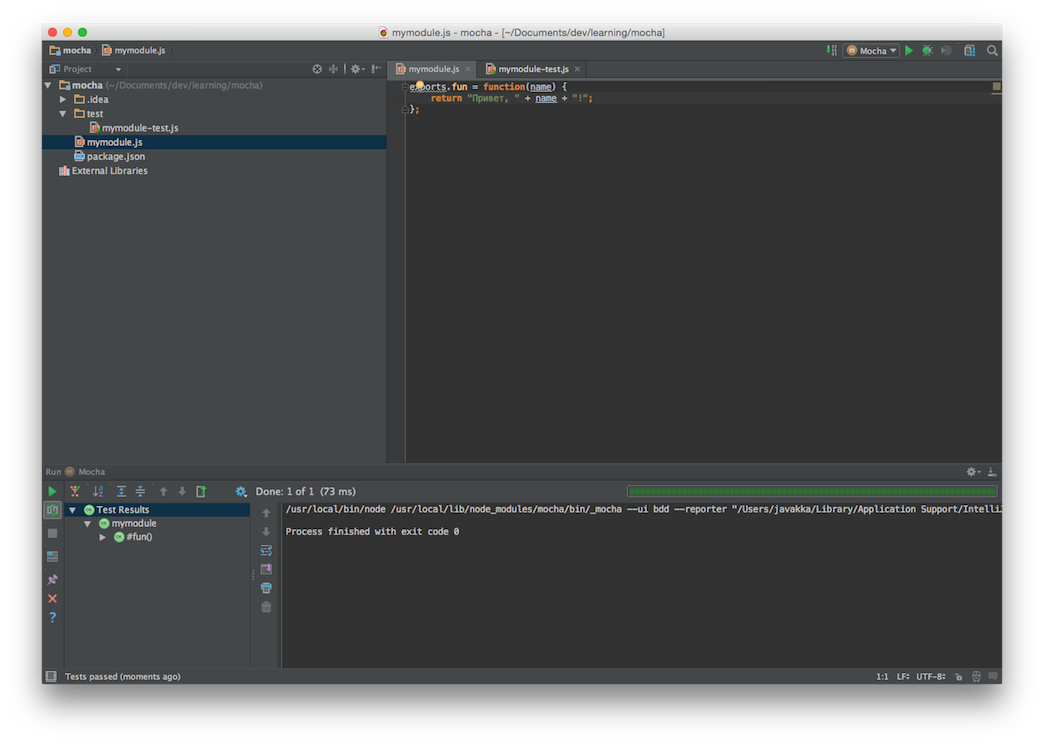
Mocha can also monitor source files and automatically run tests when code changes. You can launch it in this mode from the command line using the launch parameter - watch, but since we are building our workflow in IntelliJ IDEA, we use a special launch configuration for this:

In the launch configuration settings window, we indicate the name of this configuration (Name), as well as the path to the test folder (Test directory). Save the configuration.

Modify the function code so that it does not pass, and execute (Run) the Mocha launch configuration.

Now click the Toggle auto-test button in the panel that appears. This button turns on the automatic test run mode when the source changes.

We will fix the function code, while Mocha will automatically run the test and show that everything is fine now:
Resources
- The node.js documentation is the main source of information, although in some places it is rather concise, and structured around standard modules.
- Web repository npm - search for libraries, information about them.
- Awesome List for node.js is an indispensable source of information about proven libraries and solutions for development on node.js.
- Practices of using node.js in production - the information portal of Joyent, a company engaged in supporting node.js.
Source: https://habr.com/ru/post/259987/
All Articles