Integration of 3CX Phone System and Bitrix24
Many companies are interested in integrating the installed IP PBX 3CX Phone System with the corporate portal Bitrix24. In this article we will look at how to do this integration.
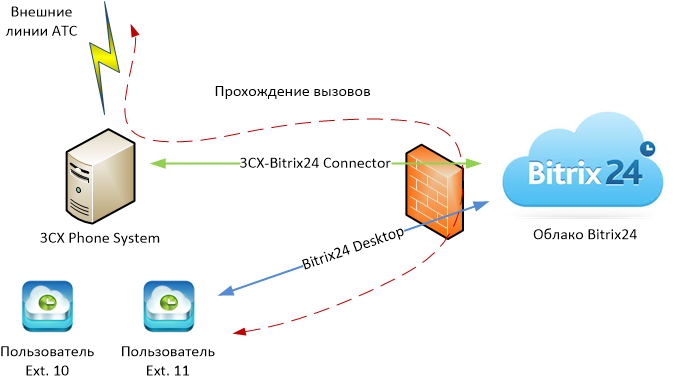
First of all, we note the disadvantages of such integration. The fact is that in this case the PBX turns into a simple gateway providing communication over its external lines (connections). You can see the statistics, send calls on the most profitable route and use your SIP numbers and gateways, but all the broad functionality of the PBX will not be available to you. It is only available if you make calls from the 3CXPhone corporate client or a connected IP phone, but not from the Bitrix24 Desktop application. This is due to the Voximplant SIP connector technology that Bitrix24 uses. Combining systems, we create a connector that intercepts all incoming calls to 3CX and sends them to Bitrix24 for processing. Further, Bitrix24 itself distributes calls between users.
')
Outgoing calls work on the same principle, but with a slight difference. A Bitrix24 user connects to his 3CX Phone System with the credentials of his extension and makes a call through the system kernel. Due to this, call statistics is available in 3CX, and some versatility is possible, i.e. The user can use both the Bitrix24 application and the 3CXPhone client.
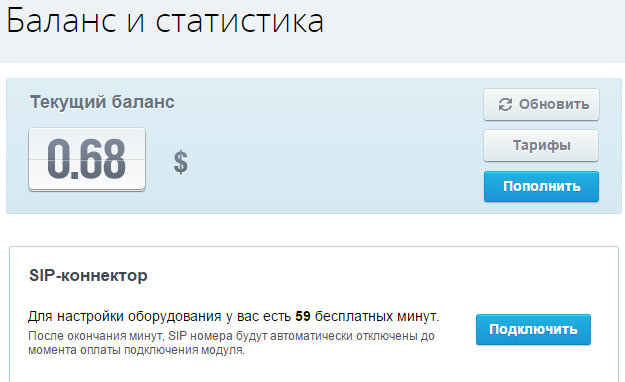
The integration setup will start creating the 3CX> Bitrix24 connector. In Bitrix24, under Telephony> Balance and Statistics, check the connectivity of the SIP connector and click the Connect button.
In Telephony> Number Management, click Connect PBX .
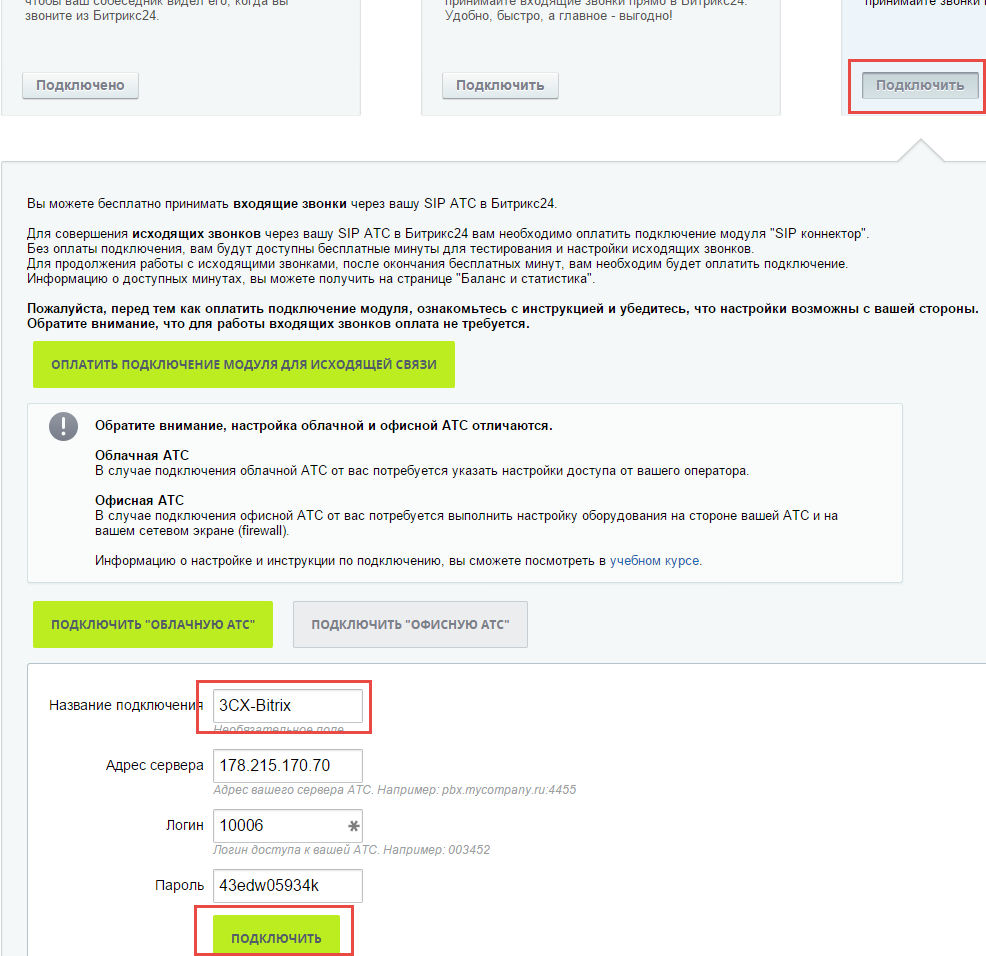
You can specify the public IP address of your 3CX server and any username and password. In fact, these data do not matter. Then click the Connect button.
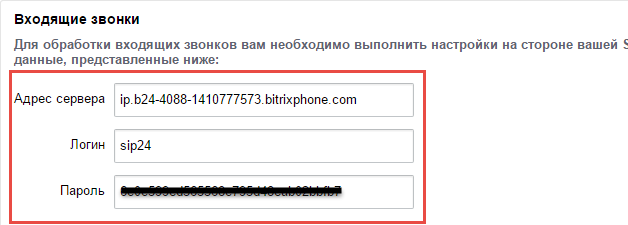
The connection settings of the office PBX will open, where we are interested only in the right side of Incoming calls . The parameters specified here must be configured in the SIP trunk from the 3CX side.
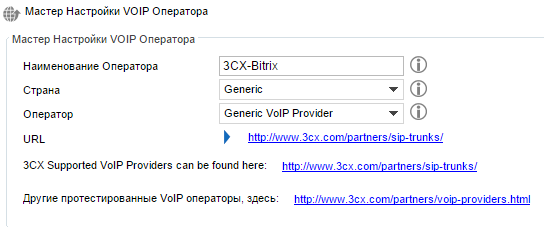
Now we will configure SIP trunk from 3CX Phone System. We select Generic - Generic VoIP Provider .
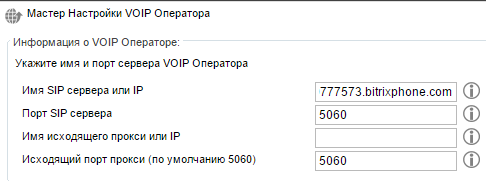
The name of the SIP server is taken from the settings issued by Bitrix24.
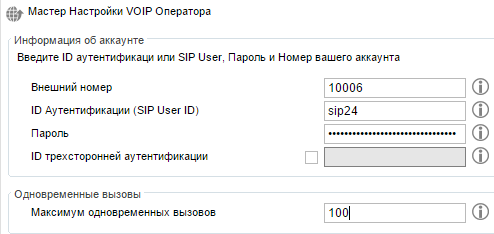
The External Number field does not matter. The Maximum Concurrent Calls parameter should not be less than the maximum number of calls that can be received on trunk lines of the 3CX Phone System.
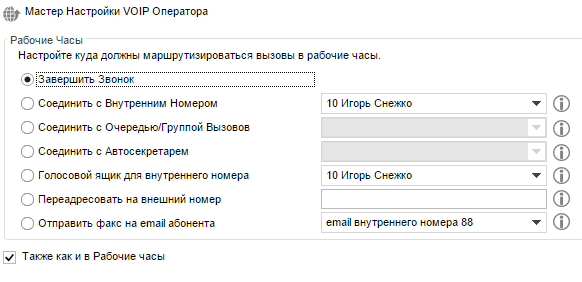
Since this connector only serves to send 3CX> Bitrix24 calls, there are no incoming calls to it.
We will not create the outgoing rule yet. Click Skip .
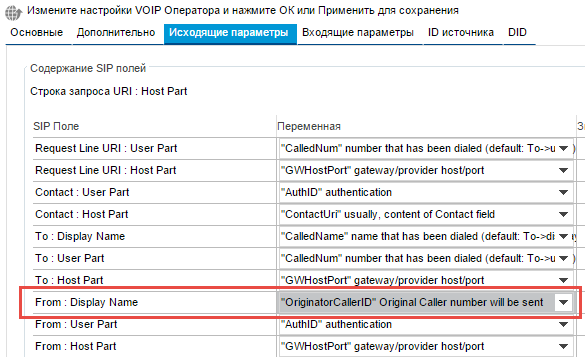
Then go to the trunk settings and go to the Outgoing settings tab. Change the From: Display Name parameter to the Originator Caller ID . This must be done in order for the Caller ID of the incoming call to be correctly transferred from 3CX to Bitrix24. Remember to click OK to apply the changes.
Verify that the trunk successfully registered to Bitrix24.

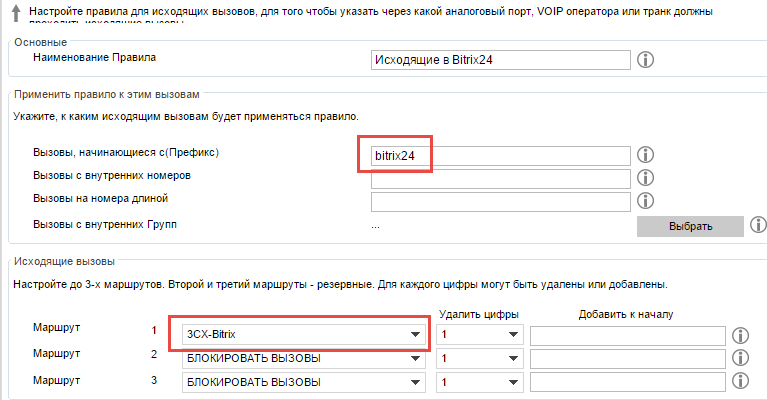
Next, you need to send all incoming calls (or only some that you would like to “skip” through Bitrix24) via the 3CX> Bitrix trunk to the Bitrix24 cloud. To do this, we will apply one trick: we will create an outgoing rule, which will send all numbers with the bitrix24 prefix to the 3CX-Bitrix trunk.
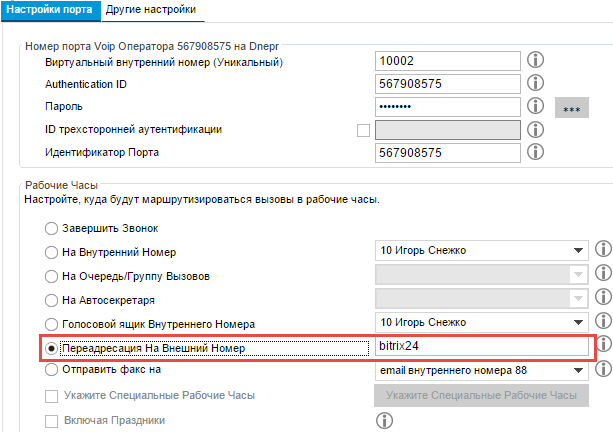
Then, on all external lines that should start in Bitrix24, set the transfer to the external number bitrix24 . Now all calls coming to these lines will bypass 3CX in the Bitrix24 cloud and there will be distributed to users by means of Bitrix24.
The incoming call looks like this.
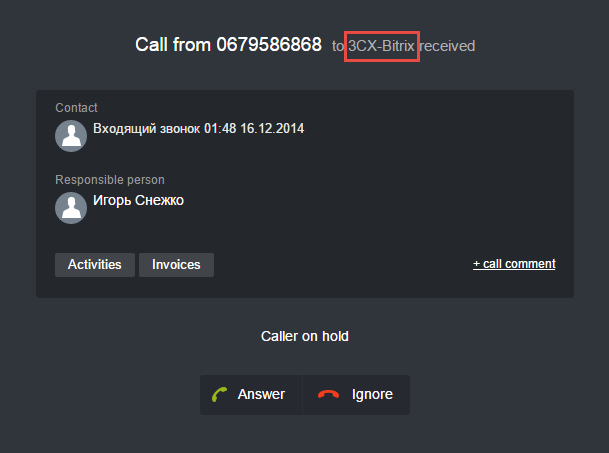
Note that if you need to know exactly which external line the call came in, you can create individual trunks between 3CX and Bitrix24 for each 3CX external line and give them distinctive names. And then send calls from a specific external line 3CX to the corresponding trunk.
Outgoing calls are made as follows: a Bitrix24 user uses a Bitrix personal SIP trunk> 3CX to connect with the credentials of his extension number to the 3CX system and make calls through it just like he would call from a 3CXPhone client or any other SIP phone. The only difference is that the number should be dialed in full international format, i.e. including country code.
If you are using the cloud version of Bitrix24, allow incoming connections for the Bitrix IP address of the SIP connector on the firewall. If Bitrix24 is located locally, this is optional.
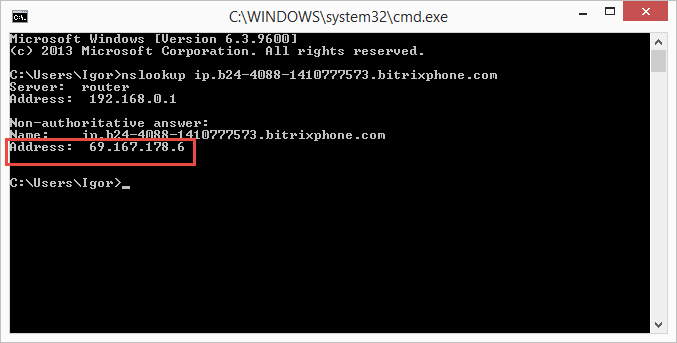
Find out the IP address of the connector.
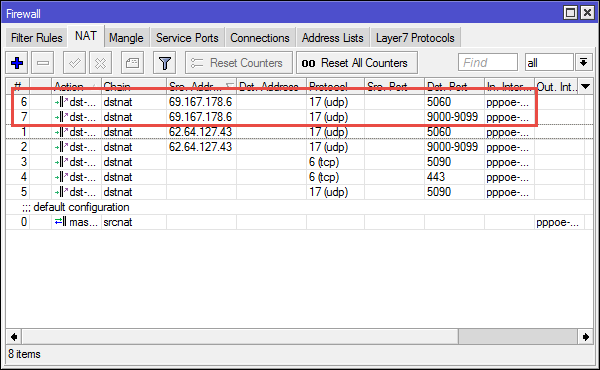
And configure the network screen. Here is an example of setting up a Mirotik firewall .
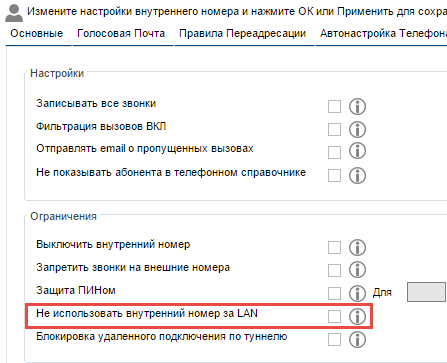
Next you need to allow the appropriate users (extensions) external SIP connections, since the Bitrix24 cloud connects from 3CX externally. If Bitrix24 is located locally, this is not necessary.
Now create a Bitrix connector for the extension. Let it be number 10.
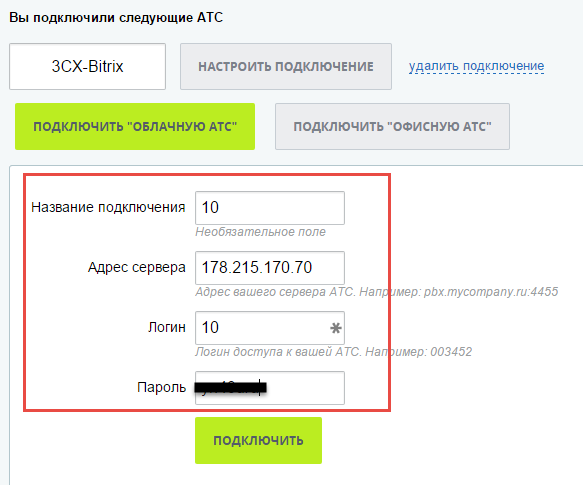
In this case, the public IP address of the 3CX Phone System and the credentials of extension 10, which can be viewed in the 3CX management console, are listed. Connections for all extensions are created in the same way.
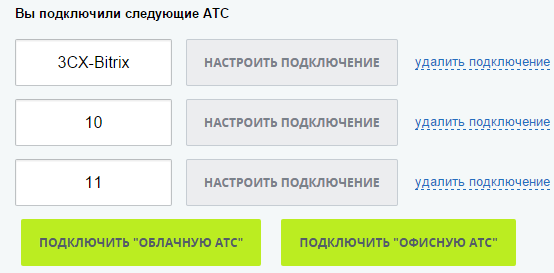
Now every Bitrix24 user needs to specify the same internal number and specify which SIP trunk to make outgoing calls. This will be the user's personal SIP trunk. This is done in the section Telephony > Users .
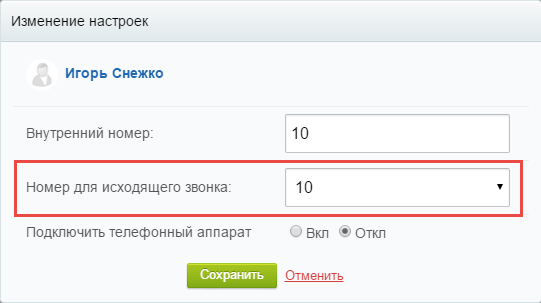
After setting up, the list of users will look like this.
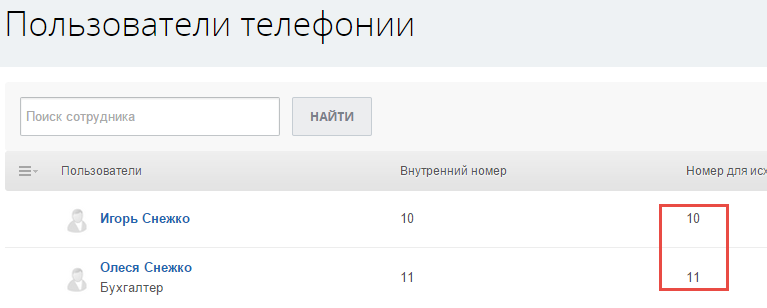
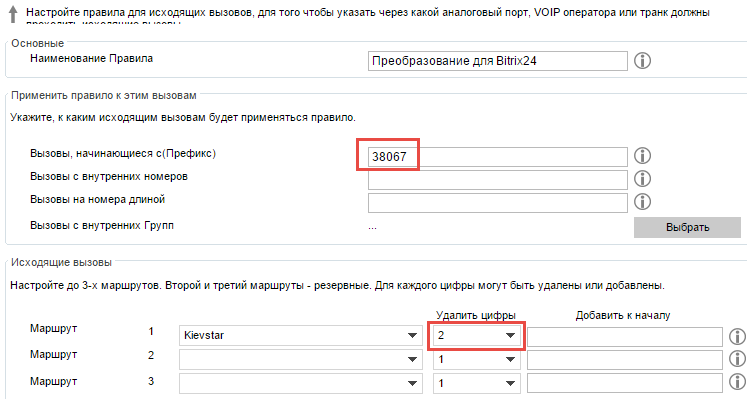
Now the user will be able to make outgoing calls via 3CX Phone System. If you have shortened dialing for some operators in 3CX, for example, without a country code, create the appropriate conversion outgoing rules (as stated, Bitrix24 does not understand abbreviated dialing).
An outgoing call looks like this.
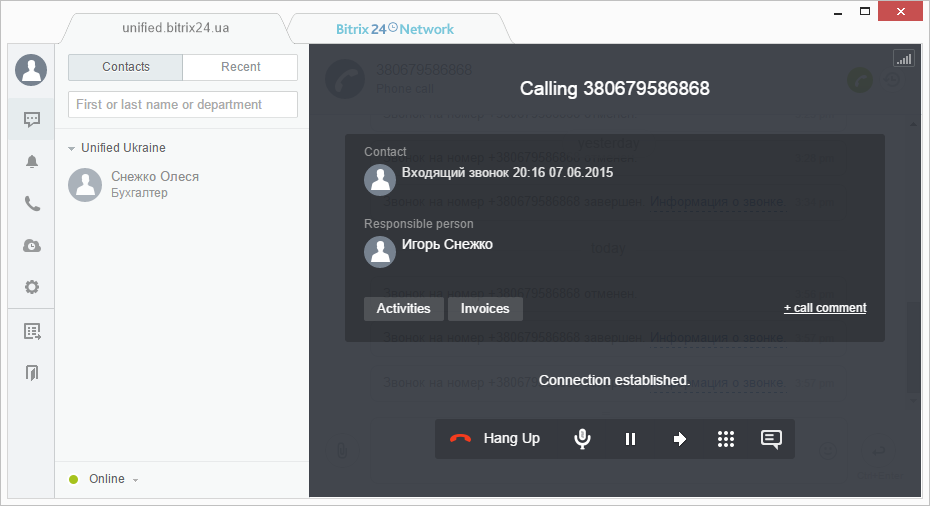
This completes the integration of 3CX Phone System and Bitrix24.
First of all, we note the disadvantages of such integration. The fact is that in this case the PBX turns into a simple gateway providing communication over its external lines (connections). You can see the statistics, send calls on the most profitable route and use your SIP numbers and gateways, but all the broad functionality of the PBX will not be available to you. It is only available if you make calls from the 3CXPhone corporate client or a connected IP phone, but not from the Bitrix24 Desktop application. This is due to the Voximplant SIP connector technology that Bitrix24 uses. Combining systems, we create a connector that intercepts all incoming calls to 3CX and sends them to Bitrix24 for processing. Further, Bitrix24 itself distributes calls between users.

')
Outgoing calls work on the same principle, but with a slight difference. A Bitrix24 user connects to his 3CX Phone System with the credentials of his extension and makes a call through the system kernel. Due to this, call statistics is available in 3CX, and some versatility is possible, i.e. The user can use both the Bitrix24 application and the 3CXPhone client.
Incoming calls
The integration setup will start creating the 3CX> Bitrix24 connector. In Bitrix24, under Telephony> Balance and Statistics, check the connectivity of the SIP connector and click the Connect button.

In Telephony> Number Management, click Connect PBX .

You can specify the public IP address of your 3CX server and any username and password. In fact, these data do not matter. Then click the Connect button.
The connection settings of the office PBX will open, where we are interested only in the right side of Incoming calls . The parameters specified here must be configured in the SIP trunk from the 3CX side.

Now we will configure SIP trunk from 3CX Phone System. We select Generic - Generic VoIP Provider .

The name of the SIP server is taken from the settings issued by Bitrix24.

The External Number field does not matter. The Maximum Concurrent Calls parameter should not be less than the maximum number of calls that can be received on trunk lines of the 3CX Phone System.

Since this connector only serves to send 3CX> Bitrix24 calls, there are no incoming calls to it.

We will not create the outgoing rule yet. Click Skip .
Then go to the trunk settings and go to the Outgoing settings tab. Change the From: Display Name parameter to the Originator Caller ID . This must be done in order for the Caller ID of the incoming call to be correctly transferred from 3CX to Bitrix24. Remember to click OK to apply the changes.

Verify that the trunk successfully registered to Bitrix24.

Next, you need to send all incoming calls (or only some that you would like to “skip” through Bitrix24) via the 3CX> Bitrix trunk to the Bitrix24 cloud. To do this, we will apply one trick: we will create an outgoing rule, which will send all numbers with the bitrix24 prefix to the 3CX-Bitrix trunk.

Then, on all external lines that should start in Bitrix24, set the transfer to the external number bitrix24 . Now all calls coming to these lines will bypass 3CX in the Bitrix24 cloud and there will be distributed to users by means of Bitrix24.

The incoming call looks like this.

Note that if you need to know exactly which external line the call came in, you can create individual trunks between 3CX and Bitrix24 for each 3CX external line and give them distinctive names. And then send calls from a specific external line 3CX to the corresponding trunk.
Outgoing calls
Outgoing calls are made as follows: a Bitrix24 user uses a Bitrix personal SIP trunk> 3CX to connect with the credentials of his extension number to the 3CX system and make calls through it just like he would call from a 3CXPhone client or any other SIP phone. The only difference is that the number should be dialed in full international format, i.e. including country code.
If you are using the cloud version of Bitrix24, allow incoming connections for the Bitrix IP address of the SIP connector on the firewall. If Bitrix24 is located locally, this is optional.
Find out the IP address of the connector.

And configure the network screen. Here is an example of setting up a Mirotik firewall .

Next you need to allow the appropriate users (extensions) external SIP connections, since the Bitrix24 cloud connects from 3CX externally. If Bitrix24 is located locally, this is not necessary.

Now create a Bitrix connector for the extension. Let it be number 10.

In this case, the public IP address of the 3CX Phone System and the credentials of extension 10, which can be viewed in the 3CX management console, are listed. Connections for all extensions are created in the same way.

Now every Bitrix24 user needs to specify the same internal number and specify which SIP trunk to make outgoing calls. This will be the user's personal SIP trunk. This is done in the section Telephony > Users .

After setting up, the list of users will look like this.

Now the user will be able to make outgoing calls via 3CX Phone System. If you have shortened dialing for some operators in 3CX, for example, without a country code, create the appropriate conversion outgoing rules (as stated, Bitrix24 does not understand abbreviated dialing).

An outgoing call looks like this.

This completes the integration of 3CX Phone System and Bitrix24.
Source: https://habr.com/ru/post/259943/
All Articles