Under the press. Break and protect Wordpress with your own hands

WordPress is a convenient blogging platform for posting and managing articles, on which a huge number of different sites are based. Because of its prevalence, this CMS has long been a tidbit for intruders. Unfortunately, the basic settings do not provide a sufficient level of protection, leaving many default holes unclosed. In this article, we will go through a typical “typical” hacking of the site on Wordpress, and also show how to fix the identified vulnerabilities.
Introduction
Today WordPress is the most popular among content management systems. Its share is 60.4% of the total number of sites using CMS-engines. According to statistics, 67.3% of sites are based on the latest version of this software. Meanwhile, during the twelve years of the web engine existence, 242 vulnerabilities of various kinds were discovered in it (without taking into account the vulnerabilities found in third-party plugins and themes). And the statistics of third-party add-ons looks even sadder. So, Revisium analyzed 2350 Russified templates for WordPress, taken from various sources. As a result, they found out that more than half (54%) were infected with web shells, backdoors, blackhat seo (“spam”) links, and also contained scripts with critical vulnerabilities. So get comfortable, now we will figure out how to audit the site on WordPress and fix the found flaws. We will use version 4.1 (Russified).
Indexing site
The first stage of any test is usually collecting information about the goal. And here it often helps to incorrectly configure the site indexing, which allows unauthorized users to view the contents of individual sections of the site and, for example, get information about installed plugins and themes, as well as access to confidential data or backup copies of databases. To check which directories are visible from the outside, it's easiest to use Google. Simply run a Google Dorks query of type site: example.com intitle: “index of” inurl: / wp-content /. In the inurl: statement, you can specify the following directories:
')
/wp-content/ /wp-content/languages/plugins /wp-content/languages/themes /wp-content/plugins/ /wp-content/themes/ /wp-content/uploads/ If you can view / wp-content / plugins /, the next step in collecting information about installed plugins and their versions is much simpler. Naturally, you can disable indexing using the robots.txt file. Since by default it is not included in the WordPress installation package, you need to create it yourself and drop it into the root directory of the site. There are quite a few manuals for creating and working with a robots.txt file, so I’ll leave this topic for self-study. I will give only one of the possible options:
User-Agent: * Disallow: /cgi-bin Disallow: /wp-login.php Disallow: /wp-admin/ Disallow: /wp-includes/ Disallow: /wp-content/ Disallow: /wp-content/plugins/ Disallow: /wp-content/themes/ Disallow: /?author=* Allow: / If the files stored in the uploads folder contain confidential information, add the following line to this list: Disallow: / wp-content / uploads /. On the other hand, in the robots.txt file, it is not recommended to place links to directories that were created specifically to store sensitive information. Otherwise, by doing this you will make it easier for an intruder to take on the task, since this is the first place where everyone usually looks in search of “interesting things.
Determining the WordPress Version
Another important step is the identification of the CMS version. Otherwise, how to choose the right flop? There are three quick ways to determine the version of WordPress used on the site:
1. Find in the source code of the page. It is listed in the generator: / meta tag or in tags: <link rel = 'stylesheet' id = 'twentyfifteen-style-css' href =' http: //.../wordpress/wp-content/themes/twentyfifteen/ style.css? ver = 4.1.1 '... />.
2. Find in the readme.html file (Fig. 1), which is part of the installation package and is located at the root of the site. The file may have other names like readme-ja.html.
3. Find in the file ru_RU.po (Fig. 2), which is included in the installation package and located at / wp-content / languages /: "Project-Id-Version: WordPress 4.1.1 \ n".

Fig. 1. WordPress version in readme.html
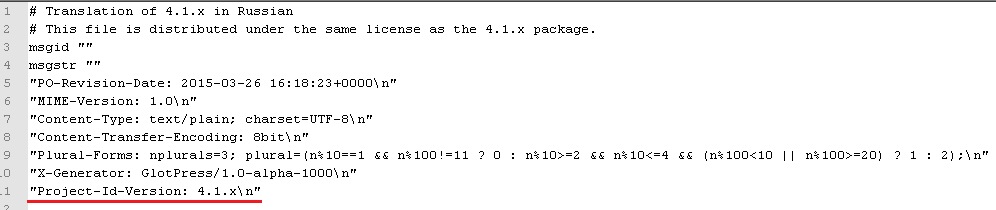
Fig. 2. Peep WordPress version in ru_RU.po
One of the security options in this case is to restrict access to the readme.html and ru_RU.po files using .htaccess.
Automate the testing process
WordPress didn’t study security yesterday, so there are enough tools to automate routine tasks.
Nmap:
- determining the version and theme using the http-wordpress-info scriptnmap -sV --script http-wordpress-info <ip>
- password selection by dictionariesnmap -p80 --script http-wordpress-brute --script-args 'userdb=users.txt,passdb=passwords.txt' example.com
Metasploit:
- module for determining the version: auxiliary / scanner / http / wordpress_scanner;
- a module for determining the user name auxiliary / scanner / http / wordpress_login_enum.
WPScan:
- list of installed plugins: wpscan --url www.exmple.com --enumerate p;
- listing established topics: wpscan --url www.exmple.com --enumerate t;
- listing of installed timthumbs: wpscan --url www.example.com --enumerate tt;
- username definition: wpscan --url www.example.com --enumerate u;
- dictionary password selection for admin user: wpscan --url www.example.com --wordlist wordlist.txt --username admin;
- password selection using a username / password bundle with the number of threads equal to 50: wpscan --url www.example.com --wordlist wordlist.txt --threads 50.
Identify installed components
Now let's gather information about installed plugins and themes, regardless of whether they are activated or not. First of all, such information can be extracted from the source code of the HTML page, for example, via JavaScript links, from comments and CSS-like resources that are loaded onto the page. This is the easiest way to get information about installed components. For example, the lines below indicate the twentyeleven theme used:
<link rel="stylesheet" type="text/css" media="all" href="http://example.com/wp-content/themes/twentyeleven/style.css" /> <script src="http://example.com/wp-content/themes/twentyeleven/js/html5.js" type="text/javascript"></script> Further, HTTP headers, such as X-Powered-By, may indicate the presence of a plugin (for example, the W3 Total Cache plugin).
Since information about plugins is not always displayed in the source code of the HTML page, you can detect installed components using the WPScan utility (see the sidebar). Just do not forget that the search of plugin paths will be fixed in the logs of the web server.
Having obtained the data about the installed components, you can already start searching for vulnerabilities on your own or find publicly available exploits on resources like rapid7 or exploit-db .
User Name Definition
By default, in WordPress, each user is assigned a unique identifier, represented as a number: example.com/?author=1. Going through the numbers, you will determine the names of users of the site. The admin account, which is created during the WordPress installation process, is number 1, so it is recommended to remove it as a protective measure.
Brutfors wp-login
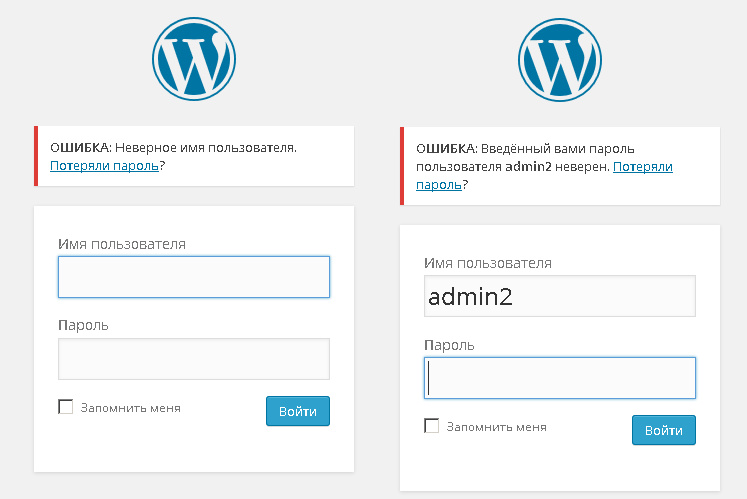
Fig. 3. Errors in user authentication
Knowing the username, you can try to find the password to the administration panel. The WordPress authorization form on the wp-login.php page is very informative (Fig. 3), especially for the attacker: when you enter incorrect data, prompts appear about the wrong username or password for a specific user. The developers are aware of this feature, but they decided to leave it, since such messages are convenient for users who may have forgotten their login and / or password. The problem of selecting a password can be solved using a strong password consisting of twelve or more characters and including upper and lower case letters, numbers and special characters. Or, for example, using the Login LockDown plugin.
Security plugins for WordPress
- Login LockDown - limits the number of failed login attempts;
- Revisium WordPress Theme Checker - searches for typical malicious snippets in WordPress themes;
- Sucuri Security - monitors and detects malicious code;
- iThemes Security (formerly Better WP Security) - multifunctional plugin to protect WordPress;
- BackUpWordPress - makes backup files and databases;
- Google Captcha (reCAPTCHA) - installs captcha during registration, authorization, password recovery and in the form of comments.
Fill the shell
After we have twisted the password, nothing prevents to pour the shell on the compromised web resource. For these purposes, the Weevely framework , which allows you to generate a shell in an obfuscated form, makes it quite difficult to detect. To avoid suspicion, the resulting code can be inserted into any theme file (for example, in index.php) via the theme editor of the WordPress console. After that, using the same Weevely, you can connect to the victim's machine and call various commands:
python weevely.py http://test/index.php Pa$$w0rd [+] weevely 3.1.0 [+] Target:test [+] Session: _weevely/sessions/test/index_0.session [+] Browse the filesystem or execute commands starts the connection [+] to the target. Type :help for more information. weevely> :help We connect .htaccess
To deny access to sensitive information, it is better to use the .htaccess file - this is the configuration file used in the Apache Web Server. Consider the capabilities of this file in terms of security. With it, you can: deny access to directories and files, block various SQL injections and malicious scripts. To do this, the standard .htaccess file for CMS WordPress 4.1 needs to be slightly extended. To close the list of files and folders, add:
Options +FollowSymLinks -Indexes RewriteCond %{QUERY_STRING} base64_encode[^(]*\([^)]*\) [OR] , Base64. , <script>: RewriteCond %{QUERY_STRING} (<|%3C)([^s]*s)+cript.*(>|%3E) [NC,OR] Counteract scripts trying to set global variables or change _REQUEST variable via URL:
RewriteCond %{QUERY_STRING} GLOBALS (=|\[|\%[0-9A-Z]{0,2}) [OR] RewriteCond %{QUERY_STRING} _REQUEST (=|\[|\%[0-9A-Z]{0,2}) To counteract SQL injections, we block URL requests that contain certain keywords:
RewriteCond %{query_string} concat.*\( [NC,OR] RewriteCond %{query_string} union.*select.*\( [NC,OR] RewriteCond %{query_string} union.*all.*select [NC] RewriteRule ^(.*)$ index.php [F,L] To spoil the life of common hacking tools, we filter out certain user-agents:
SetEnvIf user-agent «Indy Library» stayout=1 SetEnvIf user-agent «libwww-perl» stayout=1 SetEnvIf user-agent «Wget» stayout=1 deny from env=stayout Protecting files
It would also be nice to restrict access to particularly important files that store the configuration or can simply give the attacker some information. The following candidates can be distinguished:
- wp-config.php, contains the database name, user name, password and table prefix;
- .htaccess;
- readme.html and ru_RU.po, which contain the WordPress version;
- install.php.
This is done as follows:
<Files _> Order Allow,Deny Deny from all </Files> Moreover, the .htaccess file containing these lines must be located in the same directory as the protected file. Then we prohibit the transfer of users (remember, we just talked about how easy it is to get a list of users?):
RewriteCond %{QUERY_STRING} author=\d RewriteRule ^ /? [L,R=301] So what else? You can only allow login from specified IP addresses. To do this, create a .htaccess file in the wp-admin folder with the following rules:
AuthUserFile /dev/null AuthGroupFile /dev/null AuthName "Access Control" AuthType Basic order deny,allow deny from all allow from 178.178.178.178 # IP allow from 248.248.248.248 # IP The method is not very flexible and is applicable only if you work with a limited number of fixed IP addresses. Otherwise, it is recommended to set a password to the wp-admin folder through the hosting panel (if such functionality is available).
Www
The 5G Blacklist and 6G Blacklist beta ruleset from Perishable Press, which allows you to fight common malicious URL requests for WordPress.
Additional measures
To what has been said above, you can add the following recommendations. First, use only current versions of WordPress and its components - this will eliminate known vulnerabilities. Secondly, delete unused plugins and themes that can also be exploited. Thirdly, download WordPress themes and plugins from reliable sources, for example, from the developer sites and the official WordPress site. Like a home PC, you need to periodically check your web resource with a web antivirus, for example AI-Bolit . If you have access to a web server, configure permissions for files and directories. As a rule, WordPress installs all the necessary rights at the installation stage, but if necessary, chmod can be set manually. For directories - chmod 755, for files - chmod 644. Make sure that the rights 777 are assigned only to those objects that need it (sometimes this is necessary for the normal operation of some plugins). If WordPress stopped functioning normally, experiment with access rights: first try 755, then 766, and finally 777. For all htaccess files, set chmod 444 (read only). If the site stops working, try experimenting with the values 400, 440, 444, 600, 640, 644.
Move the file wp-config.php. This file contains information about MySQL settings, table prefix, secret keys, and so on. Therefore, it is necessary to transfer it so that the file is not accessible from the Internet. If the site is not located in the public_html folder, then move the wp-config.php file to a folder a higher level, and WordPress will automatically find it in this root directory (applicable if there is only one site on this CMS on the hosting).
To complicate the shell fill, disable the ability to edit the theme through the WordPress console. To do this, paste the following line into the wp-config.php file: define ('DISALLOW_FILE_EDIT', true) ;.
Another weak point is the install.php file (which is in the wp-admin folder). Therefore, it is better to remove, block or change. Complete one of the options:
- Just delete this file - after installation it is no longer necessary.
- Prevent file access with .htaccess.
- Rename the original install.php file (for example, install.php.old) and create a new install.php file with the following contents:
<?php header("HTTP/1.1 503 Service Temporarily Unavailable"); ?> <?php header("Status 503 Service Temporarily Unavailable"); ?> <?php header("Retry-After 3600"); // 60 minutes ?> <?php mail("your@email.com", "Database Error", "There is a problem with teh database!"); ?> <!DOCTYPE HTML PUBLIC "-//W3C//DTD XHTML 1.0 Strict//EN" "http://www.w3.org/TR/xhtml1/DTD/xhtml1-strict.dtd"> <html xml:lang="en" xmlns="http://www.w3.org/1999/xhtml" lang="en"> <head> <meta http-equiv="Content-Type" content="text/html; charset=utf-8" /> <title>Error Establishing Database Connection</title> </head> <body> <h1>Error Establishing Database Connection</h1> <p>We are currently experiencing database issues. Please check back shortly. Thank you.</p> </body> </html> In addition to notifying visitors to the site, this script performs the following actions:
- sends the status code 503 to the client and search engines (“The service is temporarily unavailable”);
- indicates the period of time after which customers and search engines can return to the site (custom parameter);
- notifies by e-mail about the problem with the database for appropriate action.
The fact is that in earlier versions of WordPress (<= 2.7.1) when MySQL crashes (for example, during a DDoS attack), CMS makes it possible to reinstall. In addition, it can happen when one of the WordPress tables fails or becomes corrupted. In particular, an attack is possible when the wp_options table (in WordPress 2.6.2) or wp_users (in WordPress 2.0.3 and 2.0.11) is damaged. That is, in different versions of WP different tables are the main ones when checking in the installer - this can be either the wp_options table or wp_users table.
And finally, turn off the registration of new users, if this is not necessary (Fig. 4). If, however, the site provides for registration, make sure that new users receive minimal privileges after registration.

Fig. 4. Disable registration of new users
useful links
Hardening WordPress codex.wordpress.org/Hardening_WordPress
Ten steps to protect your WordPress blog habrahabr.ru/post/62814
Every second Russified template for WordPress is infected or vulnerable www.securitylab.ru/analytics/456835.php
Presentation on hacking sites WordPress xakep.ru/2015/04/01/wordpress-hack
Conclusion
WordPress is a rather large and complex product, with its pluses and minuses. Unfortunately, in the default configuration, its security is a big question, since even the usual scripts with direct hands and the Internet will be able to penetrate the defense. Therefore, I strongly recommend checking your resource in the same way as we did in the article. And if you find flaws - fix them to reduce the chances of an attacker to compromise the resource to a minimum.
First published in Hacker Magazine # 196.
Posted by: Sergey Storchak, PentestIT
Subscribe to "Hacker"
Source: https://habr.com/ru/post/259843/
All Articles