The device of the game engine for NES on the example of the games "Capcom"
In my third article about NES-games, I will show the techniques used to create game engines, namely the implementation of screen scrolling, switching memory banks, organizing the list of objects, device character animation system, game object update functions (and collision processing), the main card device . In order not to be unfounded in the descriptions, I will cite a disassembled code from specific games (beloved by everyone “Darkwing Duck”, with references to “Chip & Dale” and “Duck Tales”); As an example, we consider the engine from Capcom, which has at least a couple of dozen games to work on .
Some of the topics are not related, so the article will be divided into several sections. Also, because of the vastness, the material would be enough for a small book, so sometimes I will give links to articles for those who want to understand the details, and describe only general things relating to the architecture of engines.
For the research, the disassembler built into the FCEUX emulator will be used, as well as the well-known IDA disassembler for working with the code base (you can do without it using the notebook and pen). Here (the cycle “Documentation for FCEUd”) there are several articles on using the debugger. The idea of the search is known, probably, to anyone who was engaged in reverse engineering - you need to find in the memory any address whose purpose is known and refers directly or indirectly to the studied functionality, and set a stopping point at this address in the debugger. Next, the researcher starts the game, waits for the breakpoint to work and learns the code that led to the triggering, thus obtaining information about what is happening in the game “under the hood”. Below are examples of studies of the engine.
If the game has more than one screen per level, then as the player approaches its boundaries, it is necessary to constantly update the picture. You can run the game “Darkwing Duck” in the emulator, load the first level and open the Debug-> Name table viewer screen viewer . If you now go to the right one step and observe the changes in this window, then you will notice that the game updates 2 blocks (2x2 tiles each, only 8 tiles of video memory) each emergency step:
')

(This time I will use screenshots from game hacks for a change)
Thus, in 16 steps of the Black Raincoat, a scrolling on one line takes place, which will be ready completely by this moment. The NES video processor is able to display the screen portion of the screen with an offset, so the screen continues to be built to the right, avoiding copying all the tiles that have already been drawn. Also for the video processor there are several option flags that allow you to adjust the cyclical repetition of the page horizontally. So after completing the screen to the right border, the next row will simply be built on the left.
You can check how scrolling works technically. To do this, you need to set a stop point in the debugger to write to the video memory at the address range of $ 2007- $ 23BF (option PPU MEM in the debugger) at the moment when the level is already loaded. Then the game starts, and the state of emergency is sent forward so that the scrolling will work and the emulator will stop the game and show the debugger window:
Communication with video memory in NES occurs through the address space of the processor, address $ 2006 is used for addressing, and address $ 2007 is for reading and writing values to memory. Then you can understand the logic of the code above - this is the function of reading records about where, from where, and how many bytes to copy to the video memory from RAM. The entries themselves start at $ 360 and have the following format:
COPY_TO_VIDEO_REC | stop byte 0xFF , where COPY_TO_VIDEO_REC = (write address in video memory, how many bytes to copy, bytes to copy) .
Next, the stopping point is rearranged to write to the region 0x360-0x36F , in which this data is stored, and the debugger shows a large scroll function at $ DB40- $ DD09 (457 bytes). The function is multipurpose and is used in all types of scrolling in the game (right, up, down), there are many branches in it depending on the setting of different bits. At the input of the function - the scrolling value of the character in the cells $ 23 and $ 25 (two-byte).
Then I will skip part of the research (it consists in rearranging the breakpoints and checking where the data originally came from and what transformations they undergo) and lay out the graph of the transformation functions:
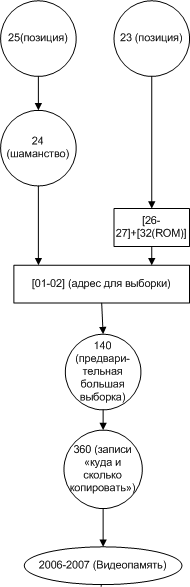
As you can see from the graph, I did not understand the whole function, but focused on its lower part — at the address $ 140 and further in RAM there are selected block indices from those macroblocks that will be displayed on the screen, and then, from this series of data, records are made for copying to video memory (row 0x360 ) is enough to understand the device scrolling, the upper part describes the transformation of coordinates and the selection of data on the number of the active screen in the ROM image.
In other engines, the device is similar - there are a number of addresses for copying and a number for storing indexes of macroblocks, sometimes located at the same address.
Dealing with the flow of data about the level further and further, one can come to the original storage locations - the place of their recording in the ROM image. Often, data records of all levels are grouped together and are called level configs .
For example, configs of levels and doors for the game "Chip & Dale":
Door description (25 records)
Description of levels (15 entries)
Hence, observant readers have a question, why do all the pointers occupy only two bytes, because with the help of 16 bits only 64 kb of memory can be addressed, and the size of ROM images can be much more? The answer is that NES uses special chips in cartridges that control the connection of different banks of memory, the mappers, to bypass this limitation. They determine which ROM memory bank will be read from when accessing the processor's address space, which is responsible for reading from the ROM. About pointers to NES can be read in the article cah4e3'a .
Memory banks are a serious limitation of NES when programming (often for a certain task you need free space in a particular bank, even if it is still enough in others) and additional difficulties in the study (you need to compare pointers and banks in which they address the memory).
From this architecture, there are two possible ways to distribute data among banks - either to store all data of one level in one bank, or to store all data sets of one type in one bank (macroblocks in one, blocks in another, screens in the third). In various engines, both the first and second approaches are encountered. In Capcom, most often they store data of the same level in one bank — in Mega Man 4, for example, even all pointers to blocks and macroblocks are the same, that is, when switching banks, data is mapped to the same addresses in the processor's address space. Even so, however, the switching of banks is carried out several times per frame, that is, the necessary data is still scattered in different places of the ROM image.
In addition to the level card, a full-fledged game also requires specifying a list of game objects - bonuses, enemies, destructible objects, animation objects for decoration, doors and other logical elements of the game. In the previous two paragraphs it was shown how to get to the configs of the levels, where you can most likely find a pointer to the beginning of the list of game objects. You can also find this list in another way - to calculate the places in the RAM, which store information about the objects on the screen, and start searching for the address from them. There are several ways to “hook” on these addresses in memory:
Regardless of the method chosen from the above, sooner or later the study leads to the configs of the levels, from where you can find the addresses of the beginning of the list of objects. For Darkwing Duck, the address of the object descriptions is:
After some experiments on data corruption in the neighborhood of these addresses, their structure becomes clear - there are 4 arrays of the same length in front of the list of objects themselves, with a pair of X and Y coordinates of the objects. The high byte indicates the coordinate of the screen on which the object appears, and the low byte indicates the coordinate of the object itself on the screen. Thus, the entire description of the position and type of object takes 5 bytes.
It also becomes clear that the objects in the list should be sorted in the order in which they appear on the screen, as there is a procedure in the engine that checks the appearance of the next object in the list, and only then increases the counter by 1 and checks the next object. If he is behind the player (and there is no scrolling back in the game), he will never appear on the screen. There are several other features of the engine that relate to the list of objects that need to be considered when sorting objects, for example, after entering the door, the counter is reset and the engine searches for the first object in the list that matches the Y coordinate of the screen, starting with the first one. This allows you to build levels with several alternative transitions that were not in the original game.
In other engines, the device of the list of objects is very similar, sometimes there are features, such as encoding one of the object's coordinates with one byte (either multiplying it by a constant, or using a fixed address as the base for a whole set of objects, for example, in “Duck Tales 2”) or variable length of entries in the list of objects (for example, “New Ghostbusters 2”, where coordinates are stored for enemies, while for the doors there is an additional room to which the transition will be made).
Decode all types of objects for Duck Tales: gist.github.com/spiiin/5524555
The object number is not just a constant, but an index in the array of records for all objects.
The write stop point for the address range 0x05A4 - 0x05AF (it contains object numbers on the screen) shows the place where the characteristics of the objects are loaded from:
The first array stores the number of lives of the object and 3 empty fields (apparently inherited from the Mega Man 4 engine, where the characteristics were greater), and in the second:
Next, the animation number is examined, which in a few steps leads to an understanding of the storage device of the animation system of objects.
Each animation consists of several frames and the time it plays:
Timer frame switches to the following:
(The frame array is divided into two parts in the ROM image due to its large size in order to divide it into different banks).
All frame tiles are displayed on the screen using standard tools for NES - in addition to the screen pages, the video processor can draw tiles on the screen (8x8 in size) in arbitrary places on the screen, for more information on displaying sprites on the screen, see the article “Sprites. DMA controller.
This animation system is used in the games “Darkwing Duck”, “Chip & Dale”, “Duck Tales” (first parts, in “Chip & Dale 2” and “Duck Tales 2” its own system), “Little Mermaid”, “Tale Spin” "," Mega Man "(from second to fifth parts)," Mighty Final Fight ".
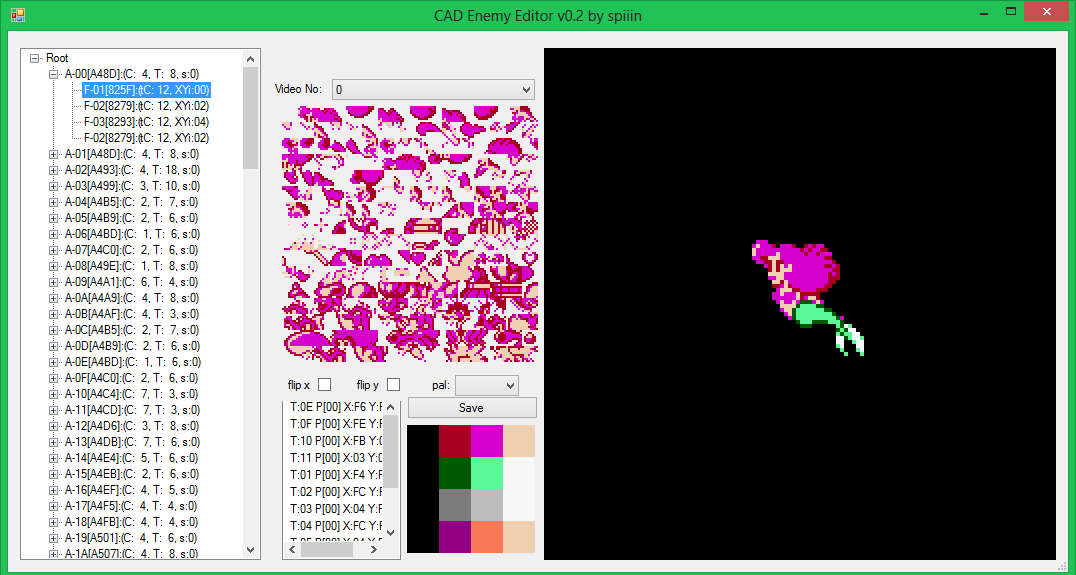
To edit animations, you can use the CadEditor editor or the Capcom Sprite Assembler utility:
When a game object appears in the frame, each game cycle for it calls the update function, which is responsible for all the game logic - moving it around the screen, spawning new objects (for example, bullets), handling collisions between walls, floor and other objects, as well as switching logical phases and animations (for example, walking-> jumping-> landing ).
The search for the update function number can be viewed in the previous section. Further, it is necessary to examine the memory cells in which the current parameters of the object are stored. For Darkwing Duck, this is:
This is followed by painstaking work on understanding the logic of each function of objects (usually difficult only for the first two or three, then everything repeats).
For an example, the code of the update function of the first enemy of the Black Raincoat , Robot: gist.github.com/spiiin/14197bc6b8889a0dd4f0
The robot has two phases, in the first ( “Patrol” ) it does not leave its post and walks in a small radius from it, sometimes stopping to turn its head in search of the Black Coat. If the distance to the player decreases to 32 pixels, or the health of the Robot decreases, he moves into the “Attack” phase, in which he begins to move in the direction from which the player is located, and he changes direction only if he gets into a deadlock from which can get a jump.
There are no special tools for creating your objects, you need to rewrite the code, preferably getting into the size limit on the update function. However, this does not prevent the creation of such fantastic hacks as "Rockman Minus Infinity" .
The bonus will be a small section about the main card device. For her, “Darkwing Duck” uses not a block method, but a descriptive method (for methods of storing data, see the first article of the cycle ).
At the same time, in order to change the card, apart from parsing the storage method (which I will skip in order not to overload the article with the assembler code), you must also write a way to save the card back into the ROM image. The descriptive method of storage means that all chains of zeros are thrown out of the map, and instead of them, before each chain of data, the address from which it starts is indicated, so that it is clear where to enter the data into the card:

Packer code in C #: gist.github.com/spiiin/8738491
Now you can add a map to the editor:
... and, for example, to resettle the Black Raincoat from Saint-Canard to another city:
For those who are not satisfied with this, I can offer to continue the independent research of the engine, or study the disassembled commented code of the “Mega Man 4” engine, similar to “Darkwing Duck”. From there you can learn some information that is not disassembled in the article, for example, the sound engine device or the device of special effects, such as background animation by switching palettes, and others.
If someone is interested in other aspects of the device game engines, welcome to the comments, I will try to help you figure it out.
Some of the topics are not related, so the article will be divided into several sections. Also, because of the vastness, the material would be enough for a small book, so sometimes I will give links to articles for those who want to understand the details, and describe only general things relating to the architecture of engines.
For the research, the disassembler built into the FCEUX emulator will be used, as well as the well-known IDA disassembler for working with the code base (you can do without it using the notebook and pen). Here (the cycle “Documentation for FCEUd”) there are several articles on using the debugger. The idea of the search is known, probably, to anyone who was engaged in reverse engineering - you need to find in the memory any address whose purpose is known and refers directly or indirectly to the studied functionality, and set a stopping point at this address in the debugger. Next, the researcher starts the game, waits for the breakpoint to work and learns the code that led to the triggering, thus obtaining information about what is happening in the game “under the hood”. Below are examples of studies of the engine.
Screen scrolling implementation
If the game has more than one screen per level, then as the player approaches its boundaries, it is necessary to constantly update the picture. You can run the game “Darkwing Duck” in the emulator, load the first level and open the Debug-> Name table viewer screen viewer . If you now go to the right one step and observe the changes in this window, then you will notice that the game updates 2 blocks (2x2 tiles each, only 8 tiles of video memory) each emergency step:
')
(This time I will use screenshots from game hacks for a change)
Thus, in 16 steps of the Black Raincoat, a scrolling on one line takes place, which will be ready completely by this moment. The NES video processor is able to display the screen portion of the screen with an offset, so the screen continues to be built to the right, avoiding copying all the tiles that have already been drawn. Also for the video processor there are several option flags that allow you to adjust the cyclical repetition of the page horizontally. So after completing the screen to the right border, the next row will simply be built on the left.
You can check how scrolling works technically. To do this, you need to set a stop point in the debugger to write to the video memory at the address range of $ 2007- $ 23BF (option PPU MEM in the debugger) at the moment when the level is already loaded. Then the game starts, and the state of emergency is sent forward so that the scrolling will work and the emulator will stop the game and show the debugger window:
ROM:C119 loc_C119:; CODE XREF: ROM:C137 ROM:C119 LDA $360,X ROM:C11C BMI locret_C139 ROM:C11E STA byte_2006 ROM:C121 LDA $361,X ROM:C124 STA byte_2006 ROM:C127 LDY $362,X ROM:C12A ROM:C12A loc_C12A:; CODE XREF: ROM:C132 ROM:C12A LDA $363,X >ROM:C12D STA byte_2007 ROM:C130 INX ROM:C131 DEY ROM:C132 BPL loc_C12A ROM:C134 INX ROM:C135 INX ROM:C136 INX ROM:C137 BNE loc_C119 Communication with video memory in NES occurs through the address space of the processor, address $ 2006 is used for addressing, and address $ 2007 is for reading and writing values to memory. Then you can understand the logic of the code above - this is the function of reading records about where, from where, and how many bytes to copy to the video memory from RAM. The entries themselves start at $ 360 and have the following format:
COPY_TO_VIDEO_REC | stop byte 0xFF , where COPY_TO_VIDEO_REC = (write address in video memory, how many bytes to copy, bytes to copy) .
Next, the stopping point is rearranged to write to the region 0x360-0x36F , in which this data is stored, and the debugger shows a large scroll function at $ DB40- $ DD09 (457 bytes). The function is multipurpose and is used in all types of scrolling in the game (right, up, down), there are many branches in it depending on the setting of different bits. At the input of the function - the scrolling value of the character in the cells $ 23 and $ 25 (two-byte).
Then I will skip part of the research (it consists in rearranging the breakpoints and checking where the data originally came from and what transformations they undergo) and lay out the graph of the transformation functions:
As you can see from the graph, I did not understand the whole function, but focused on its lower part — at the address $ 140 and further in RAM there are selected block indices from those macroblocks that will be displayed on the screen, and then, from this series of data, records are made for copying to video memory (row 0x360 ) is enough to understand the device scrolling, the upper part describes the transformation of coordinates and the selection of data on the number of the active screen in the ROM image.
In other engines, the device is similar - there are a number of addresses for copying and a number for storing indexes of macroblocks, sometimes located at the same address.
Level Configs and Memory Bank Switching
Dealing with the flow of data about the level further and further, one can come to the original storage locations - the place of their recording in the ROM image. Often, data records of all levels are grouped together and are called level configs .
For example, configs of levels and doors for the game "Chip & Dale":
Door description (25 records)
1E673 - . 1E68B - Y . 1E6A3 - X . 1E6BB - . 1E6D3 - . 1E6EB - . 1E703 - ( ). 1E71B - ( ). 1E734 - Y. 1E74C - X. Description of levels (15 entries)
101B2, 101A3 - X ( ). 101D0, 101C1 - X ( ). 101EE, 101DF - Y ( ). 1020C, 101FD - Y ( ). 1022A, 1021B - . 10248, 10239 - . 1E201 - ( ). 1E26A - . 1E2A6, 1E297 - ( ). 1E2C4, 1E2B5 - ( + ). 1E210 - . 1E23D - (8x=enemy gfx, 9x=tile gfx). 1E24C - (8x=enemy gfx, 9x=tile gfx). 1E25B - , . 1E279 - , . 1E288 - ( ). 1E22E - . 1E21F - . Hence, observant readers have a question, why do all the pointers occupy only two bytes, because with the help of 16 bits only 64 kb of memory can be addressed, and the size of ROM images can be much more? The answer is that NES uses special chips in cartridges that control the connection of different banks of memory, the mappers, to bypass this limitation. They determine which ROM memory bank will be read from when accessing the processor's address space, which is responsible for reading from the ROM. About pointers to NES can be read in the article cah4e3'a .
Memory banks are a serious limitation of NES when programming (often for a certain task you need free space in a particular bank, even if it is still enough in others) and additional difficulties in the study (you need to compare pointers and banks in which they address the memory).
From this architecture, there are two possible ways to distribute data among banks - either to store all data of one level in one bank, or to store all data sets of one type in one bank (macroblocks in one, blocks in another, screens in the third). In various engines, both the first and second approaches are encountered. In Capcom, most often they store data of the same level in one bank — in Mega Man 4, for example, even all pointers to blocks and macroblocks are the same, that is, when switching banks, data is mapped to the same addresses in the processor's address space. Even so, however, the switching of banks is carried out several times per frame, that is, the necessary data is still scattered in different places of the ROM image.
Organization of the list of objects
In addition to the level card, a full-fledged game also requires specifying a list of game objects - bonuses, enemies, destructible objects, animation objects for decoration, doors and other logical elements of the game. In the previous two paragraphs it was shown how to get to the configs of the levels, where you can most likely find a pointer to the beginning of the list of game objects. You can also find this list in another way - to calculate the places in the RAM, which store information about the objects on the screen, and start searching for the address from them. There are several ways to “hook” on these addresses in memory:
- When an enemy appears on the screen, slow down the time and check its X, Y coordinates or other parameters ( Tools-> Ram Search ... menu). So it is found that the parameters of enemies on the screen for “Darkwing Duck” in RAM are stored by columns 0x580 (for the first area, 0x581 for the second, 0x582 - for the third, etc.) - direction of movement of the object, 0x5A0 - remaining health, etc. . Among them you can find the number of the object
- Observe the counter of objects that appear on the screen. It increases by 1 when the next object appears. By the way, it can be viewed without searching in memory, and from directly looking into RAM (in FCEUX, this is convenient due to the feature of recently modified cells ( Tool-> Hex Editor menu):
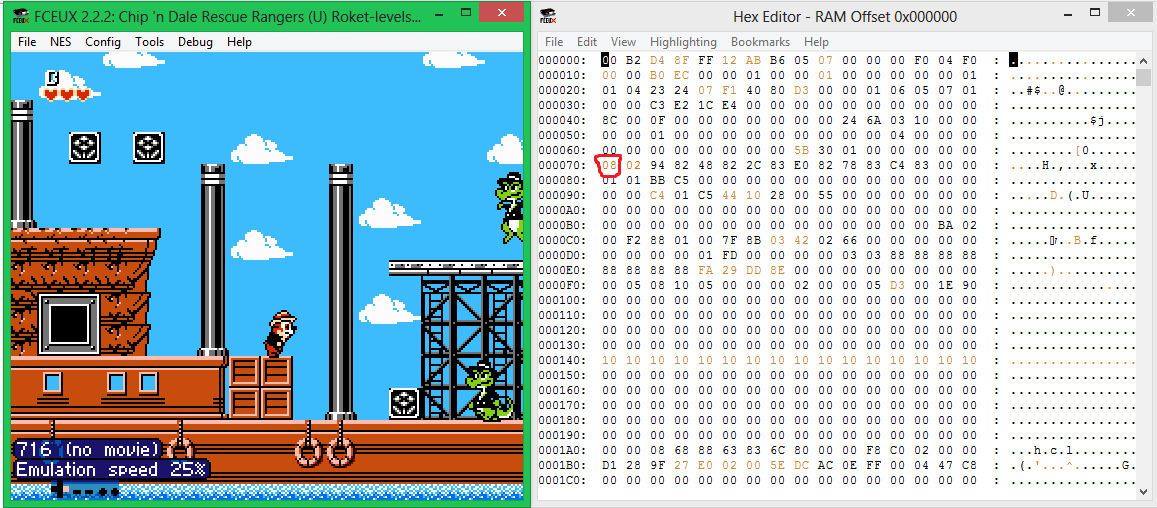
The 0x70 cell grows at the same time as a new object appears on the screen (both in Darkwing Duck and Chip & Dale). - In games with scoring for killing enemies, you can put a stopping point to increase the points counter and so go to the scoring function, which also uses data on the number of the enemy to calculate the number
- Other methods, limited only by the imagination of the researcher
Regardless of the method chosen from the above, sooner or later the study leads to the configs of the levels, from where you can find the addresses of the beginning of the list of objects. For Darkwing Duck, the address of the object descriptions is:
1 — 0x10315-0x10347 2 — 0x10438-0x10473 3 — 0x10584-0x105C7 6 — 0x106A0-0x106D5 4 — 0x10816-0x10865 5 — 0x10962-0x109A0 7 — 0x10A89-0x10AC2 After some experiments on data corruption in the neighborhood of these addresses, their structure becomes clear - there are 4 arrays of the same length in front of the list of objects themselves, with a pair of X and Y coordinates of the objects. The high byte indicates the coordinate of the screen on which the object appears, and the low byte indicates the coordinate of the object itself on the screen. Thus, the entire description of the position and type of object takes 5 bytes.
It also becomes clear that the objects in the list should be sorted in the order in which they appear on the screen, as there is a procedure in the engine that checks the appearance of the next object in the list, and only then increases the counter by 1 and checks the next object. If he is behind the player (and there is no scrolling back in the game), he will never appear on the screen. There are several other features of the engine that relate to the list of objects that need to be considered when sorting objects, for example, after entering the door, the counter is reset and the engine searches for the first object in the list that matches the Y coordinate of the screen, starting with the first one. This allows you to build levels with several alternative transitions that were not in the original game.
In other engines, the device of the list of objects is very similar, sometimes there are features, such as encoding one of the object's coordinates with one byte (either multiplying it by a constant, or using a fixed address as the base for a whole set of objects, for example, in “Duck Tales 2”) or variable length of entries in the list of objects (for example, “New Ghostbusters 2”, where coordinates are stored for enemies, while for the doors there is an additional room to which the transition will be made).
Decode all types of objects for Duck Tales: gist.github.com/spiiin/5524555
Device animation system
The object number is not just a constant, but an index in the array of records for all objects.
The write stop point for the address range 0x05A4 - 0x05AF (it contains object numbers on the screen) shows the place where the characteristics of the objects are loaded from:
LDA (06), y. [cpu addr 0x8C57->rom addr 0x10C67] - 4 () LDA (04), y. [cpu addr 0x8AB3->rom addr 0x10AC0] - 4 () The first array stores the number of lives of the object and 3 empty fields (apparently inherited from the Mega Man 4 engine, where the characteristics were greater), and in the second:
1- - . 2- - ( ). 3- - . 4- - - . Next, the animation number is examined, which in a few steps leads to an understanding of the storage device of the animation system of objects.
Each animation consists of several frames and the time it plays:
: { 1 - - N. 1 . . N - . } Timer frame switches to the following:
: { ( 1. - ) } (The frame array is divided into two parts in the ROM image due to its large size in order to divide it into different banks).
All frame tiles are displayed on the screen using standard tools for NES - in addition to the screen pages, the video processor can draw tiles on the screen (8x8 in size) in arbitrary places on the screen, for more information on displaying sprites on the screen, see the article “Sprites. DMA controller.
This animation system is used in the games “Darkwing Duck”, “Chip & Dale”, “Duck Tales” (first parts, in “Chip & Dale 2” and “Duck Tales 2” its own system), “Little Mermaid”, “Tale Spin” "," Mega Man "(from second to fifth parts)," Mighty Final Fight ".
To edit animations, you can use the CadEditor editor or the Capcom Sprite Assembler utility:
Functions for updating game objects
When a game object appears in the frame, each game cycle for it calls the update function, which is responsible for all the game logic - moving it around the screen, spawning new objects (for example, bullets), handling collisions between walls, floor and other objects, as well as switching logical phases and animations (for example, walking-> jumping-> landing ).
The search for the update function number can be viewed in the previous section. Further, it is necessary to examine the memory cells in which the current parameters of the object are stored. For Darkwing Duck, this is:
4D0 - (/ /// etc.). 420 - 580 - 5A0 - (80, ) 410 - 430 - 400 - ( , , , etc.) . This is followed by painstaking work on understanding the logic of each function of objects (usually difficult only for the first two or three, then everything repeats).
For an example, the code of the update function of the first enemy of the Black Raincoat , Robot: gist.github.com/spiiin/14197bc6b8889a0dd4f0
The robot has two phases, in the first ( “Patrol” ) it does not leave its post and walks in a small radius from it, sometimes stopping to turn its head in search of the Black Coat. If the distance to the player decreases to 32 pixels, or the health of the Robot decreases, he moves into the “Attack” phase, in which he begins to move in the direction from which the player is located, and he changes direction only if he gets into a deadlock from which can get a jump.
There are no special tools for creating your objects, you need to rewrite the code, preferably getting into the size limit on the update function. However, this does not prevent the creation of such fantastic hacks as "Rockman Minus Infinity" .
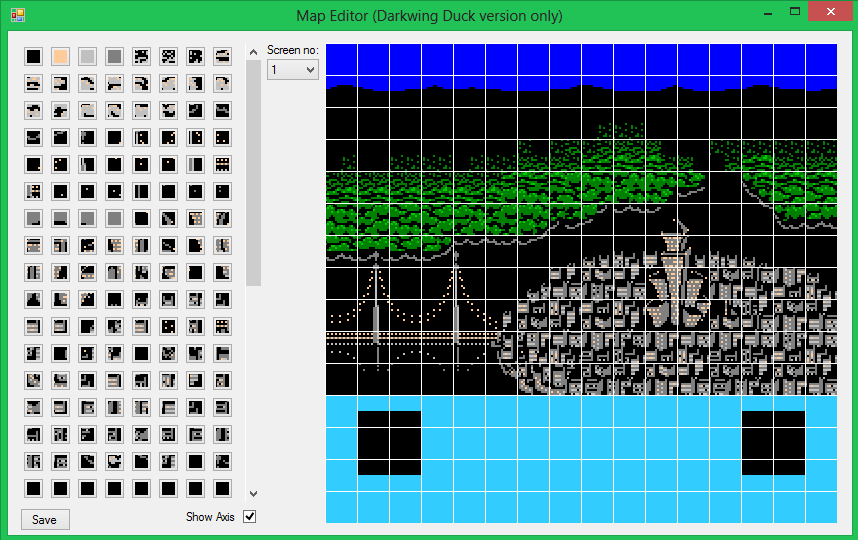
Main card device
The bonus will be a small section about the main card device. For her, “Darkwing Duck” uses not a block method, but a descriptive method (for methods of storing data, see the first article of the cycle ).
At the same time, in order to change the card, apart from parsing the storage method (which I will skip in order not to overload the article with the assembler code), you must also write a way to save the card back into the ROM image. The descriptive method of storage means that all chains of zeros are thrown out of the map, and instead of them, before each chain of data, the address from which it starts is indicated, so that it is clear where to enter the data into the card:
Packer code in C #: gist.github.com/spiiin/8738491
Now you can add a map to the editor:
... and, for example, to resettle the Black Raincoat from Saint-Canard to another city:
Afterword
For those who are not satisfied with this, I can offer to continue the independent research of the engine, or study the disassembled commented code of the “Mega Man 4” engine, similar to “Darkwing Duck”. From there you can learn some information that is not disassembled in the article, for example, the sound engine device or the device of special effects, such as background animation by switching palettes, and others.
If someone is interested in other aspects of the device game engines, welcome to the comments, I will try to help you figure it out.
Source: https://habr.com/ru/post/259761/
All Articles