Adaptive multi-level menu of the site with self-registered items based on the AngularJS directive
There is a well-founded opinion that someone else’s code found on the Internet is much better than handwritten; it has already been tested by thousands of lazy developers. Actually, therefore, when I faced the task described in the title of the article, I decided not to reinvent the wheel, but to find a ready-made solution. To my surprise, I didn’t find anything suitable for my inquiries based on angulyar on either English-speaking or Russian-language resources. Therefore, it was decided to write the code independently and share it with the public.
The menu features implemented in this article:
The source code of the directive can be found here .
Naturally, I didn’t write everything from scratch, so the following is a list of borrowed materials :
The first unpleasant surprise for me was the reproducibility of the project. The world of web-development is not in place, every day there are new versions of the above products and my menu, which was lazily written in a project that was overlooked a couple of months ago, completely refused to work in a project that was recently collected. Below is a list of problems that I encountered.
')
With the organizational moments finished, we proceed to the writing of the directive itself.
For convenience, we will move the html-template directive to a separate file.
In fact, this is a modification of the standard menu from the bootstrap documentation with a few nuances:
Next, briefly consider the css file :
Nothing special, the code for the menu “borrowed” here , the animation of the logo is here .
So slowly, we got to the most interesting part, for the sake of which this article was conceived - the code of the directive menu on an angular.
File navbar.module.js
Let's start with the programming culture. The angular itself is designed in such a way that it will not allow you to mess up much, but it is considered good practice to use strict ' use strict ' mode and wrap the module code into an anonymous function.
You may ask why such a large amount of functionality is rendered into a separate file? Everything is very simple. One of the advantages of an angular is its modularity, which makes it easy to transfer pieces of functionality from one project to another. In this case, we declare a separate module ' navbar ', on which in the future you can hang directives, controllers, factories and other joys.
At the same time, when transferring the functionality to another project, it will be enough just to connect the ' navbar ' module depending on it. All other dependencies attached to it do not require ads and will be pulled automatically.
Separately, I note that the second argument when declaring a module is an array of dependencies that are required for its operation. In this case, it is ' ui-router '. If there are no dependencies, you must specify an empty array, otherwise it will not be possible to export the module to another application.
Quite often, it is required to carry out pre-launch settings of the application, which are performed before the launch of directives, controllers and services. Such operations are performed in the config section (performed once the application is initialized) and in the run section (performed every time it switches to the state in which it is described). It is very convenient to keep the code of these settings in the above file.
File navbar.directive.js :
Immediately, I note that I am not proud of the code described in the directive. He is not of great interest, because it just describes the functionality of opening / closing menus for different screen resolutions and the assignment of the necessary classes depending on the type of item. Two recursive functions carry more or less useful information: checking the user's click outside the menu (line 181) and checking whether the menu item is active (line 70).
I note that done right from my point of view:
What is done wrong:
File navbar.provider.js
So, our directive is implemented and works, but where to get the list of menu items? It is possible to describe an array of items in the directive itself, but this is inconvenient at the subsequent addition / deletion of application states. Each time you have to go into the array of directive points, look for the right place in it and add a new one. And when deleting a state, you can forget about the presence of an item in the menu, which will lead to errors when a user tries to visit the page.
The way out of the situation is obvious - it is necessary to register each menu item directly next to the description of a specific state. There is a small nuance. The order of initializing the Angulyarov application is as follows:
Based on the queue, the config section is suitable for us, for which only the provider is available. You can reach the provider from any part of the application simply by connecting its name depending on it. At the config stage, the provider is available by its name with the addition “ Provider ”, that is, for example, if our provider name is navbarList , then in the config section it will be available under the name navbarListProvider .
The code of our provider is presented below:
$ get is a utility function, which, in our case, returns the method of adding an item to the add menu and the list menu itself, which is stored in the closure .
The add function accepts an object with the following fields as input:
The function of the add function is simple. First there is a validation of the object received at the input, then a search is made for a place to insert the current item. If no match is found, the recursive function makeOriginalPart () is called , which returns the newly created part of the menu; if a match is found, changeExistPart () is called , which recursively goes to the next nesting level as long as there are matches in the name of the items from the place array .
After each addition of an item, the menu is sorted by the priority field .
When writing the provider code, the else if constructions were not specifically used.. Instead, return was added at the end of the condition . I consider this step justified, since it improves the readability of the code. In general, the provider code has been repeatedly optimized. Who cares, below I attach the first version.
File navbar.permission.js
Menu filtering script depending on the access level defined by the angular-permission module. The code is moved to a separate factory to increase readability and modularity (not everyone needs this functionality).
The factory consists of two methods:
File navbar.decorator.js
In fact, everything that I have planned is implemented, let's see how it works. Below is an example of the code of the declaration of the state " Persian cat " with the registration of this submenu item in the chain of sublevels " living creatures " => " mammals " => " cats ". The item is available to all users except “ anonymous ” and “ banned ”.
It seems that everything works, but, you see, it is ugly? Almost all the information needed to declare a menu item is duplicated when a state is declared. To merge everything together we will use the function as a decorator , which was kindly provided by the developers of the UI-router module . In fact, the decorator creates a wrapper around an existing function and allows you to change its functionality. Below is the decoration code of our “ .state ” method , which allows us to process the menu field from the object passed to the state:
Now the announcement of our state with registration in the menu looks like this:
Agree - more elegant.
And finally, a small life hack: create in your projects for each state not only a separate folder , but also a separate Angulean module , and connect it to the dependency list. This will significantly reduce your time when removing / transferring states from the project. It will be enough to remove the module from the list of dependencies and the folder with the state.
Thank you for your attention, good luck to all.
The menu features implemented in this article:
- The entire menu filling is hidden under the hood of the directive. When html page layout, only a DOM element with a directive is specified, which improves the readability of the code.
- The menu has the ability to create items with an infinite level of nesting.
- The active page in the menu is highlighted not only at the first level, but also at any nesting level.
- The ability to register a menu item at the stage of application configuration.
- The ability to display / hide specific menu items depending on the access rights of the current user.
The source code of the directive can be found here .
Naturally, I didn’t write everything from scratch, so the following is a list of borrowed materials :
View list
PS : points 5-8 are optional, but they significantly simplify the life of a modern front-end developer.
- AngularJS is a superheroic Google framework that implements the MVVM application architecture design pattern.
- UI-router is an Angulyarovsky module, without which designing state- based applications is unthinkable.
- Angular-permission is the Angulyarovsky module (only works in conjunction with ui-router), which simplifies access control and authorization on the client side.
- Bootstrap 3 is a CSS framework that speeds up the layout of responsive pages.
- Yeoman- generator is a console utility for automatic construction of the project structure.
- Bower is a package manager that simplifies the installation and update of project dependencies.
- Gulp - the stream collector of projects on JS.
- NodeJS is a server-side development environment.
PS : points 5-8 are optional, but they significantly simplify the life of a modern front-end developer.
The first unpleasant surprise for me was the reproducibility of the project. The world of web-development is not in place, every day there are new versions of the above products and my menu, which was lazily written in a project that was overlooked a couple of months ago, completely refused to work in a project that was recently collected. Below is a list of problems that I encountered.
')
View problems
- The latest version of the UI-router falls out with an error if there are fields in the params object with values that equate to logical negation (false, 0, undefined, null, or an empty string). I did not find a solution to the problem, so I rolled back to the latest workable version “0.2.13”.
- Yeoman generator offers a fairly convenient structure of the future application. In the root directory, in addition to the service directory, a src directory with the project itself is created. It contains the main html page and three directories:
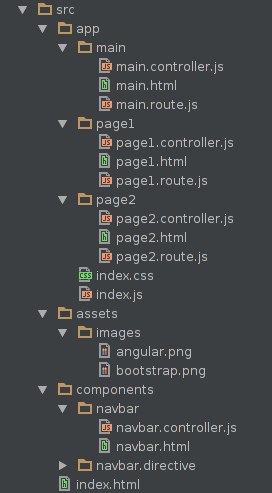
app - directory with application states (it is recommended to allocate a folder for each state).
assets - a folder with static content.
components - a folder for application elements that can be used many times (in our case, these are directives, services, factories, providers, etc.).
In accordance with this structure, the Yeoman generator sets up gulp for monitoring changes and connecting files to the running application (everything is done automatically, no need to connect the dependencies to the html page manually).
In the latest version of the generator, the components folder was moved to the app directory and, accordingly, the gulp settings were changed. In order for our project to see the components folder and not give an error on the absence of the navbar module in the developer’s console, edit the following files in the gulp folder:- inject.js script
we add an element to the injectScripts arrayoptions.src + '/components/**/*.js'
add an element to the injectStyles arrayoptions.src + '/components/**/*.css' - script watch.js - add the following rules:
gulp.watch(options.src + '/components/**/*.css', function(event) { if(isOnlyChange(event)) { browserSync.reload(event.path); } else { gulp.start('inject'); } }); gulp.watch(options.src + '/components/**/*.js', function(event) { if(isOnlyChange(event)) { gulp.start('scripts'); } else { gulp.start('inject'); } }); gulp.watch(options.src + '/components/**/*.html', function(event) { browserSync.reload(event.path); });
- inject.js script
- Since the directive is written in the bootstrap, then, naturally, it requires its components, in particular, the jQuery library. When creating the project, Yeoman will ask about the need to connect jquery, bootstrap and how to work with it (Angulyar ui-bootstrap or AngularStrap directives, the official use of bootstrap with jQuery or pure CSS). There is a small catch. When installing, even before selecting the above options, you will be prompted to add to the jQuery project. Be sure to select this option, otherwise we will remain without important dependencies and everything will break.
PS : actually fix the moment is not difficult. Just need to podshamanit the directive code itself and you can do without jQuery at all, but, as they say, “it works - do not touch (c)”. - If there is a desire to indulge in the project with Google's angular-material , which Yeoman proposes to include in the project, you need to know that in this case the old version of the library will be connected, for which the documentation from the official site is not suitable. Therefore, the correct option would be to connect the library using bower with the --save option.
With the organizational moments finished, we proceed to the writing of the directive itself.
For convenience, we will move the html-template directive to a separate file.
Show template
<div class="container" ng-mouseleave="closeMenu($event)"> <div class="navbar-header"> <button type="button" class="navbar-toggle" ng-click="collapseMenu($event)"> <span class="sr-only">Toggle navigation</span> <span class="icon-bar"></span> <span class="icon-bar"></span> <span class="icon-bar"></span> </button> <a class="link-kukuri" href="#" ui-sref="{{::sref}}" data-letters="{{::name}}">{{::name}}</a> </div> <div id="navbar" class="collapse navbar-collapse" aria-expanded="false" ng-class="navCollapsed"> <ul class="nav navbar-nav navbar-right"> <li ng-repeat="items in navbar" class="{{::menuClass(items.name, 'firstLevel')}} list-status"> <a href="#" ng-if="!items.name.pop" ui-sref="{{items.state}}" ng-mouseenter="closeOnMoveMenu()">{{items.name}}</a> <a href="#" ng-if="items.name.pop" class="dropdown-toggle dropdown-toggle-firstLevel" dropdown-toggle aria-expanded="false" ng-click="expandMenu($event)" ng-mouseenter="expandMenu($event)" ng-mouseleave="closeSubMenu($event)"> {{::items.name[0]}}<b class="caret"></b> </a> <ul ng-if="items.name.pop" class="dropdown-menu" ng-include="'submenu.template'"></ul> </li> </ul> </div> </div> <script type="text/ng-template" id="submenu.template"> <li ng-repeat="items in items.name" ng-if="$index !== 0" class="{{::menuClass(items.name)}} sub-menu"> <a href="#" class="sub-link" ng-if="!items.name.pop" ui-sref="{{::items.state}}" ng-mouseenter="closeOnMoveSubMenu($event)"> {{::items.name}}</a> <a href="#" ng-if="items.name.pop" class="dropdown-toggle" data-toggle="dropdown" ng-click="expandSubMenu($event)" ng-mouseenter="expandSubMenu($event)"> {{::items.name[0]}} </a> <ul ng-if="items.name.pop" class="dropdown-menu" ng-include="'submenu.template'"> </ul> </li> </script> In fact, this is a modification of the standard menu from the bootstrap documentation with a few nuances:
Show features
- The list of menu items is generated using the ng-repeat directive, which clones the prepared html template, substituting data from the menu item array, which is defined in the current directive's scopes, into it. I note that the template uses the so-called one-time assignment ( one time binding ), the syntax of which is two points near the variable (for example {{:: name}} ). The fact is that for each variable an angular creates a separate listener (watcher), which checks its change with each digest (checking for changes of all variables in the current scopa as long as their values change, at the end DOM is drawn with new values) . Since our menu items are constant, it makes sense to draw them once, reducing the number of listeners and increasing productivity.
- Nested subclauses are collected recursively using ng-include . The recursive part of the template is stored in the script tag with the type = "text / ng-template" attribute. The browser does not know this type of script and does not handle this part of the DOM, but the ng-include directive inserts only the contents of the script in the right place, which allows the browser to handle the DOM element normally.
The nesting itself is controlled by the ng-if directive, which checks whether the current element is an array of items or a string with the name of the item. The check is carried out using the so-called “ duck typing ”, if we have an array before us, then it has array methods (push, pop, etc.), the access to which without () will return a function that equates to a logical true. If we have a string before us, such a call to the array method will return undefined. - There is an unspoken rule for working with angular directives, which says: "The directive should not change the elements of a DOM tree outside its element." The work of the drop-down menu items requires listeners who will track the events of a click, a hover and an cursor leave the item. It would be possible to use the usual search for elements by the selectors of the DOM elements of the tree and hang listeners on them. But in a large project, there is a possibility that someone else will use identical selector names. The consequences of such an event are unpredictable :) For such cases, the directives ng-click, ng-mouseenter and ng-mouseleave are provided , which were hung on the corresponding elements.
Next, briefly consider the css file :
Show CSS
@import url (http://fonts.googleapis.com/css?family=Gloria+Hallelujah);
.navbar-brand {
font-family: "Gloria Hallelujah", Verdana, Tahoma;
font-size: 23px;
}
.sub-menu {
background-color: # 333;
}
.sub-menu> a {
color: # 9d9d9d! important;
padding-left: 10px! important;
}
.dropdown-menu {
padding: 0px;
margin-left: -1px;
margin-right: -1px;
min-width: 90px! important;
}
.dropdown-submenu {
position: relative;
}
.dropdown-submenu> .dropdown-menu {
top: 0;
right: 100%;
margin-top: 6px;
margin-left: -1px;
-webkit-border-radius: 0 6px 6px 6px;
-moz-border-radius: 0 6px 6px 6px;
border-radius: 0 6px 6px 6px;
}
.dropdown-submenu: hover> a: after {
border-left-color: #ffffff;
}
.dropdown-submenu.pull-left {
float: none;
}
.dropdown-submenu.pull-left> .dropdown-menu {
left: -100%;
margin-left: 10px;
-webkit-border-radius: 6px 0 6px 6px;
-moz-border-radius: 6px 0 6px 6px;
border-radius: 6px 0 6px 6px;
}
.dropdown-submenu> a: before {
display: block;
content: "";
float: left;
width: 0;
height: 0;
border-style: solid;
border-color: transparent #cccccc transparent transparent;
margin-top: 7px;
margin-left: -5px;
margin-right: 10px;
}
.dropdown-submenu-big> a: before {
border-width: 4.5px 7.8px 4.5px 0;
}
.dropdown-submenu-small> a: before {
margin-right: 7px;
border-left: 5px solid transparent;
border-right: 5px solid transparent;
border-top: 5px solid #ccccc;
}
.dropdown-menu: hover,
.dropdown-toggle: focus,
li> [aria-expanded = "true"],
.navbar-brand: hover,
.sub-menu> a: hover,
.list-status: hover,
.nav .open> a {
color: #fff! important;
background-color: # 004444! important;
}
.menu-active,
.menu-active> a {
font-weight: bold! important;
text-decoration: underline;
}
.navbar-cheat {
width: 100%;
height: 45px;
}
.sub-link: before {
display: block;
content: "";
float: left;
width: 12px;
height: 5px;
}
/ * Kukuri * /
.link-kukuri {
font-family: "Gloria Hallelujah";
outline: none;
text-decoration: none! important;
position: relative;
font-size: 23px;
line-height: 2;
color: # c5c2b8;
display: inline-block;
}
.link-kukuri: hover {
color: # c5c2b8;
}
.link-kukuri: hover :: after {
-webkit-transform: translate3d (100%, 0.0);
transform: translate3d (100%, 0.0);
}
.link-kukuri :: before {
content: attr (data-letters);
position: absolute;
z-index: 2;
overflow: hidden;
color: # 424242;
white-space: nowrap;
width: 0%;
-webkit-transition: width 0.4s 0.0s;
transition: width 0.4s 0.0s;
}
.link-kukuri: hover :: before {
width: 100%;
}
.link-kukuri: focus {
color: # 9e9ba4;
}
Nothing special, the code for the menu “borrowed” here , the animation of the logo is here .
So slowly, we got to the most interesting part, for the sake of which this article was conceived - the code of the directive menu on an angular.
File navbar.module.js
'use strict'; (function () { angular.module('navbar', ['ui.router']); })(); Let's start with the programming culture. The angular itself is designed in such a way that it will not allow you to mess up much, but it is considered good practice to use strict ' use strict ' mode and wrap the module code into an anonymous function.
You may ask why such a large amount of functionality is rendered into a separate file? Everything is very simple. One of the advantages of an angular is its modularity, which makes it easy to transfer pieces of functionality from one project to another. In this case, we declare a separate module ' navbar ', on which in the future you can hang directives, controllers, factories and other joys.
At the same time, when transferring the functionality to another project, it will be enough just to connect the ' navbar ' module depending on it. All other dependencies attached to it do not require ads and will be pulled automatically.
Separately, I note that the second argument when declaring a module is an array of dependencies that are required for its operation. In this case, it is ' ui-router '. If there are no dependencies, you must specify an empty array, otherwise it will not be possible to export the module to another application.
Quite often, it is required to carry out pre-launch settings of the application, which are performed before the launch of directives, controllers and services. Such operations are performed in the config section (performed once the application is initialized) and in the run section (performed every time it switches to the state in which it is described). It is very convenient to keep the code of these settings in the above file.
File navbar.directive.js :
Show navbar.directive.js
'use strict'; (function () { angular.module('navbar') .directive('navbar', function ($document, $state, navbarList, navPermission) { return { restrict: 'A', scope: { name: '@', sref: '@' }, templateUrl: '/components/navbar.directive/navbar.template.html', link: function (scope, elem) { var openedMenu = null, openedSubMenu = null, username = navPermission.getUser($state.params); // DOM bootstrap elem.addClass('navbar navbar-inverse navbar-fixed-top'); elem.attr('role', 'navigation'); // scope if(username) { navPermission.acceptPermission(navbarList.list, username); } scope.navbar = navbarList.list; // / scope.collapseMenu = function ($event) { var navbar = elem.find('#navbar'), expanded = navbar.hasClass('in'); navbar.attr('aria-expanded', !expanded); scope.navCollapsed = (expanded) ? '' : 'in'; closeAllMenu(); stopBubleAndPropagation($event); }; // , scope.menuClass = function (item, level) { var status = false, activePage = getActivePage($state.current.name), currentPage = (item.pop) ? item[0] : item, classList = (level === 'firstLevel') ? 'dropdown dropdown-firstLevel ' : 'menu-item dropdown dropdown-submenu ', activeClass = (currentPage === activePage || isActive(item, activePage, status) ) ? 'menu-active' : ''; if(item.pop) { return classList + activeClass; } else { return activeClass; } }; // () function getActivePage(state, currentList) { var name; if(!currentList) { currentList = scope.navbar; } for(var i = (currentList[0].name) ? 0 : 1; i < currentList.length; i++) { if(currentList[i].state === state) { return currentList[i].name; } else if(currentList[i].name.pop) { name = getActivePage(state, currentList[i].name); } } return name; } // , function isActive (item, activePage, status) { if(item.pop) { for(var i = 1; i < item.length; i++) { if(item[i].name.pop) { status = isActive(item[i].name, activePage, status); } else if(item[i].name === activePage) { return true; } } } else if(item === activePage) { return true; } return status; } // ( , .. ) scope.expandMenu = function ($event) { var clickedElem = $($event.currentTarget), parentClicked = $($event.currentTarget.parentElement), expanded = clickedElem.attr('aria-expanded'), isOpened = parentClicked.hasClass('open'), attrExpanded = (expanded === 'false'), allOpenedMenu = parentClicked.parent().find('.open'), smallWindow = window.innerWidth < 768, eventMouseEnter = $event.type === 'mouseenter', subMenuAll = elem.find('.dropdown-submenu'); if(!smallWindow || !eventMouseEnter) { allOpenedMenu.removeClass('open'); clickedElem.attr('aria-expanded', attrExpanded); if(isOpened && !eventMouseEnter) { parentClicked.removeClass('open'); } else { parentClicked.addClass('open'); openedMenu = clickedElem; //** } } subMenuAll.removeClass('dropdown-submenu-small dropdown-submenu-big'); if(smallWindow) { subMenuAll.addClass('dropdown-submenu-small'); } else { subMenuAll.addClass('dropdown-submenu-big'); } stopBubleAndPropagation($event); }; // scope.closeOnMoveMenu = function () { var smallWindow = window.innerWidth < 768; if(openedMenu && !smallWindow) { var clickedLink = openedMenu, clickedElement = clickedLink.parent(); clickedElement.removeClass('open'); clickedLink.attr('aria-expanded', false); openedMenu = null; } }; // ( 92 ) scope.expandSubMenu = function ($event) { var elemClicked = $($event.currentTarget.parentElement), smallWindow = window.innerWidth < 768, eMouseEnter = $event.type === 'mouseenter', sameElement = elemClicked.hasClass('open'); if(!smallWindow || !eMouseEnter) { // if(!sameElement && !eMouseEnter || !eMouseEnter || !sameElement) { elemClicked.parent().find('.open').removeClass('open'); } if(!sameElement) { elemClicked.addClass('open'); openedSubMenu = elemClicked; } } stopBubleAndPropagation($event); }; // ( :)) scope.closeOnMoveSubMenu = function ($event) { var smallWindow = window.innerWidth < 768; if(openedSubMenu && !smallWindow) { var clickedElement = openedSubMenu, savedList = clickedElement.parent(), currentList = $($event.target).parent().parent(); if(savedList[0] === currentList[0]) { clickedElement.removeClass('open'); openedSubMenu = null; } } }; scope.closeMenu = closeMenu; // var $body = $document.find('html'); elem.bind('$destroy', function() { $body.unbind(); // }); // - $body.bind('click', closeMenu); function closeMenu ($event) { var elemClicked = $event.relatedTarget || $event.target; if(isClickOutNavbar(elemClicked)) { closeAllMenu(); } } // , , function isClickOutNavbar(elem) { if($(elem).hasClass('dropdown-firstLevel')) { return false; } if(elem.parentElement !== null) { return isClickOutNavbar(elem.parentElement); } else { return true; } } // function closeAllMenu() { elem.find('.open').removeClass('open'); elem.find('[aria-expanded=true]').attr('aria-expanded', false); } // function stopBubleAndPropagation($event) { $event.stopPropagation(); $event.preventDefault(); } } }; }); })(); Immediately, I note that I am not proud of the code described in the directive. He is not of great interest, because it just describes the functionality of opening / closing menus for different screen resolutions and the assignment of the necessary classes depending on the type of item. Two recursive functions carry more or less useful information: checking the user's click outside the menu (line 181) and checking whether the menu item is active (line 70).
I note that done right from my point of view:
- The directive has an isolated scop in which the name and sref parameters are forwarded through the element attributes. Those. in a big project, there is less chance of getting into trouble.
- Complex constructions (finding the element, checking the attribute) are rendered into variables. The name of variables and functions indicates their purpose.
A good practice is to assign a name in the form of camel notation . Also, if the code declares several variables in a row, it makes no sense to constantly write var, you can simply list the variables separated by commas, or even better specify each of them with a new line. This improves the readability of the code.
What is done wrong:
- The code is too complex, some functions can be divided into more simple ones. The basic rule is: mentally pronounce what the function does and if the letter “AND” jumps in the phrase, it means that the function should be divided into a simpler one.
- Too trivial comments. A good code should speak for itself what it does. Comments require either difficult moments in understanding, or those parts of the code where you have chosen a more complex solution instead of a simple one, since something in simple did not suit you.
In this case, the comments are written to make it easier for the reader to grasp the essence of the issue.
File navbar.provider.js
So, our directive is implemented and works, but where to get the list of menu items? It is possible to describe an array of items in the directive itself, but this is inconvenient at the subsequent addition / deletion of application states. Each time you have to go into the array of directive points, look for the right place in it and add a new one. And when deleting a state, you can forget about the presence of an item in the menu, which will lead to errors when a user tries to visit the page.
The way out of the situation is obvious - it is necessary to register each menu item directly next to the description of a specific state. There is a small nuance. The order of initializing the Angulyarov application is as follows:
- connection of the registered modules of an angular (module),
- registration of providers (provider),
- processing of the config section (performed once when the application is initialized),
- register factory, service, value, constant,
- processing of the run section (performed every time the state changes),
- registration of controllers and directives.
Based on the queue, the config section is suitable for us, for which only the provider is available. You can reach the provider from any part of the application simply by connecting its name depending on it. At the config stage, the provider is available by its name with the addition “ Provider ”, that is, for example, if our provider name is navbarList , then in the config section it will be available under the name navbarListProvider .
The code of our provider is presented below:
Show navbar.provider.js
'use strict'; (function () { angular.module('navbar') .provider('navbarList', function () { var list = []; // this.add = function (obj) { // if(obj.location) { if(obj.location.place.length !== obj.location.priority.length || !obj.location.place.pop || !obj.location.priority.pop) { console.log('Warning! Bad location params for menu "' + obj.name + '". Skip item'); return; } } // if(!obj.location) { var name = obj.name; for(var i = 0; i < list.length; i++) { // var currentName = (list[i].name.pop) ? list[i].name[0] : list[i].name; if(currentName === name) { console.log('Warning! Duplicate menu "' + name + '". Skip item'); return; } } list.push(obj); list.sort(sortByPriority); return; } // , var place = obj.location.place.shift(), priority = obj.location.priority.shift(); for(i = 0; i < list.length; i++) { // , i JS var currentSubName = (list[i].name.pop) ? list[i].name[0] : null; if(place === currentSubName) { list[i].name = changeExistPart(obj, list[i].name); if(priority !== list[i].priority) { console.log('Warning! Priority of menu "' + list[i].name + '" has been changed from "' + list[i].priority + '" to "' + priority + '"'); list[i].priority = priority; list.sort(sortByPriority); } return; } currentName = list[i].name; if(place === currentName) { console.log('Warning! Duplicate submenu "' + place + '". Skip item'); return; } } // , list.push( { name: [place, makeOriginalPart(obj)], priority: priority } ); list.sort(sortByPriority); }; // function changeExistPart(obj, list) { var place = obj.location.place.shift(), priority = obj.location.priority.shift(), // searchName = (place) ? place : obj.name; for(var i = 1; i < list.length; i++) { var currentName = (list[i].name.pop) ? list[i].name[0] : list[i].name; if(searchName === currentName) { if(!list[i].name.pop || (!place && list[i].name.pop) ) { console.log('Warning! Duplicate menu "' + searchName + '". Skip item'); return list; } else { list[i].name = changeExistPart(obj, list[i].name); if(priority !== list[i].priority) { console.log('Warning! Priority of menu "' + list[i].name + '" has been changed from "' + list[i].priority + '" to "' + priority + '"'); list[i].priority = priority; list.sort(sortByPriority); } return list; } } } if(!place) { delete obj.location; list.push(obj); } else { list.push({ name: [place, makeOriginalPart(obj)], priority: priority }); } list.sort(sortByPriority); return list; } // , function makeOriginalPart (obj) { var place = obj.location.place.shift(), priority = obj.location.priority.shift(); if(place) { var menu = { priority: priority, name: [place, makeOriginalPart(obj)] }; } else { delete obj.location; menu = obj; } return menu; } // function sortByPriority(a, b) { return a.priority - b.priority; } // angularJS this.$get = function () { return { list: list, add: this.add }; }; }); })(); $ get is a utility function, which, in our case, returns the method of adding an item to the add menu and the list menu itself, which is stored in the closure .
The add function accepts an object with the following fields as input:
- priority - the numerical value of the priority by which the list is sorted
- permission is an optional object containing one of two fields:
- except — ,
- only — ,
- location — , :
- place — , ,
- priority — , ,
- name — .
The function of the add function is simple. First there is a validation of the object received at the input, then a search is made for a place to insert the current item. If no match is found, the recursive function makeOriginalPart () is called , which returns the newly created part of the menu; if a match is found, changeExistPart () is called , which recursively goes to the next nesting level as long as there are matches in the name of the items from the place array .
After each addition of an item, the menu is sorted by the priority field .
When writing the provider code, the else if constructions were not specifically used.. Instead, return was added at the end of the condition . I consider this step justified, since it improves the readability of the code. In general, the provider code has been repeatedly optimized. Who cares, below I attach the first version.
See the first version of the provider
Attention! .
'use strict'; (function () { angular.module('navbar') .provider('navbarList', function () { var list = []; this.add = addMenu; function addMenu(obj, nestedMenu, currentList) { if(currentList) { list = currentList; } else if(list.length < 1) { list.push(makeOriginalPart(obj)); return; } if(!obj.location || !obj.location.place) { // . place==priority isDuplicate(obj.name, list); list.push(obj); list.sort(sortByPriority); return; } else if(obj.location.place.length > 0){ var searchName = obj.location.place.shift(), priority = (obj.location.priority) ? obj.location.priority.shift() : null; for(var i = (nestedMenu) ? 1 : 0; i < list.length; i++) { var currentName = (list[i].name.pop) ? list[i].name[0] :list[i].name; if(currentName === searchName) { if(list[i].name.pop) { // if(!nestedMenu) { nestedMenu = [list]; } var sublistName = list[i].name.shift(); list[i].name.sort(sortByPriority); list[i].name.unshift(sublistName); list[i].name.priority = priority; // nestedMenu.push(list[i].name); addMenu(obj, nestedMenu, list[i].name); return; } else { console.log('Warning! Duplicate menu', currentName); } } } if(nestedMenu) { var last = nestedMenu.length - 1; nestedMenu[last].push({ name: [searchName, makeOriginalPart(obj, null, nestedMenu[last]) ], priority: priority }); } } else { last = nestedMenu.length - 1; nestedMenu[last].push(makeOriginalPart(obj, null, nestedMenu[last])); } if(nestedMenu) { // changeExistPart nestedMenu[nestedMenu.length - 1].sort(sortByPriority); list = changeExistPart(nestedMenu); } else { if(priority) { // . place==priority obj.location.priority.unshift(priority); } obj.location.place.unshift(searchName); list.push(makeOriginalPart(obj, null, list)); list.sort(sortByPriority); } } function changeExistPart(nestedMenu) { if(nestedMenu.length > 1) { var subList = nestedMenu.pop(), priority = subList.priority, searchName = subList[0], last = nestedMenu.length - 1; for(var i = 1; i < nestedMenu[last].length; i++) { var currentName = (nestedMenu[last][i].name.pop) ? nestedMenu[last][i].name[0] : ''; if(searchName === currentName){ nestedMenu[last][i].name = subList; nestedMenu[last][i].priority = priority; return changeExistPart(nestedMenu); } } return changeExistPart(nestedMenu); // . } else { return nestedMenu[0]; } } function makeOriginalPart(obj, menu, currentList){ if(!menu) { isDuplicate(obj.name, currentList); menu = { name: obj.name, priority: obj.priority, state: obj.state, permissions: obj.permissions }; } if(obj.location.place.length > 0) { var currentLocation = obj.location.place.pop(), priority = (obj.location.priority) ? obj.location.priority.pop() : null, currentMenu = { priority: priority, name: [currentLocation, menu] }; return makeOriginalPart(obj, currentMenu); } else { return menu; } } function isDuplicate(name, list) { if(!list || list.length < 1) { return; } for(var i = (list[0].name) ? 0 : 1; i < list.length; i++) { var currentName = (list[i].name.pop) ? list[i].name[0] : list[i].name; if(currentName === name) { console.log('Warning! Duplicate menu', currentName); } } } function sortByPriority(a, b) { return a.priority - b.priority; } this.$get = function () { return { list: list, add: this.add }; }; }); })(); File navbar.permission.js
Watch navbar.permission.js
'use strict'; (function () { angular.module('navbar') .factory('navPermission', function (Permission, $q) { // function getUser(params) { var users = Permission.roleValidations, names = Object.keys(users), promisesArr = []; for(var i = 0; i < names.length; i++) { var current = names[i], validUser = $q.when( users[current](params) ); promisesArr.push(validUser); } return $q.all(promisesArr).then(function (users) { for(var i = 0; i < users.length; i++) { if(users[i]) { return names[i]; } } return null; }); } // , , - function acceptPermission (list, username) { if(!username.then) { return changeList(list, username); } else { return username.then(function (username) { return changeList(list, username); }); } } // , function changeList(list, username) { for(var i = (list[0].name) ? 0 : 1; i < list.length; i++) { if(list[i].permissions) { if(list[i].permissions.except) { var except = list[i].permissions.except; for(var j = 0; j < except.length; j++) { if(except[j] === username) { list.splice(i--, 1); } } } else if(list[i].permissions.only) { var only = list[i].permissions.only, accessDenided = true; for(j = 0; j < only.length; j++) { if(only[j] === username) { accessDenided = false; } } if(accessDenided) { list.splice(i--, 1); } } } else if(list[i].name.pop) { list[i].name = changeList( list[i].name, username); if(list[i].name.length === 1 ) { list.splice(i--, 1); } } } return list; } // return { getUser: getUser, acceptPermission: acceptPermission }; }); })(); Menu filtering script depending on the access level defined by the angular-permission module. The code is moved to a separate factory to increase readability and modularity (not everyone needs this functionality).
The factory consists of two methods:
- acceptPermission - we recursively walk through the array of menu items and delete forbidden ones.
- getUser is a method for determining the current user role. Obviously, in a real project, the user role can be defined not only locally, but also on the server. Therefore, the user role is defined asynchronously using promises .
File navbar.decorator.js
In fact, everything that I have planned is implemented, let's see how it works. Below is an example of the code of the declaration of the state " Persian cat " with the registration of this submenu item in the chain of sublevels " living creatures " => " mammals " => " cats ". The item is available to all users except “ anonymous ” and “ banned ”.
.config(function ($stateProvider, navbarListProvider) { // $stateProvider .state('persianCat', { url: '/ ', templateUrl: 'app/cats/persianCat.html', controller: 'persianCatCtrl', permissions: { except: ['anonymous', 'banned'], redirectTo: 'login' } }); // navbarListProvider.add({ state: 'persianCat', name: ' ', permissions: { except: ['anonymous', 'banned'] }, priority: 20, location: { place: [' ', '', ''], priority: [10, 10, 10] } }); }); It seems that everything works, but, you see, it is ugly? Almost all the information needed to declare a menu item is duplicated when a state is declared. To merge everything together we will use the function as a decorator , which was kindly provided by the developers of the UI-router module . In fact, the decorator creates a wrapper around an existing function and allows you to change its functionality. Below is the decoration code of our “ .state ” method , which allows us to process the menu field from the object passed to the state:
Watch navbar.decorator.js
'use strict'; (function() { angular.module('navbar') .config(function ($stateProvider, navbarListProvider) { // state $stateProvider.decorator('state', function (obj) { var menu = obj.menu, permissions = (obj.data) ? obj.data.permissions : null; // - if(!menu) { return; } menu.state = obj.name; // if(permissions) { menu.permissions = {}; if(permissions.except) { menu.permissions.except = permissions.except; } else if(permissions.only) { menu.permissions.only = permissions.only; } else { delete menu.permissions; } } // menu navbarListProvider.add(menu); }); }); })(); Now the announcement of our state with registration in the menu looks like this:
.config(function ($stateProvider) { $stateProvider .state('persianCat', { url: '/ ', templateUrl: 'app/cats/persianCat.html', controller: 'persianCatCtrl', permissions: { except: ['anonymous', 'banned'], redirectTo: 'login' }, menu: { name: ' ', priority: 20, location: { place: [' ', '', ''], priority: [10, 10, 10] } } }); }); Agree - more elegant.
And finally, a small life hack: create in your projects for each state not only a separate folder , but also a separate Angulean module , and connect it to the dependency list. This will significantly reduce your time when removing / transferring states from the project. It will be enough to remove the module from the list of dependencies and the folder with the state.
Thank you for your attention, good luck to all.
Source: https://habr.com/ru/post/259347/
All Articles