[UPD] Programming 1986E91T microcontrollers in Qt Creator
I want to show how you can write code and collect hex files for domestic Milandr microcontrollers in a convenient Qt Creator environment. Usually other development environments are used for these tools, but with the advent of QBS, things have changed somewhat.
In order for everything to work, it is enough to download the environment and the compiler. Compiler - GCC; Wednesday, as the title says - Qt Creator.
- Qt Creator can be downloaded from the official Qt website and installed without any problems both in Windows and Linux. You can put anywhere;
- Then download GCC for ARM. I took links from here . We unpack in a place convenient for you, preferably not far from the root of the disk;
- Download CMSIS and SPL libraries from Milandra site. Unpack anywhere. Or you can take the template that I posted at the end of the article here, and use the libraries from there. But when you want to poke around further, you will have to add more library files. Them can be found on the official website.
Anything more, we do not need anything.
')
So, after you have installed and unpacked everything you need, you can start creating a project and writing code. Written here is true for both Windows and Linux (the project build was tested on Ubuntu).
Let's start:
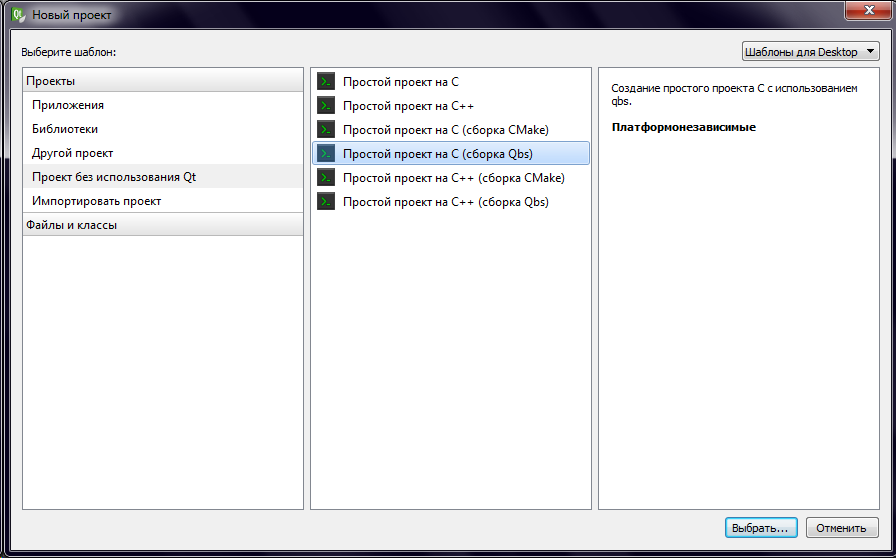
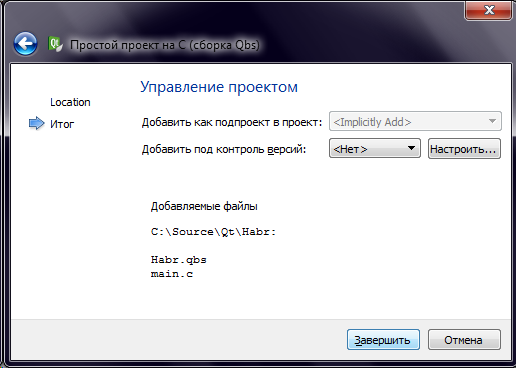
- Open Qt Creator and create a new project with the QBS build system. Let's call it, for example, “Habr”.
We get a simple Hello World. Then from the main.c file we delete everything and leave an empty file. We will return to it a little later.
- Open the file Habr.qbs and similarly clean out everything, leaving a void. Then we write the following code there:
In this code, the compiler, linker and creator of the hex file with their parameters are called in turn.
Sure to! Add the path to your compiler, linker, and gcc-objcopy to the CompilerPath variable.
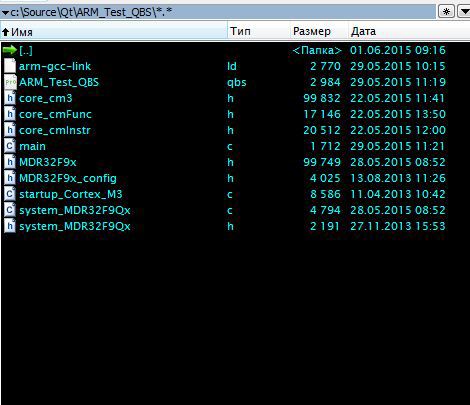
After that we add files for cmsis and spl, as well as the linker script to the source folder. It should look like this:
In the main.c file, which stands and waits while we write something there, we insert the following:
The choice of ports is due to the work with the Milandra debug board.
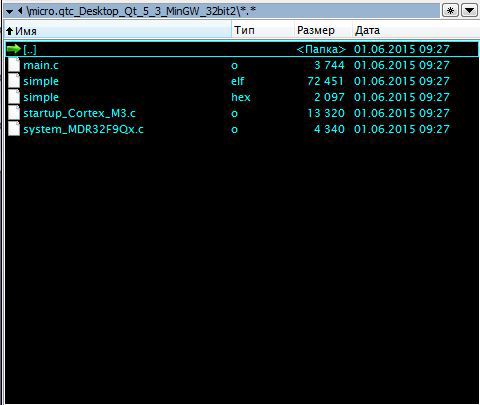
After we run the compilation and make sure that everything compiles and we become the owners of the hex file.
Everything is fine, now this file can be flashed to the controller and enjoy the flashing diodes.
As I said, I post the template with the sources .
That's all, thank you for your attention!
UPD: I posted a template on GitHub
In order for everything to work, it is enough to download the environment and the compiler. Compiler - GCC; Wednesday, as the title says - Qt Creator.
Downloading necessary
- Qt Creator can be downloaded from the official Qt website and installed without any problems both in Windows and Linux. You can put anywhere;
- Then download GCC for ARM. I took links from here . We unpack in a place convenient for you, preferably not far from the root of the disk;
- Download CMSIS and SPL libraries from Milandra site. Unpack anywhere. Or you can take the template that I posted at the end of the article here, and use the libraries from there. But when you want to poke around further, you will have to add more library files. Them can be found on the official website.
Anything more, we do not need anything.
')
Creating a template
So, after you have installed and unpacked everything you need, you can start creating a project and writing code. Written here is true for both Windows and Linux (the project build was tested on Ubuntu).
Let's start:
- Open Qt Creator and create a new project with the QBS build system. Let's call it, for example, “Habr”.
We get a simple Hello World. Then from the main.c file we delete everything and leave an empty file. We will return to it a little later.
- Open the file Habr.qbs and similarly clean out everything, leaving a void. Then we write the following code there:
import qbs Project { name: "simple" Product { name: "micro" type: "hex" Group { name: "sources" files: ["main.c", "system_MDR32F9Qx.c", "startup_Cortex_M3.c"] fileTags: ['c'] } Rule { inputs: ["c"] Artifact { fileTags: ['obj'] filePath: input.fileName + '.o' } prepare: { var args = []; args.push("-mcpu=cortex-m3") args.push("-mthumb") args.push("-g") args.push("-ffunction-sections") args.push("-O0") args.push("-Wall") args.push("-Wunused") args.push("-DM3") args.push('-c'); args.push(input.filePath); args.push('-o'); args.push(output.filePath); var compilerPath = "C:/4.9_2014q4/bin/arm-none-eabi-gcc.exe" var cmd = new Command(compilerPath, args); cmd.description = 'compiling ' + input.fileName; cmd.highlight = 'compiler'; cmd.silent = false; return cmd; } } Rule{ multiplex: true inputs: ['obj'] Artifact{ fileTags:['elf'] filePath: project.name + '.elf' } prepare:{ var args = [] args.push("-mcpu=cortex-m3") args.push("-mthumb") args.push("-g") args.push("-nostartfiles") args.push("-O0") args.push("-Wl,--gc-sections") for(i in inputs['obj']) args.push(inputs["obj"][i].filePath); args.push("-TC:/Source/Qt/ARM_Test_QBS/arm-gcc-link.ld") args.push('-o'); args.push(output.filePath); var compilerPath = "C:/4.9_2014q4/bin/arm-none-eabi-gcc.exe" var cmd = new Command(compilerPath,args); cmd.description = "linking"+project.name return cmd; } } Rule{ inputs: ['elf'] Artifact{ fileTags:['hex'] filePath: project.name + '.hex' } prepare:{ var args = [] args.push("-O") args.push("ihex") args.push(input.filePath) args.push(output.filePath) var hexcreator = "C:/4.9_2014q4/bin/arm-none-eabi-objcopy.exe" var cmd = new Command(hexcreator,args); cmd.description = 'create_hex'+project.name return cmd; } } } } In this code, the compiler, linker and creator of the hex file with their parameters are called in turn.
Sure to! Add the path to your compiler, linker, and gcc-objcopy to the CompilerPath variable.
After that we add files for cmsis and spl, as well as the linker script to the source folder. It should look like this:
In the main.c file, which stands and waits while we write something there, we insert the following:
#include "MDR32F9x.h" // #include "system_MDR32F9Qx.h" // long check = 0; void InitPortLED(void)// { MDR_PORTD->FUNC &= ~((0x3FF << (10 << 1))); MDR_PORTD->ANALOG |= (1<<14|1<<13|1<<12|1<<11|1<<10); MDR_PORTD->PWR |= (0x155 << (10 << 1)); MDR_PORTD->RXTX &= ~(1<<14|1<<13|1<<12|1<<11|1<<10); MDR_PORTD->OE |= (1<<14|1<<13|1<<12|1<<11|1<<10); } int main() { SystemInit();// , InitPortLED(); while(1)// { check++; if(check == 1000) MDR_PORTD->RXTX |= 1<<14|1<<10|1<<12;//vkl diod if(check == 4000) { check = 0; MDR_PORTD->RXTX &= (0<<11|0<<13); } } } The choice of ports is due to the work with the Milandra debug board.
After we run the compilation and make sure that everything compiles and we become the owners of the hex file.
Everything is fine, now this file can be flashed to the controller and enjoy the flashing diodes.
As I said, I post the template with the sources .
That's all, thank you for your attention!
UPD: I posted a template on GitHub
Source: https://habr.com/ru/post/259269/
All Articles