Level device in NES games
In this article I will try to talk about the method of storing the levels in the ROM-memory of cartridges for the NES console.
I will describe all the main ways and dwell in detail on the most frequently used (of the several dozen games I studied, he met in almost every).
I called this method “block” (I’ll make a reservation that many terms in the article were invented by me, since there are no materials on this topic in Russian; after researching several games, I began to study English-language materials and documentation for the editors of games for old platforms; some analogies, in such cases I will give my terms explaining their meanings and their English versions). As examples, I will give the levels from the game "Darkwing Duck", as well as other games of the company "Capcom", I dismantled a few years ago.
I will try to skip the description of using the disassembler and the technical part of the study (if there is interest, you can do a separate article on this topic), and I’ll dwell on the description of how the developers stored the data. Knowing what to look for, finding it inside the ROM image will become much easier. As a bonus, I will show a ready-made level editor and several hacks of classic NES games created on it.
So, let's begin the description, as it should be for code researchers, from bottom to top.
')
The bottom level will be the most difficult, but it’s completely completely unnecessary to deal with it, it’s enough to have a rough idea. Moreover, you can skip this part altogether and continue reading from the next paragraph.
I will just describe in a few sentences what is happening here and move on to more interesting things.
The NES video processor has several screen pages — one of them is displayed on the screen. The screen page stores the numbers of 8x8 tiles that need to be displayed (30 rows of 32 tiles, 960 bytes in total) and their attributes (additional bits of tile color); 1 kilobyte of the description goes to the whole page, the whole screen is described so compactly. Tiles themselves are taken from a character generator (256 tiles of 8x8 in size use 4 kilobytes of memory, 16 bytes per one tile), they can be located either in a separate video bank of the cartridge or copied to video memory from a regular data bank. For the researcher, the place of their storage is practically not important. Those who wish to understand this topic in more detail I can advise reading the article from MiGeRa in Russian
You can view the contents of video processor character generators using any NES emulator, I will use the most advanced for researching games - FCEUX (at the time of writing the latest version 2.2.2), in it you need to select the Debug-> PPU Viewer menu item :
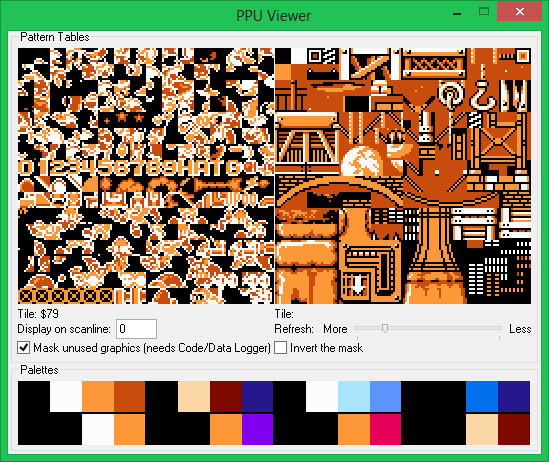
The emulator displays tiles doubled for easy study. The right character generator in this game is used to build a background screen (the left one - for drawing characters using another mechanism, this is a topic for a separate article).
As mentioned above, the description of one screen using tiles takes 960 bytes (30x32 tiles). But look at the full Darkwing Duck level one card .
It consists of 20 screens. If you keep a description of all the screens, then to save one level will take about 18 kilobytes, and on all seven game levels - 131 kilobytes. I remind you that this is not the video memory itself in the image of the game, but only a description using the video memory tiles of the game screens! This is most of the total size of the data banks in the entire image of the “Black Cape” ROM (there are only 128 kb in total for the code and data and another 128 kb for the video banks). Moreover, the levels of "Duck Tales 2" contain up to 32 screens, despite the fact that the image weighs half as much.
It is worth asking yourself, how can you keep the description of screens more economical? What would you do on site developers?
In all the games I studied, only 3 different methods were used: compression, drawing on a blank canvas, and block method — level description not with tiles, but with large block structures.
Compression.
Almost not used in NES-games (but it is constantly used in games on Sega Mega Drive and Snes) mainly due to the small amount of available RAM that is required to store unpacked data, as well as a slow processor. However, RLE compression is occasionally encountered.
An example is the first “Contra” (together with the description of screens using blocks, see below the 3rd method about blocks):
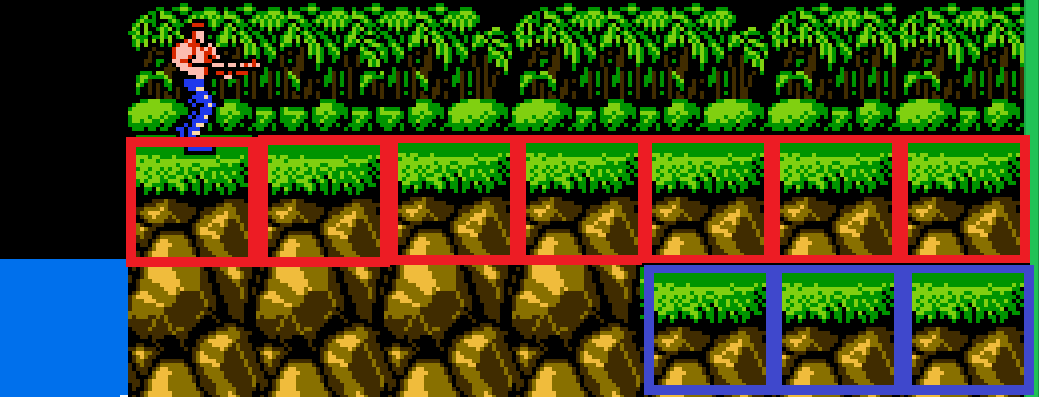
The blocks marked in red are saved in the ROM image as “repeat the block with the platform 7 times”, and with the blue, respectively, “repeat the block with the platform 3 times”. You can verify this by downloading the editor for this game.
It is worth noting that RLE on NES is still used, but not for compression of the description of the level, but for more suitable entities for this. For example, they compress the tiles stored in this case in the data banks ("Duck Tales 2", the same "Contra"). Unpacking takes place immediately in the video memory. Also, text data is sometimes compressed (by suitable algorithms for this), but to describe the level on this platform, it is still exotic.
Drawing on a blank canvas.
This approach implies that most of the screen remains clean, so it is not necessary to describe it. Described only in what coordinates should be drawn specific objects. A striking example of this approach is the Mario series:
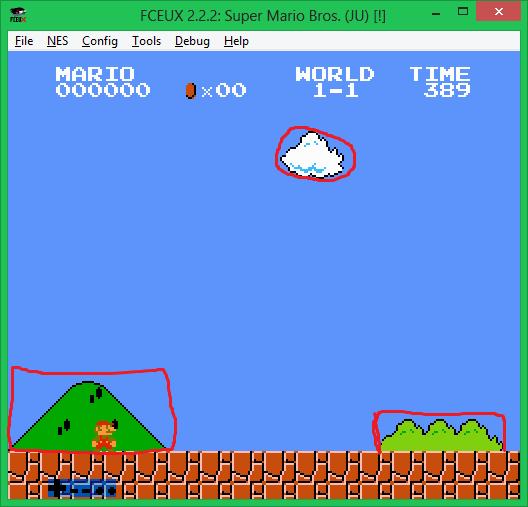
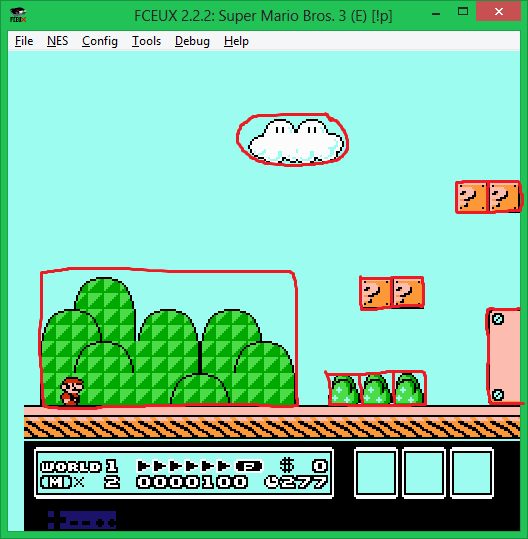
With this approach, records are stored in the memory, which are decoded in the form of “draw an X-Box object along the X, Y coordinates”. (Instead of “BOX” there can be any game object). All the rest of the space remains filled with background color and you do not need to waste precious bytes on its description. It turns out that only 3 bytes are consumed for one such record, and only 5-6 objects will be drawn on one screen. Of course, you need to spend a few dozen more bytes on the description of the objects themselves, but this does not go to any comparison in order to store almost a kilobyte of data when describing the entire screen in tiles. And if you take a closer look at the screenshots, you will learn the terrible secret of “Super Mario Bros.” The cloud and the bush are one and the same object, but drawn with a different palette. On what developers only will not go for the sake of economy of several byte.
In addition, if you investigate how to record information about objects on the screen, you can find out that RLE compression is used here, you can specify in the record that several boxes (like any other objects, for example, turtles) should be displayed in a row using one extra byte. By the way, such a method of recording can be guessed by the design of the levels or the enemies of the game - if there are often several identical objects running in succession, this method of storing information about them can probably be encountered.
Blocky
The main and most common way to save space for saving data about game levels is block, in which the level is described not by 8x8 tiles, but by large data units. The data units (blocks) themselves can be of different sizes — the most common size for a NES is a 2x2 tile, i.e. 16x16 pixel block size (in games on the Sega Mega Drive, blocks of 4x4 tiles are often found). At the same time, the blocks themselves can be organized into large structures - macroblocks (2x2 blocks, 32x32 pixels in most cases).
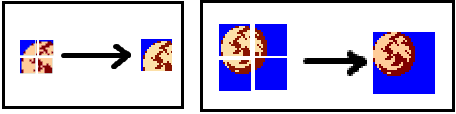
The left part of the picture shows the unification of four tiles in one block, on the right side - the union of four blocks into one macroblock of the moon from the first level “Darkwing Duck”.
From the screenshot should be clear the basic principle of association.
Note: romhakers are often called “Tiles” blocks, and macroblocks are called “Tile Sprite Assembly (TSA)” , which creates confusion in terms of a tile as a symbol / icon in a character generator and a tile as a union of several other tiles into one structure (TSA of the first level and second ). Therefore, I allow myself to keep the names I entered.
In different games there may be different, but similar systems of blocks and macroblocks. In “Batman” the macroblock size is 2x1, due to which the background looks less blocky, in “Flintstones: Rescue Dino and Hoppy” macroblocks are huge (16 blocks each), and in “New Ghostbusters 2” there are no macroblocks, and the rooms are made up of ordinary blocks . The principle does not change - the level is saved as an array of numbers, encoding the numbers of large-sized structures made up of smaller ones.
For example, the description of the first screen of the first level in “Darkwing Duck” begins in the ROM image at 0x10 (this is the very beginning of the image after 16 bytes of the header). The first 8 bytes are the first line of the screen, 8 macroblock numbers that will be displayed first, you can try to change them manually, start the game, start the first level and see the result. The second line is described next, the third and so on, one screen takes 8 lines, followed by a description of the second screen. Screen descriptions may not go in the order in which they will appear in the game. In a sense, the game screens themselves can also be represented by huge structures of 8x8 macroblocks, of which the level itself is molded (the whole level in this case is called the “layout” of the game screens). The screen may not necessarily be 8x8, often there are 8x6 screens, the top and bottom lines are used by the game to draw the interface.
Often you can see tiles on the screen that under no circumstances can be displayed by the game due to the features of the engine (either due to scrolling restrictions or due to programming features, for example, in “Tiny Toon Adventures” at elevation levels “eaten "Half a macroblock at the junction of two screens). In some games, there is no division into screens, and the whole level is described by one large matrix of macroblock indices.
How to find out which structures (macroblocks) is the level of a particular game?
To do this, you need to find the level description inside the ROM image using a disassembler or in another way and change one or several bytes in this description to see what happens on the screen:
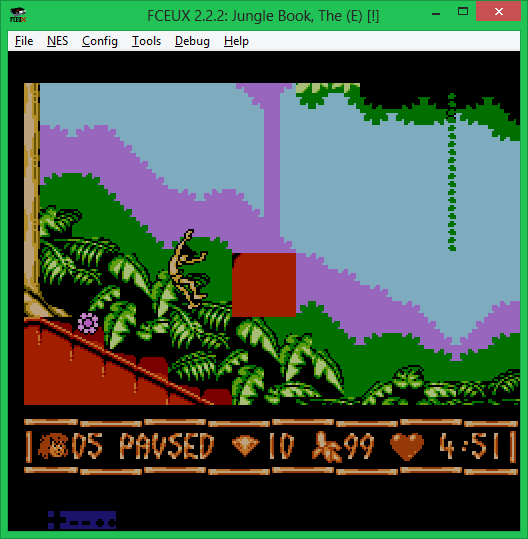
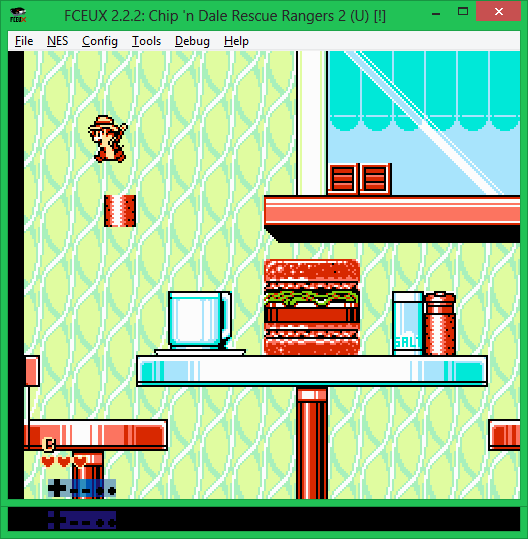
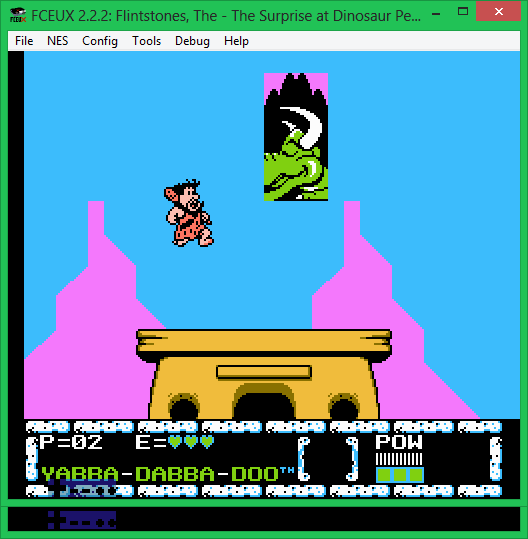
The pictures show examples of different sizes of macroblocks in different games (2x2 tiles in “Chip & Dale 2”, 4x4 tiles in the “Jungle Book”, 4x8 tiles in “Flintstones Surprise of Dinosaur Peak”).
Once again - everything in the levels of games on the NES is described by blocks (well, macroblocks). In this case, the description of macroblocks most often consists simply of indices of individual blocks (with a macroblock size of 2x2 - 4 block indexes, only 4 bytes, for the “Black Coat” from left-to-right and top-down), but the block descriptions include additional information - the color of the whole block and its characteristic, whether the block is a background, a platform on which to stand, pick up objects or spikes that cause damage, etc. Of course, there are games in which this rule is not observed (for example, in Ninja Cats, the color is set for the entire macroblock at once, and in Chip & Dale 2, information about the type of block is encoded just in its number). Another difference is the order of storage of parts of macroblocks in memory, they can go sequentially (4 bytes for the description of the first macroblock, then 4 bytes for the description of the next, etc., often 256 pieces per level), or stored separately (for example, “ Tiny Toon Adventures "firstly stores all the left upper parts of macroblocks, followed by all the left right parts, then the lower left and right quarters, respectively).
However, the general principles of block building are respected everywhere, which allows, firstly, to quickly find similar structures in different games, and secondly, to study which games use similar engines. So, for example, the levels of “Darkwing Duck” up to pointers to sets of blocks and macroblocks correspond to those in the game Tale Spin (although the engine itself is taken from MegaMan 4, in which the sets of blocks and macroblocks were divided into different banks, but while maintaining the same pointers to them), and are very similar to the “Chip & Dale” levels (the only difference is in the methods for storing auxiliary level information - in the way the screen scrolling method and door codes between rooms are recorded). The second “Chip & Dale” are made quite differently, the screens in them are described not by macroblocks, but by ordinary blocks 2x2 in size, and therefore the description takes up much more space, so the screens themselves regularly repeat the levels, although thanks to the design work the untrained player doesn't notices (in the first zone of the first level, for example, only 3 screens are cyclically repeated).
Investigating games, I wrote for the proof-of-concept the CadEditor program, which would display the levels from ROM images as they appear during the passage of the game on the console.
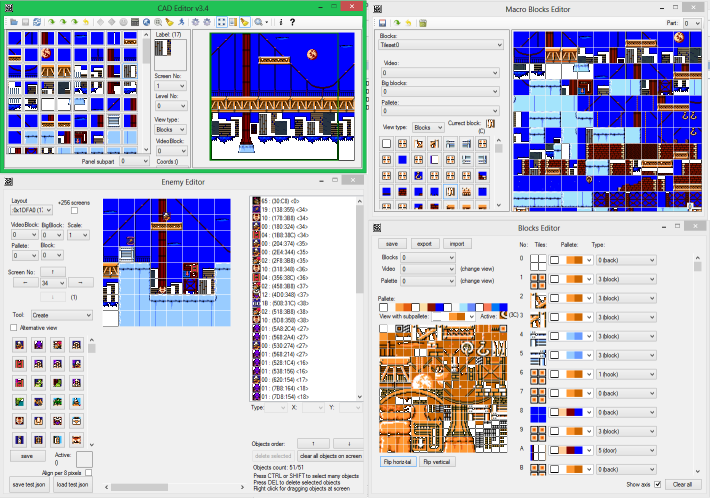
Over time, it overgrown with the functionality of the editor, and the romhakers even made with it some wonderful hacks (mainly on the “Capcom” class), as well as a dozen demos.
Here is one of the passages of the Darkwing Duck In Edoropolis hack:
The current version of the editor allows you to change the levels for 50 games on the NES and Sega Mega Drive platforms (for many games only one level, and often “file revision” is required, so knowledge of romahaking will be required).
As mentioned above, the code was written for itself, therefore it is not of good quality, many things are made clumsy. I almost don’t work as an editor due to lack of time, but I would be happy to explain the code to someone who would like to modify it or write configs to connect new games.
I hope this article will allow those who want to understand a little about how the levels were arranged in old games (by the way, not only for NES, but also for other consoles with tile graphics - Sega Mega Drive, SNES, GBA and others). If readers have an interest, I can write a few more articles of similar subjects, for example: the technical process of finding data about levels (using disassembler or file corruption scripts), differences in device levels for Segov games, device character animation systems, search for objects at levels or creation of auxiliary tools for research.
References:
Editor's sources
Subject on the forum with the discussion of the editor
I will describe all the main ways and dwell in detail on the most frequently used (of the several dozen games I studied, he met in almost every).
I called this method “block” (I’ll make a reservation that many terms in the article were invented by me, since there are no materials on this topic in Russian; after researching several games, I began to study English-language materials and documentation for the editors of games for old platforms; some analogies, in such cases I will give my terms explaining their meanings and their English versions). As examples, I will give the levels from the game "Darkwing Duck", as well as other games of the company "Capcom", I dismantled a few years ago.
I will try to skip the description of using the disassembler and the technical part of the study (if there is interest, you can do a separate article on this topic), and I’ll dwell on the description of how the developers stored the data. Knowing what to look for, finding it inside the ROM image will become much easier. As a bonus, I will show a ready-made level editor and several hacks of classic NES games created on it.
So, let's begin the description, as it should be for code researchers, from bottom to top.
')
The bottom level will be the most difficult, but it’s completely completely unnecessary to deal with it, it’s enough to have a rough idea. Moreover, you can skip this part altogether and continue reading from the next paragraph.
I will just describe in a few sentences what is happening here and move on to more interesting things.
The NES video processor has several screen pages — one of them is displayed on the screen. The screen page stores the numbers of 8x8 tiles that need to be displayed (30 rows of 32 tiles, 960 bytes in total) and their attributes (additional bits of tile color); 1 kilobyte of the description goes to the whole page, the whole screen is described so compactly. Tiles themselves are taken from a character generator (256 tiles of 8x8 in size use 4 kilobytes of memory, 16 bytes per one tile), they can be located either in a separate video bank of the cartridge or copied to video memory from a regular data bank. For the researcher, the place of their storage is practically not important. Those who wish to understand this topic in more detail I can advise reading the article from MiGeRa in Russian
You can view the contents of video processor character generators using any NES emulator, I will use the most advanced for researching games - FCEUX (at the time of writing the latest version 2.2.2), in it you need to select the Debug-> PPU Viewer menu item :
The emulator displays tiles doubled for easy study. The right character generator in this game is used to build a background screen (the left one - for drawing characters using another mechanism, this is a topic for a separate article).
As mentioned above, the description of one screen using tiles takes 960 bytes (30x32 tiles). But look at the full Darkwing Duck level one card .
It consists of 20 screens. If you keep a description of all the screens, then to save one level will take about 18 kilobytes, and on all seven game levels - 131 kilobytes. I remind you that this is not the video memory itself in the image of the game, but only a description using the video memory tiles of the game screens! This is most of the total size of the data banks in the entire image of the “Black Cape” ROM (there are only 128 kb in total for the code and data and another 128 kb for the video banks). Moreover, the levels of "Duck Tales 2" contain up to 32 screens, despite the fact that the image weighs half as much.
It is worth asking yourself, how can you keep the description of screens more economical? What would you do on site developers?
In all the games I studied, only 3 different methods were used: compression, drawing on a blank canvas, and block method — level description not with tiles, but with large block structures.
Compression.
Almost not used in NES-games (but it is constantly used in games on Sega Mega Drive and Snes) mainly due to the small amount of available RAM that is required to store unpacked data, as well as a slow processor. However, RLE compression is occasionally encountered.
An example is the first “Contra” (together with the description of screens using blocks, see below the 3rd method about blocks):
The blocks marked in red are saved in the ROM image as “repeat the block with the platform 7 times”, and with the blue, respectively, “repeat the block with the platform 3 times”. You can verify this by downloading the editor for this game.
It is worth noting that RLE on NES is still used, but not for compression of the description of the level, but for more suitable entities for this. For example, they compress the tiles stored in this case in the data banks ("Duck Tales 2", the same "Contra"). Unpacking takes place immediately in the video memory. Also, text data is sometimes compressed (by suitable algorithms for this), but to describe the level on this platform, it is still exotic.
Drawing on a blank canvas.
This approach implies that most of the screen remains clean, so it is not necessary to describe it. Described only in what coordinates should be drawn specific objects. A striking example of this approach is the Mario series:
With this approach, records are stored in the memory, which are decoded in the form of “draw an X-Box object along the X, Y coordinates”. (Instead of “BOX” there can be any game object). All the rest of the space remains filled with background color and you do not need to waste precious bytes on its description. It turns out that only 3 bytes are consumed for one such record, and only 5-6 objects will be drawn on one screen. Of course, you need to spend a few dozen more bytes on the description of the objects themselves, but this does not go to any comparison in order to store almost a kilobyte of data when describing the entire screen in tiles. And if you take a closer look at the screenshots, you will learn the terrible secret of “Super Mario Bros.” The cloud and the bush are one and the same object, but drawn with a different palette. On what developers only will not go for the sake of economy of several byte.
In addition, if you investigate how to record information about objects on the screen, you can find out that RLE compression is used here, you can specify in the record that several boxes (like any other objects, for example, turtles) should be displayed in a row using one extra byte. By the way, such a method of recording can be guessed by the design of the levels or the enemies of the game - if there are often several identical objects running in succession, this method of storing information about them can probably be encountered.
Blocky
The main and most common way to save space for saving data about game levels is block, in which the level is described not by 8x8 tiles, but by large data units. The data units (blocks) themselves can be of different sizes — the most common size for a NES is a 2x2 tile, i.e. 16x16 pixel block size (in games on the Sega Mega Drive, blocks of 4x4 tiles are often found). At the same time, the blocks themselves can be organized into large structures - macroblocks (2x2 blocks, 32x32 pixels in most cases).
The left part of the picture shows the unification of four tiles in one block, on the right side - the union of four blocks into one macroblock of the moon from the first level “Darkwing Duck”.
From the screenshot should be clear the basic principle of association.
Note: romhakers are often called “Tiles” blocks, and macroblocks are called “Tile Sprite Assembly (TSA)” , which creates confusion in terms of a tile as a symbol / icon in a character generator and a tile as a union of several other tiles into one structure (TSA of the first level and second ). Therefore, I allow myself to keep the names I entered.
In different games there may be different, but similar systems of blocks and macroblocks. In “Batman” the macroblock size is 2x1, due to which the background looks less blocky, in “Flintstones: Rescue Dino and Hoppy” macroblocks are huge (16 blocks each), and in “New Ghostbusters 2” there are no macroblocks, and the rooms are made up of ordinary blocks . The principle does not change - the level is saved as an array of numbers, encoding the numbers of large-sized structures made up of smaller ones.
For example, the description of the first screen of the first level in “Darkwing Duck” begins in the ROM image at 0x10 (this is the very beginning of the image after 16 bytes of the header). The first 8 bytes are the first line of the screen, 8 macroblock numbers that will be displayed first, you can try to change them manually, start the game, start the first level and see the result. The second line is described next, the third and so on, one screen takes 8 lines, followed by a description of the second screen. Screen descriptions may not go in the order in which they will appear in the game. In a sense, the game screens themselves can also be represented by huge structures of 8x8 macroblocks, of which the level itself is molded (the whole level in this case is called the “layout” of the game screens). The screen may not necessarily be 8x8, often there are 8x6 screens, the top and bottom lines are used by the game to draw the interface.
Often you can see tiles on the screen that under no circumstances can be displayed by the game due to the features of the engine (either due to scrolling restrictions or due to programming features, for example, in “Tiny Toon Adventures” at elevation levels “eaten "Half a macroblock at the junction of two screens). In some games, there is no division into screens, and the whole level is described by one large matrix of macroblock indices.
How to find out which structures (macroblocks) is the level of a particular game?
To do this, you need to find the level description inside the ROM image using a disassembler or in another way and change one or several bytes in this description to see what happens on the screen:
The pictures show examples of different sizes of macroblocks in different games (2x2 tiles in “Chip & Dale 2”, 4x4 tiles in the “Jungle Book”, 4x8 tiles in “Flintstones Surprise of Dinosaur Peak”).
Once again - everything in the levels of games on the NES is described by blocks (well, macroblocks). In this case, the description of macroblocks most often consists simply of indices of individual blocks (with a macroblock size of 2x2 - 4 block indexes, only 4 bytes, for the “Black Coat” from left-to-right and top-down), but the block descriptions include additional information - the color of the whole block and its characteristic, whether the block is a background, a platform on which to stand, pick up objects or spikes that cause damage, etc. Of course, there are games in which this rule is not observed (for example, in Ninja Cats, the color is set for the entire macroblock at once, and in Chip & Dale 2, information about the type of block is encoded just in its number). Another difference is the order of storage of parts of macroblocks in memory, they can go sequentially (4 bytes for the description of the first macroblock, then 4 bytes for the description of the next, etc., often 256 pieces per level), or stored separately (for example, “ Tiny Toon Adventures "firstly stores all the left upper parts of macroblocks, followed by all the left right parts, then the lower left and right quarters, respectively).
However, the general principles of block building are respected everywhere, which allows, firstly, to quickly find similar structures in different games, and secondly, to study which games use similar engines. So, for example, the levels of “Darkwing Duck” up to pointers to sets of blocks and macroblocks correspond to those in the game Tale Spin (although the engine itself is taken from MegaMan 4, in which the sets of blocks and macroblocks were divided into different banks, but while maintaining the same pointers to them), and are very similar to the “Chip & Dale” levels (the only difference is in the methods for storing auxiliary level information - in the way the screen scrolling method and door codes between rooms are recorded). The second “Chip & Dale” are made quite differently, the screens in them are described not by macroblocks, but by ordinary blocks 2x2 in size, and therefore the description takes up much more space, so the screens themselves regularly repeat the levels, although thanks to the design work the untrained player doesn't notices (in the first zone of the first level, for example, only 3 screens are cyclically repeated).
Investigating games, I wrote for the proof-of-concept the CadEditor program, which would display the levels from ROM images as they appear during the passage of the game on the console.
Over time, it overgrown with the functionality of the editor, and the romhakers even made with it some wonderful hacks (mainly on the “Capcom” class), as well as a dozen demos.
Here is one of the passages of the Darkwing Duck In Edoropolis hack:
The current version of the editor allows you to change the levels for 50 games on the NES and Sega Mega Drive platforms (for many games only one level, and often “file revision” is required, so knowledge of romahaking will be required).
As mentioned above, the code was written for itself, therefore it is not of good quality, many things are made clumsy. I almost don’t work as an editor due to lack of time, but I would be happy to explain the code to someone who would like to modify it or write configs to connect new games.
I hope this article will allow those who want to understand a little about how the levels were arranged in old games (by the way, not only for NES, but also for other consoles with tile graphics - Sega Mega Drive, SNES, GBA and others). If readers have an interest, I can write a few more articles of similar subjects, for example: the technical process of finding data about levels (using disassembler or file corruption scripts), differences in device levels for Segov games, device character animation systems, search for objects at levels or creation of auxiliary tools for research.
References:
Editor's sources
Subject on the forum with the discussion of the editor
Source: https://habr.com/ru/post/259171/
All Articles