Russification and multilingual OpenStreetMap cards
While developing web maps that use OpenStreetMap data, there is often a question about how to display maps with correct Russian names. This problem does not arise if your maps show only Russia . However, if you look, for example, at a map of China , then you are unlikely to enjoy such an abundance of hieroglyphs, and vain attempts to find Beijing on such a map are not likely to be crowned with success.
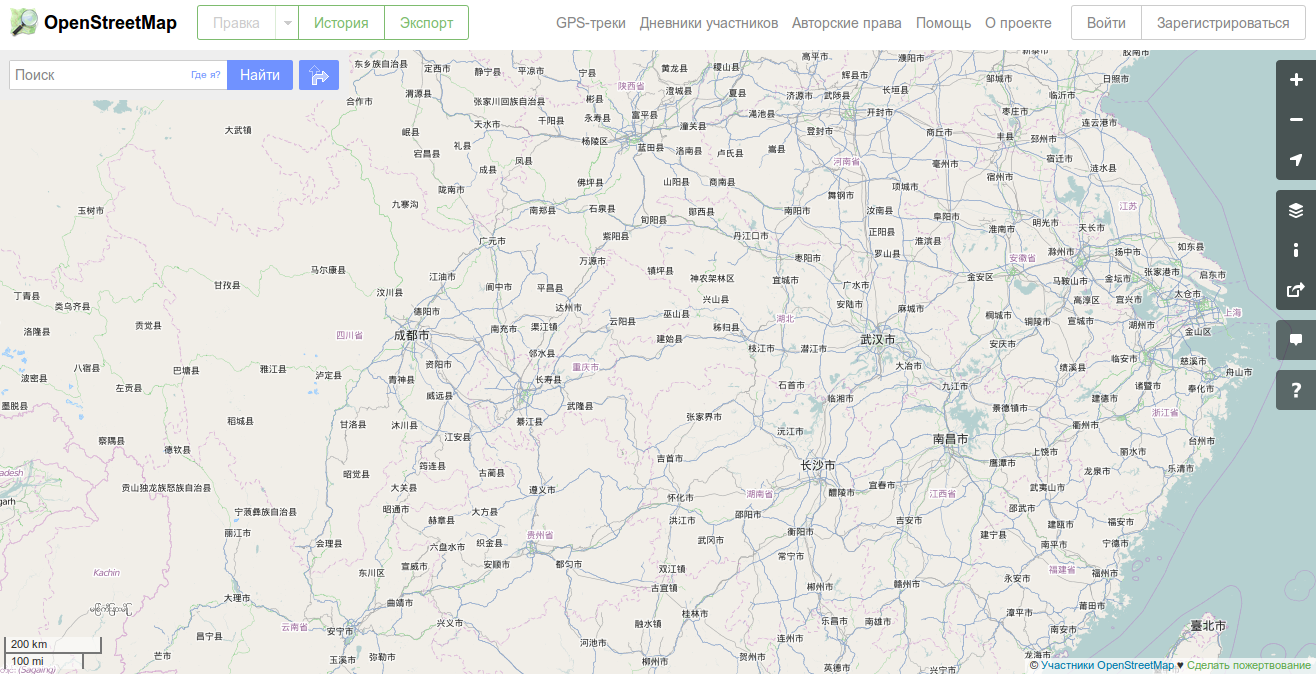
It is known that the freedom-loving project OpenStreetMap allows you to save the names of geographical objects in different languages. For this purpose, special tags are used, such as name: ru , name: en or name: es , and most importantly, they are filled in by OpenStreetMap participants. Of course, the most detailed inscriptions are created by users in the language they speak: in Russia - in Russian, in China - in Chinese, in African countries - in local languages. There is little chance that some street in Nigeria will have a Russian translation, but the main geographical objects (countries, cities, rivers, etc.) have translations. This small cartographic information is quite enough for a Russian-speaking user to open, for example, a map of China and find the main names on it. Thus, your resource will become a little more user friendly.
If you aim to find sensible instructions on how to use these translation tags on your own web maps, then in the whole space of the Runet or even the Internet there is only scattered information about various aspects of the localization of OpenStreetMap web maps, but you can hardly find the boxed instructions. On the one hand, this problem is not the most difficult architectural issue, since The technology was developed within the framework of the OpenStreetMap project itself. But on the other hand, in the completed projects of localized web maps, for example, in the well-known Rostelecom Satellite , the localization problem was solved, and the problems faced by the developers and how they were resolved remain unresponsive to the IT public.
')

There are even web- projects with multilingual support, but they are not brought to a logical, user-friendly end.
This article aims to bring together this scattered information in the form of complete instructions on the localization of OpenStreetMap maps. The article provides minimal information about the deployment of tile north based on OpenStreetMap data, since this topic was disclosed in detail by other publications on Habré , on Gis-Lab and in other special projects . Within the framework of this article we will deploy the storage of tiles (tiles-pictures, of which the image of a web map is “stitched”) according to the well-known instructions , but without going into details or specifying details. Emerging questions about the deployment of tile storage, look primarily in the instructions mentioned.
So, we will need packages (with all the necessary dependencies):
A full tile server (with Apache httpd, mod_tile and renderd) is not required to be deployed for the purpose of this article. But the guiding vectors for the deployment of the tile server will be given below, you will find detailed instructions on the above links.
We will import this data (using the osm2pgsql utility) into the Postgresql database, and then the Mapnik rendering package will generate raster tiles.
So, download the map in a given region in XML format (OSM file) or in compressed binary PBF format from one of the OpenStreetMap mirrors.
The planet file can be downloaded with the commands:
You should keep in mind that this data takes up a significant amount. For example, a file containing vector data for the entire planet Planet.osm in uncompressed OSM XML takes more than 1TB, in XML format, compressed bz2, takes 41.8GB, and in binary PBF format 18.1GB. All of these formats store the same data. Naturally, if you need only a specific region, and not the entire planet, then these numbers will be much smaller, but the proportions of the data volumes in the formats, OSM XML, OSM XML, compressed bz2, and in the PBF format, will remain the same. You should keep in mind that before importing into Postgresql, vector data in OSM XML format, compressed BZ2, and binary PBF format will be pre-processed (unpacked, parsed), which will increase the time to import the downloaded file into the Postgresql database. So, on my Core i5 quad-core machine with 16GB of RAM, 2TB HDD (Ubuntu 14.04 64x), the import of Planet.osm.pbf took 2 weeks. Importing a similar Planet.osm.bz2 file took an order of magnitude less time. According to my own feelings, the osm2pgsql utility is demanding on the amount of RAM (for optimal memory management, read about the features of the --cache and --cache-strategy utilities of the osm2pgsql utility), the frequency and number of processor cores (at the time of parsing the file, to control the processor core load, see the --number-processes utility utility of osm2pgsql), as well as the speed of the hard disk (at the time of inserting data and creating indexes in Postgresql, for optimization, see the --disable-parallel-indexing utility utility of osm2pgsql). If you have an SSD, then importing data into the Postgresql database will be much faster.
For the purposes of this article, we will use the region of China, since it is not Russified by default and has a relatively small size, which is convenient at the stage of debugging technology. The China vector data files can be downloaded from the geofabrik.de project site with the command:
The fact is that in the time that has passed since the data file was packaged until it was deployed on your machine, some changes could be made on OpenStreetMap. Therefore, before importing, we update the data file with the osmupdate command from the osmcutils package:
If your OSM file does not contain a timestamp, then most likely the osmupdate utility will return an error. In this case (if you know the timestamp of your file - it is sometimes published on the file download page) you need to run the command in the following format:
The osmupdate utility itself downloads the diff file and applies it to the file specified in the first argument of the call command. It is not recommended to run the osmupdate utility with large files in OSM XML format (for example, planet-latest.osm.bz2), since Preliminary processing of the file by the osmconvert utility from the same osmcutils package is necessary, and the osmupdate utility with the received converted file will work for several days. For large files, it is recommended to use the PBF format. But keep in mind that importing such a file into Postgresql will take longer than importing an OSM XML file. So say, a double-edged sword. Personally, I always choose the PBF format.
By default, any languages are not installed in the /usr/share/osm2pgsql/osm2pgsql/default.style style file. For inscriptions on the map, the name tag is used, which is specified in the /usr/share/osm2pgsql/osm2pgsql/default.style file with the line:
After this we add support for, for example, Russian, English and Spanish languages:
These three lines will tell the osm2pgsql utility to import from the PBF file also the values of the tags name: ru , name: en , name: se . Other localized names will be ignored.
You must first configure trust-authentication (in order not to enter a password, this article does not require this) and create the necessary database users (see the instruction ). In this article, we will limit ourselves to trust authentication and the standard postgres user. So, create a database, for example, china and connect the necessary extensions to it:
Import is carried out by the utility osm2pgsql. Utility key descriptions can be found in the utility help. Some explanatory information is provided on an English-language resource .
The --drop key allows you to reduce the disk space occupied by the database, thus sacrificing the ability to subsequently update the data in the database from fresh PBF or OSM XML files. In the case of China, the database size has decreased from about 500MB to 92MB. To see the size of the database, enter the command in the psql console connected to any existing database:
Using the instruction, create several SQL views. For the generation of “Russian” tiles (tiles containing Russian signatures) we will use the prefix china_ru, for the generation of “English” tiles - china_en, for the generation of “Spanish” tiles - china_es. Below is the SQL script for creating SQL representations for generating only “Russian” tiles. Dear reader, I think, he will deal with SQL representations for generating "English" and "Spanish" tiles, taking the "Russian» VIEW as a basis.
In this case, we will create signatures on the map in the format “name: ru \ nname”, where E '\ n' is, as is known, the carriage return to a new line. For a more sophisticated placement of signatures on the map, read the Mapnik TextSymbolizer documentation. In this case, you will need to change the display styles of the signatures on the map, generated in accordance with these instructions in the next paragraph.
Let us choose the directory / home / osm / mapnik for storing all the necessary Mapnik scripts. We will download OpenStreetMap scripts into it to generate tiles, extort world shapes (shape files) used to simplify the generation of tiles on small scales, and create Mapnik XML style files to attach to the database:
Next, we will need to create 3 tile rendering style files, respectively, for Russian, English and Spanish geographical object signatures. To do this, we set a special variable of the MAPNIK_PREFIX system environment, which allows you to set the prefix of the vector data tables in the Postgres database and which the script /home/osm/mapnik/generate_xml.py will read and substitute into pseudo queries to the database.
These teams will create 3 special styles for rendering tiles, allowing you to read the data for rendering from the Russian, English or Spanish representations we need.
We find in the script /home/osm/mapnik/generate_tiles_multiprocess.py these lines:
After these lines we will write:
This will allow China to generate tiles from the 6th to the 15th scale containing signatures in the language we need. The exit () instruction allows you to opt out of further rendering the default areas in the script /home/osm/mapnik/generate_tiles_multiprocess.py (Muenchen, Muenchen +, Muenchen ++, Nuernberg, Karlsruhe, Karlsruhe +, Augsburg, Augsburg +, Europe +). There is also a /home/osm/mapnik/generate_tiles.py script that starts the rendering process in one stream. But we will not use it, because If there are multiple processor cores, the /home/osm/mapnik/generate_tiles_multiprocess.py script will generally work faster.
We need to create directories where Mapnik will put the generated tiles:
We have to start generating tiles three times, changing the values of the variables of the system environment MAPNIK_MAP_FILE and MAPNIK_TILE_DIR. The script will read these variables and pass them to Mapnik to adjust the tile rendering:
Tiles are generated.
To do this, create a simple html-page, in which we will connect the created tile storages. The page file should be placed next to the generated / home / osm / mapnik / tiles tile directory. To display web maps, we will use the LeafletJS javascript framework:
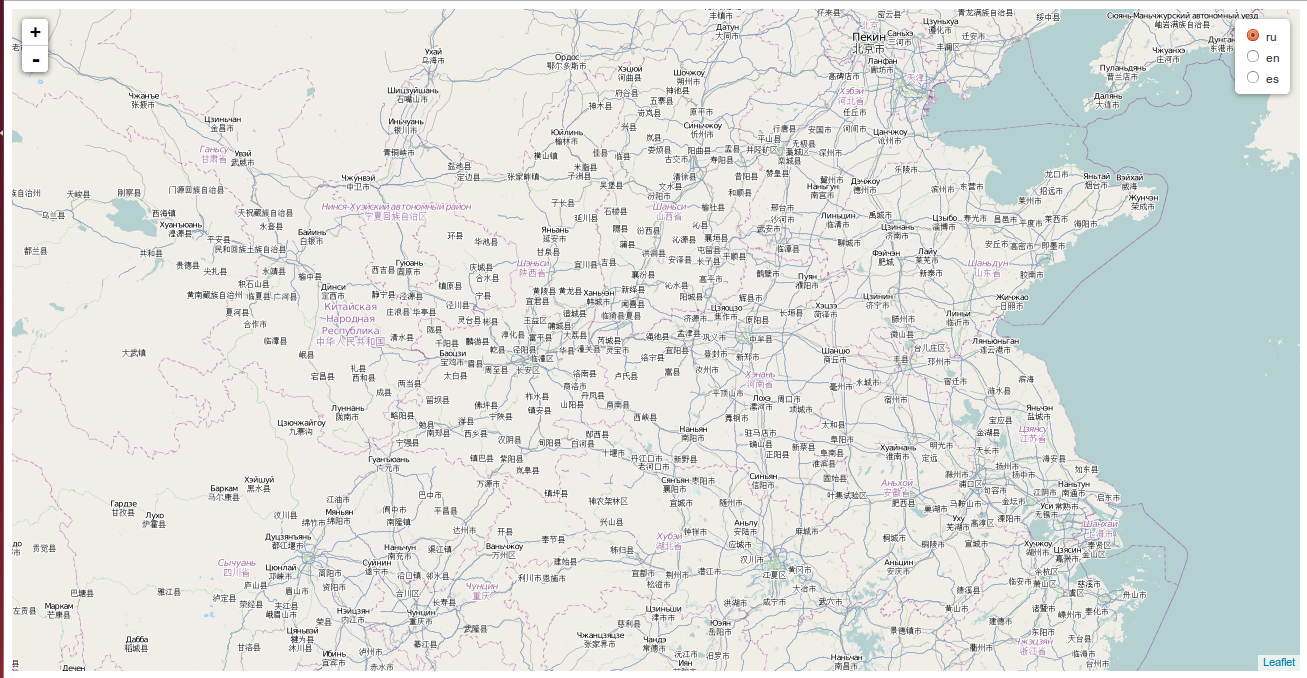
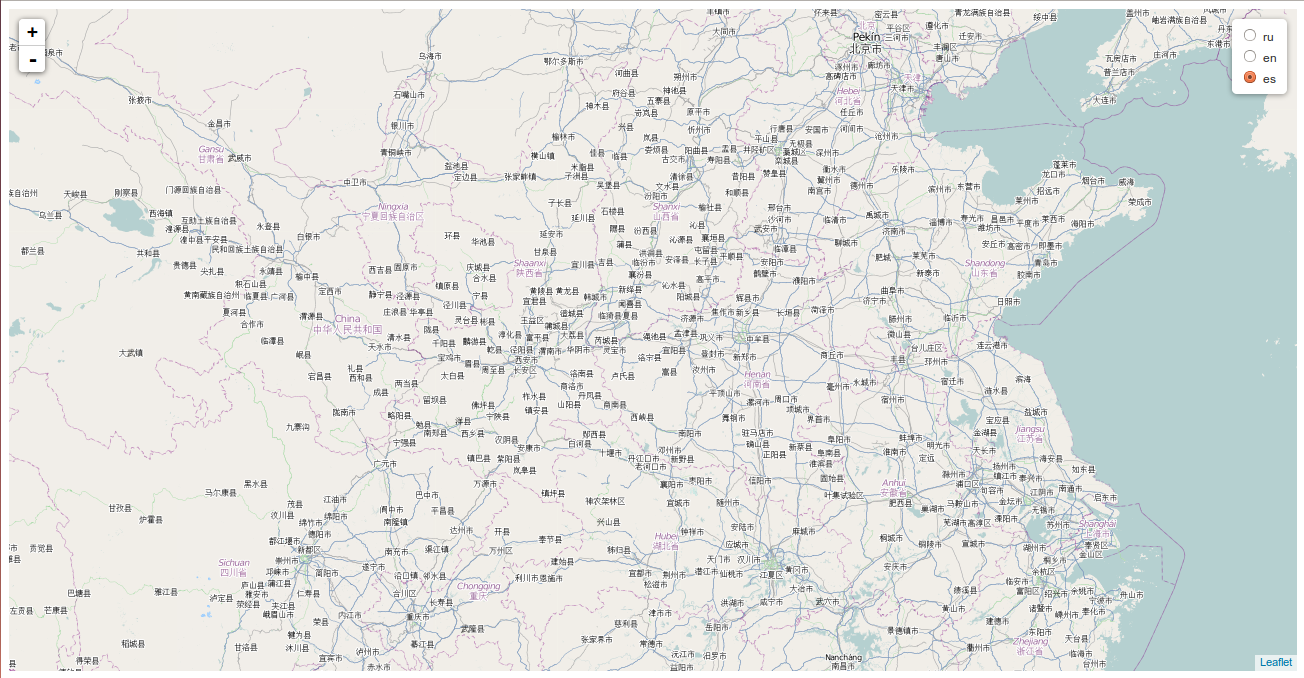
This page will be executed locally. In the upper right corner, a control should be available, allowing you to select a tile source. Russian, English and Spanish versions of maps will be as follows:

You will need to configure several mod_tile modules of the Apache web server, each of which will be responsible for its mapping - / ru - for rendering Russian tiles, / en - for rendering, respectively, English tiles, and so on. Details of mod_tile, httpd and renderd settings are in the instructions from Gis-Lab . As part of the demonstration of the example of localization of OpenStreetMap maps, I do not consider it necessary to deploy a full-fledged tile server.
The problem of localization of maps OpenStreetMap is not very difficult. There are several approaches to solving this problem. This article offers a very specific working version. I am sure that a respected reader will have many questions on the content of this article, and they will have their own ideas for branching the proposed algorithm. The author of the article does not claim to be the only correct method for solving the problem of Russification / localization of OpenStreetMap maps and is happy to read about your “tricks” in solving this issue.
It is known that the freedom-loving project OpenStreetMap allows you to save the names of geographical objects in different languages. For this purpose, special tags are used, such as name: ru , name: en or name: es , and most importantly, they are filled in by OpenStreetMap participants. Of course, the most detailed inscriptions are created by users in the language they speak: in Russia - in Russian, in China - in Chinese, in African countries - in local languages. There is little chance that some street in Nigeria will have a Russian translation, but the main geographical objects (countries, cities, rivers, etc.) have translations. This small cartographic information is quite enough for a Russian-speaking user to open, for example, a map of China and find the main names on it. Thus, your resource will become a little more user friendly.
If you aim to find sensible instructions on how to use these translation tags on your own web maps, then in the whole space of the Runet or even the Internet there is only scattered information about various aspects of the localization of OpenStreetMap web maps, but you can hardly find the boxed instructions. On the one hand, this problem is not the most difficult architectural issue, since The technology was developed within the framework of the OpenStreetMap project itself. But on the other hand, in the completed projects of localized web maps, for example, in the well-known Rostelecom Satellite , the localization problem was solved, and the problems faced by the developers and how they were resolved remain unresponsive to the IT public.
')
There are even web- projects with multilingual support, but they are not brought to a logical, user-friendly end.
This article aims to bring together this scattered information in the form of complete instructions on the localization of OpenStreetMap maps. The article provides minimal information about the deployment of tile north based on OpenStreetMap data, since this topic was disclosed in detail by other publications on Habré , on Gis-Lab and in other special projects . Within the framework of this article we will deploy the storage of tiles (tiles-pictures, of which the image of a web map is “stitched”) according to the well-known instructions , but without going into details or specifying details. Emerging questions about the deployment of tile storage, look primarily in the instructions mentioned.
So, we will need packages (with all the necessary dependencies):
- PostgreSQL> = 8.4
- PostGIS> = 1.5 <2
- Python 2.x
- Mapnik> = 2
- Osm2pgsql
- Subversion
A full tile server (with Apache httpd, mod_tile and renderd) is not required to be deployed for the purpose of this article. But the guiding vectors for the deployment of the tile server will be given below, you will find detailed instructions on the above links.
1. Get vector data OpenStreetMap
We will import this data (using the osm2pgsql utility) into the Postgresql database, and then the Mapnik rendering package will generate raster tiles.
So, download the map in a given region in XML format (OSM file) or in compressed binary PBF format from one of the OpenStreetMap mirrors.
The planet file can be downloaded with the commands:
wget http://download.bbbike.org/osm/planet/planet-latest.osm.pbf.md5 wget http://download.bbbike.org/osm/planet/planet-latest.osm.pbf md5sum planet-latest.osm.pbf You should keep in mind that this data takes up a significant amount. For example, a file containing vector data for the entire planet Planet.osm in uncompressed OSM XML takes more than 1TB, in XML format, compressed bz2, takes 41.8GB, and in binary PBF format 18.1GB. All of these formats store the same data. Naturally, if you need only a specific region, and not the entire planet, then these numbers will be much smaller, but the proportions of the data volumes in the formats, OSM XML, OSM XML, compressed bz2, and in the PBF format, will remain the same. You should keep in mind that before importing into Postgresql, vector data in OSM XML format, compressed BZ2, and binary PBF format will be pre-processed (unpacked, parsed), which will increase the time to import the downloaded file into the Postgresql database. So, on my Core i5 quad-core machine with 16GB of RAM, 2TB HDD (Ubuntu 14.04 64x), the import of Planet.osm.pbf took 2 weeks. Importing a similar Planet.osm.bz2 file took an order of magnitude less time. According to my own feelings, the osm2pgsql utility is demanding on the amount of RAM (for optimal memory management, read about the features of the --cache and --cache-strategy utilities of the osm2pgsql utility), the frequency and number of processor cores (at the time of parsing the file, to control the processor core load, see the --number-processes utility utility of osm2pgsql), as well as the speed of the hard disk (at the time of inserting data and creating indexes in Postgresql, for optimization, see the --disable-parallel-indexing utility utility of osm2pgsql). If you have an SSD, then importing data into the Postgresql database will be much faster.
For the purposes of this article, we will use the region of China, since it is not Russified by default and has a relatively small size, which is convenient at the stage of debugging technology. The China vector data files can be downloaded from the geofabrik.de project site with the command:
wget http://download.geofabrik.de/asia/china-latest.osm.pbf 2. Update the resulting OpenStreetMap vector data.
The fact is that in the time that has passed since the data file was packaged until it was deployed on your machine, some changes could be made on OpenStreetMap. Therefore, before importing, we update the data file with the osmupdate command from the osmcutils package:
osmupdate china-latest.osm.pbf new-china-latest.osm.pbf If your OSM file does not contain a timestamp, then most likely the osmupdate utility will return an error. In this case (if you know the timestamp of your file - it is sometimes published on the file download page) you need to run the command in the following format:
osmupdate china-latest.osm.pbf 2015-05-13T14:48:07Z new-china-latest.osm.pbf The osmupdate utility itself downloads the diff file and applies it to the file specified in the first argument of the call command. It is not recommended to run the osmupdate utility with large files in OSM XML format (for example, planet-latest.osm.bz2), since Preliminary processing of the file by the osmconvert utility from the same osmcutils package is necessary, and the osmupdate utility with the received converted file will work for several days. For large files, it is recommended to use the PBF format. But keep in mind that importing such a file into Postgresql will take longer than importing an OSM XML file. So say, a double-edged sword. Personally, I always choose the PBF format.
3. Configure the support of the necessary languages in the settings of the utility osm2pgsql
By default, any languages are not installed in the /usr/share/osm2pgsql/osm2pgsql/default.style style file. For inscriptions on the map, the name tag is used, which is specified in the /usr/share/osm2pgsql/osm2pgsql/default.style file with the line:
node,way name text linear After this we add support for, for example, Russian, English and Spanish languages:
node,way name:ru text linear node,way name:en text linear node,way name:es text linear These three lines will tell the osm2pgsql utility to import from the PBF file also the values of the tags name: ru , name: en , name: se . Other localized names will be ignored.
4. Create a Postgresql database to store OpenStreetMap vector data
You must first configure trust-authentication (in order not to enter a password, this article does not require this) and create the necessary database users (see the instruction ). In this article, we will limit ourselves to trust authentication and the standard postgres user. So, create a database, for example, china and connect the necessary extensions to it:
createdb -U postgres china psql -U postgres -d china -c 'CREATE EXTENSION hstore; CREATE EXTENSION postgis;' 5. Import the vector data into the Postgresql database.
Import is carried out by the utility osm2pgsql. Utility key descriptions can be found in the utility help. Some explanatory information is provided on an English-language resource .
osm2pgsql -s -m -d china -U postgres --drop new-china-latest.osm.pbf The --drop key allows you to reduce the disk space occupied by the database, thus sacrificing the ability to subsequently update the data in the database from fresh PBF or OSM XML files. In the case of China, the database size has decreased from about 500MB to 92MB. To see the size of the database, enter the command in the psql console connected to any existing database:
SELECT pg_size_pretty( pg_database_size( 'china' ) ); 6. Create views in the database to display the translated geographical names.
Using the instruction, create several SQL views. For the generation of “Russian” tiles (tiles containing Russian signatures) we will use the prefix china_ru, for the generation of “English” tiles - china_en, for the generation of “Spanish” tiles - china_es. Below is the SQL script for creating SQL representations for generating only “Russian” tiles. Dear reader, I think, he will deal with SQL representations for generating "English" and "Spanish" tiles, taking the "Russian» VIEW as a basis.
CREATE VIEW china_ru_point AS SELECT data.osm_id, data.access, data."addr:housename", data."addr:housenumber", data."addr:interpolation", data.admin_level, data.aerialway, data.aeroway, data.amenity, data.area, data.barrier, data.bicycle, data.brand, data.bridge, data.boundary, data.building, data.capital, data.construction, data.covered, data.culvert, data.cutting, data.denomination, data.disused, data.ele, data.embankment, data.foot, data."generator:source", data.harbour, data.highway, data.historic, data.horse, data.intermittent, data.junction, data.landuse, data.layer, data.leisure, data.lock, data.man_made, data.military, data.motorcar, CASE data."name:ru" IS NULL WHEN true THEN '' ELSE data."name:ru" || CASE data.name IS NULL WHEN true THEN '' ELSE E'\n' END END || CASE data.name IS NULL WHEN true THEN '' ELSE data.name END AS name, data."natural", data.office, data.oneway, data.operator, data.place, data.poi, data.population, data.power, data.power_source, data.public_transport, data.railway, data.ref, data.religion, data.route, data.service, data.shop, data.sport, data.surface, data.toll, data.tourism, data."tower:type", data.tunnel, data.water, data.waterway, data.wetland, data.width, data.wood, data.z_order, data.way FROM planet_osm_point AS data; CREATE VIEW china_ru_line AS SELECT data.osm_id, data.access, data."addr:housename", data."addr:housenumber", data."addr:interpolation", data.admin_level, data.aerialway, data.aeroway, data.amenity, data.area, data.barrier, data.bicycle, data.brand, data.bridge, data.boundary, data.building, data.construction, data.covered, data.culvert, data.cutting, data.denomination, data.disused, data.embankment, data.foot, data."generator:source", data.harbour, data.highway, data.historic, data.horse, data.intermittent, data.junction, data.landuse, data.layer, data.leisure, data.lock, data.man_made, data.military, data.motorcar, CASE data."name:ru" IS NULL WHEN true THEN '' ELSE data."name:ru" || CASE data.name IS NULL WHEN true THEN '' ELSE E'\n' END END || CASE data.name IS NULL WHEN true THEN '' ELSE data.name END AS name, data."natural", data.office, data.oneway, data.operator, data.place, data.population, data.power, data.power_source, data.public_transport, data.railway, data.ref, data.religion, data.route, data.service, data.shop, data.sport, data.surface, data.toll, data.tourism, data."tower:type", data.tracktype, data.tunnel, data.water, data.waterway, data.wetland, data.width, data.wood, data.z_order, data.way FROM planet_osm_line AS data; CREATE VIEW china_ru_polygon AS SELECT data.osm_id, data.access, data."addr:housename", data."addr:housenumber", data."addr:interpolation", data.admin_level, data.aerialway, data.aeroway, data.amenity, data.area, data.barrier, data.bicycle, data.brand, data.bridge, data.boundary, data.building, data.construction, data.covered, data.culvert, data.cutting, data.denomination, data.disused, data.embankment, data.foot, data."generator:source", data.harbour, data.highway, data.historic, data.horse, data.intermittent, data.junction, data.landuse, data.layer, data.leisure, data.lock, data.man_made, data.military, data.motorcar, CASE data."name:ru" IS NULL WHEN true THEN '' ELSE data."name:ru" || CASE data.name IS NULL WHEN true THEN '' ELSE E'\n' END END || CASE data.name IS NULL WHEN true THEN '' ELSE data.name END AS name, data."natural", data.office, data.oneway, data.operator, data.place, data.population, data.power, data.power_source, data.public_transport, data.railway, data.ref, data.religion, data.route, data.service, data.shop, data.sport, data.surface, data.toll, data.tourism, data."tower:type", data.tunnel, data.water, data.waterway, data.wetland, data.width, data.wood, data.z_order, data.way, data.way_area FROM planet_osm_polygon AS data; CREATE VIEW china_ru_roads AS SELECT data.osm_id, data.access, data."addr:housename", data."addr:housenumber", data."addr:interpolation", data.admin_level, data.aerialway, data.aeroway, data.amenity, data.area, data.barrier, data.bicycle, data.brand, data.bridge, data.boundary, data.building, data.construction, data.covered, data.culvert, data.cutting, data.denomination, data.disused, data.embankment, data.foot, data."generator:source", data.harbour, data.highway, data.historic, data.horse, data.intermittent, data.junction, data.landuse, data.layer, data.leisure, data.lock, data.man_made, data.military, data.motorcar, CASE data."name:ru" IS NULL WHEN true THEN '' ELSE data."name:ru" || CASE data.name IS NULL WHEN true THEN '' ELSE E'\n' END END || CASE data.name IS NULL WHEN true THEN '' ELSE data.name END AS name, data."natural", data.office, data.oneway, data.operator, data.place, data.population, data.power, data.power_source, data.public_transport, data.railway, data.ref, data.religion, data.route, data.service, data.shop, data.sport, data.surface, data.toll, data.tourism, data."tower:type", data.tunnel, data.water, data.waterway, data.wetland, data.width, data.wood, data.z_order, data.way FROM planet_osm_roads AS data; INSERT INTO geometry_columns VALUES ('', 'public', 'china_ru_point', 'way', 2, 900913, 'POINT'); INSERT INTO geometry_columns VALUES ('', 'public', 'china_ru_line', 'way', 2, 900913, 'LINESTRING'); INSERT INTO geometry_columns VALUES ('', 'public', 'china_ru_polygon', 'way', 2, 900913, 'POLYGON'); INSERT INTO geometry_columns VALUES ('', 'public', 'china_ru_roads', 'way', 2, 900913, 'LINESTRING'); In this case, we will create signatures on the map in the format “name: ru \ nname”, where E '\ n' is, as is known, the carriage return to a new line. For a more sophisticated placement of signatures on the map, read the Mapnik TextSymbolizer documentation. In this case, you will need to change the display styles of the signatures on the map, generated in accordance with these instructions in the next paragraph.
7. Install scripts from OpenStreetMap to generate tiles
Let us choose the directory / home / osm / mapnik for storing all the necessary Mapnik scripts. We will download OpenStreetMap scripts into it to generate tiles, extort world shapes (shape files) used to simplify the generation of tiles on small scales, and create Mapnik XML style files to attach to the database:
svn co http://svn.openstreetmap.org/applications/rendering/mapnik /home/osm/mapnik /home/osm/mapnik/get-coastlines.sh Next, we will need to create 3 tile rendering style files, respectively, for Russian, English and Spanish geographical object signatures. To do this, we set a special variable of the MAPNIK_PREFIX system environment, which allows you to set the prefix of the vector data tables in the Postgres database and which the script /home/osm/mapnik/generate_xml.py will read and substitute into pseudo queries to the database.
export MAPNIK_PREFIX='china_ru' /home/osm/mapnik/generate_xml.py /home/osm/mapnik/osm.xml china_ru.xml --dbname china --user postgres --accept-none export MAPNIK_PREFIX='china_en' /home/osm/mapnik/generate_xml.py /home/osm/mapnik/osm.xml china_en.xml --dbname china --user postgres --accept-none export MAPNIK_PREFIX='china_es' /home/osm/mapnik/generate_xml.py /home/osm/mapnik/osm.xml china_es.xml --dbname china --user postgres --accept-none These teams will create 3 special styles for rendering tiles, allowing you to read the data for rendering from the Russian, English or Spanish representations we need.
8. Denote in the script of generating tiles the region of China for generating tiles
We find in the script /home/osm/mapnik/generate_tiles_multiprocess.py these lines:
bbox = (-180.0,-90.0, 180.0,90.0) # render_tiles(bbox, mapfile, tile_dir, 0, 5, "World") # 0- 5- After these lines we will write:
bbox = (85.0,19.7,132.5,40.8) # render_tiles(bbox, mapfile, tile_dir, 6, 15, "China") # 6- 15- exit() This will allow China to generate tiles from the 6th to the 15th scale containing signatures in the language we need. The exit () instruction allows you to opt out of further rendering the default areas in the script /home/osm/mapnik/generate_tiles_multiprocess.py (Muenchen, Muenchen +, Muenchen ++, Nuernberg, Karlsruhe, Karlsruhe +, Augsburg, Augsburg +, Europe +). There is also a /home/osm/mapnik/generate_tiles.py script that starts the rendering process in one stream. But we will not use it, because If there are multiple processor cores, the /home/osm/mapnik/generate_tiles_multiprocess.py script will generally work faster.
9. Generate tiles for selected locations
We need to create directories where Mapnik will put the generated tiles:
mkdir /home/osm/mapnik/tiles mkdir /home/osm/mapnik/tiles/ru mkdir /home/osm/mapnik/tiles/en mkdir /home/osm/mapnik/tiles/es We have to start generating tiles three times, changing the values of the variables of the system environment MAPNIK_MAP_FILE and MAPNIK_TILE_DIR. The script will read these variables and pass them to Mapnik to adjust the tile rendering:
export MAPNIK_MAP_FILE=/home/osm/mapnik/china_ru.xml export MAPNIK_TILE_DIR=/home/osm/mapnik/tiles/ru/ exec python /home/osm/mapnik/generate_tiles_multiprocess.py export MAPNIK_MAP_FILE=/home/osm/mapnik/china_en.xml export MAPNIK_TILE_DIR=/home/osm/mapnik/tiles/en/ exec python /home/osm/mapnik/generate_tiles_multiprocess.py export MAPNIK_MAP_FILE=/home/osm/mapnik/china_es.xml export MAPNIK_TILE_DIR=/home/osm/mapnik/tiles/es/ exec python /home/osm/mapnik/generate_tiles_multiprocess.py Tiles are generated.
10. Display the tiles on the web map
To do this, create a simple html-page, in which we will connect the created tile storages. The page file should be placed next to the generated / home / osm / mapnik / tiles tile directory. To display web maps, we will use the LeafletJS javascript framework:
<!DOCTYPE html> <html> <head> <meta http-equiv="Content-Type" content="text/html; charset=UTF-8"> <meta name="viewport" content="width=device-width, initial-scale=1.0, maximum-scale=1.0, user-scalable=no"> <link rel="stylesheet" href="http://cdn.leafletjs.com/leaflet-0.7.3/leaflet.css" /> <script src="http://cdn.leafletjs.com/leaflet-0.7.3/leaflet.js"></script> </head> <body> <div id="map" style="height: calc(100vh - 15px)"></div> <script> var map = L.map('map', { center: [34.7, 111.7], zoom: 6 }); L.control.layers({ "ru" : L.tileLayer('tiles/ru/{z}/{x}/{y}.png').addTo(map), "en" : L.tileLayer('tiles/en/{z}/{x}/{y}.png'), "es" : L.tileLayer('tiles/es/{z}/{x}/{y}.png') }, null).addTo(map); </script> </body> </html> This page will be executed locally. In the upper right corner, a control should be available, allowing you to select a tile source. Russian, English and Spanish versions of maps will be as follows:
11. Tile rendering on the fly
You will need to configure several mod_tile modules of the Apache web server, each of which will be responsible for its mapping - / ru - for rendering Russian tiles, / en - for rendering, respectively, English tiles, and so on. Details of mod_tile, httpd and renderd settings are in the instructions from Gis-Lab . As part of the demonstration of the example of localization of OpenStreetMap maps, I do not consider it necessary to deploy a full-fledged tile server.
Notes
- In the original edition of the article, the author planned to demonstrate an example of the Russification / localization of maps using the example of Cyprus, not China, since Cyprus occupies an even smaller area than China, which means that the data will be imported to the database faster, tiles will be generated faster, etc. But, as it turned out, the “local” language contains characters similar to the Latin alphabet. Therefore, translations into English were non-demonstrative. By the way, the sizes of the Cyprus and China databases (with and without the --drop key) turned out to be approximately the same, plus or minus a couple of megabytes, despite the significant difference in the area occupied by these countries.
- The author of the article planned to implement within the article the support of the Russian, English and German languages. But since the English and German translations are written in most cases the same way, in the final version of the article the German language was replaced by Spanish for greater demonstrativeness.
- The author’s experiments with the upload of Planet.osm were not completed (as was done in the case of maps of Cyprus and China). The fact is that considerable time importing the file into the Postgres database (more than two weeks) did not allow “playing” with one or another settings of the osm2pgsql utility (and its /usr/share/osm2pgsql/osm2pgsql/default.style style file) to an acceptable for the author time. That is why the article does not contain specific statistics for processing such a large amount of data.
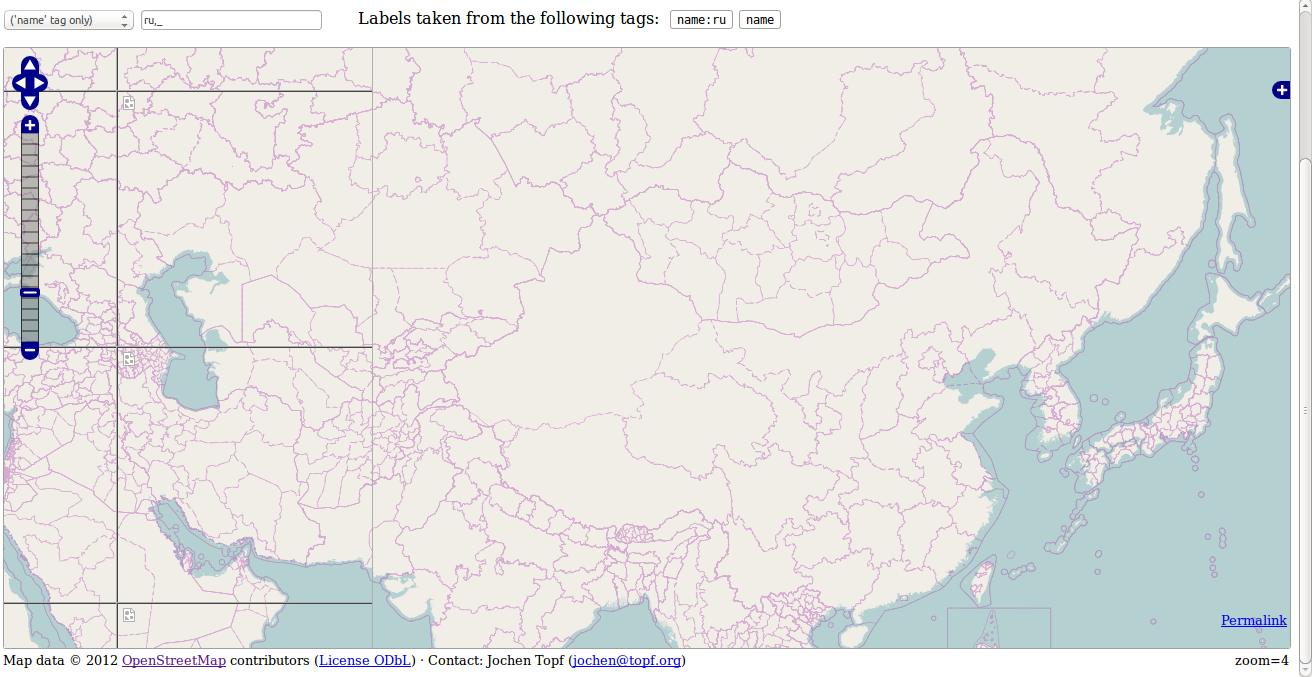
- Creating views in the database such as china_ru_point, china_ru_roads, etc., as well as forcing the MAPNIK_PREFIX system environment variable to prefix tables with the translations we need is not the only way to get the necessary translations. In the Mapnik style file generated by the generate_xml.py script, you can customize the format for displaying labels on the map in the TextSymbolizer tag. In particular, if you replace the generated name of the label field [name] with [name: ru] , then Mapnik will map labels taken from the field name: ru of the tables planet_osm_point , planet_osm_line , planet_osm_polygon , planet_osm_roads . But, as practice shows, the translation of the names of geographical objects is substantially less than the names of these names themselves. Perhaps that is why in the Multilingual Map project the maps are “bare”, without signatures of geographical objects. In this regard, the concatenation name: ru \ nname , which we created in the views of china_ru_ *, is more universal.
- If you do not plan to support multiple languages and do not plan to periodically update data (that is, you will use the --drop key of the osm2pgsql utility), then you can replace the cumbersome construction of views in the database with one UPDATE query, which replaces the existing value in the name field for concatenation name: ru \ nname in the tables planet_osm_point , planet_osm_line , planet_osm_polygon and planet_osm_roads . In this case, it is not necessary to force the setting of the MAPNIK_PREFIX system environment variable. And, as expected, Mapnik will generate tiles for the selected language only.
findings
The problem of localization of maps OpenStreetMap is not very difficult. There are several approaches to solving this problem. This article offers a very specific working version. I am sure that a respected reader will have many questions on the content of this article, and they will have their own ideas for branching the proposed algorithm. The author of the article does not claim to be the only correct method for solving the problem of Russification / localization of OpenStreetMap maps and is happy to read about your “tricks” in solving this issue.
Source: https://habr.com/ru/post/259141/
All Articles