My Internet of Things: Guest Castle
So there were circumstances that I have a one-room apartment in which I do not live, but I don’t care to rent it in the “usual way”. I tried to pass it through the Airbnb service, I liked it. And not that it is more profitable, but definitely more interesting, the process is exciting. But I'm not talking about that ...
I had a situation a couple of times when I could not personally meet a guest and hand him the key. Usually in such situations one has to invent various ways, from laying the key under the carpet to transmission through the concierge. I do not want to initiate outsiders into my business and somehow hide the key under the rug.
I wanted something high-tech. I thought like this: today, many have smartphones, and if you look at my potential guests, then almost everyone has. Really nothing is thought up for iPhone and Android to open the door lock from the smartphone? It turns out, very much invented. Found two interesting solutions.
1. Lockitron Bolt
2. Kevo Smart Lock
It turned out that heavy metal doors with a thickness of 60 mm in human homes in the United States are not very popular, as a result of which smart locks for such doors are also not very popular. The “American” type of lock is installed in a door up to 55 mm thick, usually wooden.
This was all the rationale for the project. Now the actual development itself.
A little bit about yourself. I work in the field of IT, but my work has nothing to do with controllers. I have a basic education in robotics, I did not work in my specialty, but I did not manage to forget all of the university education. The architecture of the “product” in my head appeared immediately, without my verbal participation.
She looked like this:
Command Server <=> Controller <=> Actuator
I started the project without a specific plan, without functional requirements, as a research one. A little googling revealed that I needed an Arduino platform. Then there was almost a month of exploring the capabilities of the platform, various examples of implemented projects and a short course of recalling programming skills in C ++.
In parallel, I thought about the choice of the actuator. In all the examples found on the web, the cylinder of the lock was rigidly connected to the servo drive, and it categorically did not suit me, since it was necessary that the lock could be opened from the outside with a key, and a rigid connection would exclude such a possibility. Well, again, to open / close my lock, you need at least one full turn of the cylinder, and the servos usually turn only 180 °. There were thoughts to make a complex servo drive consisting of a drive motor, a clutch and an angle sensor, but I rejected it due to the lack of metalworking equipment, which would certainly be required to accomplish this task.
The ideal variant was seen by me as a standard European cylinder for a lock, but only electromechanical, so that it could be opened from the outside, with a handle from the inside and with an electric drive upon a command from the controller. But, unfortunately, I did not find such a ready solution.
I came across an CISA electromechanical lock worth 35 tr. It was possible to change your lock (of the same manufacturer) for it, since the dimensions are standard, but the price is ...
Another parallel process is the development of functional requirements for the system. Hereinafter we will call the system “Guest Castle”. So:
It was necessary to make a painful choice of controller between the Arduino Ethernet and Arduino Yun. It would seem, Yun - the very thing that the doctor ordered. We raise a web server on the Linux part, we implement all the logic of high order on it and at the right moment we give commands to the microcontroller part. It remains only to buy a real IP address from the provider and it will work. But something stopped me from such a choice. At first, there were disturbing doubts that a real IP should be spent in the apartment, and then I realized that scalability really stops me. One lock on Yun earns one-two, and two locks? And if the two castles have different owners and guests? Etc.
Thus, the final choice fell on the Arduino Ethernet.
In the meantime, the issue with the executive mechanism was resolved. As such, YLI electric girder lock was chosen for access control systems, at the price of a little more than 3 tr. These are in offices, warehouses, etc. premises, usually complete with a bunch of other access control equipment.
Power supply 12V, the maximum starting current of the solenoid 900 mA. A special feature for users of metal doors: it can be embedded in the door frame, width 37 mm (boxes usually 40-50 mm).
These locks are of two types, open without power (NO) and closed without power (NC). In rooms for people, it is strongly recommended to use only type NO, so that in an emergency situation, accompanied by a power outage, people inside the room could easily leave the danger zone.
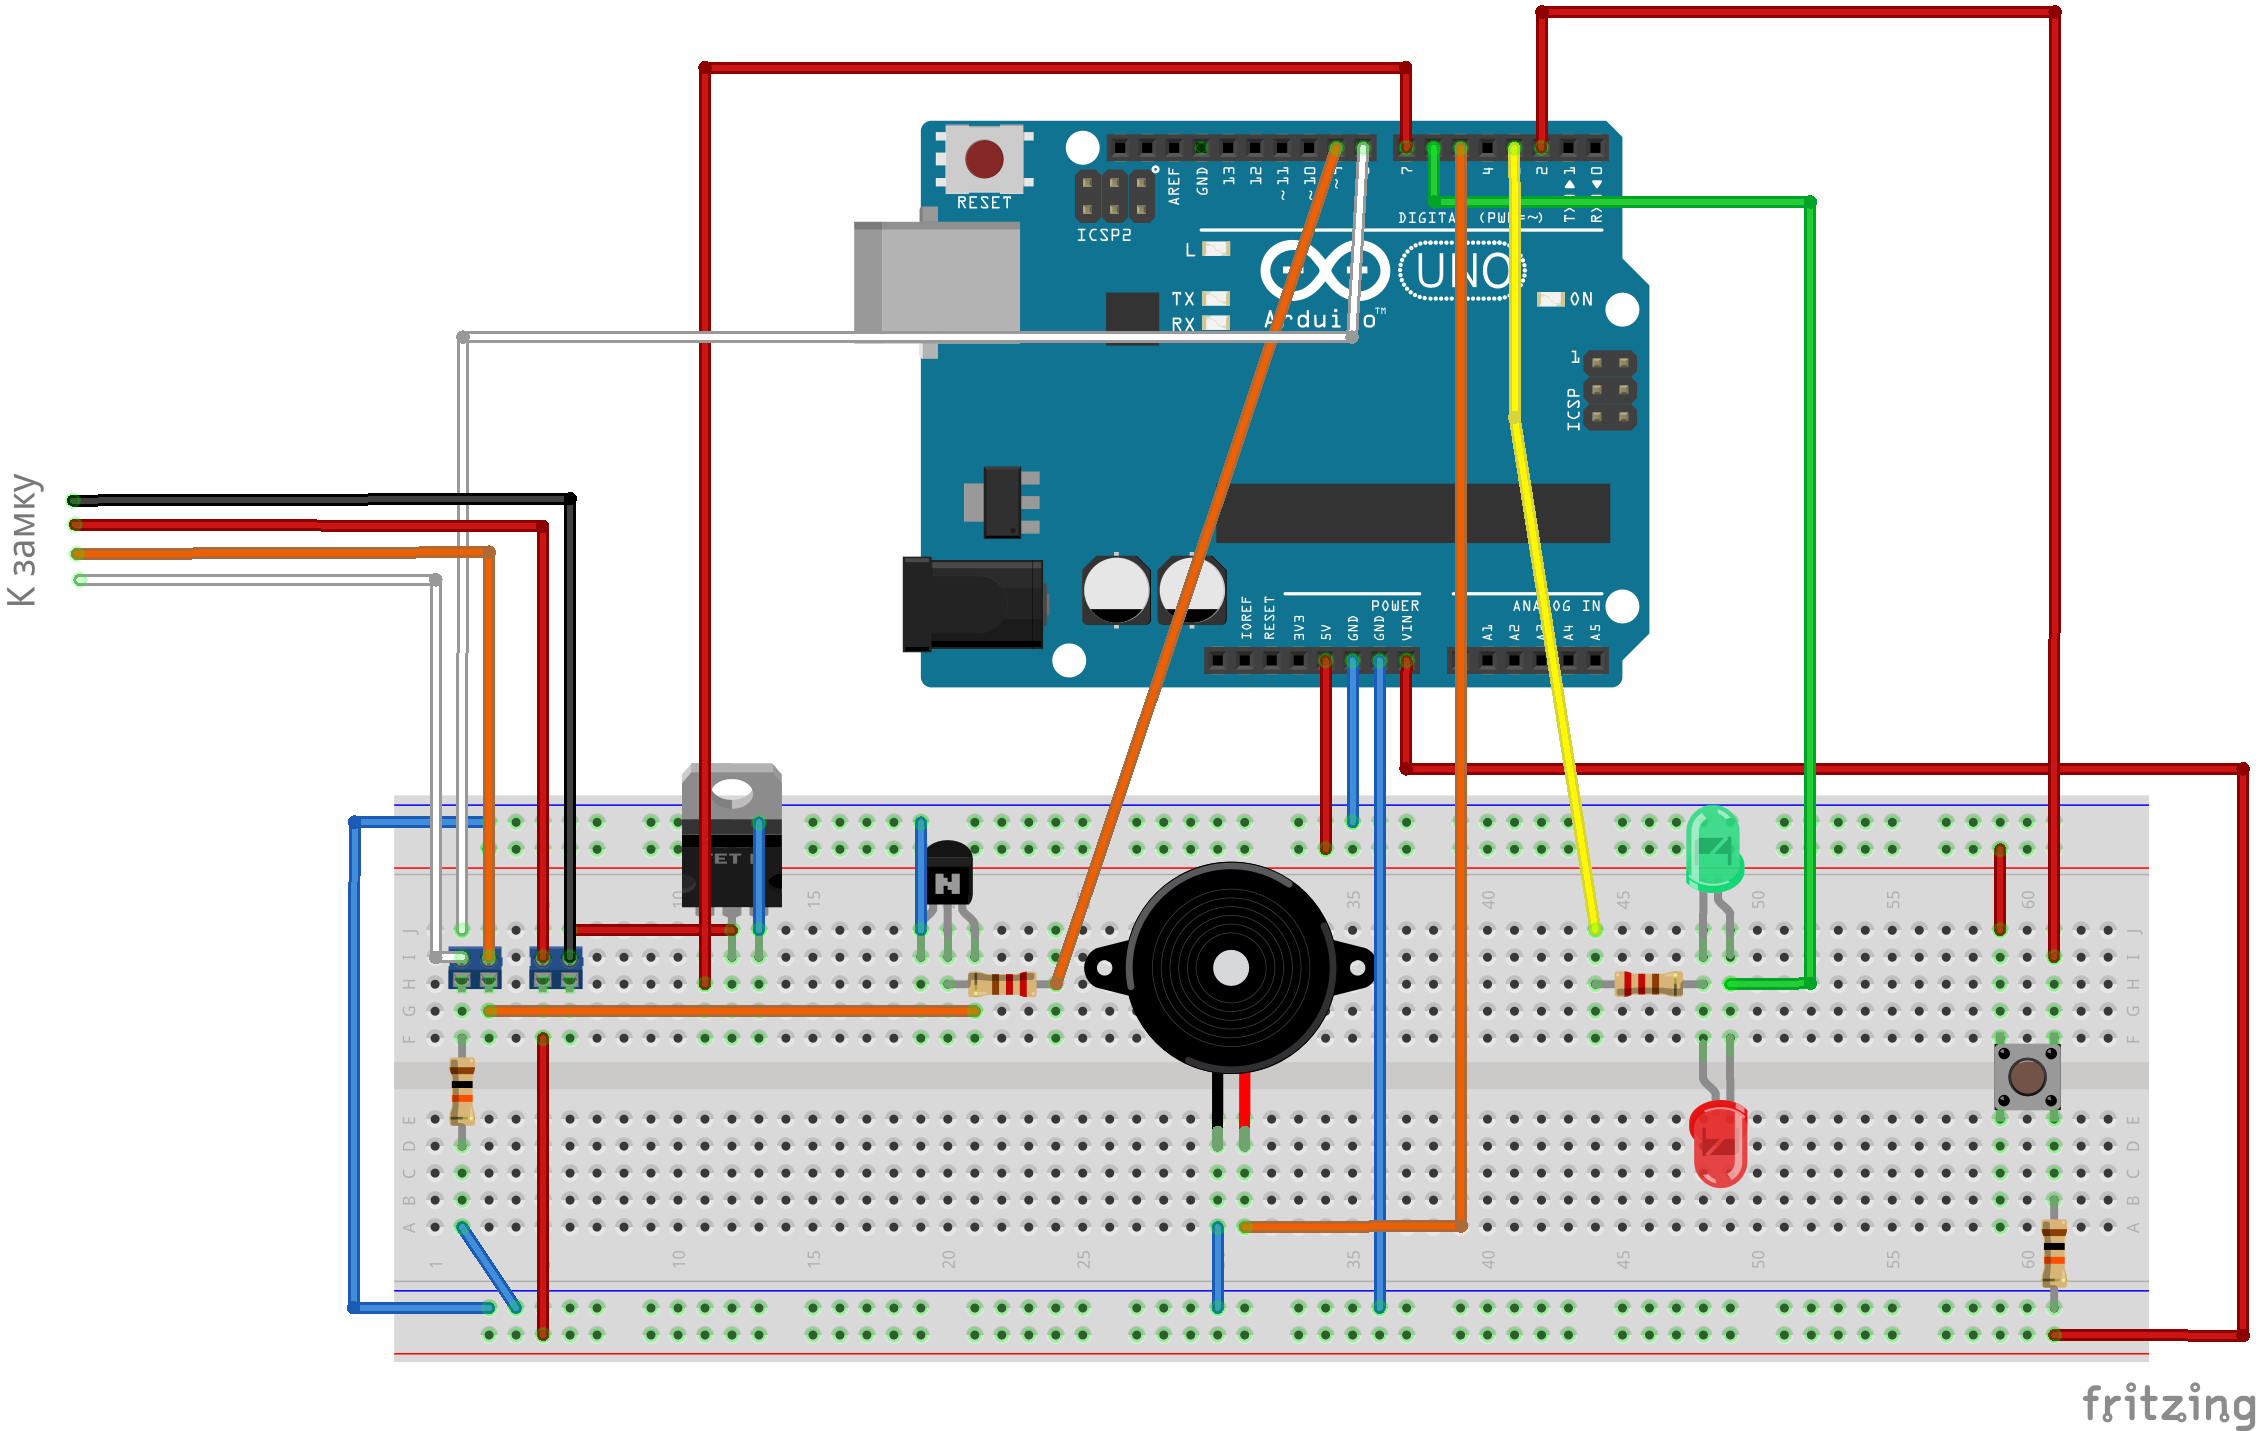
From the castle is 5 wires:
Red: + 12V
Black: Earth
Orange: Discovery. It is usually +4.8 V. In order to open the lock, you need to close the wire to the ground.
Green and White: Door Closing Sensor. When the door is open, the wires are open, when closed - closed.
We will control the 12 V supply circuit of the lock through the field effect transistor. The opening wire will be connected to ground through the NPN transistor. For beauty, we put a two-color LED to light green when the lock is not active and red when active. To give drama to the whole scene, we will put a piezo squeaker. For manual opening from the inside, as on the doors with intercom, we put the clock button.
Sketch accepts commands on the UART, recognizes them and is able to activate, deactivate and open the lock. In addition, it responds to inquiries about the current status of the lock (active or not) and the state of the door (open or closed)
Conclusions on the first iteration of the project.
The results of googling for the query “management of arduino internet” basically tell you how to make a simple web server to display sensor readings, or how to build a cat selfie booth on Yun.
Habré had an interesting overview of the Ninja Blocks cloud service . It seems that when I read this review, the service worked somehow wrong.
The same author ivizil just recently published a way to control via HTTP requests . I tried this method about a month before this publication and rejected it for aesthetic reasons. Bombing hosting every 5-10 seconds with the same request waiting for one single team per day is somehow not aesthetically pleasing.
The perfect option I saw in the use of XMPP. The client on the Arduino connects to the server and receives commands from it: “turn on”, “turn off”, “open” or requests “state”, “door”. The guest also connects as an XMPP client, the server restricts access and controls who can send a command to where.
Alas, there were no ready-made libraries for implementing XMPP client on the Arduino. We will be content with the good old Telnet.
In order to save digital outputs, I tried to put the gate of the field effect transistor and the LED on one output. The lock was suddenly lacking tension to pull the bolt. Measurements showed that the lock instead of the required 12V is slightly less than 11V. The problem is that when the gate is 5V, there is 11.8V between the source and the ground, and when 4.8V - 10.9V. We'll have to put a bipolar transistor in the 12V circuit before the gate, well, and take into account the nuance that this transistor will invert the signal a little.
For the second prototype, we need a telnet server. You can write it a lot on what, I decided to do it in Python. I admit, my acquaintance with Python is very nimble. I read that it is very fast and convenient to work on it, that it is cross platform and even could write “Hello World!” From the first attempt.
I started to google examples of working with Telnet in Python and rather quickly came across the Twisted library. Based on an example of a simple chat server and refined it to a “command server”.
The script works like this:
When enabled, the controller tries to connect to the server. If the attempt is unsuccessful, the next one is repeated after a certain time interval let's say 10 seconds.
With a successful connection, we first check if our server is ours. We send a randomly generated code to it, the server adds a secret word to it, which is stored in the mySQL table, calculates MD5 and sends it back. The controller compares the received MD5 with a similarly calculated by itself and if they match the connection is considered reliable and we are ready to receive commands from the server, to mark which we will light the orange LED. The command syntax is the same as for the UART.
On the server, we mark a client that connects in such a way as “lock”.
"Keys" are connected in a similar way. After connection, the client sends a request to the server to become a “key”. The same request authorization: the server responds with a random sequence of characters, you need to add a secret word to it, which the key must know, calculate MD5 and send back. If the result sent by the client matches the result calculated by the server, the client is defined as a “key” and he is allowed to send commands to the “locks”.
In the event handler of the protocol event, the parsim received from the client line and send back and forth commands.
The server should be started as a daemon using the standard twistd demonization utility
In the hardware, the controller seems to me logically complete, if I want to add something, it is a pair of LEDs to indicate any important or not so much events or conditions, which means it's time to assemble it humanly. Now it all looks like an art installation called “What wire to cut? !!”.

We buy Arduino ProtoShield for 240 rubles. Soldering iron, flux and solder is.


Conclusions on the second iteration:
Now we are ready to install the system. At a minimum, I can open the door for the guest while at work. The question of management from guests' smartphones remains unsolved.
To be continued...
I had a situation a couple of times when I could not personally meet a guest and hand him the key. Usually in such situations one has to invent various ways, from laying the key under the carpet to transmission through the concierge. I do not want to initiate outsiders into my business and somehow hide the key under the rug.
I wanted something high-tech. I thought like this: today, many have smartphones, and if you look at my potential guests, then almost everyone has. Really nothing is thought up for iPhone and Android to open the door lock from the smartphone? It turns out, very much invented. Found two interesting solutions.
1. Lockitron Bolt
Details about the gadget
Physically, it is a servo-plate on a regular door lock, controlled via Bluetooth. Additionally, there is a Bridge module, on the one hand, connected to the Internet, and on the other hand, it is controlled via a wireless channel by a servo drive. It is controlled by all through the application for smartphones and through the web-muzzle. You can send electronic keys to your friends so that they enter, you can open the door for them through the Internet.
')
The price of the issue is $ 99 per servo + $ 79 for Bridge + shipping.
In general, the gadget is interesting, but there are a couple of problems. First, he is not ready yet. Acceptance of pre-orders for the beta version. Secondly, the servo is designed for unlocking and locking the lock in a half-turn, it is such locks that are popular in its homeland in the USA. I have a cylinder-type European type lock in my apartment, for opening / closing you need to make at least 1 full turn of the cylinder. You can, of course, insert an additional lock into the door, but see “first”.
2. Kevo Smart Lock
Details about the gadget
This is a self-contained device, a lock with a built-in servo drive, a Bluetooth interface and a touch sensor. Looks more attractive. As a “key”, an application for a smartphone, a special key chain, or an ordinary key is used. The principle of operation is similar to the standard signaling of some modern cars. If in the range of the wireless connection there is a necessary phone or key chain, then it is enough just to touch the lock to open it. Very impressive.
Price issue $ 202 + shipping.
I even began to place an order, as I thought, but can I insert it into my metal door. And here I was in for an unpleasant surprise. I can not. The thickness of the door is more than necessary, and the distance from the end of the door to the lining is not enough.
Price issue $ 202 + shipping.
I even began to place an order, as I thought, but can I insert it into my metal door. And here I was in for an unpleasant surprise. I can not. The thickness of the door is more than necessary, and the distance from the end of the door to the lining is not enough.
It turned out that heavy metal doors with a thickness of 60 mm in human homes in the United States are not very popular, as a result of which smart locks for such doors are also not very popular. The “American” type of lock is installed in a door up to 55 mm thick, usually wooden.
This was all the rationale for the project. Now the actual development itself.
A little bit about yourself. I work in the field of IT, but my work has nothing to do with controllers. I have a basic education in robotics, I did not work in my specialty, but I did not manage to forget all of the university education. The architecture of the “product” in my head appeared immediately, without my verbal participation.
She looked like this:
Command Server <=> Controller <=> Actuator
I started the project without a specific plan, without functional requirements, as a research one. A little googling revealed that I needed an Arduino platform. Then there was almost a month of exploring the capabilities of the platform, various examples of implemented projects and a short course of recalling programming skills in C ++.
In parallel, I thought about the choice of the actuator. In all the examples found on the web, the cylinder of the lock was rigidly connected to the servo drive, and it categorically did not suit me, since it was necessary that the lock could be opened from the outside with a key, and a rigid connection would exclude such a possibility. Well, again, to open / close my lock, you need at least one full turn of the cylinder, and the servos usually turn only 180 °. There were thoughts to make a complex servo drive consisting of a drive motor, a clutch and an angle sensor, but I rejected it due to the lack of metalworking equipment, which would certainly be required to accomplish this task.
The ideal variant was seen by me as a standard European cylinder for a lock, but only electromechanical, so that it could be opened from the outside, with a handle from the inside and with an electric drive upon a command from the controller. But, unfortunately, I did not find such a ready solution.
I came across an CISA electromechanical lock worth 35 tr. It was possible to change your lock (of the same manufacturer) for it, since the dimensions are standard, but the price is ...
Another parallel process is the development of functional requirements for the system. Hereinafter we will call the system “Guest Castle”. So:
- The guest lock is not the main lock ensuring the safety of the apartment;
- The guest lock is used only for guests to enter the apartment for the first time in the absence of the owner and in the absence of the owner to leave the apartment for the last time, without having to transfer the key through the mailbox or in any other unsafe way;
- The rest of the time the apartment is locked with the usual locks with the usual metal keys, respectively, the Guest lock can be in an active and inactive state;
- The guest lock must be safe from the point of view of fire safety, not to impede evacuation when the power supply is off;
- The owner must be able to open the Guest lock remotely via the Internet, transfer it to an active or inactive state;
- The guest can use the “guest key” received from the host to open the lock;
- "Guest key" works only in the immediate vicinity of the castle;
- "Guest key" is limited in time of action.
It was necessary to make a painful choice of controller between the Arduino Ethernet and Arduino Yun. It would seem, Yun - the very thing that the doctor ordered. We raise a web server on the Linux part, we implement all the logic of high order on it and at the right moment we give commands to the microcontroller part. It remains only to buy a real IP address from the provider and it will work. But something stopped me from such a choice. At first, there were disturbing doubts that a real IP should be spent in the apartment, and then I realized that scalability really stops me. One lock on Yun earns one-two, and two locks? And if the two castles have different owners and guests? Etc.
Thus, the final choice fell on the Arduino Ethernet.
In the meantime, the issue with the executive mechanism was resolved. As such, YLI electric girder lock was chosen for access control systems, at the price of a little more than 3 tr. These are in offices, warehouses, etc. premises, usually complete with a bunch of other access control equipment.
Power supply 12V, the maximum starting current of the solenoid 900 mA. A special feature for users of metal doors: it can be embedded in the door frame, width 37 mm (boxes usually 40-50 mm).
These locks are of two types, open without power (NO) and closed without power (NC). In rooms for people, it is strongly recommended to use only type NO, so that in an emergency situation, accompanied by a power outage, people inside the room could easily leave the danger zone.
From the castle is 5 wires:
Red: + 12V
Black: Earth
Orange: Discovery. It is usually +4.8 V. In order to open the lock, you need to close the wire to the ground.
Green and White: Door Closing Sensor. When the door is open, the wires are open, when closed - closed.
So, we will assemble the first prototype
We will control the 12 V supply circuit of the lock through the field effect transistor. The opening wire will be connected to ground through the NPN transistor. For beauty, we put a two-color LED to light green when the lock is not active and red when active. To give drama to the whole scene, we will put a piezo squeaker. For manual opening from the inside, as on the doors with intercom, we put the clock button.
Sketch accepts commands on the UART, recognizes them and is able to activate, deactivate and open the lock. In addition, it responds to inquiries about the current status of the lock (active or not) and the state of the door (open or closed)
Sketch
#include <EEPROM.h> // / #define BEEPER 5 // #define BUTTON 2 // #define LED_RED 6 // #define LED_GREEN 3 // #define LOCK_POWER 7 // , #define LOCK_OPEN 9 // , #define NO_PIN 8 // // loop() #define EVENT_NONE 0 // #define EVENT_BUTTON 1 // #define EVENT_ACTIVATE 2 // #define EVENT_DEACTIVATE 3 // #define EVENT_OPEN 4 // #define EVENT_SERIAL 99 // UART char deviceID[12]; int eventButton = EVENT_NONE; int lockActive = LOW; String inputString = ""; void pressButton(){ // eventButton = EVENT_BUTTON; } void setup(){ pinMode(BEEPER, OUTPUT); pinMode(LED_RED, OUTPUT); pinMode(LED_GREEN, OUTPUT); pinMode(LOCK_POWER, OUTPUT); pinMode(LOCK_OPEN, OUTPUT); pinMode(BUTTON, INPUT); pinMode(NO_PIN, INPUT); Serial.begin(9600); inputString.reserve(30); attachInterrupt(0, pressButton, RISING); eventButton = EVENT_NONE; lockActive = EEPROM.read(0); // " " digitalWrite(LOCK_POWER, lockActive); digitalWrite(LED_RED, lockActive); digitalWrite(LED_GREEN, !lockActive); } int commandProcessor(String incomingString){ incomingString.trim(); incomingString.toUpperCase(); if (incomingString == "OPEN") { return EVENT_OPEN; } else if (incomingString == "ACTIVATE") { return EVENT_ACTIVATE; } else if (incomingString == "DEACTIVATE") { return EVENT_DEACTIVATE; } else { return EVENT_NONE; } } void loop(){ // if (eventButton == EVENT_SERIAL){ // Serial inputString.trim(); inputString.toUpperCase(); if (inputString == "STATUS") { // if (lockActive == HIGH) { Serial.println("ACTIVE"); } else { Serial.println("NOTACTIVE"); } } else if (inputString == "DOOR") { // if (digitalRead(NO_PIN) == HIGH) { Serial.println("CLOSE"); } else { Serial.println("OPEN"); } } else if (inputString == "NORMAL OPEN") { // if (EEPROM.read(0) != LOW) { EEPROM.write(0, LOW); delay(10); } } else if (inputString == "NORMAL CLOSE") { if (EEPROM.read(0) != HIGH) { EEPROM.write(0, HIGH); delay(10); } } // eventButton = commandProcessor(inputString); inputString = ""; } // if (eventButton == EVENT_BUTTON) { eventButton = EVENT_OPEN; // } else if (eventButton == EVENT_ACTIVATE) { lockActive = HIGH; digitalWrite(LOCK_POWER, HIGH); digitalWrite(LED_RED, HIGH); digitalWrite(LED_GREEN, LOW); tone(BEEPER, 700, 50); } else if (eventButton == EVENT_DEACTIVATE) { lockActive = LOW; digitalWrite(LOCK_POWER, LOW); digitalWrite(LED_RED, LOW); digitalWrite(LED_GREEN, HIGH); tone(BEEPER, 700, 50); } else if (eventButton == EVENT_OPEN) { digitalWrite(LOCK_OPEN, HIGH); if (lockActive == HIGH) { tone(BEEPER, 750, 50); } delay(10); digitalWrite(LOCK_OPEN, LOW); eventButton = EVENT_NONE; } eventButton = EVENT_NONE; } void serialEvent() { while (Serial.available()) { char inChar = (char)Serial.read(); inputString += inChar; if (inChar == '\n') { eventButton = EVENT_SERIAL; } } } Conclusions on the first iteration of the project.
- Arduino is Vesch!
- Engineering skills do not drink, it turns out, I remember a lot of things;
- Ethernet Shield reserves a lot of Arduino Uno outputs, if you miss the LEDs, you'll have to save. For example, the field-effect transistor gate and the red LED can be connected to the same pin, the opening button does not have to be entered into the controller, you can go directly to the lock or transistor key.
Add some distribution
The results of googling for the query “management of arduino internet” basically tell you how to make a simple web server to display sensor readings, or how to build a cat selfie booth on Yun.
Habré had an interesting overview of the Ninja Blocks cloud service . It seems that when I read this review, the service worked somehow wrong.
The same author ivizil just recently published a way to control via HTTP requests . I tried this method about a month before this publication and rejected it for aesthetic reasons. Bombing hosting every 5-10 seconds with the same request waiting for one single team per day is somehow not aesthetically pleasing.
The perfect option I saw in the use of XMPP. The client on the Arduino connects to the server and receives commands from it: “turn on”, “turn off”, “open” or requests “state”, “door”. The guest also connects as an XMPP client, the server restricts access and controls who can send a command to where.
Alas, there were no ready-made libraries for implementing XMPP client on the Arduino. We will be content with the good old Telnet.
Second prototype
In order to save digital outputs, I tried to put the gate of the field effect transistor and the LED on one output. The lock was suddenly lacking tension to pull the bolt. Measurements showed that the lock instead of the required 12V is slightly less than 11V. The problem is that when the gate is 5V, there is 11.8V between the source and the ground, and when 4.8V - 10.9V. We'll have to put a bipolar transistor in the 12V circuit before the gate, well, and take into account the nuance that this transistor will invert the signal a little.
For the second prototype, we need a telnet server. You can write it a lot on what, I decided to do it in Python. I admit, my acquaintance with Python is very nimble. I read that it is very fast and convenient to work on it, that it is cross platform and even could write “Hello World!” From the first attempt.
I started to google examples of working with Telnet in Python and rather quickly came across the Twisted library. Based on an example of a simple chat server and refined it to a “command server”.
The script works like this:
When enabled, the controller tries to connect to the server. If the attempt is unsuccessful, the next one is repeated after a certain time interval let's say 10 seconds.
With a successful connection, we first check if our server is ours. We send a randomly generated code to it, the server adds a secret word to it, which is stored in the mySQL table, calculates MD5 and sends it back. The controller compares the received MD5 with a similarly calculated by itself and if they match the connection is considered reliable and we are ready to receive commands from the server, to mark which we will light the orange LED. The command syntax is the same as for the UART.
On the server, we mark a client that connects in such a way as “lock”.
"Keys" are connected in a similar way. After connection, the client sends a request to the server to become a “key”. The same request authorization: the server responds with a random sequence of characters, you need to add a secret word to it, which the key must know, calculate MD5 and send back. If the result sent by the client matches the result calculated by the server, the client is defined as a “key” and he is allowed to send commands to the “locks”.
In the event handler of the protocol event, the parsim received from the client line and send back and forth commands.
Python server code
from twisted.protocols import basic from twisted.internet import reactor from twisted.internet.protocol import ServerFactory from twisted.protocols.basic import LineOnlyReceiver from twisted.application import service, internet import hashlib import threading import MySQLdb from MySQLdb import Error import random class ChatProtocol(LineOnlyReceiver): name = "" isKey = False authKey = "" def getSecret(self,isKey): if not self.factory.conn: self.factory.mySQLdbConnect() if isKey: reqTable = "lockkeys" else: reqTable = "locks" try: cursor = self.factory.conn.cursor() cursor.execute("SELECT `secret` FROM `" + reqTable + "` WHERE id='" + self.getName() + "'") rows = cursor.fetchall() if cursor.rowcount > 0: cursor.close() return rows[0][0].strip() else: cursor.close() return None except Error as e: print(e) return None finally: cursor.close() def validKey(self,lockID): if not self.isKey: return False if self.transport.getPeer().host == "127.0.0.1": return True if not self.factory.conn: self.factory.mySQLdbConnect() try: cursor = self.factory.conn.cursor() cursor.execute("SELECT `rights` FROM `hosts` WHERE (`lock`='" + lockID + "') AND (`lockkey`='"+ self.getName() + "')") rows = cursor.fetchall() if cursor.rowcount > 0: cursor.close() return rows[0][0] else: cursor.close() return False except Error as e: print(e) return False finally: cursor.close() def getName(self): if self.name!="": return self.name return self.transport.getPeer().host def connectionMade(self): print "New connection from "+self.getName() if self.transport.getPeer().host == "127.0.0.1": self.isKey = True d = {self.getName() : self} self.factory.clients.update(d) def connectionLost(self, reason): print "Lost connection from "+self.getName() self.factory.clients.pop(self.getName()) self.factory.sendMessageToAllclients(self.getName()+" has disconnected.") def lineReceived(self, line): #print self.getName()+" said "+line #if line[:3] == "/OK" if line[:5]=="/KEY:": str1 = '123456789' str2 = 'qwertyuiopasdfghjklzxcvbnm' str3 = str2.upper() str4 = str1+str2+str3 ls = list(str4) random.shuffle(ls) self.authKey = ''.join([random.choice(ls) for x in range(12)]) self.sendLine("ANSW:"+self.authKey) oldName = self.getName() self.name = line[5:].strip() self.factory.clients.pop(oldName) self.factory.clients.update({self.getName() : self}) self.isKey = False print oldName+" has requested to be Key ID:"+self.getName() elif line=="/EXIT": self.transport.loseConnection() elif line[:6]=="/ANSW:": secret = self.getSecret(True) if secret: m = hashlib.md5() m.update(self.authKey + secret) if m.hexdigest() == line[6:].strip(): self.isKey = True print self.getName() + " was authorisated as Key" else: self.sendLine("Authorisation fail") self.transport.loseConnection() else: self.sendLine("Authorisation fail") self.transport.loseConnection() if self.isKey: #Only from keys if line[:6]=="/OPEN:": if self.validKey(line[6:]): adresat = self.factory.clients.get(line[6:],None) if adresat: adresat.sendLine("OPEN:" + self.getName() + "\r\n") else: self.sendLine("DeviceID="+ line[6:] + " is not online\r\n") elif line[:10]=="/ACTIVATE:": if self.validKey(line[10:]): adresat = self.factory.clients.get(line[10:],None) if adresat: adresat.sendLine("ACTIVATE:" + self.getName() + "\r\n") else: self.sendLine("DeviceID="+ line[10:] + " is not online\r\n") elif line[:12]=="/DEACTIVATE:": if self.validKey(line[12:]): adresat = self.factory.clients.get(line[12:],None) if adresat: adresat.sendLine("DEACTIVATE:" + self.getName() + "\r\n") else: self.sendLine("DeviceID="+ line[12:] + " is not online\r\n") else: # Only from locks if line[:4]=="/ID:": oldName = self.getName() self.name = line[4:].strip() self.factory.clients.pop(oldName) self.factory.clients.update({self.getName() : self}) print oldName+" changed name to "+self.getName() elif line[:4]=="/RE:": secret = self.getSecret(self.isKey) if secret == None: self.sendLine("Your Device ID is not register in Command Server") self.transport.loseConnection() else: requestCode = line[4:] m = hashlib.md5() m.update(requestCode + secret) self.sendLine("AUTH:" + m.hexdigest() + "\r\n") elif line[:4]=="/OK:": adresat = self.factory.clients.get(line[4:],None) if adresat: adresat.sendLine("OK:" + self.getName()) else: self.factory.sendMessageToAllclients(self.getName()+" says "+line) def sendLine(self, line): self.transport.write(line+"\r\n") class ChatProtocolFactory(ServerFactory): protocol = ChatProtocol clients = {} def mySQLdbConnect(self): try: self.conn = MySQLdb.connect(host='127.0.0.1',user='guestlock',passwd='passw',db='guestlock') except Error as e: print(e) return False else: return True def __init__(self): print "Starting server..." self.clients = {} if self.mySQLdbConnect(): print "Server ready!" else: print "Data base error. Server doesn't work correctly." def sendMessageToAllclients(self, mesg): for client in self.clients.values(): client.sendLine(mesg) factory = ChatProtocolFactory() application = service.Application("CommandServer") internet.TCPServer(12345, factory).setServiceParent(application) The server should be started as a daemon using the standard twistd demonization utility
$twistd -y CommandServer.py Sketch
#include <EEPROM.h> #include <SPI.h> #include <Ethernet.h> #include <MD5.h> // / #define BEEPER 5 // #define BUTTON 2 // #define LOCK_POWER 7 // #define LED_DEACTIVE 6 // #define LOCK_OPEN 9 // #define LED_ETHERNET 8 // #define NO_PIN A0 // NO // loop() #define EVENT_NONE 0 #define EVENT_ETHERNET 98 #define EVENT_SERIAL 99 #define RECONNECT_TIME 5000 // , char deviceID[12]; byte mac[] = { 0xDE, 0xAD, 0xBE, 0xEF, 0xFE, 0xED}; EthernetClient client; IPAddress server(192,168,1,7); long port = 12345; unsigned long lastConnectionTime = 0; unsigned long disconnectTime = 0; boolean lastConnected = false; volatile int eventButton = EVENT_NONE; // loop() int lockActive = LOW; String inputString = ""; String ethernetString = ""; long requestCode; void pressButton(){ // lockOpen(); } void majorBeep() { tone(BEEPER, 750, 50); } void minorBeep() { tone(BEEPER, 300, 100); } void lockActivate(boolean lockState){ digitalWrite(LOCK_POWER, lockState); digitalWrite(LED_DEACTIVE, !lockState); lockActive = lockState; majorBeep(); } void lockOpen() { digitalWrite(LOCK_OPEN, HIGH); delay(50); digitalWrite(LOCK_OPEN, LOW); majorBeep(); } void lockSetDefaultState(int state){ if (EEPROM.read(0) != state) { EEPROM.write(0, state); delay(10); } majorBeep(); } boolean serverAuthRequest() { if (!client.connected()){ return false; } client.print("/ID:"); client.println(deviceID); delay(1000); char rCode[6]; ultoa(random(99999),rCode,16); unsigned char* hash=MD5::make_hash(rCode); char *md5str = MD5::make_digest(hash, 16); client.print("/RE:"); client.println(md5str); String answerHash = md5str; answerHash.trim(); for (int i=0; EEPROM.read(50+i) != 0; i++){ answerHash += char(EEPROM.read(50+i)); } char *aCode = (char*)malloc(answerHash.length()+1); ; answerHash.toCharArray(aCode,answerHash.length()+1); hash=MD5::make_hash(aCode); md5str = MD5::make_digest(hash, 16); answerHash = md5str; free(md5str); free(aCode); unsigned long mm = millis(); ethernetString = ""; while (millis()-mm < RECONNECT_TIME) { if (client.available()) { char inChar = client.read(); ethernetString += inChar; if (inChar == '\n') { ethernetString.trim(); if (ethernetString.startsWith("AUTH:")) { ethernetString = ethernetString.substring(5); break; } else { ethernetString = ""; } } } } return (ethernetString == answerHash); } boolean serverConnect() { if (client.connect(server, port)) { lastConnectionTime = millis(); if (serverAuthRequest()) { Serial.println("Server autenfication sucsesseful"); majorBeep(); digitalWrite(LED_ETHERNET, HIGH); ethernetString = ""; return true; } else{ Serial.println("Server autenfication fail"); minorBeep(); digitalWrite(LED_ETHERNET, LOW); ethernetString = ""; client.stop(); return false; } } else { Serial.println("Connection fail"); client.stop(); digitalWrite(LED_ETHERNET, LOW); disconnectTime = millis(); ethernetString = ""; return false; } } void setup(){ pinMode(BEEPER, OUTPUT); pinMode(LOCK_OPEN, OUTPUT); pinMode(BUTTON, INPUT); pinMode(LOCK_POWER, OUTPUT); pinMode(LED_DEACTIVE, OUTPUT); pinMode(LED_ETHERNET, OUTPUT); lockActivate(EEPROM.read(0)); Serial.begin(9600); randomSeed(analogRead(A1)); for (int i=1; i<12; i++) { deviceID[i-1] = EEPROM.read(i); } Serial.print("Device ID: "); Serial.println(deviceID); delay(1000); // start the Ethernet connection using a DNS server: Ethernet.begin(mac); Serial.print("My IP address: "); Serial.println(Ethernet.localIP()); if (!serverConnect()) { disconnectTime = millis(); } inputString.reserve(30); attachInterrupt(0, pressButton, RISING); eventButton = EVENT_NONE; } boolean commandProcessor(String incomingString, int commandSource){ boolean result = true; String report = "OK"; incomingString.trim(); incomingString.toUpperCase(); if (incomingString.startsWith("OPEN")) { lockOpen(); } else if (incomingString.startsWith("ACTIVATE")) { lockActivate(HIGH); } else if (incomingString.startsWith("DEACTIVATE")) { lockActivate(LOW); } else if (incomingString.startsWith("STATUS")) { if (lockActive == HIGH) { report = "ACTIVE"; } else { report = "NOTACTIVE"; } } else if (incomingString.startsWith("DOOR")) { if (analogRead(NO_PIN) > 1000) { report = "CLOSE"; } else { report = "OPEN"; } } else { result = false; } if (result && (commandSource == EVENT_ETHERNET) && client.connected()) { if (incomingString.indexOf(":") > 0) { client.print("/" + report + incomingString.substring(incomingString.indexOf(":"))); } else { client.println("/" + report); } } if (result && (commandSource == EVENT_SERIAL)) { Serial.println(report); } } void ethernetEvent() { if (client.available()) { char inChar = client.read(); ethernetString += inChar; if (inChar == '\n') { eventButton = EVENT_ETHERNET; } } } void loop(){ if (eventButton == EVENT_ETHERNET) { commandProcessor(ethernetString, eventButton); ethernetString = ""; eventButton = EVENT_NONE; } if (eventButton == EVENT_SERIAL) { commandProcessor(inputString, eventButton); inputString = ""; eventButton = EVENT_NONE; } if (!client.connected() && lastConnected) { Serial.println("Disconnecting."); minorBeep(); digitalWrite(LED_ETHERNET, LOW); disconnectTime = millis(); client.stop(); } lastConnected = client.connected(); if ((!lastConnected) && (millis() > disconnectTime+RECONNECT_TIME)) { disconnectTime = millis(); serverConnect(); } ethernetEvent(); } void serialEvent() { while (Serial.available()) { char inChar = (char)Serial.read(); inputString += inChar; if (inChar == '\n') { eventButton = EVENT_SERIAL; } } } ProtoShield
In the hardware, the controller seems to me logically complete, if I want to add something, it is a pair of LEDs to indicate any important or not so much events or conditions, which means it's time to assemble it humanly. Now it all looks like an art installation called “What wire to cut? !!”.
We buy Arduino ProtoShield for 240 rubles. Soldering iron, flux and solder is.
Conclusions on the second iteration:
- Python is powerful but unusual;
- I have not forgotten how to solder;
- The server will run on a Rapsberry Pi;
- You must order a real IP address from the provider;
- You can install the "product" on the "object" and receive guests.
Now we are ready to install the system. At a minimum, I can open the door for the guest while at work. The question of management from guests' smartphones remains unsolved.
To be continued...
Source: https://habr.com/ru/post/259127/
All Articles