Automatic update of IP phones in 3CX. Part two. Practice
In continuation of the first article: Automatic update of IP phones in 3CX. Part one. The theory , as promised, will tell you how it all works in practice.
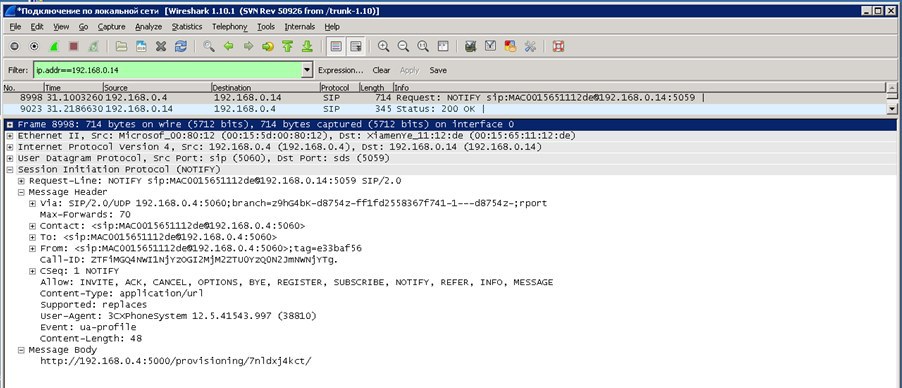
So, when an IP phone is connected to the local network, the IP phone sends a broadcast request (SIP NOTIFY) and reports its MAC address and current location:
what the 3CX server responds to and after the IP phone appears in the 3CX system in the “Phones” section with the “New” status:
')

Further, there may be two scenarios.
Scenario 1. Manual configuration
The point is that the IP phone is new, previously we knew nothing about it and the IP phone was simply added to the park of phones. Our task is to assign it an internal number in the system and tighten the general settings pattern for phones of this type.
To do this, click on the phone from the list with the right mouse button and select one of the items from the drop-down list:

If we select the first item, the menu for adding an extension will open:

Enter user data and go to the tab "Autotune phone"

The system automatically filled in the fields: MAC address and Model, then there are individual settings for this IP phone, where we can change:
In the same menu, a BLF list is set for a specific user:

Those. we add the extension numbers that the user should or can track.
Next, click on the save button and the configuration file with all the individual settings, goes to the IP phone.

From the log you can see that the phone is registered and subscribed to the BLF, which we wrote to it:
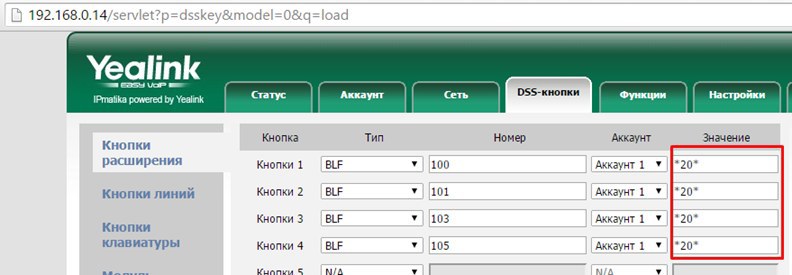
In addition, if you pay attention, the system automatically registers the old code set in 3CX (* 20 *) to capture the call.
If you select the second item - Assign to an existing internal number, the previously created number is selected with all the settings and simply saved:

After that, the phone will perform the same actions.
Scenario 2. Automatic update or pre-create a virtual park of phones.
In order to automate the process as much as possible in the future, one way or another, at the beginning it will be necessary to build on individual settings for each IP phone + a template for each model.
So, the task: we have new IP phones, we know to whom which IP phone should be installed and accordingly we have all the data to configure (MAC address, extension number, etc.).
To solve the problem, we need to create a common template for the model, where we enter general data, plus for convenience, we indicate that the IP phone will contact our server every day at a given time and check for changes in the configuration file. This is done by means of a checksum, the IP phone sends a request, receives a response from the server, checks the checksum, and if it is different from the current one in the IP phone, the new configuration file will be uploaded.


Save the template.
Next, go to the "Internal numbers" section and create numbers with binding to the MAC address + individual settings:

As you can see in the screenshot, all the fields are empty and must be filled in:
And then the general settings.
What is the difference between Scenario 1 and Scenario 2? The only difference is that by creating a new fleet of phones, you get rid of unnecessary work - unpacking the phone, connecting to the network, catching it in the system, making the settings, after packaging or immediately attributed to the user on the table and so on for each device.
Scenario 2 makes it possible to save time on this, since all we need to know from the IP phone is the MAC address, and it is usually written on the box itself. And further, you can simply give the phone to an employee who sets it on his desk and after connecting the IP phone to the network, the IP phone automatically (without additional intervention) receives all the settings that we created earlier.
So, when an IP phone is connected to the local network, the IP phone sends a broadcast request (SIP NOTIFY) and reports its MAC address and current location:
what the 3CX server responds to and after the IP phone appears in the 3CX system in the “Phones” section with the “New” status:
')
Further, there may be two scenarios.
Scenario 1. Manual configuration
The point is that the IP phone is new, previously we knew nothing about it and the IP phone was simply added to the park of phones. Our task is to assign it an internal number in the system and tighten the general settings pattern for phones of this type.
To do this, click on the phone from the list with the right mouse button and select one of the items from the drop-down list:
- Add extension number - a new number is created
- Assign existing extension number — select one of the existing extension numbers.
If we select the first item, the menu for adding an extension will open:
Enter user data and go to the tab "Autotune phone"
The system automatically filled in the fields: MAC address and Model, then there are individual settings for this IP phone, where we can change:
- Password to access the web interface
- The language on the screen is convenient if you have a multilingual company.
- Time zone - again, employees can work remotely and in different time zones
- Autotune method - user local or remote
- Interface - where the phone should go to check for updating configuration files (depending on local or remote user)
- Set codec priority
In the same menu, a BLF list is set for a specific user:
Those. we add the extension numbers that the user should or can track.
Next, click on the save button and the configuration file with all the individual settings, goes to the IP phone.
From the log you can see that the phone is registered and subscribed to the BLF, which we wrote to it:
In addition, if you pay attention, the system automatically registers the old code set in 3CX (* 20 *) to capture the call.
If you select the second item - Assign to an existing internal number, the previously created number is selected with all the settings and simply saved:
After that, the phone will perform the same actions.
Scenario 2. Automatic update or pre-create a virtual park of phones.
In order to automate the process as much as possible in the future, one way or another, at the beginning it will be necessary to build on individual settings for each IP phone + a template for each model.
So, the task: we have new IP phones, we know to whom which IP phone should be installed and accordingly we have all the data to configure (MAC address, extension number, etc.).
To solve the problem, we need to create a common template for the model, where we enter general data, plus for convenience, we indicate that the IP phone will contact our server every day at a given time and check for changes in the configuration file. This is done by means of a checksum, the IP phone sends a request, receives a response from the server, checks the checksum, and if it is different from the current one in the IP phone, the new configuration file will be uploaded.
Save the template.
Next, go to the "Internal numbers" section and create numbers with binding to the MAC address + individual settings:
As you can see in the screenshot, all the fields are empty and must be filled in:
- MAC address - specify the MAC address of the IP phone
- Model - choose the model of the desired IP phone
And then the general settings.
What is the difference between Scenario 1 and Scenario 2? The only difference is that by creating a new fleet of phones, you get rid of unnecessary work - unpacking the phone, connecting to the network, catching it in the system, making the settings, after packaging or immediately attributed to the user on the table and so on for each device.
Scenario 2 makes it possible to save time on this, since all we need to know from the IP phone is the MAC address, and it is usually written on the box itself. And further, you can simply give the phone to an employee who sets it on his desk and after connecting the IP phone to the network, the IP phone automatically (without additional intervention) receives all the settings that we created earlier.
Source: https://habr.com/ru/post/259119/
All Articles