NOT Arduino for 55 cents
The experiment with attaching cheap ATTiny microcontrollers to the bootloader and Arduino development environment was quite successful. Of course, the AVR is not bad living without Arduino. But it is good when there is a choice. And then I plunged into the STM32 and got stuck in libraries and cumbersome port initialization constructs. Salvation ARM- "kettle" was the project ARM mbed . Personally, he let me just take and start working with STM32.
But the LED on the Nucleo blinks flashing very quickly. I put it off, for too many legs and bells and whistles, and took up the Maple Mini (STM32F103CBT6 with minimal strapping). Everything is also pretty easy and simple - the servo drives are spinning, the sensors are working, the screens are showing - all the popular libraries that are familiar to arduinschik are in mbed.
')
And the third run was partly repeated "Arduino for $ 1." I will tell about it in detail. The idea is this: I want ARM for a penny. I open Aliexpress and find STM32F030F4P6 for 55 cents for a thing when buying a bundle (10 chips).
This chip seems to be quite inconvenient for handicraft use, since it is made in the TSSOP20 package. But this is even interesting, since it is already boring to decouple DIP cases, and it is lazy to drill holes in the board. It is possible, by the way, to use the TSSOP-DIP adapter boards, but while I was waiting for the cherished Chinese bag, I made my own.
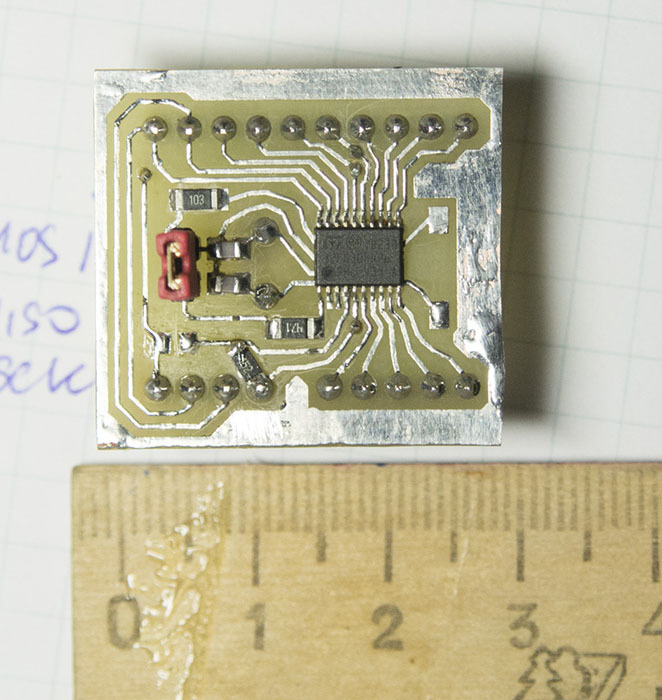
In addition to the controller itself, a quartz resonator, two capacitors, three resistors and one jumper are placed on the scarf (one-sided). Separately derived pins for connecting the debugger. The power supply voltage regulator has not yet been installed, since the device is purely test-demonstration, for collecting rakes and as a proof of concept. The main thing - do not apply 5 volts of power.
Mbed does not support STM32F030F4P6 out of the box, Nucleo-F030R8 will be the closest relative. This board is chosen as the target platform. A good version of the mbed library has already been done . So, there was no trouble.
Tests
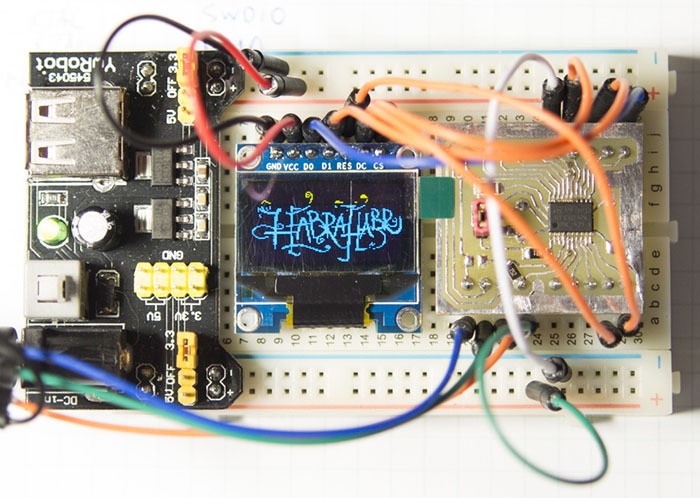
Here, in theory, there should have been an enthusiastic description of the porting process of the legendary Blink. But no, let the test be a little more complicated, especially since the author of the modified library writes that SPI's work has not been tested. So, I assemble a construction from a board, a Chinese OLED display (128x64) and a power module on a bread breadboard, I connect a self-made ST-Link (I never put it in the case, but at least I soldered the necessary elements directly onto the board) and I collect from the bricks the firmware code.
Bricks such:
1. Modified mbed library. I do not forget to remove the default from the project.
2. SSD1306 library - for working with the display. I added a Russian font to it (I stole the codes from here ), but I didn’t use it in this project, limiting myself to displaying a bitmap image.
3. The primitive main.cpp.
Raster image prepared using the utility LCD Assistant . The most useful thing in the household, you feed it a one-bit bmp-file, and it produces a byte array in text form that is usable in C.

And then everything is almost like in Arduino:
/* 0.96 12864 OLED. SPI_MOSI=PA_7 SPI_MISO=PA_6 SPI_SCK =PA_5 SPI_CS =PB_6 SPI_CS STM32F030F4, PB1 */ #include "mbed.h" #include "ssd1306.h" #include "standard_font.h" // 8, 6 (21 ) #include "bold_font.h" // 8, 8 (16 ) #include "russian_font.h" // experimental // LCD Assistant: Byte orientation - horizontal, const unsigned char habr [] = { , }; SSD1306 oled(PB_1 /* cs */, PA_4 /* reset */, PA_3 /* dc */, SPI_SCK /* clock */, SPI_MOSI /* data */); int main() { oled.initialise(); oled.clear(); oled.set_contrast(100); // 255 max contrast oled.drawBitmap(0, 0, habr, 128, 64, 1); oled.update(); } // EOF I compile, download the binary firmware file, upload it to the controller using the ST-Link Utility and get the desired result. Unfortunately, there are no problems worthy of description.
However, I managed to make a mistake - I made two mistakes in setting the board. For some reason, pulled the NRST (reset, active level - low) to the ground. And the distance between the combs made such that the board is not normally inserted into the breadboard, only with the application of a pair of gentle and physical strength.
Total
The budget 32-bit ARM microcontroller STM32F030F4P6 costs just over half a dollar. At the same time - 4 kilobytes of RAM and 16 - flash. Binding - probably another 20 rubles, but it can be reduced by removing all the "extra" around the pin BOOT0. The mbed development environment is much easier to learn for a beginner when compared to the same IAR, Keil or Coocox, but it does not suffer from excessive primitivism of the Arduino IDE. In addition, only the ST-Link Utility should be installed on the local computer, no fussing with compilers is excluded.
I summarize: very much. I consider it possible and necessary to recommend mbed for mastering beginners in the field of microcontrollers. TSSOP soldering is not necessary, you can purchase a Nucleo board or any other supported, up to cheap “minimal” Chinese handicrafts for $ 3.8.
Source: https://habr.com/ru/post/258965/
All Articles