Using Arduino as a component of Wolfram SystemModeler
Translation of the Leonardo Laguna Ruiz and Johan Rhodin post " Using Arduinos as SystemModeler Components ".
Download the file with the models discussed in the post here .
I express my deep gratitude to Kirill Guzenko for his help in translating.
With the new free ModelPlug library for Wolfram SystemModeler, you can connect Arduino for modeling in SystemModeler . Arduino easily mates with input and output components, so you can safely turn them on in SystemModeler models to control, say, light bulbs, sensors, switches, start servos, and the like. Using the ModelPlug library, you can freely combine software and hardware components in modeling and use the Arduino as a fee for data collection.
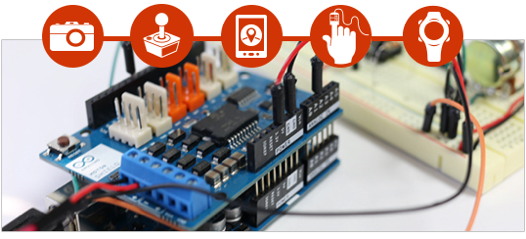
After downloading the library from the SystemModeler Library Store, you should install it; all you need is to double click on the package and accept the license agreement. With this library you can connect any Firmata-compatible cards to the SystemModeler . That is any Arduino boards.
In this post I used Arduino Uno. The simplest example I could come up with is the blinking of the LED that is on the board.
')
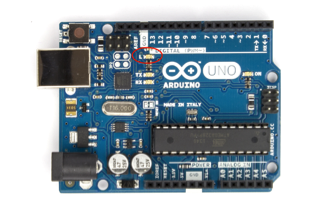
Integrated Arduino Uno LED highlighted in red
To do this, I created a simple model in which the logical signal is transmitted to the 13th pin, which corresponds to the LED. The flashing frequency of the LED corresponds to the frequency of the signal.
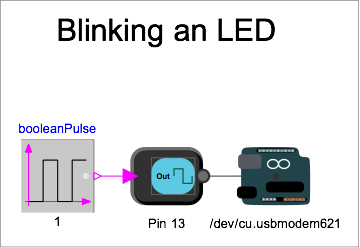
Model in SystemModeler that uses ModelPlug components — digital contact and Arduino
Then you can place the LED on the prototype board and connect it to the ninth Arduino contact:

Connection diagram of the external LED to the ninth contact Arduino Uno
If you connect a sine wave to the analog output of the board, the signal from the actual values is converted into voltage, which must be applied to the contact of the LED.
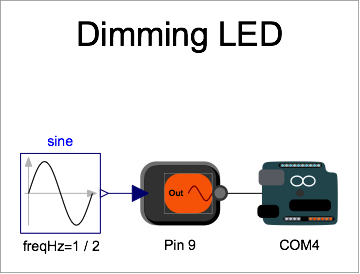
Sine wave as LED input
You can see how the LED shines at full brightness, then does not shine at all, changing the brightness of the sine wave. And all this does not require any "coding under the Arduino."
The image below shows four different options: in the first we connect the simulated input to the simulated output, in the second the signal from the model is connected to the hardware (as shown in the two previous examples), in the third the signal from the hardware is connected to the model, in the fourth - all components are hardware.

Below in the table I gave four options.
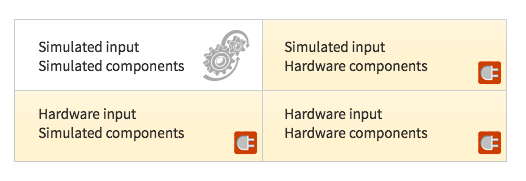
For each option, the ModelPlug library will be very useful.
The first option, when the input and output are models, is applied immediately after installing SystemModeler , and in most cases is all that is needed. That is why I did not select it in the table. If the input and output are hardware components, then they can be controlled and the signals processed / filtered through SystemModeler . In my opinion, the most interesting option is when some components are simulated, while others are represented in physical embodiment. Consider a few examples where components are simulated, and data comes from physical devices.
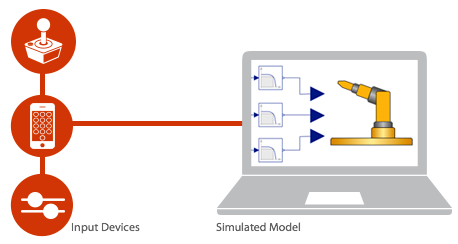
Then I set up my Uno board to read data from the 14th contact. I connected a photosensitive resistor, which will determine the illumination.
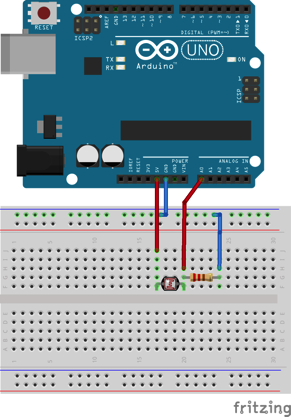
Uno board with photoresistor connected to analog input
In my model in SystemModeler, I connect this analog signal from the 14th pin to another component.

This component will receive values from the photosensitive resistor and compare them with the threshold value. If the value is greater than 0.02 and the simulation time exceeds 5 seconds, the simulation will end.

Comparison of the light value with the threshold, the result is the answer to the question - will the simulation be completed?
If I briefly close the photosensitive resistor with my hand, it will stop receiving light, the value will be less than 0.02 and the simulation will end.
Here is an example when physical devices are presented at the input and output: instead of using a signal from a photosensitive resistor to complete the simulation, I can use a low-pass filter from SystemModeler . Then it should be scaled so that the servo can rotate between -90 ° and 90 °. When I close the photosensitive resistor with my hand, it turns in one direction, and if not, in the other.

Analog signal that is fed to the servo through software components
The previous example shows that communication through ModelPlug can be implemented not only between some hardware systems - you can use components that are specified as models. Instead of connecting resistors and capacitors to filter the low frequencies, or instead of writing a program that filters the signal, I use the filter model. This greatly accelerates prototyping.
Consider a more illustrative example. Take a larger software model and connect it with an analog input. We will use an inverted pendulum model that rolls on a cart. The system consists of the engine, mechanisms, three-dimensional components of the pendulum and carts, and all of them are software components. Connect to this model the signal from the accelerometer, which is connected to the Arduino. In the model below, the analog signal is from the left. The first high-pass filter will filter the stationary values of the signal, and the low-pass filter will smooth the signal.

At the top of the pendulum we place a power component that converts an analog signal to a force that is applied to the top of the pendulum.
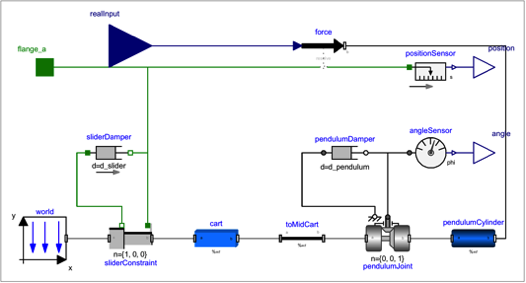
Mechanical system with force applied
And finally, let's connect the accelerometer to the analog contact.

Accelerometer connected to an inverted pendulum
Now, if you quickly move the accelerometer back and forth, then interference will occur, and the pendulum control system will have to try to adapt. I wonder if it will be possible so quickly to move the pendulum back and forth to turn it over?
The ModelPlug library is free and can be downloaded from the SystemModeler Library Store . It works on Mac, Windows and Linux.
You can try a trial version of SystemModeler . There are also options with a license for students or for home use . All the equipment presented in this article fits into a budget of $ 50.
Download the file with the models discussed in the post here .
I express my deep gratitude to Kirill Guzenko for his help in translating.
With the new free ModelPlug library for Wolfram SystemModeler, you can connect Arduino for modeling in SystemModeler . Arduino easily mates with input and output components, so you can safely turn them on in SystemModeler models to control, say, light bulbs, sensors, switches, start servos, and the like. Using the ModelPlug library, you can freely combine software and hardware components in modeling and use the Arduino as a fee for data collection.

After downloading the library from the SystemModeler Library Store, you should install it; all you need is to double click on the package and accept the license agreement. With this library you can connect any Firmata-compatible cards to the SystemModeler . That is any Arduino boards.
In this post I used Arduino Uno. The simplest example I could come up with is the blinking of the LED that is on the board.
')

Integrated Arduino Uno LED highlighted in red
To do this, I created a simple model in which the logical signal is transmitted to the 13th pin, which corresponds to the LED. The flashing frequency of the LED corresponds to the frequency of the signal.

Model in SystemModeler that uses ModelPlug components — digital contact and Arduino
Then you can place the LED on the prototype board and connect it to the ninth Arduino contact:

Connection diagram of the external LED to the ninth contact Arduino Uno
If you connect a sine wave to the analog output of the board, the signal from the actual values is converted into voltage, which must be applied to the contact of the LED.

Sine wave as LED input
You can see how the LED shines at full brightness, then does not shine at all, changing the brightness of the sine wave. And all this does not require any "coding under the Arduino."
The image below shows four different options: in the first we connect the simulated input to the simulated output, in the second the signal from the model is connected to the hardware (as shown in the two previous examples), in the third the signal from the hardware is connected to the model, in the fourth - all components are hardware.

Below in the table I gave four options.

For each option, the ModelPlug library will be very useful.
The first option, when the input and output are models, is applied immediately after installing SystemModeler , and in most cases is all that is needed. That is why I did not select it in the table. If the input and output are hardware components, then they can be controlled and the signals processed / filtered through SystemModeler . In my opinion, the most interesting option is when some components are simulated, while others are represented in physical embodiment. Consider a few examples where components are simulated, and data comes from physical devices.

Then I set up my Uno board to read data from the 14th contact. I connected a photosensitive resistor, which will determine the illumination.

Uno board with photoresistor connected to analog input
In my model in SystemModeler, I connect this analog signal from the 14th pin to another component.

This component will receive values from the photosensitive resistor and compare them with the threshold value. If the value is greater than 0.02 and the simulation time exceeds 5 seconds, the simulation will end.

Comparison of the light value with the threshold, the result is the answer to the question - will the simulation be completed?
If I briefly close the photosensitive resistor with my hand, it will stop receiving light, the value will be less than 0.02 and the simulation will end.
Here is an example when physical devices are presented at the input and output: instead of using a signal from a photosensitive resistor to complete the simulation, I can use a low-pass filter from SystemModeler . Then it should be scaled so that the servo can rotate between -90 ° and 90 °. When I close the photosensitive resistor with my hand, it turns in one direction, and if not, in the other.

Analog signal that is fed to the servo through software components
The previous example shows that communication through ModelPlug can be implemented not only between some hardware systems - you can use components that are specified as models. Instead of connecting resistors and capacitors to filter the low frequencies, or instead of writing a program that filters the signal, I use the filter model. This greatly accelerates prototyping.
Consider a more illustrative example. Take a larger software model and connect it with an analog input. We will use an inverted pendulum model that rolls on a cart. The system consists of the engine, mechanisms, three-dimensional components of the pendulum and carts, and all of them are software components. Connect to this model the signal from the accelerometer, which is connected to the Arduino. In the model below, the analog signal is from the left. The first high-pass filter will filter the stationary values of the signal, and the low-pass filter will smooth the signal.

At the top of the pendulum we place a power component that converts an analog signal to a force that is applied to the top of the pendulum.

Mechanical system with force applied
And finally, let's connect the accelerometer to the analog contact.

Accelerometer connected to an inverted pendulum
Now, if you quickly move the accelerometer back and forth, then interference will occur, and the pendulum control system will have to try to adapt. I wonder if it will be possible so quickly to move the pendulum back and forth to turn it over?
The ModelPlug library is free and can be downloaded from the SystemModeler Library Store . It works on Mac, Windows and Linux.
You can try a trial version of SystemModeler . There are also options with a license for students or for home use . All the equipment presented in this article fits into a budget of $ 50.
Source: https://habr.com/ru/post/258599/
All Articles