Animation of characters in Blender 3D is just

The world of open source does not stand still and is constantly evolving. Many articles have already been written about Blender 3D , but besides Blender, there are many more useful and free programs. One of them is MakeHuman . On Habré mentions about it are available, but there is no information on it. I suggest you look under the cut and see that the animation of the characters in the MakeHuman + Blender3D bundle is really simple. Caution, a lot of pictures.
Training
Since Today's topic is connected with the creation of animation, then we start with a little preparation. Download MakeHuman . To date, the current version 1.0.2. Unpack the archive in any folder. Next, download Blender tools from the same page and unpack the contents of the archive. This archive contains four folders: mhx_importer, makewalk, maketarget, makeclothes. All these folders need to be copied to where Blender can find them. Depending on the operating system, these folders are as follows:
- Windows 7,8: C: \ Users \% username% \ AppData \ Roaming \ Blender Foundation \ Blender \ 2.6x \ scripts \ addons
- Windows XP: C: \ Documents and Settings \% username% \ Application Data \ Blender Foundation \ Blender \ 2.6x \ scripts \ addons
- Vista: C: \ Program Files \ Blender Foundation \ Blender \% blenderversion% \ scripts \ addons (at least for blender 2.69)
- Linux: /home/$user/.blender/$version/scripts/addons
Launch Blender and go to settings (Ctrl + Alt + U).
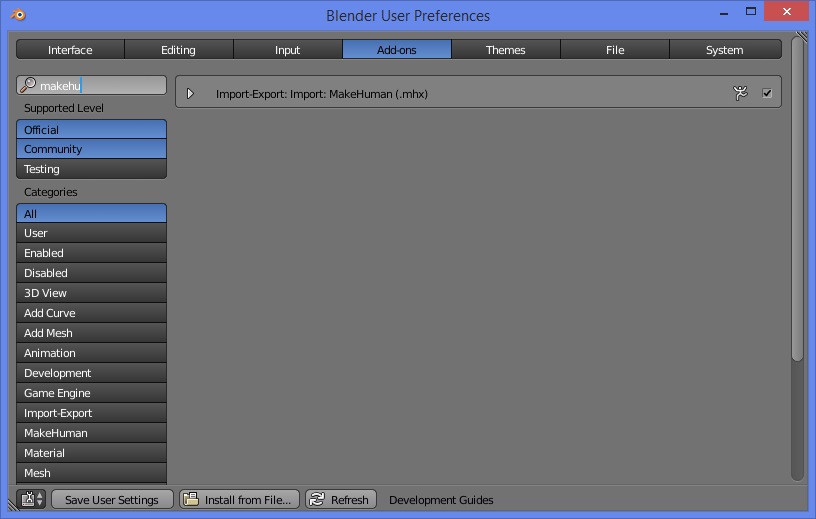
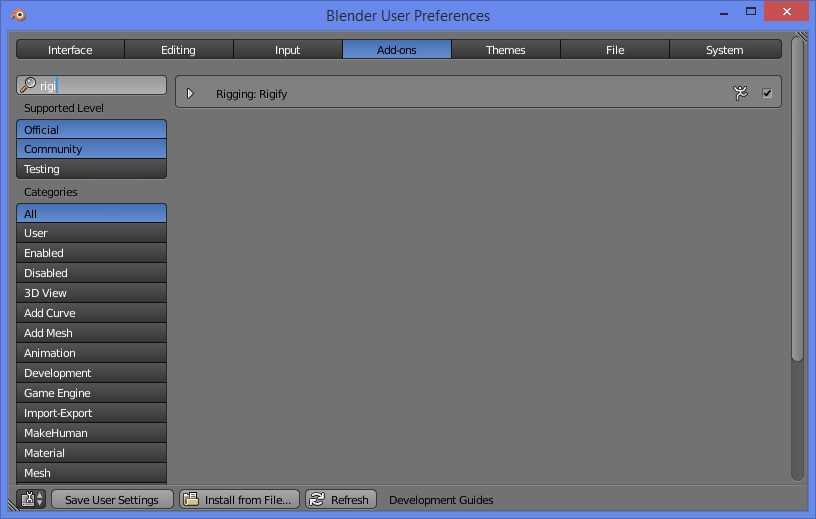
In additions, you should have the MakeHuman item, when you select which, you will see three additions that you need to activate by ticking.
')

You also need to activate the Import-Export Make Human add-on:
And Rigify:
The last thing you need to do in the settings is to put a check mark next to Auto Run Python Scripts (necessary for the import script to work).

Save the settings by clicking Save User Settings.
Character simulation
Run makehuman:

I must say that the Russian language is included in the settings.
MakeHuman is a generator of male and female characters. According to the pictograms and inscriptions, I think it is clear which slider is responsible for which part of the human body.
In the “Modeling” tab of the character, you can make it old, change the skin color, make him long arms, legs, etc.
In the "Geometry" tab of the character, you can put it on, add hair, teeth, eyebrows, eyelids, tongue and other necessary organs (if required).
For example, I made such a nice young man.

Now, you need to add bones to it for animation.
Go to the Pose-Animate tab and select any bones you like. I chose the bones "Basic."

Next, we export our character in a format that Blender understands. File-> Export, select everything as in the screenshot:
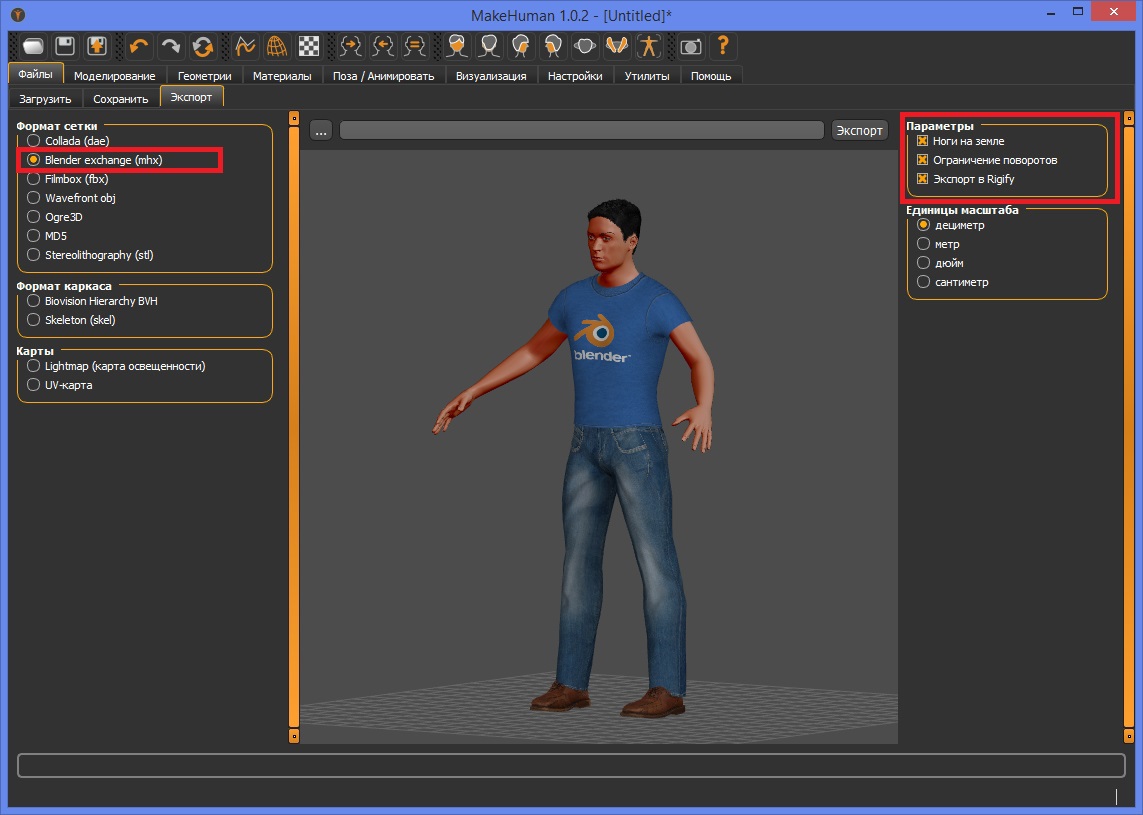
In the middle of the window, there is a button with three dots, which allows you to select the folder to save and the file name. Save our character and go to Blender.
Animation
In Blender, remove everything from the scene and go to the File-Import-> MakeHuman menu:
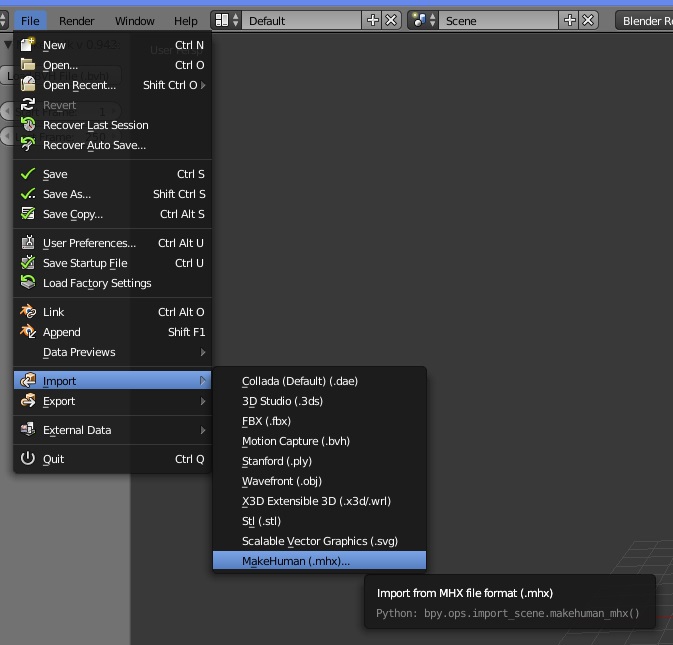
We are looking for a previously saved file and select it.

In principle, the character with all the bones and manipulators is ready. You can move parts of the body and already do the animation in manual. But this is not our method and we will go further.
Blender supports the bvh animation format. This animation is mainly obtained using Motion Capture. On the Internet a lot of files with the finished animation. We'll take an animation from here . Download the archive Zip file for BVH directories 01-09 (45 MB). and unpack.
Make sure that our character is selected in Blender and in the so-called “T” window, select the Misc tab and press the Load And Retarget button.

In the file selection window that opens, select any file with animation bvh that we liked, which we downloaded earlier.
And now you can enjoy our animation by clicking the Play button.

Some useful stuff
1. MakeHuman, when exporting, saves the character file to a file with the mhx extension and next creates the textures folder of which the eye, skin, etc. textures are located. You can always finish something special. For example tattoos or scars. UV he also creates a UV scan.
2. Once you have accumulated a lot of files with bhv animations, it becomes difficult to navigate them all. Naturally, you want to have some kind of previewer. And he is. Called bvhacker, is a free and open source program and lives here . Also, with the help of it, you can correct and adjust the animation.
That's all for today, I hope the information will be useful to someone.
In the next article I will talk about how to create an animation using a camera and motion capture in blender.
Source: https://habr.com/ru/post/258587/
All Articles