Kubernetes Basics
In this publication, I wanted to tell you about an interesting, but unfairly little described on Habré, container management system Kubernetes.
Kubernetes is an open source project designed to manage a cluster of Linux containers as a single system. Kubernetes manages and runs Docker containers on a large number of hosts, and also provides co-location and replication of a large number of containers. The project was launched by Google and is now supported by many companies, including Microsoft, RedHat, IBM and Docker.
Google has been using container technology for over a decade. She started with the launch of more than 2 billion containers in one week. With the help of the Kubernetes project, the company shares its experience in creating an open platform designed for scalable container launch.
')
The project has two objectives. If you are using Docker containers, the next question is how to scale and run containers at once on a large number of Docker hosts, and also how to balance them. The project proposes a high-level API that defines a logical grouping of containers, which allows defining pools of containers, balancing the load, and also specifying their location.
Nodes ( node.md ): A node is a machine in a Kubernetes cluster.
Pods ( pods.md ): Pod is a group of containers with shared partitions running as a unit.
Replication Controllers ( replication-controller.md ): replication controller ensures that a certain number of "replicas" pods will be started at any time.
Services ( services.md ): A service in Kubernetes is an abstraction that defines a logical, integrated set of pods and access policies for them.
Volumes ( volumes.md ): Volume (section) is a directory, possibly with data in it, which is available in a container.
Labels ( labels.md ): Labels are key / value pairs that are attached to objects, such as pods. Labels can be used to create and select sets of objects.
Kubectl Command Line Interface ( kubectl.md ): kubectl command line interface for managing Kubernetes.
A working Kubernetes cluster includes an agent running on nodes (kubelet) and wizard components (APIs, scheduler, etc), on top of a solution with distributed storage. The above diagram shows the desired, ultimately, state, although some things are still being worked on, for example: how to make the kubelet (all components, in fact) run independently in a container, which will make the scheduler 100% connectable.
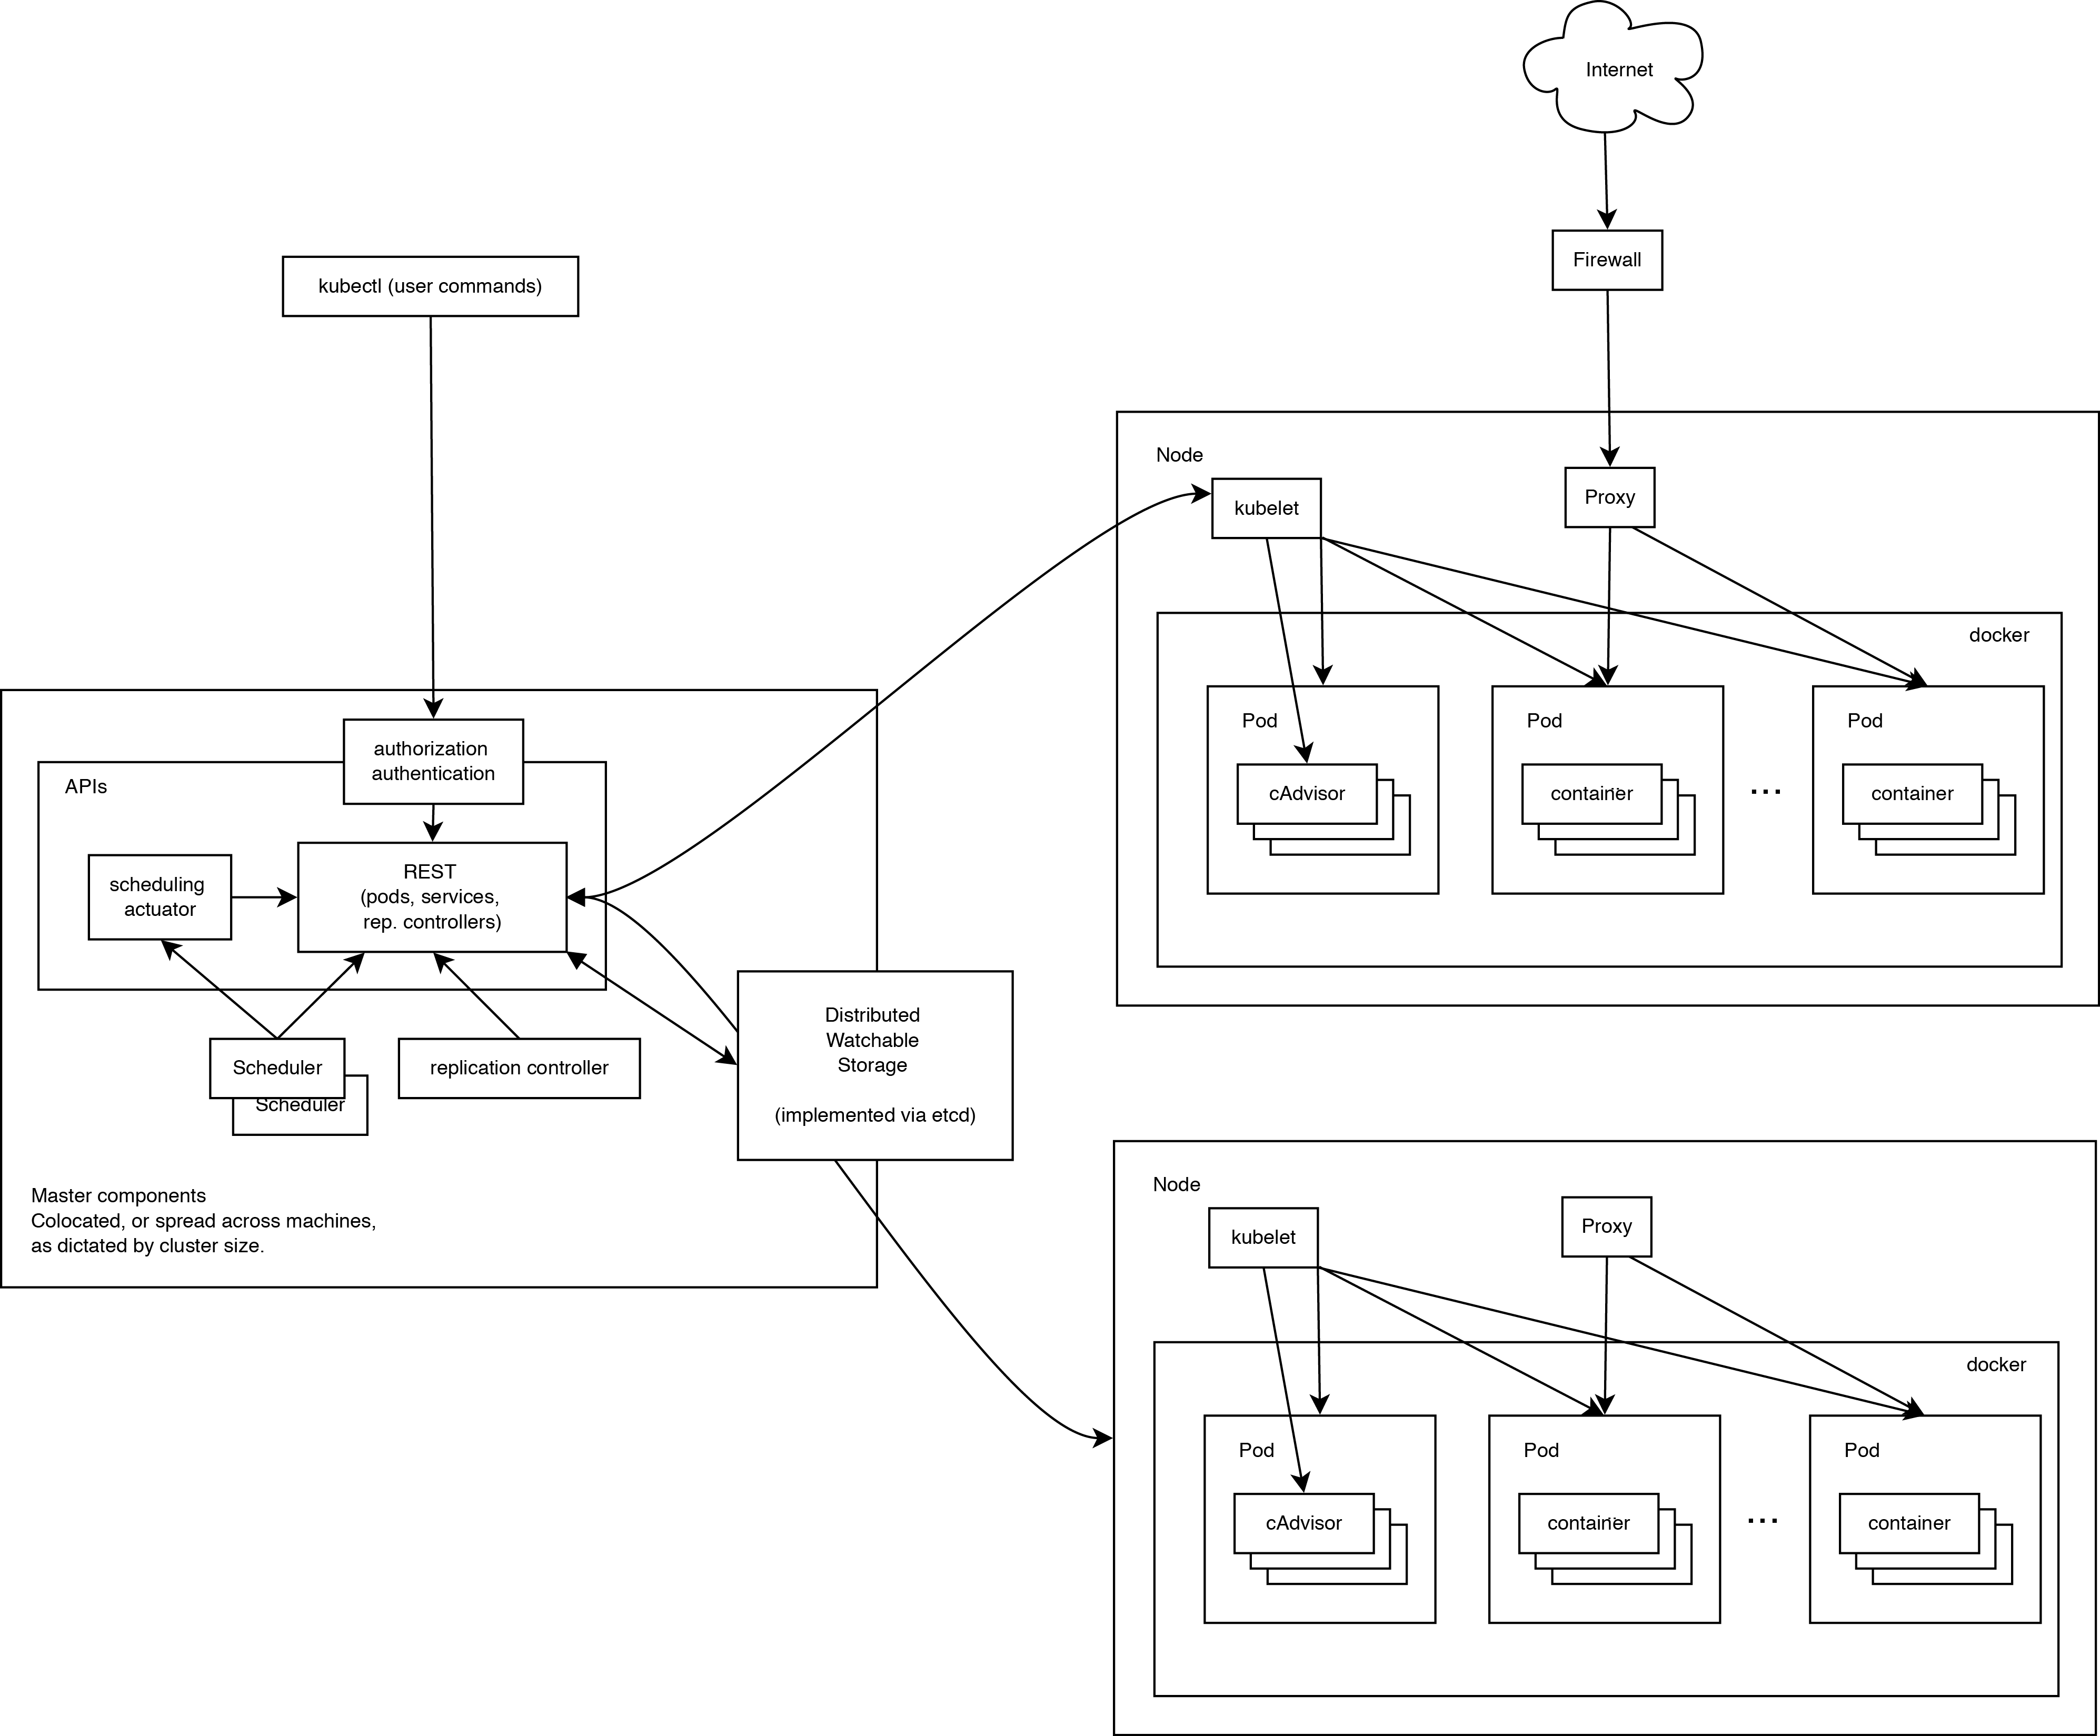
When looking at the system architecture, we can break it down into services that run on each node and cluster management level services. On each Kubernetes node, the services necessary for managing the node on the part of the wizard and for launching applications are launched. Of course, Docker is launched on each node. Docker provides loading of images and launch of containers.
Kubelet manages pods of their containers, images, sections, etc.
Also, a simple proxy balancer is launched on each node. This service runs on each node and is configured in the Kubernetes API. Kube-Proxy can perform the simplest redirection of TCP and UDP (round robin) streams between a set of backends.
The Kubernetes control system is divided into several components. At the moment, they all run on the master node, but soon it will be changed to enable the creation of a fault-tolerant cluster. These components work together to provide a unified view of the cluster.
The status of the wizard is stored in the etcd instance. This ensures reliable storage of configuration data and timely notification of other components of state changes.
Kubernetes API provides the operation of the api-server. It is designed to be a CRUD server with embedded business logic implemented in individual components or plug-ins. It mainly handles REST operations, checking them and updating the corresponding objects in etcd (and eventually in other repositories).
Scheduler binds unallocated pods to the nodes via the / binding API call. Scheduler connect; Support for multiple schedulers and custom schedulers is planned.
All other cluster-level functions are represented in the Controller Manager. For example, nodes are detected, managed, and controlled by node controller. This entity can eventually be divided into separate components to make them independently connectable.
ReplicationController is a mechanism based on the pod API. Ultimately, it is planned to transfer it to the general mechanism of the plug-in when it is implemented.
Ubuntu-server 14.10 was chosen as the platform for the example of configuration as the simplest for the example and, at the same time, allowing to demonstrate the basic cluster settings.
To create a test cluster, three machines will be used to create nodes and a separate machine for remote installation. You can not allocate a separate machine and install with one of the nodes.
List of used machines:
Docker installation can be done under the article in the official sources :
Additional setup Docker after installation is not needed, because will be generated by the Kubernetes installation script.
Install bridge-utils:
Perform on the machine with which the installation script will run.
If keys are not yet created, create them:
Copy the keys to remote machines, after making sure that they have the necessary user, in our case core.
Next we will install Kubernetes directly. To do this, first download and unpack the latest available release from GitHub:
Configuring Kubernetes through standard example scripts is completely done before installation is done through configuration files. During installation, we will use the scripts in the folder ./cluster/ubuntu/.
First we change the script ./cluster/ubuntu/build.sh which downloads and prepares the Kubernetes, etcd and flannel binaries needed for installation:
In order to use the latter, at the time of this writing, the release 0.17.0 must be replaced:
On:
And run:
Next, we specify the parameters of the future cluster, for which we edit the ./config-default.sh file:
This completes the setting and you can proceed to the installation.
First of all, you need to inform the system about our ssh-agent and use the ssh-key to do this:
Next, go directly to the installation. To do this, use the script ./kubernetes/cluster/kube-up.sh which needs to indicate that we are using ubuntu.
During installation, the script will require a sudo password for each node. At the end of the installation, check the cluster status and display a list of nodes and addresses of Kubernetes api.
Let's see which nodes and services are present in the new cluster:
We see a list of installed nodes in the Ready state and two pre-installed services kubernetes and kubernetes-ro - this is a proxy for direct access to the Kubernetes API. As with any Kubernetes service, kubernetes and kubernetes-ro can be accessed directly at the IP address from any of the nodes.
To start the service, you need to prepare a docker container, on the basis of which the service will be created. In order not to complicate things, the example will use the public nginx container. The obligatory components of the service are Replication Controller, which ensures the neglect of the necessary set of containers (more precisely, pod) and service, which determines which IP address and ports will listen to the service and the rules for distributing requests between the pods.
Any service can be launched in 2 ways: manually and using a config file. Consider both.
Let's start by creating the Replication Controller:
Where:
Let's see what we got:
A Replication Controller was created with the name nginx and the number of replicas equal to 6. Replicas were randomly launched on the nodes, the location of each pod is indicated in the HOST column.
The output may differ from the one given in some cases, for example:
Next, create a service that will use our Replication Controller as a backend.
For http:
And for https:
Where:
Check the result:
To check the neglect, you can go to any of the nodes and run in the console:
In the output of curl we will see the standard welcome page of nginx. Done, the service is running and available.
For this launch method, you need to create configs for Replication Controller and service. Kubernetes accepts configs in yaml and json formats. Yaml is closer to me, so we will use it.
Pre-clean our cluster from the previous experiment:
nginx_rc.yaml
Apply config:
Check the result:
A Replication Controller was created with the name nginx and the number of replicas equal to 6. Replicas were randomly launched on the nodes, the locations of each pods are indicated in the HOST column.
nginx_service.yaml
You may notice that when using the config, several ports can be assigned to one service.
Apply config:
Check the result:
To check the neglect, you can go to any of the nodes and run in the console:
In the output of curl we will see the standard welcome page of nginx.
As a conclusion, I want to describe a couple of important points about which I had to falter when designing a system. They were connected with the work of kube-proxy, the very module that allows you to turn a disparate set of elements into a service.
PORTAL_NET. The essence itself is interesting, I suggest to get acquainted with how it is implemented.
A brief excavation led me to the realization of a simple but effective model, let's look at the iptables-save output:
All requests to the IP address of the service are wrapped in iptables on the port on which kube-proxy listens. One problem arises in this connection: Kubernetes, in itself, does not solve the problem of communication with the user. Therefore it is necessary to solve this question by external means, for example:
SOURCE IP Same. when setting up the nginx service I had to face an interesting problem. It looked like a line in the manual: “Using the kite-proxy obscures of the access-IP of a packet accessing service.” Literally - when using kube-proxy, it hides the source address of the packet, which means that all processing based on source-IP will have to be carried out before using kube-proxy.
That's all, thank you for your attention
Unfortunately, all the information that I want to convey, can not fit in one article.
What is Kubernetes?
Kubernetes is an open source project designed to manage a cluster of Linux containers as a single system. Kubernetes manages and runs Docker containers on a large number of hosts, and also provides co-location and replication of a large number of containers. The project was launched by Google and is now supported by many companies, including Microsoft, RedHat, IBM and Docker.
Google has been using container technology for over a decade. She started with the launch of more than 2 billion containers in one week. With the help of the Kubernetes project, the company shares its experience in creating an open platform designed for scalable container launch.
')
The project has two objectives. If you are using Docker containers, the next question is how to scale and run containers at once on a large number of Docker hosts, and also how to balance them. The project proposes a high-level API that defines a logical grouping of containers, which allows defining pools of containers, balancing the load, and also specifying their location.
Kubernetes concepts
Nodes ( node.md ): A node is a machine in a Kubernetes cluster.
Pods ( pods.md ): Pod is a group of containers with shared partitions running as a unit.
Replication Controllers ( replication-controller.md ): replication controller ensures that a certain number of "replicas" pods will be started at any time.
Services ( services.md ): A service in Kubernetes is an abstraction that defines a logical, integrated set of pods and access policies for them.
Volumes ( volumes.md ): Volume (section) is a directory, possibly with data in it, which is available in a container.
Labels ( labels.md ): Labels are key / value pairs that are attached to objects, such as pods. Labels can be used to create and select sets of objects.
Kubectl Command Line Interface ( kubectl.md ): kubectl command line interface for managing Kubernetes.
Kubernetes architecture
A working Kubernetes cluster includes an agent running on nodes (kubelet) and wizard components (APIs, scheduler, etc), on top of a solution with distributed storage. The above diagram shows the desired, ultimately, state, although some things are still being worked on, for example: how to make the kubelet (all components, in fact) run independently in a container, which will make the scheduler 100% connectable.
Noda Kubernetes
When looking at the system architecture, we can break it down into services that run on each node and cluster management level services. On each Kubernetes node, the services necessary for managing the node on the part of the wizard and for launching applications are launched. Of course, Docker is launched on each node. Docker provides loading of images and launch of containers.
Kubelet
Kubelet manages pods of their containers, images, sections, etc.
Kube-Proxy
Also, a simple proxy balancer is launched on each node. This service runs on each node and is configured in the Kubernetes API. Kube-Proxy can perform the simplest redirection of TCP and UDP (round robin) streams between a set of backends.
Kubernetes Management Components
The Kubernetes control system is divided into several components. At the moment, they all run on the master node, but soon it will be changed to enable the creation of a fault-tolerant cluster. These components work together to provide a unified view of the cluster.
etcd
The status of the wizard is stored in the etcd instance. This ensures reliable storage of configuration data and timely notification of other components of state changes.
Kubernetes API Server
Kubernetes API provides the operation of the api-server. It is designed to be a CRUD server with embedded business logic implemented in individual components or plug-ins. It mainly handles REST operations, checking them and updating the corresponding objects in etcd (and eventually in other repositories).
Scheduler
Scheduler binds unallocated pods to the nodes via the / binding API call. Scheduler connect; Support for multiple schedulers and custom schedulers is planned.
Kubernetes Controller Manager Server
All other cluster-level functions are represented in the Controller Manager. For example, nodes are detected, managed, and controlled by node controller. This entity can eventually be divided into separate components to make them independently connectable.
ReplicationController is a mechanism based on the pod API. Ultimately, it is planned to transfer it to the general mechanism of the plug-in when it is implemented.
Cluster Configuration Example
Ubuntu-server 14.10 was chosen as the platform for the example of configuration as the simplest for the example and, at the same time, allowing to demonstrate the basic cluster settings.
To create a test cluster, three machines will be used to create nodes and a separate machine for remote installation. You can not allocate a separate machine and install with one of the nodes.
List of used machines:
- Conf
- Node1: 192.168.0.10 - master, minion
- Node2: 192.168.0.11 - minion
- Node3: 192.168.0.12 - minion
Node preparation
Requirements to run:
- Docker version 1.2+ and bridge-utils are installed on all nodes
- All the machines are connected with each other, there is no need to access the Internet (in this case it is necessary to use the local docker registry)
- All nodes can be entered without entering a login / password using ssh-keys
Installing software on nodes
Docker installation can be done under the article in the official sources :
node% sudo apt-get update $ sudo apt-get install wget node% wget -qO- https://get.docker.com/ | sh Additional setup Docker after installation is not needed, because will be generated by the Kubernetes installation script.
Install bridge-utils:
node% sudo apt-get install bridge-utils Adding ssh keys
Perform on the machine with which the installation script will run.
If keys are not yet created, create them:
conf% ssh-keygen Copy the keys to remote machines, after making sure that they have the necessary user, in our case core.
conf% ssh-copy-id core@192.168.0.10 conf% ssh-copy-id core@192.168.0.11 conf% ssh-copy-id core@192.168.0.12 Kubernetes installation
Next we will install Kubernetes directly. To do this, first download and unpack the latest available release from GitHub:
conf% wget https://github.com/GoogleCloudPlatform/kubernetes/releases/download/v0.17.0/kubernetes.tar.gz conf% tar xzf ./kubernetes.tar.gz conf% cd ./kubernetes Customization
Configuring Kubernetes through standard example scripts is completely done before installation is done through configuration files. During installation, we will use the scripts in the folder ./cluster/ubuntu/.
First we change the script ./cluster/ubuntu/build.sh which downloads and prepares the Kubernetes, etcd and flannel binaries needed for installation:
conf% vim ./cluster/ubuntu/build.sh In order to use the latter, at the time of this writing, the release 0.17.0 must be replaced:
# k8s echo "Download kubernetes release ..." K8S_VERSION="v0.15.0" On:
# k8s echo "Download kubernetes release ..." K8S_VERSION="v0.17.0" And run:
conf% cd ./cluster/ubuntu/ conf% ./build.sh # , . Next, we specify the parameters of the future cluster, for which we edit the ./config-default.sh file:
## Contains configuration values for the Ubuntu cluster # , MASTER- # <user_1@ip_1> <user_2@ip_2> <user_3@ip_3> - # ssh- export nodes="core@192.168.0.10 core@192.168.0.10 core@192.168.0.10" # : a(master) i(minion) ai(master minion), , . export roles=("ai" "i" "i") # export NUM_MINIONS=${NUM_MINIONS:-3} # IP- , . # , , .. . # IP- iptables . export PORTAL_NET=192.168.3.0/24 # flannel. #flannel 24 , Docker-. # PORTAL_NET export FLANNEL_NET=172.16.0.0/16 # Admission Controllers . ADMISSION_CONTROL=NamespaceLifecycle,NamespaceAutoProvision,LimitRanger,ResourceQuota # Docker. # --insecure-registry . DOCKER_OPTS="" This completes the setting and you can proceed to the installation.
Installation
First of all, you need to inform the system about our ssh-agent and use the ssh-key to do this:
eval `ssh-agent -s` ssh-add /// Next, go directly to the installation. To do this, use the script ./kubernetes/cluster/kube-up.sh which needs to indicate that we are using ubuntu.
conf% cd ../ conf% KUBERNETES_PROVIDER=ubuntu ./kube-up.sh During installation, the script will require a sudo password for each node. At the end of the installation, check the cluster status and display a list of nodes and addresses of Kubernetes api.
Sample script output
Starting cluster using provider: ubuntu ... calling verify-prereqs ... calling kube-up Deploying master and minion on machine 192.168.0.10 < > [sudo] password to copy files and start node: etcd start/running, process 16384 Connection to 192.168.0.10 closed. Deploying minion on machine 192.168.0.11 < > [sudo] password to copy files and start minion: etcd start/running, process 12325 Connection to 192.168.0.11 closed. Deploying minion on machine 192.168.0.12 < > [sudo] password to copy files and start minion: etcd start/running, process 10217 Connection to 192.168.0.12 closed. Validating master Validating core@192.168.0.10 Validating core@192.168.0.11 Validating core@192.168.0.12 Kubernetes cluster is running. The master is running at: http://192.168.0.10 ... calling validate-cluster Found 3 nodes. 1 NAME LABELS STATUS 2 192.168.0.10 <none> Ready 3 192.168.0.11 <none> Ready 4 192.168.0.12 <none> Ready Validate output: NAME STATUS MESSAGE ERROR etcd-0 Healthy {"action":"get","node":{"dir":true,"nodes":[{"key":"/coreos.com","dir":true,"modifiedIndex":11,"createdIndex":11},{"key":"/registry","dir":true,"modifiedIndex":5,"createdIndex":5}],"modifiedIndex":5,"createdIndex":5}} nil controller-manager Healthy ok nil scheduler Healthy ok nil Cluster validation succeeded Done, listing cluster services: Kubernetes master is running at http://192.168.0.10:8080 Let's see which nodes and services are present in the new cluster:
conf% cp ../kubernetes/platforms/linux/amd64/kubectl /opt/bin/ conf% /opt/bin/kubectl get services,minions -s "http://192.168.0.10:8080" NAME LABELS SELECTOR IP PORT(S) kubernetes component=apiserver,provider=kubernetes <none> 192.168.3.2 443/TCP kubernetes-ro component=apiserver,provider=kubernetes <none> 192.168.3.1 80/TCP NAME LABELS STATUS 192.168.0.10 <none> Ready 192.168.0.11 <none> Ready 192.168.0.12 <none> Ready We see a list of installed nodes in the Ready state and two pre-installed services kubernetes and kubernetes-ro - this is a proxy for direct access to the Kubernetes API. As with any Kubernetes service, kubernetes and kubernetes-ro can be accessed directly at the IP address from any of the nodes.
Running a test service
To start the service, you need to prepare a docker container, on the basis of which the service will be created. In order not to complicate things, the example will use the public nginx container. The obligatory components of the service are Replication Controller, which ensures the neglect of the necessary set of containers (more precisely, pod) and service, which determines which IP address and ports will listen to the service and the rules for distributing requests between the pods.
Any service can be launched in 2 ways: manually and using a config file. Consider both.
Start the service manually
Let's start by creating the Replication Controller:
conf% /opt/bin/kubectl run-container nginx --port=80 --port=443 --image=nginx --replicas=6 -s "http://192.168.0.10:8080" Where:
- nginx is the name of the future rc
- --port - ports on which rc containers will listen
- --image - the image from which the containers will be launched
- --replicas = 6 - number of replicas
Let's see what we got:
/opt/bin/kubectl get pods,rc -s "http://192.168.0.10:8080" Conclusion
POD IP CONTAINER(S) IMAGE(S) HOST LABELS STATUS CREATED MESSAGE nginx-3gii4 172.16.58.4 192.168.0.11/192.168.0.11 run-container=nginx Running 9 seconds nginx nginx Running 9 seconds nginx-3xudc 172.16.62.6 192.168.0.10/192.168.0.10 run-container=nginx Running 9 seconds nginx nginx Running 8 seconds nginx-igpon 172.16.58.6 192.168.0.11/192.168.0.11 run-container=nginx Running 9 seconds nginx nginx Running 8 seconds nginx-km78j 172.16.58.5 192.168.0.11/192.168.0.11 run-container=nginx Running 9 seconds nginx nginx Running 8 seconds nginx-sjb39 172.16.83.4 192.168.0.12/192.168.0.12 run-container=nginx Running 9 seconds nginx nginx Running 8 seconds nginx-zk1wv 172.16.62.7 192.168.0.10/192.168.0.10 run-container=nginx Running 9 seconds nginx nginx Running 8 seconds CONTROLLER CONTAINER(S) IMAGE(S) SELECTOR REPLICAS nginx nginx nginx run-container=nginx 6 A Replication Controller was created with the name nginx and the number of replicas equal to 6. Replicas were randomly launched on the nodes, the location of each pod is indicated in the HOST column.
The output may differ from the one given in some cases, for example:
- Part of the pod is in pending state: this means that they have not yet started, you need to wait a bit
- The pod does not have a HOST defined: this means that the scheduler has not yet assigned a node on which the pod will be running.
Next, create a service that will use our Replication Controller as a backend.
For http:
conf% /opt/bin/kubectl expose rc nginx --port=80 --target-port=80 --service-name=nginx-http -s "http://192.168.0.10:8080" And for https:
conf% /opt/bin/kubectl expose rc nginx --port=443 --target-port=443 --service-name=nginx-https -s "http://192.168.0.10:8080" Where:
- rc nginx - the type and name of the resource used (rc = Replication Controller)
- --port - the port on which the service will “listen”
- - target-port - the container port on which requests will be broadcast
- --service-name - future service name
Check the result:
/opt/bin/kubectl get rc,services -s "http://192.168.0.10:8080" Conclusion
CONTROLLER CONTAINER(S) IMAGE(S) SELECTOR REPLICAS nginx nginx nginx run-container=nginx 6 NAME LABELS SELECTOR IP PORT(S) kubernetes component=apiserver,provider=kubernetes <none> 192.168.3.2 443/TCP kubernetes-ro component=apiserver,provider=kubernetes <none> 192.168.3.1 80/TCP nginx-http <none> run-container=nginx 192.168.3.66 80/TCP nginx-https <none> run-container=nginx 192.168.3.172 443/TCP To check the neglect, you can go to any of the nodes and run in the console:
node% curl http://192.168.3.66 In the output of curl we will see the standard welcome page of nginx. Done, the service is running and available.
Starting the service using configs
For this launch method, you need to create configs for Replication Controller and service. Kubernetes accepts configs in yaml and json formats. Yaml is closer to me, so we will use it.
Pre-clean our cluster from the previous experiment:
conf% /opt/bin/kubectl delete services nginx-http nginx-https -s "http://192.168.0.10:8080" conf% /opt/bin/kubectl stop rc nginx -s "http://192.168.0.10:8080" . nginx_rc.yaml
content
apiVersion: v1beta3 kind: ReplicationController # ReplicationController metadata: name: nginx-controller spec: # replicas: 6 selector: name: nginx template: metadata: labels: name: nginx spec: containers: # - name: nginx image: nginx # ports: - containerPort: 80 - containerPort: 443 livenessProbe: # enabled: true type: http # pod' initialDelaySeconds: 30 TimeoutSeconds: 5 # http httpGet: path: / port: 80 portals: - destination: nginx Apply config:
conf% /opt/bin/kubectl create -f ./nginx_rc.yaml -s "http://192.168.0.10:8080" Check the result:
conf% /opt/bin/kubectl get pods,rc -s "http://192.168.0.10:8080" Conclusion
POD IP CONTAINER(S) IMAGE(S) HOST LABELS STATUS CREATED MESSAGE nginx-controller-0wklg 172.16.58.7 192.168.0.11/192.168.0.11 name=nginx Running About a minute nginx nginx Running About a minute nginx-controller-2jynt 172.16.58.8 192.168.0.11/192.168.0.11 name=nginx Running About a minute nginx nginx Running About a minute nginx-controller-8ra6j 172.16.62.8 192.168.0.10/192.168.0.10 name=nginx Running About a minute nginx nginx Running About a minute nginx-controller-avmu8 172.16.58.9 192.168.0.11/192.168.0.11 name=nginx Running About a minute nginx nginx Running About a minute nginx-controller-ddr4y 172.16.83.7 192.168.0.12/192.168.0.12 name=nginx Running About a minute nginx nginx Running About a minute nginx-controller-qb2wb 172.16.83.5 192.168.0.12/192.168.0.12 name=nginx Running About a minute nginx nginx Running About a minute CONTROLLER CONTAINER(S) IMAGE(S) SELECTOR REPLICAS nginx-controller nginx nginx name=nginx 6 A Replication Controller was created with the name nginx and the number of replicas equal to 6. Replicas were randomly launched on the nodes, the locations of each pods are indicated in the HOST column.
nginx_service.yaml
Content
apiVersion: v1beta3 kind: Service metadata: name: nginx spec: publicIPs: - 12.0.0.5 # IP . ports: - name: http port: 80 # targetPort: 80 protocol: TCP - name: https port: 443 targetPort: 443 protocol: TCP selector: name: nginx # ReplicationController You may notice that when using the config, several ports can be assigned to one service.
Apply config:
conf% /opt/bin/kubectl create -f ./nginx_service.yaml -s "http://192.168.0.10:8080" Check the result:
/opt/bin/kubectl get rc,services -s "http://192.168.0.10:8080" Conclusion
CONTROLLER CONTAINER(S) IMAGE(S) SELECTOR REPLICAS nginx-controller nginx nginx name=nginx 6 NAME LABELS SELECTOR IP PORT(S) kubernetes component=apiserver,provider=kubernetes <none> 192.168.3.2 443/TCP kubernetes-ro component=apiserver,provider=kubernetes <none> 192.168.3.1 80/TCP nginx <none> name=nginx 192.168.3.214 80/TCP 12.0.0.5 443/TCP To check the neglect, you can go to any of the nodes and run in the console:
node% curl http://192.168.3.214 node% curl http://12.0.0.5 In the output of curl we will see the standard welcome page of nginx.
Margin notes
As a conclusion, I want to describe a couple of important points about which I had to falter when designing a system. They were connected with the work of kube-proxy, the very module that allows you to turn a disparate set of elements into a service.
PORTAL_NET. The essence itself is interesting, I suggest to get acquainted with how it is implemented.
A brief excavation led me to the realization of a simple but effective model, let's look at the iptables-save output:
-A PREROUTING -j KUBE-PORTALS-CONTAINER -A PREROUTING -m addrtype --dst-type LOCAL -j DOCKER -A OUTPUT -j KUBE-PORTALS-HOST -A OUTPUT ! -d 127.0.0.0/8 -m addrtype --dst-type LOCAL -j DOCKER -A POSTROUTING -s 10.0.42.0/24 ! -o docker0 -j MASQUERADE -A KUBE-PORTALS-CONTAINER -d 10.0.0.2/32 -p tcp -m comment --comment "default/kubernetes:" -m tcp --dport 443 -j REDIRECT --to-ports 46041 -A KUBE-PORTALS-CONTAINER -d 10.0.0.1/32 -p tcp -m comment --comment "default/kubernetes-ro:" -m tcp --dport 80 -j REDIRECT --to-ports 58340 -A KUBE-PORTALS-HOST -d 10.0.0.2/32 -p tcp -m comment --comment "default/kubernetes:" -m tcp --dport 443 -j DNAT --to-destination 172.16.67.69:46041 -A KUBE-PORTALS-HOST -d 10.0.0.1/32 -p tcp -m comment --comment "default/kubernetes-ro:" -m tcp --dport 80 -j DNAT --to-destination 172.16.67.69:58340 All requests to the IP address of the service are wrapped in iptables on the port on which kube-proxy listens. One problem arises in this connection: Kubernetes, in itself, does not solve the problem of communication with the user. Therefore it is necessary to solve this question by external means, for example:
- gcloud - paid development from Google
- bgp - using subnet announcements
- IPVS
- and other options that many
SOURCE IP Same. when setting up the nginx service I had to face an interesting problem. It looked like a line in the manual: “Using the kite-proxy obscures of the access-IP of a packet accessing service.” Literally - when using kube-proxy, it hides the source address of the packet, which means that all processing based on source-IP will have to be carried out before using kube-proxy.
That's all, thank you for your attention
Unfortunately, all the information that I want to convey, can not fit in one article.
Use materials:
Source: https://habr.com/ru/post/258443/
All Articles