Install AirSlax on a virtual machine. Work with WiFi
Somehow I ran BackTrack r5 on VirtualBox, but I couldn’t do anything, because I need a Wi-Fi adapter for it, and I saw the adapter built in my laptop as Ethernet, so it’s impossible to work through it. The monitoring mode on it will not turn on.
Climbing a bunch of sites on the Internet, I did not find anything. I decided to start digging myself. And I did it. I’ll say right away that I didn’t install AirSlax to crack other people's WiFi networks. I needed to find out who is connected to my network, but this is not about now.
I will describe the whole process, namely:
1. Install AirSlax on VirtualBox
2. Preparing a flash drive
3. Configure the virtual machine
4 Work with usb WiFi adapter
')
Those who know how to install AirSlax on VirtualBox can skip this and start reading about setting up a USB WiFi adapter.
Let's start.
By the way, why VirtualBox, and not VMWare?
There are several reasons:
1. I did not fully understand VMWare, but I have experience with VirtualBox.
2. I could not launch AirSlax on VMWare
Let's get started
1.1 Enter a name for the virtual machine
1.2 Linux Type (Required Linux)
1.3 Version, at your discretion, but I chose Linux 2.6 / 3.x 64bit (if you have a 32-bit operating system, then select 32 bit)
Now we specify the amount of memory allocated for the virtual machine.
Specify the number so that in reserve you have a couple of GB left on the main operating system, optimally like this:
- with 4 GB of RAM ~ 2 GB per virtual machine;
- with 8 GB of RAM, ~ 4 GB per virtual machine;
- with 16 GB of RAM, ~ 8 GB per virtual machine;
- with 32 GB or more, it is possible and 8. It is enough for her.
Since the Porteus bootloader is present in AirSlax, installation on a real hard disk is not desirable. This bootloader will break your windows downloader.
Now, if you have not created a flash drive with AirSlax, then I described it here, and if the flash drive has already been created, then proceed to point 3
You can download the image from here . Link leads to Yandex disk.
If you do not believe, then go to the website www.airslax.ru and download from there yourself.
Copy the boot and porteus folders to the USB flash drive. After copying files, go to the boot folder and open the file porteus-installer-windows:
When this window appears, click on any key to install the porteus bootloader to the media. Make sure you do not install the bootloader on your hard disk:
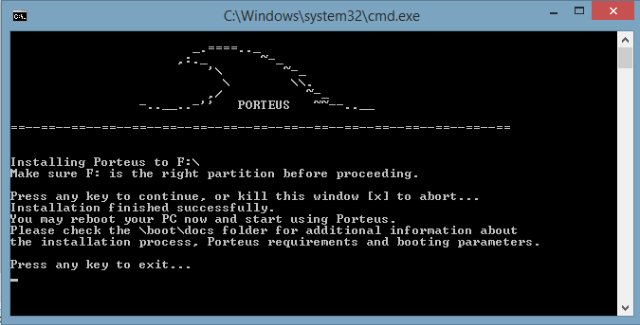
Now again, press any key to exit the installer. That's all, the flash drive is ready and AirSlax is already present on the flash drive.
Now I will explain why you need a flash drive, as mentioned above, Porteus bootloader can ruin your system bootloader, respectively, sticking all the files in iso, you can not run airslax without installing porteus bootloader.
Yes, by the way, on the hard disk account for the virtual machine, select the item “Do not connect a virtual hard disk”. We will do this later.
Somewhere on the Internet, I found an article on how to boot from a flash drive in a virtualbox, maybe even read it on this site, I don’t remember exactly.
In order for VirtualBox to work with a flash drive, you need to record the path to the device, all the information in the vmdk file, how to do it.
To create we need:
1. VBoxManager (vboxmanage.exe is located in the folder with VirtualBOX)
2. Diskpart (system utility for working with disks, disk partitions)
I managed to create a regular bat file in the VirtualBox folder, but I didn’t have enough rights to create a vmdk file, the program required administrative rights, I had to do it via the command line (cmd).
I will describe how to do it via the command line, but if you want to make a bat file, then just copy the lines and edit them a bit to your own.
Open cmd (as administrator).
Enter the following: cd path to VirtualBox (I have this: "C: \ Program Files \ Oracle \ VirtualBox"). Then
VboxManage.exe internalcommands createrawvmdk -filename c: \ vbox \ usb.vmdk -rawdisk \\. \ PhysicalDrive1
I will sign the teams:
VboxManage.exe internalcommands createrawvmdk (this must be rewritten);
- filename (path to save the vmdk file);
- rawdisk (physical disk, flash drive) - how to find out what number, for this we need Diskpart.
Getting Started with Diskpart.
Open another cmd, for this utility administrator rights are not needed.
Enter diskpart, if entered correctly, you will see this window:
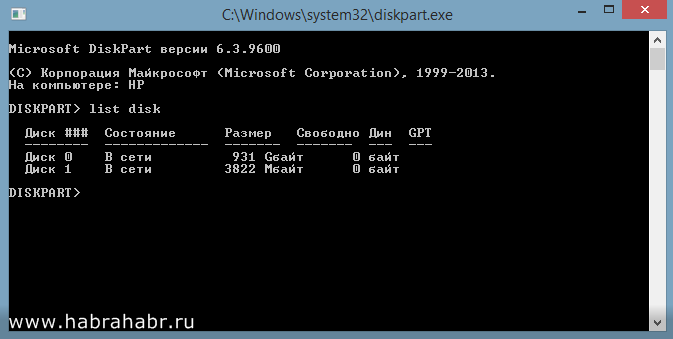
Enter list disk and in the list find the flash drive. Please note, since I have Disk 0 - this is a hard disk, and Disk 1 is a USB flash drive. Since Disk 1 is a flash drive, the command in VboxManager will be:
Switch back to cmd with the command you entered.
VboxManage.exe internalcommands createrawvmdk -filename path for vmdk -rawdisk \\. \ PhysicalDrive1 (in my case 1 is a USB flash drive).
Do not forget to create a folder in which you will save the vmdk file. If everything goes well, you will see
RAW host disk access VMDK file filename.vmdk created successfully.
Now let's proceed directly to setting up the virtual machine itself.
Right-click on the virtual machine -> Settings
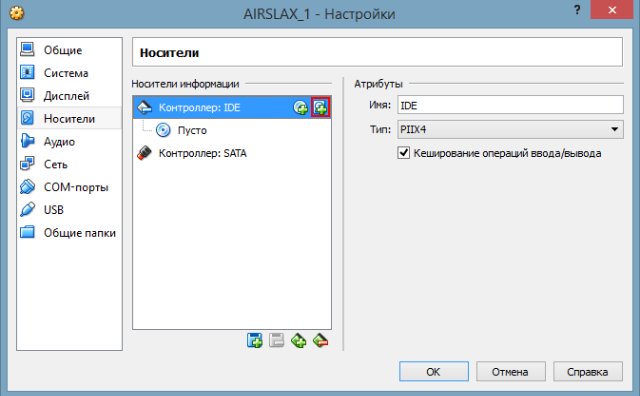
Select "Media" in the list on the left. Then click on the button highlighted in red in the picture.
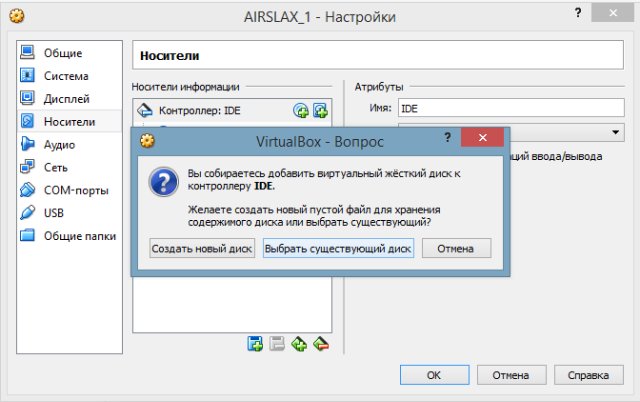
Click on the button “Select existing disk” and select your created vmdk file.
Now let's move on to connecting USB WiFi to AirSlax in VirtualBox:
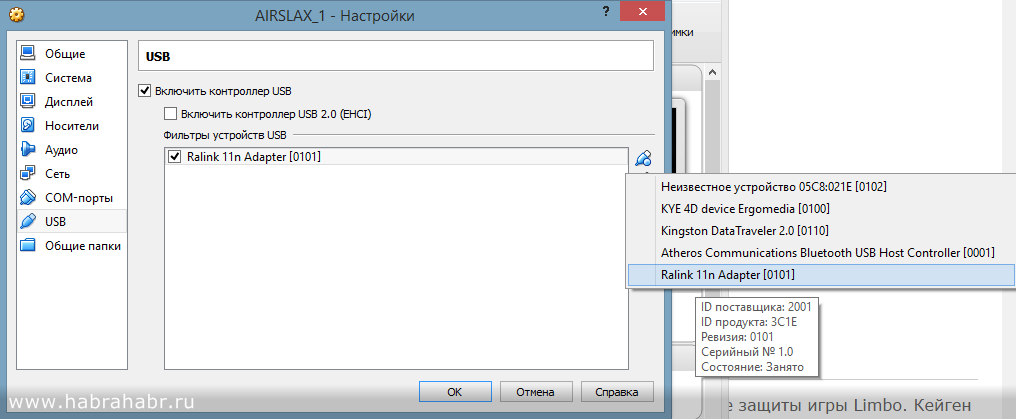
Go to the USB menu and click on the button with a green plus and choose your adapter, then click "OK" and run.
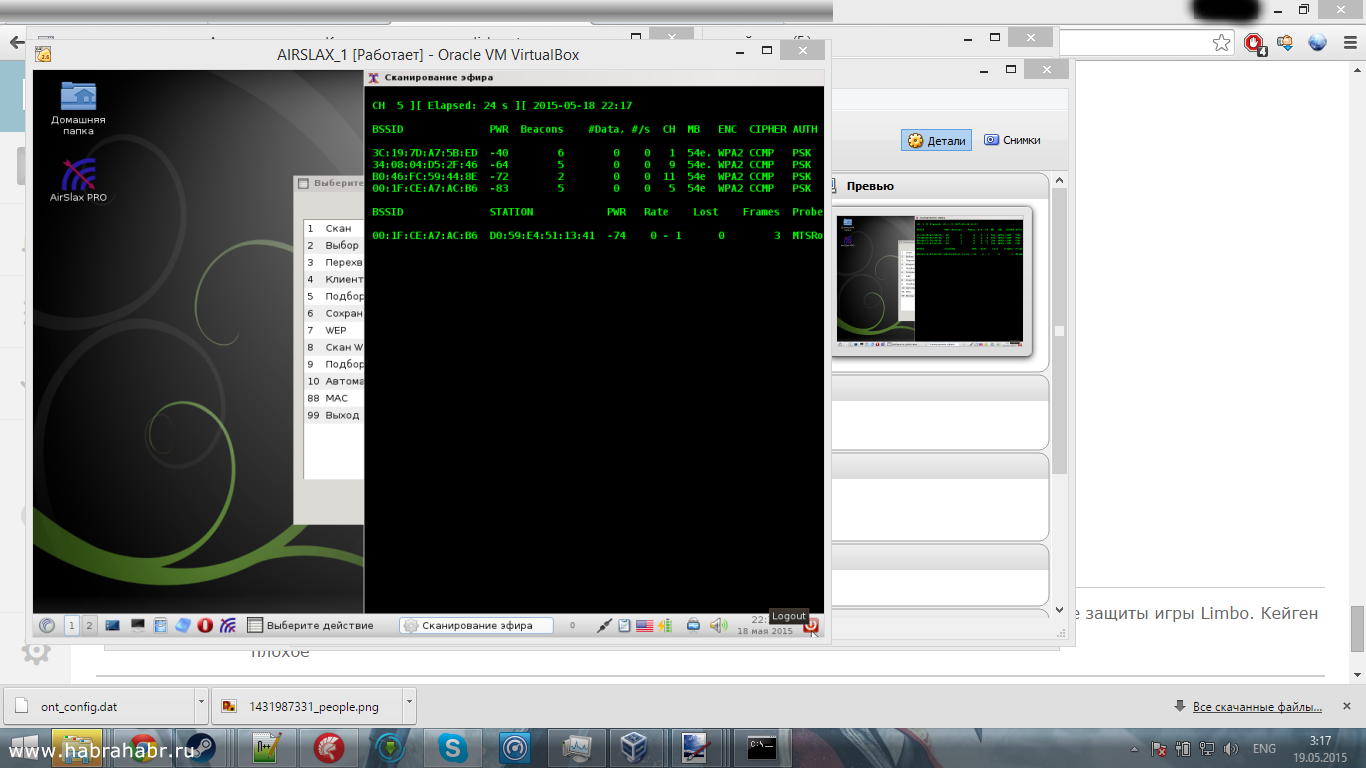
If everything is set up correctly, you will see a blue menu, select Graphic Mode and wait.
As the desktop appears, you can work.
Here is a screenshot of AirSlax in VirtualBox:
I hope I knowingly killed so much time. Good luck!
This article was created for informational purposes only. The author of the article is not responsible for the damage caused by this program.
Climbing a bunch of sites on the Internet, I did not find anything. I decided to start digging myself. And I did it. I’ll say right away that I didn’t install AirSlax to crack other people's WiFi networks. I needed to find out who is connected to my network, but this is not about now.
I will describe the whole process, namely:
1. Install AirSlax on VirtualBox
2. Preparing a flash drive
3. Configure the virtual machine
4 Work with usb WiFi adapter
')
Those who know how to install AirSlax on VirtualBox can skip this and start reading about setting up a USB WiFi adapter.
Let's start.
Step 1: Prepare the virtual machine in VirtualBox
By the way, why VirtualBox, and not VMWare?
There are several reasons:
1. I did not fully understand VMWare, but I have experience with VirtualBox.
2. I could not launch AirSlax on VMWare
Let's get started
1.1 Enter a name for the virtual machine
1.2 Linux Type (Required Linux)
1.3 Version, at your discretion, but I chose Linux 2.6 / 3.x 64bit (if you have a 32-bit operating system, then select 32 bit)
Now we specify the amount of memory allocated for the virtual machine.
Specify the number so that in reserve you have a couple of GB left on the main operating system, optimally like this:
- with 4 GB of RAM ~ 2 GB per virtual machine;
- with 8 GB of RAM, ~ 4 GB per virtual machine;
- with 16 GB of RAM, ~ 8 GB per virtual machine;
- with 32 GB or more, it is possible and 8. It is enough for her.
Since the Porteus bootloader is present in AirSlax, installation on a real hard disk is not desirable. This bootloader will break your windows downloader.
Now, if you have not created a flash drive with AirSlax, then I described it here, and if the flash drive has already been created, then proceed to point 3
2. Preparing a flash drive
2.1 Downloading the original image
You can download the image from here . Link leads to Yandex disk.
If you do not believe, then go to the website www.airslax.ru and download from there yourself.
2.2 Copying the downloaded image to a USB flash drive
Copy the boot and porteus folders to the USB flash drive. After copying files, go to the boot folder and open the file porteus-installer-windows:
When this window appears, click on any key to install the porteus bootloader to the media. Make sure you do not install the bootloader on your hard disk:
Now again, press any key to exit the installer. That's all, the flash drive is ready and AirSlax is already present on the flash drive.
Now I will explain why you need a flash drive, as mentioned above, Porteus bootloader can ruin your system bootloader, respectively, sticking all the files in iso, you can not run airslax without installing porteus bootloader.
Yes, by the way, on the hard disk account for the virtual machine, select the item “Do not connect a virtual hard disk”. We will do this later.
Somewhere on the Internet, I found an article on how to boot from a flash drive in a virtualbox, maybe even read it on this site, I don’t remember exactly.
3. Configure the virtual machine and configure boot from a USB flash drive for VirtualBox
In order for VirtualBox to work with a flash drive, you need to record the path to the device, all the information in the vmdk file, how to do it.
To create we need:
1. VBoxManager (vboxmanage.exe is located in the folder with VirtualBOX)
2. Diskpart (system utility for working with disks, disk partitions)
I managed to create a regular bat file in the VirtualBox folder, but I didn’t have enough rights to create a vmdk file, the program required administrative rights, I had to do it via the command line (cmd).
I will describe how to do it via the command line, but if you want to make a bat file, then just copy the lines and edit them a bit to your own.
3.1 Configuring VirtualBox boot from flash drive
Open cmd (as administrator).
Enter the following: cd path to VirtualBox (I have this: "C: \ Program Files \ Oracle \ VirtualBox"). Then
VboxManage.exe internalcommands createrawvmdk -filename c: \ vbox \ usb.vmdk -rawdisk \\. \ PhysicalDrive1
I will sign the teams:
VboxManage.exe internalcommands createrawvmdk (this must be rewritten);
- filename (path to save the vmdk file);
- rawdisk (physical disk, flash drive) - how to find out what number, for this we need Diskpart.
Getting Started with Diskpart.
Open another cmd, for this utility administrator rights are not needed.
Enter diskpart, if entered correctly, you will see this window:
Enter list disk and in the list find the flash drive. Please note, since I have Disk 0 - this is a hard disk, and Disk 1 is a USB flash drive. Since Disk 1 is a flash drive, the command in VboxManager will be:
Switch back to cmd with the command you entered.
VboxManage.exe internalcommands createrawvmdk -filename path for vmdk -rawdisk \\. \ PhysicalDrive1 (in my case 1 is a USB flash drive).
Do not forget to create a folder in which you will save the vmdk file. If everything goes well, you will see
RAW host disk access VMDK file filename.vmdk created successfully.
Now let's proceed directly to setting up the virtual machine itself.
3.2 Connecting external flash drive with virtual machine
Right-click on the virtual machine -> Settings
Select "Media" in the list on the left. Then click on the button highlighted in red in the picture.
Click on the button “Select existing disk” and select your created vmdk file.
Now let's move on to connecting USB WiFi to AirSlax in VirtualBox:
Go to the USB menu and click on the button with a green plus and choose your adapter, then click "OK" and run.
If everything is set up correctly, you will see a blue menu, select Graphic Mode and wait.
As the desktop appears, you can work.
Here is a screenshot of AirSlax in VirtualBox:
I hope I knowingly killed so much time. Good luck!
This article was created for informational purposes only. The author of the article is not responsible for the damage caused by this program.
Source: https://habr.com/ru/post/258283/
All Articles