Using the Intel Edison board to change the color of the Orbotix Sphero ball when new tweets appear
This article describes how to create a device based on Intel Edison, which checks Twitter and changes the color of the Orbotix Sphero ball if a new tweet with the #intelmaker hashtag appears . Additionally, we will consider a small example that uses the built-in LED on the board in the absence of the Sphero ball.

A few words about the Orbotix Sphero. This is a robotic ball, inside of which is the engine and lights. It can be controlled via Bluetooth. There are various applications and games for phones that work with him.
')
This article will use the ability of the ball to change color. So, we need:
This part contains steps for creating a new project in Intel XDK IoT Edition with code for updating the Sphero ball status.
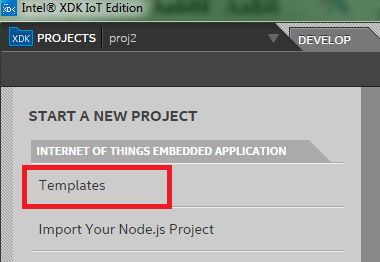
1. In the Intel XDK IoT Edition application, select the Projects tab. Click "Start a New Project".

2. In the "Internet of Things Embedded Application" section, click "Templates":
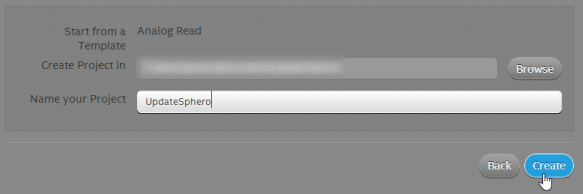
3. Select any application and click “Continue”.
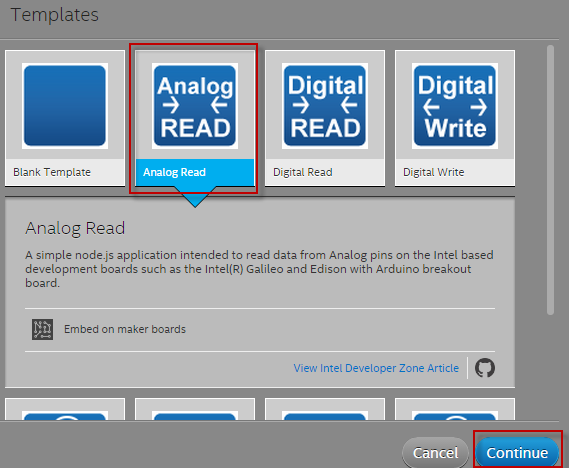
4. In the field “Name your Project” enter the name of your project and click “Create”.
5. Your new project will open. The main.js file will be displayed. Delete all its contents and replace with the following code:
6. In the left pane, select the package.json file. In the "dependencies" section add all modules that will be needed in the program:

This part describes the steps to create a new Twitter application and obtain keys that will allow your application to interact with Twitter.
1. Go to the Twitter Apps page on Twitter using your twitter account.
2. Click “Create New App”. The page for setting new application parameters will open.

3. On this page, do the following:
a. In the field "Name" enter the name of your application.
b. In the "Description" field, enter a description.
c. Enter the URL of your site in the Website field.

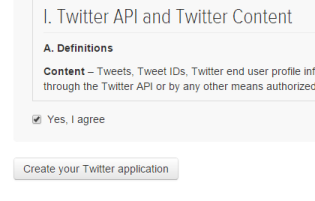
4. Read the terms of use, and if you agree, check “Yes, I agree”. Click "Create your Twitter Application".
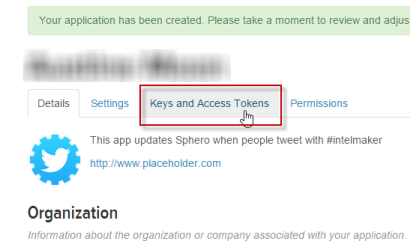
5. Click the “Keys and Access Tokens” tab.
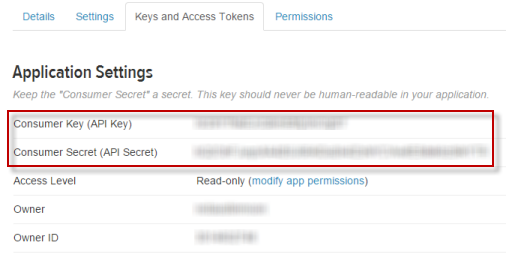
6. In the Settings section of the “Application Settings”, copy the user key from the Consumer Key field (API Key) and the secret key from the Consumer Secret field (API Secret) and paste them into your text editing program, for example, Notepad.
7. In the “Your Access Token” section, click “Create my access token”.
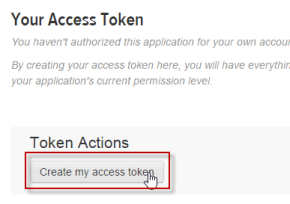
8. Copy the token from the Access Token field and the secret token from the Access Token Secret field and paste into your text editing program.

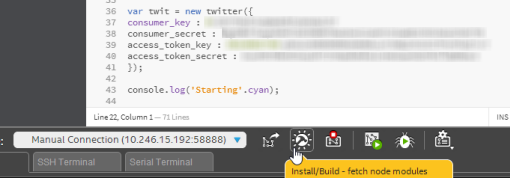
9. In the Intel XDK IoT Edition application in the main.js file, go to the line that starts with consumer_key. Paste the real keys you previously copied into the values of consumer_key, consumer_secret, access_token_key and access_token_secret.
Connect the Edison board to Sphero using Bluetooth:
1. Connect to your board through a terminal window.
2. To activate Bluetooth and scan for available devices, enter the following commands:
3. The MAC address of your Sphero should be on the bottom of the box in the format XX-XX-XX-XX-XX-XX. If you cannot find the MAC address, do the following:
a. Enter the command:
b. Find your Sphero in the list and copy the MAC address.
c. Enter the command:
4. Connect your board and Sphero by entering the following commands:
The MAC address must be in the format XX: XX: XX: XX: XX: XX. This will create a connection to Sphero.
Now you can build our application and upload it to the board. After completing the following steps, the color of your Sphero ball will change when a new tweet arrives. In the Intel XDK IoT Edition application, click on the Install / Build icon. . If you are asked to upload or build an “upload or build” project, choose to build “Build”.
When the project is completed, a message about this will appear. Click the “Upload” icon to upload the project to the board.
Click the "Run" icon to run your project. Now your Sphero will check Twitter once a second and light up for a second in blue if someone tweets with the #intelmaker hashtag.
Addition from the translator: if there is no Sphero ball, you can make a flashing of the built-in LED on the board, which is connected to the 13th digital output. And in order to observe this event more often, you can search for some popular hashtag from Top, for example #gameinsight .
In the package.json file, add the following dependencies:
A few words about the Orbotix Sphero. This is a robotic ball, inside of which is the engine and lights. It can be controlled via Bluetooth. There are various applications and games for phones that work with him.
')
This article will use the ability of the ball to change color. So, we need:
- Sphero Ball.
- Accout on Twitter.
- Configured and connected Intel Edison board. For this step you can see the following links:
- Installed and connected to your Intel XDK IoT Edition. Getting Started with Intel XDK IoT Edition on Intel IoT Platforms.
Create application
This part contains steps for creating a new project in Intel XDK IoT Edition with code for updating the Sphero ball status.
1. In the Intel XDK IoT Edition application, select the Projects tab. Click "Start a New Project".
2. In the "Internet of Things Embedded Application" section, click "Templates":
3. Select any application and click “Continue”.
4. In the field “Name your Project” enter the name of your project and click “Create”.
5. Your new project will open. The main.js file will be displayed. Delete all its contents and replace with the following code:
main.js
var twitter = require('mtwitter'); var colors = require('colors'); var moment = require('moment'); var spheron = require('spheron'); var sphero = spheron.sphero(); var spheroPort = '/dev/rfcomm0'; var COLORS = spheron.toolbelt.COLORS; var newMessage = false; var lastTweet = '21:35:5'; var twit = new twitter({ consumer_key : 'xxxxxxxxxxxxxxxxxxxxx', consumer_secret : 'xxxxxxxxxxxxxxxxxxxxx', access_token_key : 'xxxxxxxxxxxxxxxxxxxxx', access_token_secret : 'xxxxxxxxxxxxxxxxxxxxx' }); console.log('Starting'.cyan); setInterval(function() { twit.get('search/tweets', {q: '#intelmaker'}, function(err, item) { console.log(item.statuses[0].created_at.substring(11, 18).cyan) console.log(lastTweet); console.log("From isNew(): ", newMessage); if(item.statuses[0].created_at.substring(11, 18) === lastTweet) { console.log("we here"); newMessage = false; } else{ newMessage = true updateSphero(true); lastTweet = item.statuses[0].created_at.substring(11, 18); } }); }, 1000); function updateSphero(flag) { console.log('updating sphero'); sphero.on('open', function() { sphero.setRGB(COLORS.RED, false); setTimeout(function(){sphero.setRGB(COLORS.BLUE, false);}, 2000); }); sphero.open(spheroPort); } 6. In the left pane, select the package.json file. In the "dependencies" section add all modules that will be needed in the program:
"dependencies": { "mtwitter":"latest", "colors":"latest", "moment":"latest", "spheron":"latest" } Twitter application
This part describes the steps to create a new Twitter application and obtain keys that will allow your application to interact with Twitter.
1. Go to the Twitter Apps page on Twitter using your twitter account.
2. Click “Create New App”. The page for setting new application parameters will open.
3. On this page, do the following:
a. In the field "Name" enter the name of your application.
b. In the "Description" field, enter a description.
c. Enter the URL of your site in the Website field.
4. Read the terms of use, and if you agree, check “Yes, I agree”. Click "Create your Twitter Application".
5. Click the “Keys and Access Tokens” tab.
6. In the Settings section of the “Application Settings”, copy the user key from the Consumer Key field (API Key) and the secret key from the Consumer Secret field (API Secret) and paste them into your text editing program, for example, Notepad.
7. In the “Your Access Token” section, click “Create my access token”.
8. Copy the token from the Access Token field and the secret token from the Access Token Secret field and paste into your text editing program.
9. In the Intel XDK IoT Edition application in the main.js file, go to the line that starts with consumer_key. Paste the real keys you previously copied into the values of consumer_key, consumer_secret, access_token_key and access_token_secret.
Compound
Connect the Edison board to Sphero using Bluetooth:
1. Connect to your board through a terminal window.
2. To activate Bluetooth and scan for available devices, enter the following commands:
rfkill unblock bluetooth bluetoothctl 3. The MAC address of your Sphero should be on the bottom of the box in the format XX-XX-XX-XX-XX-XX. If you cannot find the MAC address, do the following:
a. Enter the command:
scan on b. Find your Sphero in the list and copy the MAC address.
c. Enter the command:
scan off 4. Connect your board and Sphero by entering the following commands:
pair SpheroMacAddress exit rfcomm bind 0 SpheroMacAddress 1 The MAC address must be in the format XX: XX: XX: XX: XX: XX. This will create a connection to Sphero.
Upload code to board
Now you can build our application and upload it to the board. After completing the following steps, the color of your Sphero ball will change when a new tweet arrives. In the Intel XDK IoT Edition application, click on the Install / Build icon.
. If you are asked to upload or build an “upload or build” project, choose to build “Build”.When the project is completed, a message about this will appear. Click the “Upload” icon
to upload the project to the board.Click the "Run" icon
to run your project. Now your Sphero will check Twitter once a second and light up for a second in blue if someone tweets with the #intelmaker hashtag.If there is no Sphero ball
Addition from the translator: if there is no Sphero ball, you can make a flashing of the built-in LED on the board, which is connected to the 13th digital output. And in order to observe this event more often, you can search for some popular hashtag from Top, for example #gameinsight .
main.js
var twitter = require('mtwitter'); var mraa = require('mraa'); var lastTweet = 'XX:XX:XX'; var myOnboardLed = new mraa.Gpio(13); myOnboardLed.dir(mraa.DIR_OUT); var twit = new twitter({ consumer_key : 'XXXXXXXXXXXXXXXXXXXXXXXXX', consumer_secret : 'XXXXXXXXXXXXXXXXXXXXXXXXX', access_token_key : 'XXXXXXXXXXXXXXXXXXXXXXXXX', access_token_secret : 'XXXXXXXXXXXXXXXXXXXXXXXXX' }); console.log('Starting'); setInterval(function() { console.log('--------------'); twit.get('search/tweets', {q: '#gameinsight'}, function(err, item) { if( item !== null ) { currTweetTime = item.statuses[0].created_at.substring(11, 18); if( currTweetTime !== lastTweet) { console.log( 'Have new message: ' + item.statuses[0].text); lastTweet = currTweetTime; updateLed(); } } }); }, 1000); function updateLed() { myOnboardLed.write(1); setTimeout(function(){myOnboardLed.write(0);}, 500); } In the package.json file, add the following dependencies:
"dependencies": { "mtwitter":"latest" } Additional resources:
Source: https://habr.com/ru/post/258163/
All Articles