Install OpenCV 3.0.0-rc1 (using IPP and TBB) on Intel Edison Yocto. USB camera in OpenCV
 The Intel Edison board has enough computing power, so it would be logical to use all of its capabilities. One of the demanding tasks is computer vision.
In this article we describe how to build and install the OpenCV library on the Intel Edison board and connect a USB camera. We will build OpenCV with IPP and TBB enabled, which will allow the library to fully utilize both Intel Edison cores.
Note from the translator
The original article describes how to work with the previous version of the image Yocto Intel Edison. A new version of the image is now available (edison-image-ww05-15.zip), which is much easier to work with, since most of the necessary packages are already installed. The new image already has cmake, UVC and sections have the correct size, so you can skip the description of these steps. Additionally, the source code of two simple examples for working with OpenCV and with a USB camera in OpenCV has been added to the translation.
Build OpenCV on Intel Edison will require at least 2 GB of additional memory, so you will need to install a microSD card of the required amount in the slot on the board.
Image preparation (old image)
Prepare a standard (or special with optional packages) Edison image using the Board Support Package and Startup Guide . You can use the original image or customize your own with additional packages.
')
Enable UVC (USB Video device Class) in Linux kernel (old image)
If you want to use a regular USB camera, then you need to enable UVC in the Linux kernel. If you have finished building your own image (made a 'bitbake edison-image'), now you are ready to configure the Linux kernel. Enter on the host machine:
~/edison-src> bitbake virtual/kernel -c menuconfig Then find and activate Device Drivers -> Multimedia support -> Media USB Adapters. When the configuration is complete, replace the defconfig with the contents of the .config that you just changed. Enter:
~/edison-src> cp /build/tmp/work/edison-poky-linux/linuxyocto/3.10.17+gitAUTOINC+6ad20f049a_c03195ed6e-r0/linux-edison-standardbuild/.config build/tmp/work/edison-poky-linux/linuxyocto/3.10.17+gitAUTOINC+6ad20f049a_c03195ed6er0/defconfig Finally, execute bitbake again:
~/edison-src> bitbake virtual/kernel -c configure -f –v ~/edison-src> bitbake edison-image Change sections (old image)
If you have an old image, we recommend changing the standard partitioning, because the size of the root file system is only 512 MB, most of which will be occupied right away. '/ home' - takes up all that remains after joining the specified sections, and usually it is more than 2 GB. Therefore, the creation of both sections of 1.3 GB will be more reasonable.
Look in the file 'edison-src / device-software / meta-edison-distro / recipes-bsp / u-boot / files / edison.env' (for a new source release this is the file 'edison-src / device-software / meta- edison / recipes-bsp / u-boot / files / edison.env ') change the size of Rootfs from 512 MB to 1312 MB. As a result, the size of / home will be reduced automatically. Another change will need to be made before re-recording the image. This is the size of the rootfs, which is installed in 'edison-src / device-software / meta-edison-distro / recipes-core / images / edison-image.bb' and is also equal to 512 MB. Resize the rootfs again and rebuild the image by executing 'bitbake edison-image'. When the bitbake finishes, run:
~/edison-src> /device-software/utils/flash/postBuild.sh Check if you have 'dfu-util'. If not, install:
~/edison-src> sudo apt-get install dfu-util Now we need to write the image twice to apply the settings section. First, do:
~/edison-src> /build/toFlash/flashall.sh –recovery And then write without '--recovery'
~/edison-src> /build/toFlash/flashall.sh After successfully launching Edison, connect the USB cable to the serial port. Check what USB device number your Edison received when connecting to a Linux computer. Then connect via 'screen' (enter the appropriate number instead of 'X', for example, ttyUSBX -> ttyUSB0)
> sudo screen /dev/ttyUSBX 115200 If you see that Edison has successfully booted, log in as 'root' and check the available space by running:
root@edison:~# df –h Configure WiFi, password for ssh and FTP
After your host computer connects to Edison via the serial port, run:
root@edison:~# configure_edison –setup Follow the instructions and set up passwords and WiFi. If you do not have a password, then ssh access will be denied. Connect the host computer and Edison to the same access point. To transfer files, you can use any type of FTP or SCP connection.
Make sure that the Edison board has access to the Internet, as it will be needed during an automatic IPP installation.
Install CMake (old image)
The old image of Edison does not come with 'cmake', but we will need it to build OpenCV. We'll have to manually install it. One way to use 'opkg'. User AlexT from the Intel forum created the repository described in the thread .
AlexT tells how to attach the repository via 'opkg'. In order for Edison to receive packages from the repository, replace everything you have in /etc/opkg/base-feeds.conf with the following (you don’t need to change other opkg configuration files):
===/etc/opkg/base-feeds.conf contents below=== src/gz all http://repo.opkg.net/edison/repo/all src/gz edison http://repo.opkg.net/edison/repo/edison src/gz core2-32 http://repo.opkg.net/edison/repo/core2-32 ===end of /etc/opkg/base-feeds.conf contents=== Enter 'opkg update'. You should see the following lines indicating that you have successfully connected to the repository:
root@edison:~# opkg update Downloading http://repo.opkg.net/edison/repo/all/Packages.gz. Inflating http://repo.opkg.net/edison/repo/all/Packages.gz. Updated list of available packages in /var/lib/opkg/all. Downloading http://repo.opkg.net/edison/repo/edison/Packages.gz. Inflating http://repo.opkg.net/edison/repo/edison/Packages.gz. Updated list of available packages in /var/lib/opkg/edison. Downloading http://repo.opkg.net/edison/repo/core2-32/Packages.gz. Inflating http://repo.opkg.net/edison/repo/core2-32/Packages.gz. Updated list of available packages in /var/lib/opkg/core2-32. Now you are ready to install CMake. Enter:
root@edison:~# opkg install cmake-dev Enter 'cmake' and you should see the help page.
OpenCV 3.0.0
Before we go to the very OpenCV, we need a lot of free space to build it on Edison. Therefore, we need additional external memory, at least 2 GB. We will format the micro SD card and mount it to Edison. The card can be formatted either directly on the board or on a Linux host machine. To format a card on a Linux computer, type (block_device replace with your device, for example, / dev / mmcblk1)
> mkfs.ext4 block_device Or:
> mke4fs -t ext4 block_device Mark the section:
> e4label <block_device> new_label Insert the SD card into Edison and mount it:
root@edison:~# mkdir <Desired_DIR> root@edison:~# mount block_device <Desired_DIR> Check that it was mounted without problems using 'df -h'. For convenience, you can configure auto mount 'auto mount'. Add / dev / block_device <your folder> 'in / etc / fstab.
root@edison:~# vi /etc/fstab And add '/ dev / mmcblk1 / home / ext'

Download OpenCV for Linux 3.0 from the official OpenCV page . Copy the resulting zip file to Edison via FTP or SCP. It is better to immediately copy to an external SD card, since when OpenCV is built, it will take more than 1 GB. Unzip the downloaded file with the 'unzip opencv-3.0.0-rc1.zip' command and check that the opencv-3.0.0-rc1 folder has been created. Navigate to the <OpenCV_DIR> folder, enter 'cmake.' and see what options there are.
We will enable IPP and TBB for better performance. The IPP library will be loaded automatically when the WITH_IPP flag is enabled. This cannot be said about the TBB library. It will need to be installed manually. Therefore, install the TBB package on your host computer and copy the corresponding files to Edison. If your host computer is Linux 64-bit, you need to specify i386 when you download via apt-get. On your host computer, type:
> sudo apt-get install libtbb-dev:i386 And copy the files to the / usr / include / tbb folder on Edison with the same name. You also need to copy the following files to Edison:
/usr/lib/libtbb.so, /usr/lib/libtbbmalloc.so, /usr/lib/libtbbmalloc_proxy.so /usr/lib/pkgconfig/tbb.pc On this page , you can see a complete list of tbb library files.
Now on Edison in <OpenCV_DIR> type (without forgetting the '.' Dot at the end of the command line)
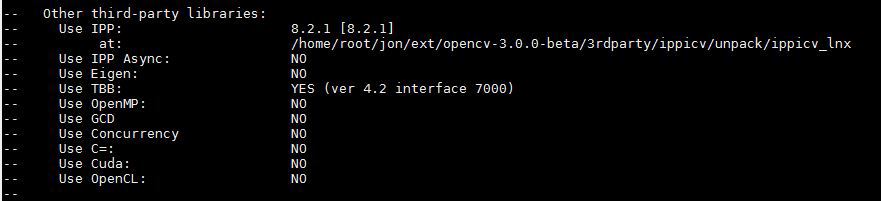
root@edison:<OpenCV DIR># cmake -D WITH_IPP=ON -D WITH_TBB=ON -D WITH_CUDA=OFF -D WITH_OPENCL=OFF -D BUILD_SHARED_LIBS=OFF -D BUILD_PERF_TESTS=OFF -D BUILD_TESTS=OFF . This command turns on IPP and TBB and turns off all unnecessary. With the option 'BUILD_SHARED_LIBS = OFF' you can create executable programs to run without OpenCV installed. This can be useful, for example, when distributing applications. (If you do not need IPP and TBB, use WITH_TBB = OFF and WITH_IPP = OFF). As a result of the configuration, you should see that IPP and TBB are enabled.
If there are no problems, enter:
root@edison:<OpenCV DIR># make -j2 Full assembly will take from 30 minutes to one hour. If you get an error
'undefined reference to symbol 'v4l2_munmap' ... libv4l2.so.0 : error adding symbols: DSO missing from command line' when creating OpenCV or OpenCV examples, then add '-lv4l2' after '-lv4l1' to the corresponding configuration files. A similar error may appear in more than 50 files, so it would be better to make this replacement with the following command:
root@edison:<OpenCV_DIR># grep -rl -- -lv4l1 samples/* modules/* | xargs sed -i 's/-lv4l1/-lv4l1 -lv4l2/g' When the build is complete, install what you built:
root@edison:<OpenCV_DIR># make install Installing TBB without a Linux computer
You may not have a Linux machine available. Here is a variant of such an installation TBB.
Download TBB from www.threadingbuildingblocks.org , this is a tgz archive. Unpack. We need two folders that need to be copied to Edison.
<DIR>/include/tbb All its contents will need to be copied to the Edison board in / usr / include / tbb
<DIR>/lib/ia32/gcc4.4/ And its contents will need to be copied to the Edison board in / usr / lib by setting up the links to the library so-files correctly.
Creating applications using OpenCV 3.0.0-rc1
The easiest way to create a simple OpenCV application is to use the examples that come with the library.
Navigate to the '/ samples' folder and enter:
root@edison:<OpenCV DIR>/samples# cmake . everything will be configured and ready to compile the examples. Now you can replace one of the sample files in 'samples / cpp' and build it through cmake. For example, you can replace 'image.cpp' with your own code. First back up the original file:
root@edison:<OpenCV DIR>/samples/cpp# cp image.cpp image_orig.cpp Replace image.cpp with the following code:
#include <iostream> #include <opencv2/imgproc/imgproc.hpp> #include <opencv2/highgui/highgui.hpp> using namespace cv; using namespace std; int main( int argc, char** argv ) { const char* imagename = "../data/lena.jpg"; Mat img = imread(imagename); if(img.empty()) { cout<<"Can't load image "<<imagename<<endl; return -1; } cout<<"Image read ok"<<endl; Mat gray_image; cvtColor( img, gray_image, CV_BGR2GRAY ); if( ! imwrite( "../data/test_gray_Image.jpg", gray_image ) ) { cout<<"Can't write image"<<endl; return -1; } cout<<"Write image ok"<<endl; return 0; } In this example, the image is read from the file 'lena.jpg', transferred to the gray scale mode, and written to the file 'test_gray_Image.jpg'. Let's go up one level and compile an example:
root@edison:<OpenCV DIR>/samples/cpp# cd .. root@edison:<OpenCV DIR>/samples# make example_image If you get an error:
'undefined reference to symbol 'v4l2_munmap' ... libv4l2.so.0 : error adding symbols: DSO missing from command line' while building OpenCV or OpenCV examples, you will need to add '-lv4l2' after '-lv4l1' to the appropriate configuration files. A similar error may appear in more than 50 files, so it would be better to make this replacement with the following command:
root@edison:<OpenCV_DIR># grep -rl -- -lv4l1 samples/* modules/* | xargs sed -i 's/-lv4l1/-lv4l1 -lv4l2/g' Run:
root@edison:<OpenCV DIR>/samples# cd cpp root@edison:<OpenCV DIR>/samples/cpp#./cpp-example-image If everything is fine, the screen will appear:
Write image ok And in the folder:
<OPENCV_DIR>/samples/data A file should appear:
test_gray_Image.jpg Copy it to the host computer and see. And, if you see that someone is looking at us from the picture, or a prince in an old raincoat ... But it's better if it is Lena in black and white, which means that OpenCV is working.
And yet, since Edison does not have video output, there will be an error if the code has output to a graphical screen. For example, it will not be possible to use 'imshow', which creates and displays an image or video.
Look at the world
Check out OpenCV work with the camera. The easiest way to use a camera that works in Linux and is compatible with UVC.
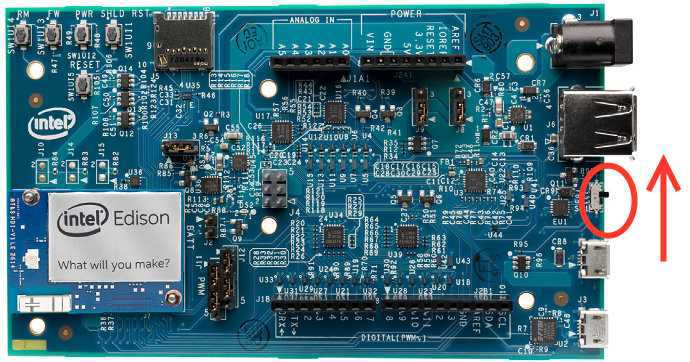
To connect the camera via USB, switch SW1 on the board must be moved so that it is located on the side of the full-sized USB port where the camera will be connected.
By connecting the camera, you can display information about all USB devices:
root@Edison:/# lsusb Bus 001 Device 002: ID 1a40:0101 Terminus Technology Inc. 4-Port HUB Bus 001 Device 001: ID 1d6b:0002 Linux Foundation 2.0 root hub Bus 002 Device 001: ID 1d6b:0003 Linux Foundation 3.0 root hub Bus 001 Device 005: ID 1871:0141 Aveo Technology Corp. The last line is our camera. Check that it can work on UVC:
root@Edison:/# lsusb -d 1871:0141 -v | grep "14 Video" bFunctionClass 14 Video bInterfaceClass 14 Video bInterfaceClass 14 Video bInterfaceClass 14 Video bInterfaceClass 14 Video bInterfaceClass 14 Video bInterfaceClass 14 Video bInterfaceClass 14 Video If such strings are found, then the camera supports UVC and it can be used in OpenCV. Enter the following code:
Replace image.cpp with the following code:
#include <iostream> #include "opencv2/opencv.hpp" using namespace cv; using namespace std; int main(int, char**) { VideoCapture cap(0); // open the default camera if(!cap.isOpened()) // check if we succeeded { cout<<"Can't open camera"<<endl; return -1; } cout<<"Camare init ok"<<endl; Mat img,frame; cap >> frame; cvtColor(frame, img, CV_BGR2GRAY); if( ! imwrite( "../data/test_camera_Image.jpg", img) ) { cout<<"Can't write image"<<endl; return -1; } cout<<"Camera image write OK"<<endl; return 0; } In this example, the camera is initialized, one image is obtained from it, translated into a black and white version and recorded into a file.
If everything works, you can use the camera in OpenCV.
Additional links:
facedetect.zip (13.81 MB)
mjpg-streamer-for-Edison.zip (957.36 KB)
VTune-Result-Edison.zip (1.07 MB)
Previous publications:
Audio playback on Intel Edison via Bluetooth using the Advanced Audio Distribution Profile (A2DP)
Practice "Intel IoT". Edison - the mighty "crumb"
Source: https://habr.com/ru/post/258159/
All Articles