OpenHAB and home controller - we make iron
Having successfully connected a simple Modbus device with the OpenHAB platform , I immediately wanted to do something useful for the house. In the nearest online store were purchased wiring, layout, modules and sensors for the Arduino, and a skein of blue electrical tape.
That's how I secured myself an exciting lesson for the coming weekend. At first it was fun, but soon the confusion of wires began to strain, and hope to experience this miracle in combat conditions melted away every minute. It seemed that the wiring was trying to crawl away by itself, and the construction scattered from every careless movement. And at this time in the head new brilliant thoughts were already being born ...
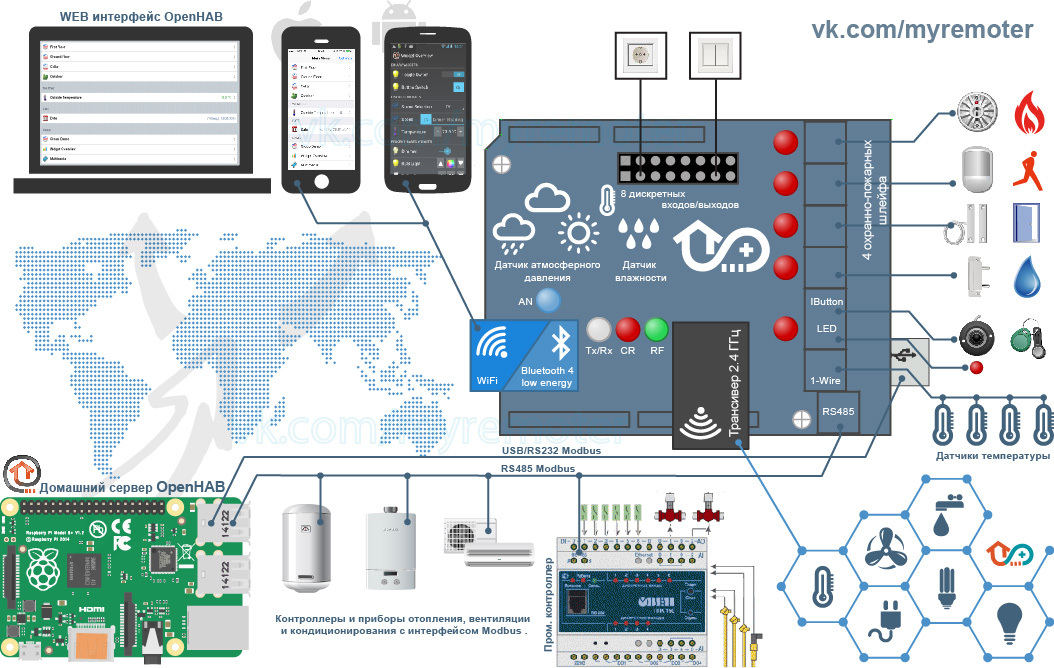
It was decided, you need to design a board , to which it will be easy to connect all these sensors and stuff into it everything you need for automation. And if on the same bus to hang on OpenHAB other devices, you get an excellent system of smart home:
')
So what needs to be implemented first?
- pressure measurement; temperature and humidity;
- monitoring the state of windows and doors, motion sensors, protection against fire and leakage;
- access control using IButton and RFID keys;
- control of contacts and control of actuators through discrete inputs and outputs;
- control of several remote temperature sensors through the 1-Wire interface;
- control of additional sensors, contacts and control of actuators through a radio channel.
Great, let's get down to the hardware design.
Let's try to implement the functions we need, using the most popular sensors and modules from Arduino, adding together we get the following structure:

With the design figured out, it's time to start developing the board.
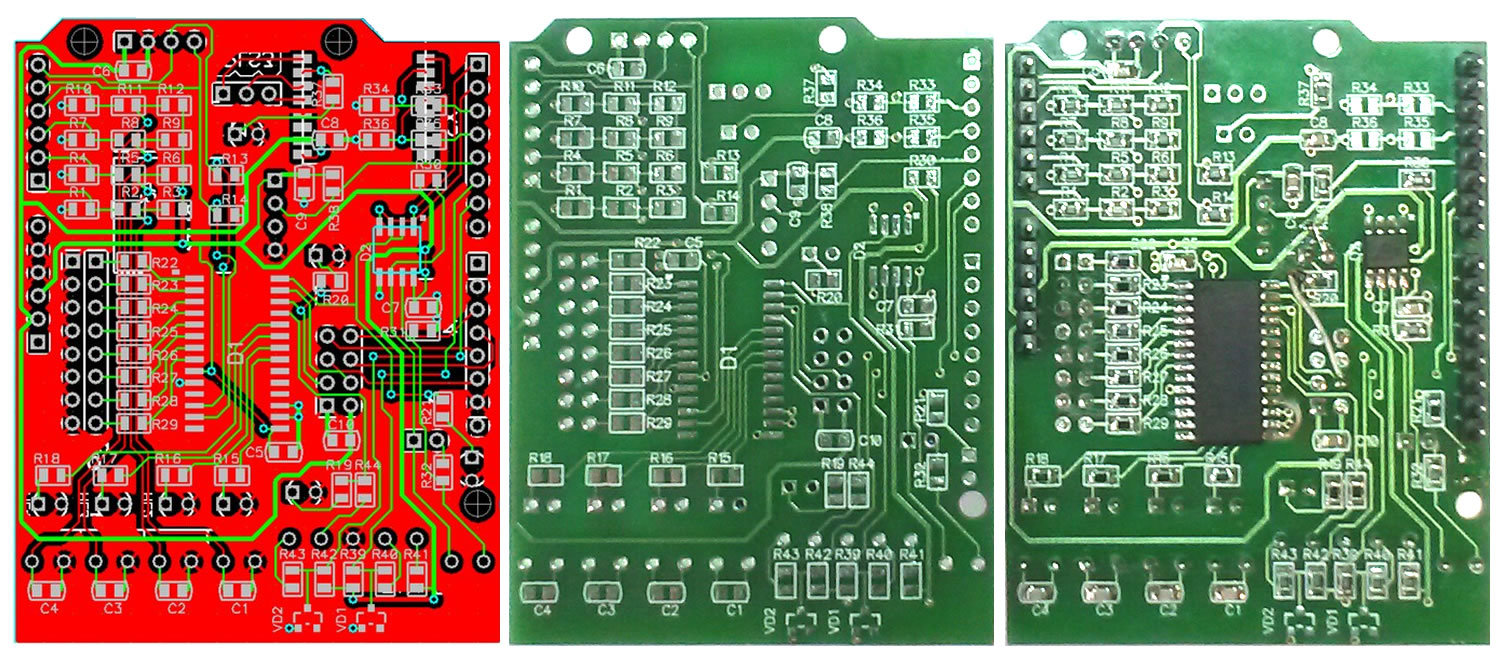
There are so few good installers among fans, so I did not make them difficult, chose a rather large size of resistors and capacitors - 0805, left a decent gap between the elements and made the marking of the components with silk-screen printing. All elements are placed on the 68.6 x 53.3 mm board, the design of which corresponds to the Arduino UNO expansion module.
A prototype PCB developed in PCAD was sent to Rezonite for prototyping at urgent production. After a few days of payment and pre-ordered equipment was already with me. Another couple of days with a soldering iron, and now the thought has acquired a real shape!
It remains to hang the module on the Arduino and here it is, the long-awaited controller!
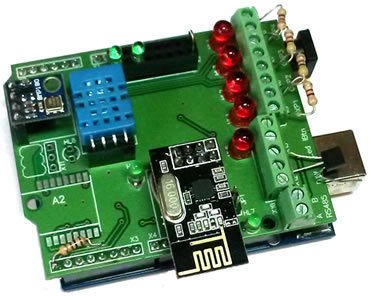
Working with such a device is a pleasure! It was easy to test individual nodes using standard libraries and examples for Arduino. Errors and inaccuracies in the design and layout were found and corrected, of which there were not so many.
But the problem known in advance was clearly manifested, its essence is the “mono-task” of Arduino. Reading one sensor interfered with the work of others, stopped the exchange with OpenHAB.
Looking ahead I will say that I managed to solve this problem, for which I had to rewrite part of the libraries, having arranged a kind of multitasking using the timer interrupts. But about this in the next publication, which will be devoted to software.
What happened as a result of the work:
A prototype of a reliable and compact I / O controller for the Smart Home system has been created, which can be used not only for experiments, but also in real conditions, it can serve as a good basis for the development of other devices.
The modular design makes it easy to change the configuration of the controller, provides ease of testing the sensors and nodes of its composition.
An important feature of the controller is ease of assembly and adequate cost, even with pilot production, which can positively affect its popularity.
What is left to do before making a full version of the controller:
1. To carry out adjustments in the scheme and design, eliminating errors and shortcomings found in the process of alpha testing.
2. Install instead of the HM-11 module a connector for connecting the ESP8266 WiFi module, while designing an adapter card for the HM-11 with the same pinout of the connector.
3. Provide a Grove or DFRobot standard connector for remote connection of a DHT11 humidity sensor.
Here, it seems everything, the scheme and additional information on the progress of work can be viewed on the project page vk.com/myremoter
Previous publications on the Arduino docking with the OpenHAB system using the Modbus protocol can be found here:
How to make friends OpenHAB and Arduino habrahabr.ru/post/248569
Arduino & Modbus habrahabr.ru/post/249043
Arduino & OpenHAB habrahabr.ru/post/252555
That's how I secured myself an exciting lesson for the coming weekend. At first it was fun, but soon the confusion of wires began to strain, and hope to experience this miracle in combat conditions melted away every minute. It seemed that the wiring was trying to crawl away by itself, and the construction scattered from every careless movement. And at this time in the head new brilliant thoughts were already being born ...
It was decided, you need to design a board , to which it will be easy to connect all these sensors and stuff into it everything you need for automation. And if on the same bus to hang on OpenHAB other devices, you get an excellent system of smart home:
')
So what needs to be implemented first?
- pressure measurement; temperature and humidity;
- monitoring the state of windows and doors, motion sensors, protection against fire and leakage;
- access control using IButton and RFID keys;
- control of contacts and control of actuators through discrete inputs and outputs;
- control of several remote temperature sensors through the 1-Wire interface;
- control of additional sensors, contacts and control of actuators through a radio channel.
Great, let's get down to the hardware design.
Let's try to implement the functions we need, using the most popular sensors and modules from Arduino, adding together we get the following structure:
Brief hardware description
The pressure sensor BMP180 is used to measure the pressure, and it also controls the temperature. Data is read from the BMP180 via the I2C interface. The expander of input-output ports MCP23017 is connected to the same bus, which provides control of eight external inputs / outputs and LED indication of the operation of the controller and security loops.
A DHT11 sensor with its own single-wire interface was used to measure humidity. In the future, it should be possible to install this sensor outside the controller.
DS18B20 sensors connected to a common 1-Wire bus are used to monitor the outdoor temperature, water temperature, radiators and room temperature.
The second 1-Wire interface works with the I-Button keys, it is used in the functions of arming and disarming, and the control of the electric lock. Next to it is the output of the security mode indicator. It can be connected to the LED located on the pocket of the key reader.
Security sensors through matching circuits are connected to the inputs of the ADC controller, thus, four standard security loops are implemented, which allow to monitor the integrity of the line and the detectors with normally closed and normally open contacts.
The radio channel is made on the most common and cheap radio module for Arduino made on the NRF24L01 chip. The transceiver operates at 2.4 GHz, the main disadvantage of this is the short range due to poor signal passing through concrete walls. But this disadvantage can be easily turned into an advantage by placing several controller-gateways in the apartment, while some sensors will not interfere with others located in other rooms and apartments.
For direct communication with mobile devices is designed BLE (Bluetooth Low Energy) transceiver HM-11. It will allow you to integrate Apple’s iBeacon functions into your device, as well as Google Nearby or physical-web. Later, during the discussion, it was decided to envisage the possibility of replacing the Bluetooth module of the HM-11 with an inexpensive WiFi module based on ESP8266, which should expand the application options of the controller, for example, wirelessly connect to a master controller or router or connect WiFi sensors and devices.
With the design figured out, it's time to start developing the board.
There are so few good installers among fans, so I did not make them difficult, chose a rather large size of resistors and capacitors - 0805, left a decent gap between the elements and made the marking of the components with silk-screen printing. All elements are placed on the 68.6 x 53.3 mm board, the design of which corresponds to the Arduino UNO expansion module.
A prototype PCB developed in PCAD was sent to Rezonite for prototyping at urgent production. After a few days of payment and pre-ordered equipment was already with me. Another couple of days with a soldering iron, and now the thought has acquired a real shape!
It remains to hang the module on the Arduino and here it is, the long-awaited controller!
Working with such a device is a pleasure! It was easy to test individual nodes using standard libraries and examples for Arduino. Errors and inaccuracies in the design and layout were found and corrected, of which there were not so many.
But the problem known in advance was clearly manifested, its essence is the “mono-task” of Arduino. Reading one sensor interfered with the work of others, stopped the exchange with OpenHAB.
Looking ahead I will say that I managed to solve this problem, for which I had to rewrite part of the libraries, having arranged a kind of multitasking using the timer interrupts. But about this in the next publication, which will be devoted to software.
What happened as a result of the work:
A prototype of a reliable and compact I / O controller for the Smart Home system has been created, which can be used not only for experiments, but also in real conditions, it can serve as a good basis for the development of other devices.
The modular design makes it easy to change the configuration of the controller, provides ease of testing the sensors and nodes of its composition.
An important feature of the controller is ease of assembly and adequate cost, even with pilot production, which can positively affect its popularity.
What is left to do before making a full version of the controller:
1. To carry out adjustments in the scheme and design, eliminating errors and shortcomings found in the process of alpha testing.
2. Install instead of the HM-11 module a connector for connecting the ESP8266 WiFi module, while designing an adapter card for the HM-11 with the same pinout of the connector.
3. Provide a Grove or DFRobot standard connector for remote connection of a DHT11 humidity sensor.
Here, it seems everything, the scheme and additional information on the progress of work can be viewed on the project page vk.com/myremoter
Previous publications on the Arduino docking with the OpenHAB system using the Modbus protocol can be found here:
How to make friends OpenHAB and Arduino habrahabr.ru/post/248569
Arduino & Modbus habrahabr.ru/post/249043
Arduino & OpenHAB habrahabr.ru/post/252555
Source: https://habr.com/ru/post/258127/
All Articles