Designing and embedding .vsix extensions in Visual Studio on C # for dummies
Who is this article for?
It is strange to talk about such concepts as expanding the functionality of a product such as Visual Studio in the context of “for dummies”, but there are people who watch magazines from the last page. This article is for those who already have an idea how to deal with a studio, but so far they know little about how it can help, and already really want to add my feature.
Expected results
Learn how to create and embed VSPackage extensions in VS 2012, using the example of an extension to run a calculator directly from the studio.
What is required
To develop the extension, you will need a studio itself, I will use VS 2012, and also I need to install VS SDK 2012 . I note that for development in VS 2010 there is VSPackage Builder , and this tool helps to create extensions in the designer. We will manage only the project template provided by the SDK.
Step 1. Create a project
File-> Create-> Project-> Templates-> Other Project Types-Environment Enhancement-> Visual Studio Package and set the project name VSPackageCalc.
')
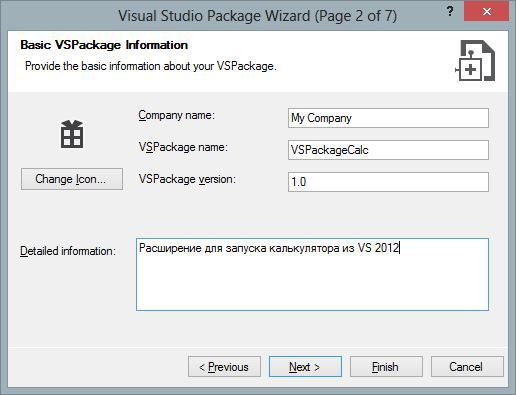
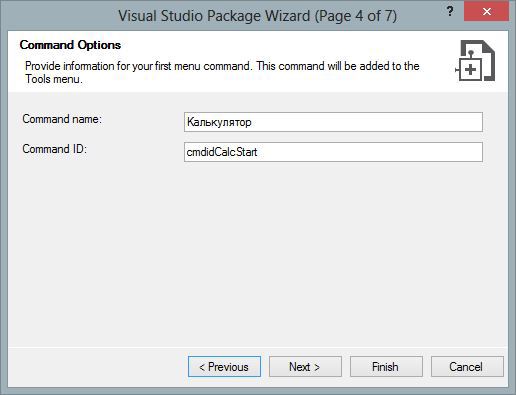
Then follow the wizard’s instructions, paying attention to the following windows.


Step 2. Edit the way to launch and display the button in the studio
File for search : VSPackageCalc.vsct - file with .vsct extension
Determine where to display the button and how to run the extension, I note two options for displaying:
- adding a menu item to the “Tools” menu
- add toolbar to toolbar
The group of commands for the “Service” menu is set as follows (the code has already been generated):
<Group guid="guidVSPackageCalcCmdSet" id="MyMenuGroup" priority="0x0600"> <Parent guid="guidSHLMainMenu" id="IDM_VS_MENU_TOOLS"/> </Group> What will be the name of the toolbar in the toolbar menu (we’ll leave the default name VSPackageCalc Toolbar):
<Menu guid="guidVSPackageCalcCmdSet" id="IDM_TLB_RTF" priority="0x0000" type="Toolbar"> <Parent guid="guidVSPackageCalcCmdSet" id="0"/> <Strings> <ButtonText>VSPackageCalc Toolbar</ButtonText> </Strings> </Menu> Honestly, IDM_VS_MENU_TOOLS type identifiers, indicating in which section of the menu you can place an extension function call, are many, and dealing with everyone is not included in the article, but you can learn something in MSDN
Further we will be defined with a type of the toolbar button. First, remove the extra buttons from our toolbar (by default, editing tools are created), replacing the code with the description of the extension toolbar button group:
<!-- Toolbar groups --> <Group guid="guidVSPackageCalcCmdSet" id="IDG_RTF_TLB_FONT1" priority="0x0100"> <Parent guid="guidVSPackageCalcCmdSet" id="IDM_TLB_RTF"/> </Group> ... on the code of one element of a toolbar:
<!-- Toolbar groups --> <Group guid="guidVSPackageCalcCmdSet" id="MyMenuGroup" priority="0x0100"> <Parent guid="guidVSPackageCalcCmdSet" id="IDM_TLB_RTF"/> </Group> Then you can edit the text and display the menu item itself:
<Button guid="guidVSPackageCalcCmdSet" id="cmdidCalcStart" priority="0x0100" type="Button"> <Parent guid="guidVSPackageCalcCmdSet" id="MyMenuGroup" /> <Icon guid="guidImages" id="bmpPic1" /> <Strings> <ButtonText></ButtonText> </Strings> </Button> You can remove the Icon element (icon), and then only text will be displayed. Otherwise, when displayed in the toolbar, there will be an icon, and in order to show the text to it, you will have to adjust the toolbar button display settings in the studio itself through the tool.
Step 3. Description of the extension functionality
To set the functionality of our extension, it needs to be described in the VSPackageCalcPackage.cs file by editing the menu button handling processing method that was also generated when the project was created. Let's delete everything inside the method and replace it with the launch of the application - the standard calculator:
private void MenuItemCallback(object sender, EventArgs e) { // : Process.Start("Calc.exe"); } Step 4. Embedding the extension
Well, almost done, all you have to do is build the project and run VSPackageCalc.vsix in the build folder.
Installation process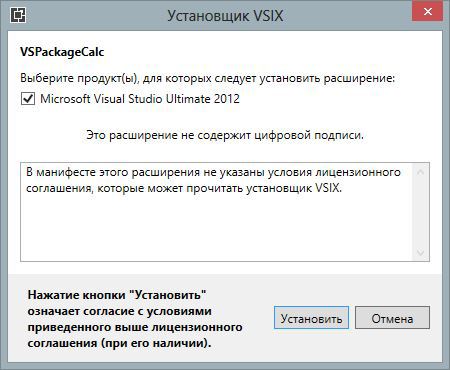
After installation, you must restart the studio.
Step 5. Using the built-in feature
Run from the Tools menu
Run from the toolbar
First you need to add the VSPackageCalc Toolbar toolbar using VS tools - right mouse over the toolbar and tick. Tula appeared on the panel:

Conclusion
Suppose the feature is not very useful and not difficult turned out, but I hope the knowledge gained will push to a deeper study of the issue of developing extensions for Visual Studio.
Source: https://habr.com/ru/post/258051/
All Articles