LFS: The dark side of power. Part 2
Foreword
So, in the previous article, we started to build LFS, having stopped at the fact that we have assembled a temporary system that has all the necessary tools for further assembly.
Now we will build the main system, performing the necessary settings for the work. As this article continues the LFS cycle, let's get down to business without any special prefaces.
However, before moving on, move a little away from the classical scheme proposed by the authors of the book and do this
')
$ su - lfs $ wget http://roy.marples.name/downloads/dhcpcd/dhcpcd-6.7.1.tar.bz2 --directory-prefix=$LFS/sources $ wget http://www.linuxfromscratch.org/blfs/downloads/7.7/blfs-bootscripts-20150304.tar.bz2 --directory-prefix=$LFS/sources $ logout The fact is that the standard documentation concerning the assembly of the base system does not describe the process of setting up the network when you receive an ip-address from a DNS provider, or if a dynamic ip gives you your home router. Or if you are building a VM that has access to the network through NAT.
Therefore, after we collect everything and everything, we will additionally install and configure a DHCP client, which will allow the fresh system to get ip immediately after a reboot and still have access to the network. This step already refers to the book BLFS.
1. Chroot, Great and Awful
First of all, again, let's make the root user the owner of the $ LFS / tools directory
$ su - root # export LFS=/mnt/lfs # chown -R root:root $LFS/tools Before that, he belonged to the user lfs, but this user is in the host system and he is not (there are no users there yet!) In the system we are collecting. All further actions will be performed as root in the section where the system is built. In this regard, we need to solve the following problems
- Problem # 1 (main): All paths that we will use must start from the root of the real system. This is vital for the normal operation of the entire assembled environment and the system core.
- Problem # 2 (attendant): taking into account that the installation paths of binary files in the assembled system and the host system are the same (or almost the same), it is necessary to “fence off” the system directories of the host and the assembled system from each other.
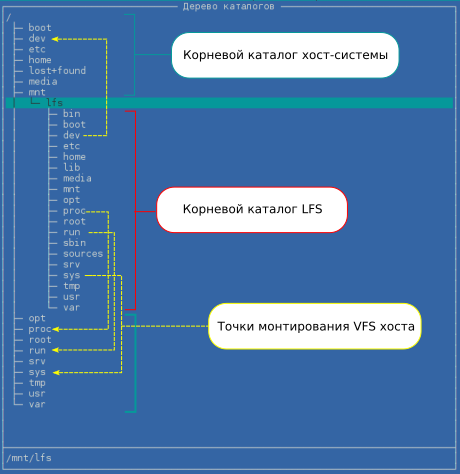
Both problems are solved by the chroot command, which allows changing the root directory of the system on the fly. The chroot field on the $ LFS section all paths to LFS directories will begin with "/", that is, we create the appearance of work in the root of the system being assembled. Those directories that are above $ LFS (that is, the / mnt / lfs directory) will be completely cut off and will not be accessible to them. This is great - all actions performed by us as root will not affect the host system. But we will need access to the VFS — the virtual file system of the host machine formed by the directories / dev, / proc, / sys, and / run. We remember one of the basic concepts of unix - “everything is a file”. We will need access to equipment and system resources, and it is done by working with VFS objects.
Access to host directories from chroot is possible if you pre-mount the necessary directories to the corresponding LFS directories. To do this, perform the following operations. Create VFS Mount Points
# mkdir -pv $LFS/{dev,proc,sys,run} Create character devices / dev / console and / dev / null
# mknod -m 600 $LFS/dev/console c 5 1 # mknod -m 666 $LFS/dev/null c 1 3 The -m switch defines access rights to the device file; c - indicates that the device is a character, and the following digits - the major and minor number of the device. The first characterizes the type of character device, the second - the device number in the system.
/ dev / console provides a terminal system, / dev / null is most often used to get data from an empty file, or to redirect output to nowhere.
Now we will mount the virtual file system in a special way. Such a mount is often called a "binding" - when it is executed, the contents of the mounted directory are mapped to the directory specified as the mount point.
# mount -v --bind /dev $LFS/dev Now our temporary system will have access to device files. Mount the remaining VFS nodes
# mount -vt devpts devpts $LFS/dev/pts -o gid=5,mode=620 # mount -vt proc proc $LFS/proc # mount -vt sysfs sysfs $LFS/sys # mount -vt tmpfs tmpfs $LFS/run / dev / pts is a file system that provides access to pseudo terminals. It is mounted with the gid = 5 identifier of the tty group with 620 access rights (-rw- -r- ---).
/ proc is a virtual file system containing information about the processes running on the system.
/ sys - virtual file system that adds to the user space information about devices and drivers present in the system
/ run is a virtual file system designed to create temporary files in the early stages of system boot. Previously, such files were created in / dev, but at the initiative of Lenard Pottering, in connection with the advancement of systemd, an additional directory was added for this purpose.
In addition, on some host systems, symbolic links to / run / shm may exist in / dev - temporary files for accessing shared memory. We check their availability on our host and, if necessary, create them in the temporary system
$ if [ -h $LFS/dev/shm ]; then > mkdir -pv $LFS/$(readlink $LFS/dev/shm) > fi Now, after the “chruta”, we get the structure shown schematically in the following figure.
LFS directory tree relative to host system
Actually we are now entering the temporary system.
# chroot "$LFS" /tools/bin/env -i \ > HOME=/root \ > TERM="$TERM" \ > PS1='\u:\w\$ ' \ > PATH=/bin:/usr/bin:/sbin:/usr/sbin:/tools/bin \ > /tools/bin/bash --login +h The command changes the system root directory to $ LFS and executes two commands - / tools / bin / env - creates a new “clean” user environment, assigning some variables: HOME - the position of the home directory; TERM - terminal type; PS1 - command line prompt format; PATH - list of paths to executable files; / tools / bin / bash --login + h - launches a new instance of the command shell, and the launch is performed as an entrance to a separate user session with disabling hashing of the paths to executable files. Note - we use programs (env and bash) compiled by us at the previous stage.
After executing the commands, we get the following result
I have no name!:/# ls dev proc run sources sys tools The root of the system has successfully changed, and at the command line prompt there is a warning “I have no name!”, Which occurs due to the absence of the / etc / passwd file in the system. Do not let this confuse you, we will create a file soon.
Note : Building the system can take a long time, so the VFS mount and chroot commands can be combined into a script in order to simplify entry into the assembled system after turning off the computer.
2. Creating the necessary directories and files
Now we need to create a directory tree of our system.
# mkdir -pv /{bin,boot,etc/{opt,sysconfig},home,lib/firmware,mnt,opt} # mkdir -pv /{media/{floppy,cdrom},sbin,srv,var} # install -dv -m 0750 /root # install -dv -m 1777 /tmp /var/tmp # mkdir -pv /usr/{,local/}{bin,include,lib,sbin,src} # mkdir -pv /usr/{,local/}share/{color,dict,doc,info,locale,man} # mkdir -v /usr/{,local/}share/{misc,terminfo,zoneinfo} # mkdir -v /usr/libexec # mkdir -pv /usr/{,local/}share/man/man{1..8} # case $(uname -m) in > x86_64) ln -sv lib /lib64 > ln -sv lib /usr/lib64 > ln -sv lib /usr/local/lib64 ;; > esac # mkdir -v /var/{log,mail,spool} # ln -sv /run /var/run # ln -sv /run/lock /var/lock # mkdir -pv /var/{opt,cache,lib/{color,misc,locate},local} Directories created by the mkdir command have, by default, 755 access (drwx rx rx). The install command is used in this case to create directories with a specific meaning of access attributes: 0750 (drwx rx ---) for / root - the root directory of the home directory; 1777 (drwx rwx rwx) for / tmp and / var / tmp are directories for hosting temporary files that all users of the system should have access to. However, it is necessary to prohibit the movement of files of another user contained in the temporary directory. For this, the so-called sticky bit is cocked, indicating that deleting files in the temporary directory is allowed only to their owner.
In case a 64-bit system is built, it is necessary to create symbolic links leading to the / lib directory containing the system libraries. In addition, some programs use hard-coded paths to the necessary components of the system. While we are working on a temporary system, these paths will be different (for example, all executable files are currently located in the / tools / bin directory), therefore, it is necessary to create symbolic links to correct this discrepancy
# ln -sv /tools/bin/{bash,cat,echo,pwd,stty} /bin # ln -sv /tools/bin/perl /usr/bin # ln -sv /tools/lib/libgcc_s.so{,.1} /usr/lib # ln -sv /tools/lib/libstdc++.so{,.6} /usr/lib # sed 's/tools/usr/' /tools/lib/libstdc++.la > /usr/lib/libstdc++.la # ln -sv bash /bin/sh Traditionally, in Linux, the list of mounted file systems was located in the / etc / mtab file. However, modern kernels use the / proc virtual file system for this. Create a symbolic link
# ln -sv /proc/self/mounts /etc/mtab for programs that continue to use / etc / mtab.
Now we need to create the / etc / passwd file containing the list of users registered in the system.
# cat > /etc/passwd << "EOF" > root:x:0:0:root:/root:/bin/bash > bin:x:1:1:bin:/dev/null:/bin/false > daemon:x:6:6:Daemon User:/dev/null:/bin/false > messagebus:x:18:18:D-Bus Message Daemon User:/var/run/dbus:/bin/false > nobody:x:99:99:Unprivileged User:/dev/null:/bin/false > EOF using for this purpose the redirection of standard input to the file, since in the temporary system we do not have a text editor. This text file has the following format - each line contains information about the user in the form
<login>:<password>:<UID>:<GID>:<GECOS>:<home>:<shell> - login - username in the system
- password is a password hash that was previously stored here, but now moved to a separate / etc / shadow file, which is not readable by the average user. Instead, the placeholder "x" is now put.
- UID - user ID - a number from 0 to 2 32 - 1. Actually, the main purpose of this file is to match the login and user ID.
- GID - the default group identifier in which the user is included
- GECOS - information field that stores additional information about the user. It has no clear syntax and in fact can contain any comments on this account.
- home - the absolute path to the user's home directory
- shell - the command shell used in this user's session
A colon is used as a field separator. Our file contains a description of the superuser root, as well as special users bin, daemon, a messagebus on whose behalf some programs and services are started.
The unprivileged user nobody has a separate meaning - on its behalf we will run tests of some collected system components. Since we do not yet have access to the useradd utility of this user, as well as others, we create it manually.
Manually create and the necessary set of user groups in the / etc / group file
# cat > /etc/group << "EOF" > root:x:0: > bin:x:1:daemon > sys:x:2: > kmem:x:3: > tape:x:4: > tty:x:5: > daemon:x:6: > floppy:x:7: > disk:x:8: > lp:x:9: > dialout:x:10: > audio:x:11: > video:x:12: > utmp:x:13: > usb:x:14: > cdrom:x:15: > adm:x:16: > messagebus:x:18: > systemd-journal:x:23: > input:x:24: > mail:x:34: > nogroup:x:99: > users:x:999: > EOF Each line describes a separate group in the format
<group name>:<group passwd>:<GID>:<users list> - group name - the symbolic name of the group
- group passwd - group password - contains “x” because this field is obsolete and is not used at present
- GID - group ID
- users list - a list of users in a group, separated by commas.
I will briefly describe the purpose of each group.
- root - a group of super users with root rights. Under normal conditions, this is only the root user.
- bin, sys - these groups are preserved as historically existing, some programs do not work if they are not in the system
- kmem - kernel memory access group
- tape - device node access group
- tty - group access terminal devices (including the console)
- daemon - unprivileged daemon startup group
- floppy, cdrom, disk - groups of access to various types of disk drives
- lp is a group of access to a printer historically “sitting” on a parallel LPT port.
- dialout - a group of access to devices that perform "dialing" during a network connection (modems)
- audio, video - access to multimedia devices
- usb - USB bus access group
- adm - access group for viewing system logs in the / var / log directory
- messagebus - group access to the transmission of messages between the devices D-BUS
- systemd-journal - access to systemd logs
- input - access to user input devices
- mail - access to e-mail services
- nogroup is an empty group
- users - ordinary, unprivileged, system users
You can now re-enter a user session.
exec /tools/bin/bash --login +h and, voila, the system now knows the name of the user on whose behalf you are logged in
root:/# We initialize some of the log files required by the system, assigning the appropriate rights.
root:/# touch /var/log/{btmp,lastlog,wtmp} root:/# chgrp -v utmp /var/log/lastlog root:/# chmod -v 664 /var/log/lastlog root:/# chmod -v 600 /var/log/btmp 3. The long and tedious process of building a GNU environment ...
This stage is the most laborious and long. You have to manually collect all the necessary packages GNU-environment - the minimum set of programs that allows you to get a workable linux-system.
I must say, as we move through the list of collected packages, the nervous tension increases - the list is quite extensive, and the operations are quite monotonous. At some point, the question arises in my head - but to hell do I need it at all ??? The main thing here is to collect thoughts and an effort of will to overcome discouragement - everything started should be completed.
The sequence of assembling packages is designed so that at the current stage all dependencies necessary for its implementation are satisfied. So the order of assembly can not be violated.
The assembly of each package is accompanied by detailed instructions, providing in general
- applying patches to the source code of the package. All necessary patches are downloaded by us and located in the / sources directory
- source editing performed by sed. Here it is advisable to grasp the meaning of regular expressions defining the editing pattern, since thoughtless input of commands will most likely lead to errors. And sed does not display error messages - if you make a mistake when entering the template, the operation may not be performed or will be executed incorrectly, which will be fatal to the build process.
- configuration Separate attention to directory prefixes - when installing, all executable binaries, libraries and documentation should appear in their places.
- copying binary files, assigning rights to files and directories, creating symbolic links. Some links may lead to non-existent FS points, so the syntax of symlink creation commands should be taken literally and should not allow any independent activity when constructing paths. Follow the instructions rigorously!
And finally, the most important thing is the tests! When building a temporary system, we ignored the tests, firstly because testing tools were not available to us, and secondly, there was no need for tests. Now, when we collect the final versions of the system software, we are obliged to comprehensively check the result of the assembly for proper functioning. This is especially true of the compiler, standard libraries and software assembly tools (assembler and linker).
Do not skip testing if there is a note in the instructions stating that it should be completed. Testing takes a lot of time, for example, building a GCC with tests takes place within 63 SBUs, which is about 150 minutes on my machine. But we have no other choice.
The instruction contains remarks about which tests may not take place with an indication of the reasons. After the tests are completed, we verify the obtained result with the expected one according to the instructions. The reference logs of all tests performed for the LFS 7.7 version are based on this link.
As an example, I’ll give a squeeze from my GCC testing log.
GCC short test log
=== g ++ Summary ===
# of expected passes 88501
# of unexpected successes 2
# of expected failures 443
# of unsupported tests 3058
/sources/gcc-build/gcc/testsuite/g++/../../xg++ version 4.9.2 (GCC)
- === gcc Summary ===
# of expected passes 106352
# of expected failures 252
# of unsupported tests 1422
/ sources / gcc-build / gcc / xgcc version 4.9.2 (GCC)
=== libatomic tests ===
- === libatomic Summary ===
# of expected passes 54
=== libgomp tests ===
Running target unix
=== libgomp Summary ===
# of expected passes 693
=== libitm tests ===
Running target unix
=== libitm Summary ===
# of expected passes 26
# of expected failures 3
# of unsupported tests 1
=== libstdc ++ tests ===
- === libstdc ++ Summary ===
# of expected passes 9925
# of expected failures 41
# of unsupported tests 233
Compiler version: 4.9.2 (GCC)
Platform: x86_64-unknown-linux-gnu
which can be compared with the sample
The official GCC build log from the LFS authors
=== gcc Summary ===
# of expected passes 106401
# of expected failures 252
# of unsupported tests 1404
/ sources / gcc-build / gcc / xgcc version 4.9.2 (GCC)
make [4]: Leaving directory '/ sources / gcc-build / gcc'
- === g ++ Summary ===
# of expected passes 88501
# of unexpected successes 2
# of expected failures 443
# of unsupported tests 3058
/sources/gcc-build/gcc/testsuite/g++/../../xg++ version 4.9.2 (GCC)
- === libstdc ++ Summary ===
# of expected passes 9835
# of expected failures 41
# of unsupported tests 278
make [5]: Leaving directory '/ sources / gcc-build / x86_64-unknown-linux-gnu / libstdc ++ - v3 / testsuite'
make [4]: Leaving directory '/ sources / gcc-build / x86_64-unknown-linux-gnu / libstdc ++ - v3 / testsuite'
Making check in python
- === libgomp Summary ===
# of expected passes 693
make [5]: Leaving directory '/ sources / gcc-build / x86_64-unknown-linux-gnu / libgomp / testsuite'
make [4]: Leaving directory '/ sources / gcc-build / x86_64-unknown-linux-gnu / libgomp / testsuite'
make [4]: Entering directory '/ sources / gcc-build / x86_64-unknown-linux-gnu / libgomp'
true DO = all multi-do # make
make [4]: Leaving directory '/ sources / gcc-build / x86_64-unknown-linux-gnu / libgomp'
- === libitm Summary ===
# of expected passes 26
# of expected failures 3
# of unsupported tests 1
make [5]: Leaving directory '/ sources / gcc-build / x86_64-unknown-linux-gnu / libitm / testsuite'
make [4]: Leaving directory '/ sources / gcc-build / x86_64-unknown-linux-gnu / libitm / testsuite'
make [4]: Entering directory '/ sources / gcc-build / x86_64-unknown-linux-gnu / libitm'
- === libatomic Summary ===
# of expected passes 54
make [5]: Leaving directory '/ sources / gcc-build / x86_64-unknown-linux-gnu / libatomic / testsuite'
make [4]: Leaving directory '/ sources / gcc-build / x86_64-unknown-linux-gnu / libatomic / testsuite'
make [4]: Entering directory '/ sources / gcc-build / x86_64-unknown-linux-gnu / libatomic'
true DO = all multi-do # make
make [4]: Leaving directory '/ sources / gcc-build / x86_64-unknown-linux-gnu / libatomic'
- === g ++ Summary ===
# of expected passes 88501
# of unexpected successes 2
# of expected failures 443
# of unsupported tests 3058
/sources/gcc-build/gcc/testsuite/g++/../../xg++ version 4.9.2 (GCC)
- === gcc Summary ===
# of expected passes 106401
# of expected failures 252
# of unsupported tests 1404
/ sources / gcc-build / gcc / xgcc version 4.9.2 (GCC)
=== libatomic tests ===
- === libatomic Summary ===
# of expected passes 54
=== libgomp tests ===
Running target unix
=== libgomp Summary ===
# of expected passes 693
=== libitm tests ===
Running target unix
=== libitm Summary ===
# of expected passes 26
# of expected failures 3
# of unsupported tests 1
=== libstdc ++ tests ===
- === libstdc ++ Summary ===
# of expected passes 9835
# of expected failures 41
# of unsupported tests 278
Compiler version: 4.9.2 (GCC)
Platform: x86_64-unknown-linux-gnu
# of expected passes 106401
# of expected failures 252
# of unsupported tests 1404
/ sources / gcc-build / gcc / xgcc version 4.9.2 (GCC)
make [4]: Leaving directory '/ sources / gcc-build / gcc'
- === g ++ Summary ===
# of expected passes 88501
# of unexpected successes 2
# of expected failures 443
# of unsupported tests 3058
/sources/gcc-build/gcc/testsuite/g++/../../xg++ version 4.9.2 (GCC)
- === libstdc ++ Summary ===
# of expected passes 9835
# of expected failures 41
# of unsupported tests 278
make [5]: Leaving directory '/ sources / gcc-build / x86_64-unknown-linux-gnu / libstdc ++ - v3 / testsuite'
make [4]: Leaving directory '/ sources / gcc-build / x86_64-unknown-linux-gnu / libstdc ++ - v3 / testsuite'
Making check in python
- === libgomp Summary ===
# of expected passes 693
make [5]: Leaving directory '/ sources / gcc-build / x86_64-unknown-linux-gnu / libgomp / testsuite'
make [4]: Leaving directory '/ sources / gcc-build / x86_64-unknown-linux-gnu / libgomp / testsuite'
make [4]: Entering directory '/ sources / gcc-build / x86_64-unknown-linux-gnu / libgomp'
true DO = all multi-do # make
make [4]: Leaving directory '/ sources / gcc-build / x86_64-unknown-linux-gnu / libgomp'
- === libitm Summary ===
# of expected passes 26
# of expected failures 3
# of unsupported tests 1
make [5]: Leaving directory '/ sources / gcc-build / x86_64-unknown-linux-gnu / libitm / testsuite'
make [4]: Leaving directory '/ sources / gcc-build / x86_64-unknown-linux-gnu / libitm / testsuite'
make [4]: Entering directory '/ sources / gcc-build / x86_64-unknown-linux-gnu / libitm'
- === libatomic Summary ===
# of expected passes 54
make [5]: Leaving directory '/ sources / gcc-build / x86_64-unknown-linux-gnu / libatomic / testsuite'
make [4]: Leaving directory '/ sources / gcc-build / x86_64-unknown-linux-gnu / libatomic / testsuite'
make [4]: Entering directory '/ sources / gcc-build / x86_64-unknown-linux-gnu / libatomic'
true DO = all multi-do # make
make [4]: Leaving directory '/ sources / gcc-build / x86_64-unknown-linux-gnu / libatomic'
- === g ++ Summary ===
# of expected passes 88501
# of unexpected successes 2
# of expected failures 443
# of unsupported tests 3058
/sources/gcc-build/gcc/testsuite/g++/../../xg++ version 4.9.2 (GCC)
- === gcc Summary ===
# of expected passes 106401
# of expected failures 252
# of unsupported tests 1404
/ sources / gcc-build / gcc / xgcc version 4.9.2 (GCC)
=== libatomic tests ===
- === libatomic Summary ===
# of expected passes 54
=== libgomp tests ===
Running target unix
=== libgomp Summary ===
# of expected passes 693
=== libitm tests ===
Running target unix
=== libitm Summary ===
# of expected passes 26
# of expected failures 3
# of unsupported tests 1
=== libstdc ++ tests ===
- === libstdc ++ Summary ===
# of expected passes 9835
# of expected failures 41
# of unsupported tests 278
Compiler version: 4.9.2 (GCC)
Platform: x86_64-unknown-linux-gnu
I was lucky - I got the results that coincide well with the proposed authors. What and you want.
4. Re-login, clearing debug information, deleting temporary system
So, you have collected all the packages. Congratulations - the most and most difficult part of the journey has been covered by you. Now let's get into our new system.
# logout # chroot $LFS /tools/bin/env -i \ > HOME=/root TERM=$TERM PS1='\u:\w\$ ' \ > PATH=/bin:/usr/bin:/sbin:/usr/sbin \ > /tools/bin/bash --login restarting / tools / bin / bash with hashing enabled, and removing the / tools / bin directory from the search paths for executable files. We cut off debug information
# /tools/bin/find /{,usr/}{bin,lib,sbin} -type f \ > -exec /tools/bin/strip --strip-debug '{}' ';' Clean temporary directory from files left after testing.
# rm -rf /tmp/* log in again, launching already “combat” bash
# chroot "$LFS" /usr/bin/env -i \ > HOME=/root TERM="$TERM" PS1='\u:\w\$ ' \ > PATH=/bin:/usr/bin:/sbin:/usr/sbin \ > /bin/bash --login Now we no longer need a temporary system - delete it
# rm -rf /tools Fuh ... the main difficulties are over. It remains for us to configure our system to boot, build the kernel, configure the network.But I will write about this in the final article.
The ending should ...
Source: https://habr.com/ru/post/257941/
All Articles