We put controllers on a diet: Android
The MVC pattern appeared quite a long time ago and was created in order to separate the business logic of the application from the presentation. But not all programmers implement it correctly, which is why “Thick, stupid, ugly controllers” arise that contain tons of code. This article will discuss the correct implementation of the View classes, in order to reduce the amount of code in the controllers and leave room for the pure business logic of the application.

Everyone probably needs to know that MVC is of two types - with an active model and passive, the difference between which lies in the fact that the passive model serves as a simple data source (for example, DAO for the database), and the active model itself updates the status of its subscribers. - View. The passive model is more versatile and simple, besides it is most often used in development, so it will be used as an example in this article. Let's take a look at its scheme.
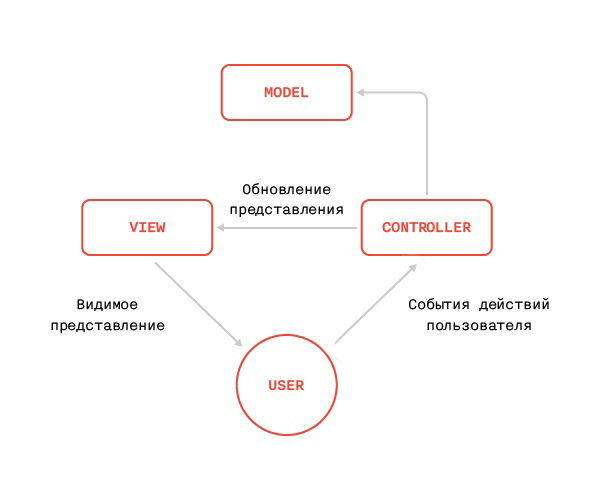
The user interacts with the controller, the controller requests data from the model and fills the View that is displayed to the user, everything is simple.
If everything seems clear with the controller and model, then View has some difficulties, the main reason is View, as such, no, nobody thinks about creating separate View classes with an interface through which the controller could transmit data for display . Most simply create xml markup and fill it directly in the controller, which is why the code, which in theory should contain business logic, is filled with display details, such as text color, font size, setting text in TextView, working with ActionBar, NavigatonDrawer 'om and others. As a result, the Activity code grows to 1000 lines and at first glance contains some kind of garbage.
')
Let's take a look at how a typical Android application is done without creating separate View classes, and another one, in which the View is fully used.
Our application will solve a quite common task - to load and display a user profile. Let's start the implementation.
To do this, create a model class User, which will store the name and surname of the user.
And the provider class that will load it. This class is created for demonstration purposes; in a real project, you should not use AsyncTask to load data and you should not write your bike that does not even take into account the Life cycle of the Activity and does not handle errors; it is better to use a ready-made solution, for example, RoboSpice. Here, this class is needed, for the most part, just to hide the details of the implementation of loading data in a separate stream.
Next, an xml layout is created, which we omit and the controller, which should link View and Model, and add some business logic to our application. An Activity appears in the form of a controller, usually it is implemented like this:
When the screen opens, the profile loading starts, the progress bar is displayed, when the profile is loaded, the progress bar is hidden and the screen is filled with data.
As you can see from this code, it mixes work with presentation and business logic.
If now everything does not look so bad, then with the development of the project such code will become poorly readable and difficult to maintain.
Let's remember about OOP and add a little abstraction to our code.
View assumes all work with the view of the Activity. To display the user profile, simply use the showUser (User) method and pass the model object to it. In a real project for View, it is desirable to create a base class in which you can transfer helper methods, such as showProgressBar (), hideProgressBar (), and others. As a result, all the logic of working with a view is removed from the Activity to a separate entity, which significantly reduces the amount of controller code and creates a transparent abstraction of working with the View.
Activity now knows nothing about TextView and other controls. All interaction with the view takes place using the UserView class and its interface.
Now the controller operates with only two entities - UserView and UserProvider, there are no subtleties in the implementation of the data mapping. The code has become cleaner and clearer.
Now the UserView class simply displays the data, you may want to make state saving between screen rotations — this issue can be easily solved by creating a method that writes the View state to Parcelable or Bundle. Also, most likely, you will need the ability to handle clicks, in this case, OnClickListener itself is better to create in the View class and pass a callback to it that your controller implements.
That's all. This solves the problem of underestimated View in Android. Using this approach, the amount of code in your controllers will noticeably decrease, the level of abstractions will increase and the dollar will again cost 30 rubles.
See also:
Styling iOS Applications: How We Stretch Fonts, Colors, and Images
Architectural design of mobile applications
Architectural design of mobile applications: part 2
Everyone probably needs to know that MVC is of two types - with an active model and passive, the difference between which lies in the fact that the passive model serves as a simple data source (for example, DAO for the database), and the active model itself updates the status of its subscribers. - View. The passive model is more versatile and simple, besides it is most often used in development, so it will be used as an example in this article. Let's take a look at its scheme.
The user interacts with the controller, the controller requests data from the model and fills the View that is displayed to the user, everything is simple.
- When using MVC in Android, Activity or Fragment is a controller.
- A model is a set of classes that serve as a source of application data.
- View - xml markup and custom View components, like Button, etc.
If everything seems clear with the controller and model, then View has some difficulties, the main reason is View, as such, no, nobody thinks about creating separate View classes with an interface through which the controller could transmit data for display . Most simply create xml markup and fill it directly in the controller, which is why the code, which in theory should contain business logic, is filled with display details, such as text color, font size, setting text in TextView, working with ActionBar, NavigatonDrawer 'om and others. As a result, the Activity code grows to 1000 lines and at first glance contains some kind of garbage.
')
Let's take a look at how a typical Android application is done without creating separate View classes, and another one, in which the View is fully used.
Our application will solve a quite common task - to load and display a user profile. Let's start the implementation.
To do this, create a model class User, which will store the name and surname of the user.
public class User { private final String firstname; private final String lastname; public User(String firstname, String lastname) { this.firstname = firstname; this.lastname = lastname; } // getters } And the provider class that will load it. This class is created for demonstration purposes; in a real project, you should not use AsyncTask to load data and you should not write your bike that does not even take into account the Life cycle of the Activity and does not handle errors; it is better to use a ready-made solution, for example, RoboSpice. Here, this class is needed, for the most part, just to hide the details of the implementation of loading data in a separate stream.
public class UserProvider { // Callback public void loadUser(Callback callback) { new LoadUserTask(callback).execute(); } public class LoadUserTask extends AsyncTask<Void, Void, User> { private Callback callback; public LoadUserTask(Callback callback) { this.callback = callback; } @Override protected User doInBackground(Void... params) { User user = new User("firstname", "lastname"); return user; } @Override protected void onPostExecute(User user) { super.onPostExecute(user); callback.onUserLoaded(user); } } public interface Callback { void onUserLoaded(User user); } } Next, an xml layout is created, which we omit and the controller, which should link View and Model, and add some business logic to our application. An Activity appears in the form of a controller, usually it is implemented like this:
public class UserProfileActivity extends Activity implements Callback { private TextView firstnameTxt, lastnameTxt; private ProgressBar progressBar; private UserProvider userProvider; @Override protected void onCreate(Bundle savedInstanceState) { super.onCreate(savedInstanceState); setContentView(R.layout.activity_user_profile); firstnameTxt = (TextView) findViewById(R.id.firstname); lastnameTxt = (TextView) findViewById(R.id.lastname); progressBar = (Progressbar) findViewById(R.id.progressBar); userProvider = new UserProvider(); loadUser(); } @Override public void onUserLoaded(User user) { hideProgressBar(); showUser(user); } private void loadUser() { showProgressBar(); userProvider.loadUser(this); } public void showUser(User user) { firstnameTxt.setText(user.getFirstname()); lastnameTxt.setText(user.getLastname()); } public void showProgressBar() { progressBar.setVisibility(View.VISIBLE); } public void hideProgressBar() { progressBar.setVisibility(View.INVISIBLE); } } When the screen opens, the profile loading starts, the progress bar is displayed, when the profile is loaded, the progress bar is hidden and the screen is filled with data.
As you can see from this code, it mixes work with presentation and business logic.
If now everything does not look so bad, then with the development of the project such code will become poorly readable and difficult to maintain.
Let's remember about OOP and add a little abstraction to our code.
public class UserView { private final TextView firstnameTxt, lastnameTxt; private final ProgressBar progressBar; public UserView(View rootView) { firstnameTxt = (TextView) rootView.findViewById(R.id.firstname); lastnameTxt = (TextView) rootView.findViewById(R.id.lastname); progressBar = (ProgressBar) rootView.findViewById(R.id.progressBar); } public void showUser(User user) { firstnameTxt.setText(user.getFirstname()); lastnameTxt.setText(user.getLastname()); } public void showProgressBar() { progressBar.setVisibility(View.VISIBLE); } public void hideProgressBar() { progressBar.setVisibility(View.INVISIBLE); } } View assumes all work with the view of the Activity. To display the user profile, simply use the showUser (User) method and pass the model object to it. In a real project for View, it is desirable to create a base class in which you can transfer helper methods, such as showProgressBar (), hideProgressBar (), and others. As a result, all the logic of working with a view is removed from the Activity to a separate entity, which significantly reduces the amount of controller code and creates a transparent abstraction of working with the View.
Activity now knows nothing about TextView and other controls. All interaction with the view takes place using the UserView class and its interface.
public class UserProfileActivity extends Activity { private UserView userView; private UserProvider userProvider; @Override protected void onCreate(Bundle savedInstanceState) { super.onCreate(savedInstanceState); setContentView(R.layout.activity_user); userView = new UserView(getWindow().getDecorView()) userProvider = new UserProvider(); loadUser(); } @Override public void onUserLoaded(User user) { userView.hideProgressBar(); userView.showUser(user); } private void loadUser() { userView.showProgressBar(); userProvider.loadUser(this); } } Now the controller operates with only two entities - UserView and UserProvider, there are no subtleties in the implementation of the data mapping. The code has become cleaner and clearer.
Now the UserView class simply displays the data, you may want to make state saving between screen rotations — this issue can be easily solved by creating a method that writes the View state to Parcelable or Bundle. Also, most likely, you will need the ability to handle clicks, in this case, OnClickListener itself is better to create in the View class and pass a callback to it that your controller implements.
That's all. This solves the problem of underestimated View in Android. Using this approach, the amount of code in your controllers will noticeably decrease, the level of abstractions will increase and the dollar will again cost 30 rubles.
See also:
Styling iOS Applications: How We Stretch Fonts, Colors, and Images
Architectural design of mobile applications
Architectural design of mobile applications: part 2
Source: https://habr.com/ru/post/257861/
All Articles