Configuring a Pfsense based gateway. Part 1
What will each user always notice? That's right, the lack of internet. But how? "Vkontakte" is not loaded - it means that there is no Internet. But it happens that the director or the brave warriors from the information security department want to ban something, collect something, check it somewhere. And then the administrator begins to dance around the gateway to the Internet. If the company has a lot of money, then the dances can be long and with gallant cavaliers (Mar Checkpoint, Mr. PaloAlto, Mr. SonicWall). But what to do if there is only a lot of money for hardware, they want a lot of functionality, but they need to be done quickly? Run Mr Proper Pfsense, actively supported by the community free, flexible and easy to configure FreeBSD-based firewall, comes to the rescue.
In the first part, we will look at the classics of the genre — a firewall with a proxy (authentication using Active Directory credentials) and content filtering, as well as some kind of anti-virus checking of traffic on the fly. We will separately consider the issue of setting up remote user access to the enterprise network.
If there is interest, I can write the second part of the deployment instructions, where I will consider balancing between several providers, creating and simultaneously operating two gateways, and adding security features such as IPS / IDS, spam filtering, more kosher filtering with Dansguardian tools, IM and HTTPS sniffing content and much more interesting.
To reduce the possible holivar: "Yes, this can be done on% yourdistrname%" and "Yes, everything can be configured from the command line." So, all the formalities are met - you can begin.
')
Installation will do with a flash drive. To do this, use the pfSense-memstick-2.2.2-RELEASE-i386.img.gz image, downloaded from one of the mirrors listed on the official website. It is very convenient that at first we choose architecture, functionality, and then we are offered a list of mirrors. I will not describe the installation process in detail, everything is elementary there, no additional settings are needed. At the end of the installation, you will be prompted to assign VLANs and define interfaces, as well as their purpose. It looks like this:

After configuring the interfaces, we get to the menu with a limited number of items, but it is possible to go to the shell. In my opinion, the most useful menu item is the ability to reset the password on the web muzzle. The pfsense developers strongly recommend that all configuration be done only through a graphical interface. And it looks pretty nice, the set of widgets is wide, you can customize their set for yourself.

First of all, create your internal CA on pfsense or use the existing one. To do this, select Cert Manager in the System menu and make the necessary settings in the CA section: you need to specify the key length, the hashing algorithm, the lifetime and the full name of the CA. We will need the configured CA to create an OpenVPN server and to work on LDAPS.

Now we integrate our gateway with Active Directory. In the Servers section of the User Manager block from the System menu, settings were made to use a domain controller. Everything is so disgraceful - you can specify the address, transport, search area, containers with accounts, credits for creating a binding and a template for filling in Microsoft AD - you can publish users'kraken to the Internet.

Let's proceed to setting up traffic filtering rules. First, if any grouping of addresses, ports, URLs is required, then welcome to the Aliases tab. Secondly, you can configure the time intervals that can be used for the operation of the rules. By default, a rule is created that “everything is possible everywhere and everywhere”, as well as a rule that does not block access to the web. Creating rules looks pretty casual:

However, there are a number of additional features, for example, allowed OS, which can be set TCP-flags, schedule work rules, as well as an inspector of application-level protocols.

Setting up OpenVPN remote access with password authentication in the local database and certificate can be found here - www.youtube.com/watch?v=VdAHVSTl1ys . The choice of remote access protocols is small - IPSec, L2TP, PPTP and OpenVPN. When you select PPTP, pfsense itself will write to you that the protocol is not secure and it is better to choose another one.

Authentication in the local database was chosen in order to preserve the possibility of a remote connection in case of any problems with the directory servers.
To export the OpenVPN settings for devices on different platforms, you need to install the OpenVPN Client Export Utility package, which is in the list of packages available for installation. Now we return to the sources - in the Cert Manager tab, there we create a certificate for the VPN server and each client. The only difference is in the type of certificate.

Go to the OpenVPN server setup. We select the server operation mode - in my case “Remote Access (SSL / TLS + User Auth)”, authentication server, protocol, port, necessary VPN server certificate and set the necessary encryption parameters. What is offered by default is not the best choice.

Next, set up a VPN-network and set up the settings for clients. Here we can determine whether to issue a DNS server to the client, whether to drive all client traffic into the tunnel, etc. After that, save and go to the client export tab. From here we export the necessary settings for the connection and user certificate.

By the way, when setting up the server, you could use the Wizard, which would lead you through all the “sorrows and tribulations” of the OpenVPN settings. A certain analogue of the “Make Good” button.
Of course, if you have many users need remote access, then the work on issuing and revoking certificates, exporting settings, setting up users in a local database will turn into a very boring, but responsible task. I believe that with such requirements for scaling it is necessary to have a separate CA with a CRL and a single authentication database, such as Active Directory. But if there are few users, the option proposed above is fully functional.
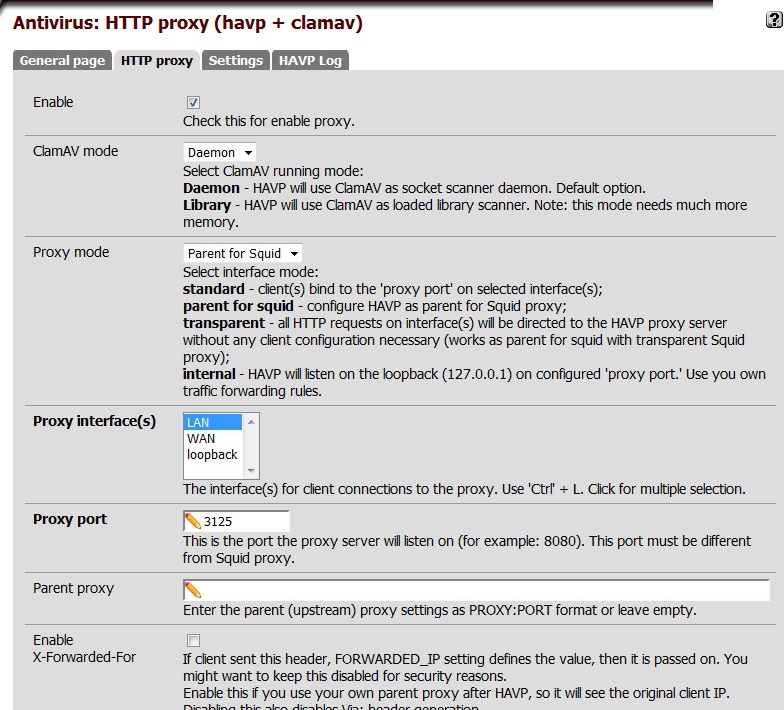
It remains for us to configure the proxy, content filtering and anti-virus scanning. Installing a HAVP package is a proxy with a ClamAV scanner. To configure, we specify the ClamAV mode and proxy, port, interface, settings for checking for passing traffic. Since squid is planned to be used, our mode of operation is “Parent for Squid”. Separately, we configure the settings for updating the anti-virus database and its mirror.
Go to the Squid setup. After installing the package, select the proxy mode of operation and the port, then on the tab “Auth Settings” specify the authentication method used. Since we have the task of using Active Directory as a user base, we use the LDAP protocol. Settings for integration with a domain controller are presented below.

If necessary, configure the settings of the upstream proxy, cache and traffic management, and ACL. For example, I made * microsoft.com / * to whitelist for normal updates and OS activation, and that didn’t scan. But more about that below.
Now filtering - set up squidGuardian. In terms of filtering approaches, in principle, there is a good article - “To-do: Filter everything and everything” . After installing squidGuardian, use the “Proxy filter” item of the “Services” menu to proceed to its configuration. On the Blacklist tab, we indicate where to download the blacklist in tar or tar.gz format, and also on the General settings tab, tick the box to enable the use of blacklist. I used free blacklist from here . If the content filter needs to work by time, the intervals can be set on the Times tab. Next you are setting up public or group ACLs, the main thing is not to forget to tick the box next to the ban on the use of IP addresses in the URL. To set up filtering rules, click “Target Rules List” and select actions for the necessary categories, as well as the default action.

If you need to create your own categories, you can use the Target Categories page. After saving, your category will appear in the general list of rules. I created my category to allow access to resources by IP addresses that do not have a DNS name.
And now a fly in the ointment. I fully admit that the problems are caused by their own curvature of the hands, but still. If someone from the community can suggest any solutions, I will be extremely grateful.
1. Developers have long promised, but have not yet done support for L2TP over IPSec.
2. Problems attempting to grow pfsense to use AD CS certificates. I read the discussion from here , but I couldn’t beat the small dragon.
3. The problems of the work of client-banks in case you have balancing between providers.
4. If you have specified user authentication via AD, and the domain controller is unavailable, then your built-in (!!!) pfsense admin will also refuse to work. There is a discussion on the forum, people write scripts in php to resolve the issue, but this is not a recommended solution.
5. Apparently here my personal problems with the Cyrillic alphabet. First, authentication does not work if the password is used in the Cyrillic layout. Secondly, problems in displaying AD container names in Cyrillic.
6. Despite all the efforts, from time to time there are problems with the services from Microsoft. Most often, OS activation does not work. I think, here nevertheless it will be necessary to correct a squid config manually.
In conclusion, I would like to note that this distribution distribution appeals to me with broad functionality and flexibility, it is very easy to clone the settings to several gateways, it is possible to make embedded solutions. Of course, full configuration via the web IMHO is not good, but it is precisely in this way that developers fencing novice admins from the painful blows of a rake of different heights.
In the first part, we will look at the classics of the genre — a firewall with a proxy (authentication using Active Directory credentials) and content filtering, as well as some kind of anti-virus checking of traffic on the fly. We will separately consider the issue of setting up remote user access to the enterprise network.
If there is interest, I can write the second part of the deployment instructions, where I will consider balancing between several providers, creating and simultaneously operating two gateways, and adding security features such as IPS / IDS, spam filtering, more kosher filtering with Dansguardian tools, IM and HTTPS sniffing content and much more interesting.
To reduce the possible holivar: "Yes, this can be done on% yourdistrname%" and "Yes, everything can be configured from the command line." So, all the formalities are met - you can begin.
')
Installation will do with a flash drive. To do this, use the pfSense-memstick-2.2.2-RELEASE-i386.img.gz image, downloaded from one of the mirrors listed on the official website. It is very convenient that at first we choose architecture, functionality, and then we are offered a list of mirrors. I will not describe the installation process in detail, everything is elementary there, no additional settings are needed. At the end of the installation, you will be prompted to assign VLANs and define interfaces, as well as their purpose. It looks like this:
After configuring the interfaces, we get to the menu with a limited number of items, but it is possible to go to the shell. In my opinion, the most useful menu item is the ability to reset the password on the web muzzle. The pfsense developers strongly recommend that all configuration be done only through a graphical interface. And it looks pretty nice, the set of widgets is wide, you can customize their set for yourself.
First of all, create your internal CA on pfsense or use the existing one. To do this, select Cert Manager in the System menu and make the necessary settings in the CA section: you need to specify the key length, the hashing algorithm, the lifetime and the full name of the CA. We will need the configured CA to create an OpenVPN server and to work on LDAPS.
Now we integrate our gateway with Active Directory. In the Servers section of the User Manager block from the System menu, settings were made to use a domain controller. Everything is so disgraceful - you can specify the address, transport, search area, containers with accounts, credits for creating a binding and a template for filling in Microsoft AD - you can publish users'
Let's proceed to setting up traffic filtering rules. First, if any grouping of addresses, ports, URLs is required, then welcome to the Aliases tab. Secondly, you can configure the time intervals that can be used for the operation of the rules. By default, a rule is created that “everything is possible everywhere and everywhere”, as well as a rule that does not block access to the web. Creating rules looks pretty casual:
However, there are a number of additional features, for example, allowed OS, which can be set TCP-flags, schedule work rules, as well as an inspector of application-level protocols.
Setting up OpenVPN remote access with password authentication in the local database and certificate can be found here - www.youtube.com/watch?v=VdAHVSTl1ys . The choice of remote access protocols is small - IPSec, L2TP, PPTP and OpenVPN. When you select PPTP, pfsense itself will write to you that the protocol is not secure and it is better to choose another one.
Authentication in the local database was chosen in order to preserve the possibility of a remote connection in case of any problems with the directory servers.
To export the OpenVPN settings for devices on different platforms, you need to install the OpenVPN Client Export Utility package, which is in the list of packages available for installation. Now we return to the sources - in the Cert Manager tab, there we create a certificate for the VPN server and each client. The only difference is in the type of certificate.
Go to the OpenVPN server setup. We select the server operation mode - in my case “Remote Access (SSL / TLS + User Auth)”, authentication server, protocol, port, necessary VPN server certificate and set the necessary encryption parameters. What is offered by default is not the best choice.
Next, set up a VPN-network and set up the settings for clients. Here we can determine whether to issue a DNS server to the client, whether to drive all client traffic into the tunnel, etc. After that, save and go to the client export tab. From here we export the necessary settings for the connection and user certificate.
By the way, when setting up the server, you could use the Wizard, which would lead you through all the “sorrows and tribulations” of the OpenVPN settings. A certain analogue of the “Make Good” button.
Of course, if you have many users need remote access, then the work on issuing and revoking certificates, exporting settings, setting up users in a local database will turn into a very boring, but responsible task. I believe that with such requirements for scaling it is necessary to have a separate CA with a CRL and a single authentication database, such as Active Directory. But if there are few users, the option proposed above is fully functional.
It remains for us to configure the proxy, content filtering and anti-virus scanning. Installing a HAVP package is a proxy with a ClamAV scanner. To configure, we specify the ClamAV mode and proxy, port, interface, settings for checking for passing traffic. Since squid is planned to be used, our mode of operation is “Parent for Squid”. Separately, we configure the settings for updating the anti-virus database and its mirror.
Go to the Squid setup. After installing the package, select the proxy mode of operation and the port, then on the tab “Auth Settings” specify the authentication method used. Since we have the task of using Active Directory as a user base, we use the LDAP protocol. Settings for integration with a domain controller are presented below.
If necessary, configure the settings of the upstream proxy, cache and traffic management, and ACL. For example, I made * microsoft.com / * to whitelist for normal updates and OS activation, and that didn’t scan. But more about that below.
Now filtering - set up squidGuardian. In terms of filtering approaches, in principle, there is a good article - “To-do: Filter everything and everything” . After installing squidGuardian, use the “Proxy filter” item of the “Services” menu to proceed to its configuration. On the Blacklist tab, we indicate where to download the blacklist in tar or tar.gz format, and also on the General settings tab, tick the box to enable the use of blacklist. I used free blacklist from here . If the content filter needs to work by time, the intervals can be set on the Times tab. Next you are setting up public or group ACLs, the main thing is not to forget to tick the box next to the ban on the use of IP addresses in the URL. To set up filtering rules, click “Target Rules List” and select actions for the necessary categories, as well as the default action.
If you need to create your own categories, you can use the Target Categories page. After saving, your category will appear in the general list of rules. I created my category to allow access to resources by IP addresses that do not have a DNS name.
And now a fly in the ointment. I fully admit that the problems are caused by their own curvature of the hands, but still. If someone from the community can suggest any solutions, I will be extremely grateful.
1. Developers have long promised, but have not yet done support for L2TP over IPSec.
2. Problems attempting to grow pfsense to use AD CS certificates. I read the discussion from here , but I couldn’t beat the small dragon.
3. The problems of the work of client-banks in case you have balancing between providers.
4. If you have specified user authentication via AD, and the domain controller is unavailable, then your built-in (!!!) pfsense admin will also refuse to work. There is a discussion on the forum, people write scripts in php to resolve the issue, but this is not a recommended solution.
5. Apparently here my personal problems with the Cyrillic alphabet. First, authentication does not work if the password is used in the Cyrillic layout. Secondly, problems in displaying AD container names in Cyrillic.
6. Despite all the efforts, from time to time there are problems with the services from Microsoft. Most often, OS activation does not work. I think, here nevertheless it will be necessary to correct a squid config manually.
In conclusion, I would like to note that this distribution distribution appeals to me with broad functionality and flexibility, it is very easy to clone the settings to several gateways, it is possible to make embedded solutions. Of course, full configuration via the web IMHO is not good, but it is precisely in this way that developers fencing novice admins from the painful blows of a rake of different heights.
Source: https://habr.com/ru/post/257787/
All Articles