Generating a QR code in the format of a machine embroidery file Tajima DST
Introduction
Today, QR codes (quick-response) are widely used in various fields. The structure of the QR code was developed in Japan by Masahiro Hara .
I want to share with the readers of “Habrakhabr” a method of generating a QR code in the machine embroidery format Tajima DST. This method allows to exclude manual operations on the formation of a QR-code and the subsequent conversion of the resulting image into the machine embroidery design. If you or your acquaintances have an embroidery machine, then by downloading the resulting file into the machine's memory and performing embroidery, you can get the following:

Problem
No program for working with machine embroidery has a function to generate a QR code. To get the QR-code embroidery file, you must first obtain a QR-code image in any online service that allows you to do this, then convert it into stitch blocks using the machine embroidery editor. For one or two QR codes this approach is acceptable. To form an unlimited number of QR codes, it is necessary to exclude manual operations.
')
Decision
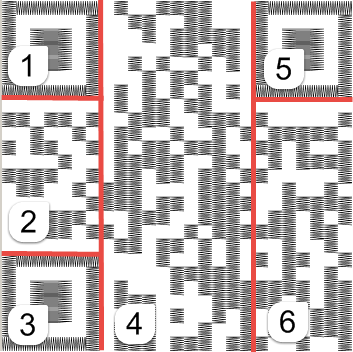
We will create a QR code on our own using a third-party library, then using the resulting matrix for each column, we construct a set of stitches for continuously running cells of the matrix. For the quality of the QR code, we will form the reference squares separately, for this we divide the matrix into six areas:
Embroidery tested on the embroidery machine model Brother NV 90E.
Input Description
The input string can be in the format of an electronic business card (VCARD), it can contain information about geographical location (GEO). It can also be just a text or a URL string.
Input in the form of VCARD:
BEGIN:VCARD VERSION:3.0 FN:..., . N:;;;.,... ORG: URL:http://ru.wikipedia.org/_ EMAIL;TYPE=INTERNET:vasya.kvakin@example.com END:VCARD A full description of the VCARD format is here .
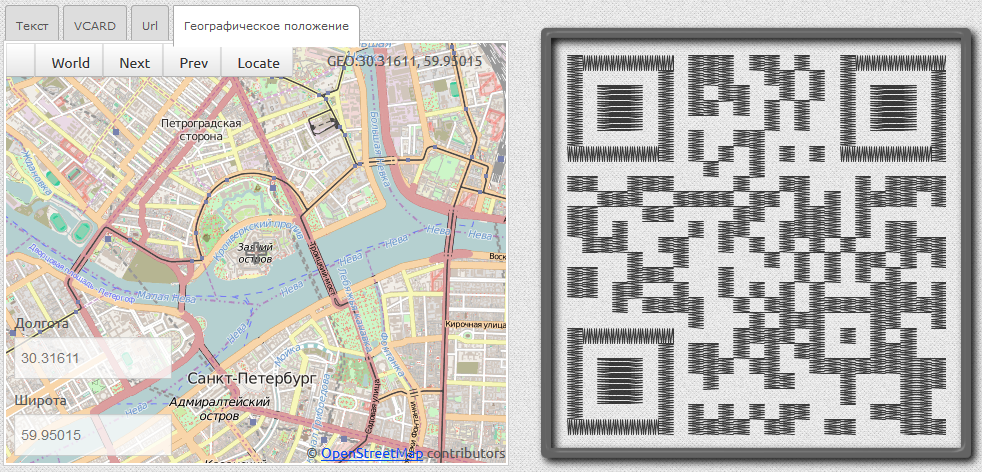
Input data in the form of geographic coordinates, the first coordinate is longitude, the second is latitude:
GEO:30.31616, 59.95015
Application Description
The application is written in C #. The library MessagingToolkit.QRCode is used, which allows you to create a QR code on the incoming information line. The library is installed as a package with nuget.org via the package manager console:
PM> Install-Package MessagingToolkit.QRCode
The QR code matrix is formed as a two-dimensional array of logical values.
Having received the QR code matrix, we proceed to the next step - the formation of a list of lines for the formation of stitch sequences.
We will consider the line as a set of consecutive cells of a QR code without gaps. The lines can be both vertical and vertical in the case of the QR code support frames. A set of lines is used to form blocks of stitches.
Three supporting rectangles are located at the corners of the QR-code. Divide the matrix into 6 areas. The first area is the upper left rectangle, the stitches of which are formed first. Stitches for a rectangle are formed sequentially for all its sides, and not by vertical columns as in the general case. Then stitches are formed for the lines between the left upper and left lower supporting rectangles. Stitches for odd columns are formed from top to bottom. For even-numbered columns, stitches are formed from bottom to top. Such a sequence of stitches eliminates long thread transitions from the bottom up and vice versa. The fourth region - the largest region, is formed similarly to the second. The fifth area is the reference rectangle located in the upper right corner. The sixth area is the final, stitches for the columns in it are also formed: odd from top to bottom, even from bottom to top.
QRCodeCreator class
The class uses the MessagingToolkit.QRCode.Codec namespace to form a QR code matrix in the following method:
using System.Text; using MessagingToolkit.QRCode.Codec; namespace EmbroideryFile.QRCode { internal class QRCodeCreator { public bool[][] GetQRCodeMatrix(string DataToEncode) { if (string.IsNullOrEmpty(DataToEncode)) return new bool[1][]; QRCodeEncoder qrCodeEncoder = new QRCodeEncoder(); qrCodeEncoder.CharacterSet = "UTF8"; qrCodeEncoder.QRCodeEncodeMode = QRCodeEncoder.ENCODE_MODE.BYTE; qrCodeEncoder.QRCodeScale = 1; qrCodeEncoder.QRCodeVersion = -1; qrCodeEncoder.QRCodeErrorCorrect = QRCodeEncoder.ERROR_CORRECTION.L; return qrCodeEncoder.CalQrcode(Encoding.UTF8.GetBytes(DataToEncode)); } } } CharacterSet set UTF8, for the possibility of encoding Cyrillic characters.
The property QRCodeErrorCorrect is assigned the value QRCodeEncoder.ERROR_CORRECTION.L - a low level of redundancy during encoding.
We believe that excessive data redundancy in reading is not needed.
If Cyrillic characters are present in the input file, the file must be saved in UTF8 encoding.
An instance of this class is created in the QRCodeStitcher class constructor.
QRCodeStitcher class
The formation of all kinds of stitch blocks is implemented in this class. This is ensured by the following steps:
- Formation of a list of continuous lines for each of the 6 areas;
- Generation of stitches for each area on the list of lines.
To form a list of vertical lines on the matrix of the QR code, we perform a walk through the cells of the vertical columns and, with the current cell empty, add the current line to the resulting list. The only exception is the reference squares located along the edges of the QR code. Each element of the list contains data about the starting point, the ending point of the line, its length, as well as a sign that the lowest cell of the line hits the last row of the QR code matrix.
When forming stitches for vertical lines of movement along the axes of ordinates and abscissas, have fixed values: dX = 25; dY = 2; The size of the QR-code cell is also fixed: cellSize = 25 units. The units here are 0.1 mm.
The line data model is presented as follows:
public struct Line { public Coords Dot1 { get; set; } public Coords Dot2 { get; set; } public int Length { get; set; } public bool Lowest { get; set; } } The following method forms stitch blocks for all 6 previously described areas of a QR code:
private List<List<Coords>> GenerateQRCodeStitchesBoxed() { var blocks = new List<List<Coords>>(); int rectSize = GetRectSize(); // blocks.AddRange(GetRectangleSatin(0, 0, rectSize - 1, rectSize - 1)); // blocks.Add(GenerateBoxStitchBlock(2, 2, rectSize - 4)); // blocks.AddRange(GetSatinStitches(GetLaneList(0, rectSize + 1, rectSize, _dimension - rectSize - 1))); // blocks.AddRange(GetRectangleSatin(0, _dimension - rectSize, rectSize - 1, _dimension - 1)); // blocks.Add(GenerateBoxStitchBlock(2, _dimension - rectSize + 2, rectSize - 4)); // blocks.AddRange(GetSatinStitches(GetLaneList(rectSize + 1, 0, _dimension - rectSize - 1, _dimension - 1))); // blocks.AddRange(GetRectangleSatin(_dimension - rectSize, 0, _dimension - 1, rectSize - 1)); // blocks.Add(GenerateBoxStitchBlock(_dimension - rectSize + 2, 2, rectSize - 4)); // blocks.AddRange(GetSatinStitches(GetLaneList(_dimension - rectSize, rectSize + 1, _dimension - 1, _dimension - 1))); return blocks; } The GetRectangleSatin () method creates blocks for stitch squares at the coordinates of the outermost cells:
IEnumerable<List<Coords>> GetRectangleSatin(int x1, int y1, int x2, int y2) { int LeftX = (x1 > x2) ? x2 : x1; int TopY = (y1 > y2) ? y2 : y1; int RightX = (x1 < x2) ? x2 : x1; var BottomY = (y1 < y2) ? y2 : y1; int length = RightX - LeftX; var rect = new List<List<Coords>>(); rect.Add(GenerateVerticalColumnStitchBlock(LeftX, TopY, length)); rect.Add(GenerateHorizonColumnStitchBlock(LeftX, BottomY, length)); rect.Add(ReverseCoords(GenerateVerticalColumnStitchBlock(RightX, TopY + 1, length))); rect.Add(ReverseCoords(GenerateHorizonColumnStitchBlock(LeftX + 1, TopY, length))); return rect; } The following method creates for the generation of the internal square of the reference areas of the QR code:
/// <summary> /// /// </summary> /// <param name="cellHorizonPos"> </param> /// <param name="cellVerticalPos"> </param> /// <param name="boxSize"> </param> /// <returns> </returns> private List<Coords> GenerateBoxStitchBlock(int cellHorizonPos, int cellVerticalPos, int boxSize) { var block = new List<Coords>(); int y = 0; int x = 0; int startX = cellHorizonPos * _cellSize; int startY = cellVerticalPos * _cellSize; block.Add(new Coords { X = startX, Y = startY }); while (y < _cellSize * boxSize) { while (x < _cellSize * boxSize - _dX) { x = x + _dX; block.Add(new Coords{ X = startX + x, Y = startY + y }); } x = boxSize * _cellSize; block.Add(new Coords { X = startX + x, Y = startY + y }); y = y + _dY; while (x > _dX) { x = x - _dX; block.Add(new Coords { X = startX + x, Y = startY + y }); } x = 0; block.Add(new Coords { X = startX + x, Y = startY + y }); y = y + _dY; } return block; } Stitch blocks for a sequence of vertical lines are formed in the following method:
/// <summary> /// /// </summary> private List<List<Coords>> GetSatinStitches(List<Line> lanes) { List<List<Coords>> blockList = new List<List<Coords>>(); foreach (var lane in lanes) { List<Coords> satin = null; if (((lane.Length == 1) && ((lane.Dot1.X % 2) == 0)) || ((lane.Length > 1) && (lane.Dot2.Y > lane.Dot1.Y))) satin = GenerateVerticalColumnStitchBlock(lane.Dot1.X, lane.Dot1.Y, lane.Length); else satin = ReverseCoords(GenerateVerticalColumnStitchBlock(lane.Dot2.X, lane.Dot2.Y, lane.Length)); blockList.Add(satin); } return blockList; } The list of lines is formed for areas 2, 4, 6 in the following method. The line completion check is performed in the ConsumeRelativeCellDown () and ConsumeRelativeCellUp () methods.
/// <summary> /// /// </summary> /// <param name="x1">X </param> /// <param name="y1">Y </param> /// <param name="x2">X </param> /// <param name="y2">Y </param> /// <returns></returns> private List<Line> GetLaneList(int x1, int y1, int x2, int y2) { try { if (_lines != null) _lines.Clear(); if (y1 > y2) { _topY = y2; _bottomY = y1; } else { _topY = y1; _bottomY = y2; } if (x1 > x2) { _leftX = x2; _rightX = x1; } else { _leftX = x1; _rightX = x2; } for (int j = _leftX; j <= _rightX; j = j + 2) //X { _state = false; for (int i = _topY; i <= _bottomY; i++) // Y { ConsumeRelativeCellDown(j, i); } if (j >= _rightX) break; _state = false; for (int i = _bottomY; i >= _topY; i--) // Y { ConsumeRelativeCellUp(j + 1, i); } } return _lines; } catch (Exception ex) { Trace.WriteLine(string.Format("GetLineList(): {0}",ex)); throw; } } The ConsumeRelativeCellDown () method is called when forming a list of lines for an even QR-code column.
/// <summary> /// /// </summary> /// <param name="j"></param> /// <param name="i"></param> void ConsumeRelativeCellDown(int j, int i) { if (_cells[j][i] == true) { // if ((i == _topY)) { _dot1 = new Coords() { X = j, Y = i }; _curLane.Dot1 = _dot1; _laneLen = 1; _state = true; } else if ((_state == false)) { // if (i == _bottomY) { _dot1 = new Coords() { X = j, Y = i }; _curLane.Dot1 = _dot1; _dot2 = new Coords() { X = j, Y = i }; _curLane.Dot2 = _dot2; _curLane.Length = 1; _curLane.Lowest = true; _endLaneFlag = true; } // else { _dot1 = new Coords() { X = j, Y = i }; _curLane.Dot1 = _dot1; _laneLen = 1; _state = true; } } else if ((i == _bottomY)) { // _dot2 = new Coords() { X = j, Y = i }; _curLane.Dot2 = _dot2; _curLane.Length = ++_laneLen; _curLane.Lowest = true; _endLaneFlag = true; } // else { _laneLen++; } } // , else if (_state == true) { _dot2 = new Coords() { X = j, Y = i - 1 }; _curLane.Dot2 = _dot2; _curLane.Length = _laneLen; _state = false; _endLaneFlag = true; } if (_endLaneFlag == true) { _lines.Add(_curLane); _endLaneFlag = false; } } The ConsumeRelativeCellUp () method is called when forming the list of lines for the odd QR code column.
void ConsumeRelativeCellUp(int j, int i) { if (_cells[j][i] == true) { // if ((i == _bottomY)) { _dot1 = new Coords { X = j, Y = i }; _curLane.Dot1 = _dot1; _laneLen = 1; _state = true; } else if ((_state == false)) { // if (i == _topY) { _dot1 = new Coords { X = j, Y = i }; _curLane.Dot1 = _dot1; _dot2 = new Coords { X = j, Y = i }; _curLane.Dot2 = _dot2; _curLane.Length = 1; _curLane.Lowest = true; _endLaneFlag = true; } // else { _dot1 = new Coords { X = j, Y = i }; _curLane.Dot1 = _dot1; _laneLen = 1; _state = true; } } else if ((i == _topY)) { // end of lane at the top _dot2 = new Coords { X = j, Y = i }; _curLane.Dot2 = _dot2; _curLane.Length = ++_laneLen; _curLane.Lowest = true; _endLaneFlag = true; } // else { _laneLen++; } } // , else if (_state) { _dot2 = new Coords { X = j, Y = i + 1 }; _curLane.Dot2 = _dot2; _curLane.Length = _laneLen; _state = false; _endLaneFlag = true; } if (_endLaneFlag) { _lines.Add(_curLane); _endLaneFlag = false; } } Even columns are embroidered from top to bottom, odd ones from bottom to top, this allows to exclude long stitches of thread movement when moving to the next column of QR code cells. The following code implements the logic for adding stitches to a line:
/// <summary> /// /// </summary> /// <param name="cellHorizonPos"> </param> /// <param name="cellVerticalPos"> </param> /// <param name="length"></param> private List<Coords> GenerateVerticalColumnStitchBlock(int cellHorizonPos, int cellVerticalPos, int length) { var block = new List<Coords>(); int curX, curY; int columnLength = _cellSize * length; int startX = cellHorizonPos * _cellSize; int startY = cellVerticalPos * _cellSize; block.Add(new Coords { X = startX + _cellSize, Y = startY }); for (curY = 0; curY < columnLength; curY = curY + _dY) { for (curX = (curY == 0) ? 0 : _dX; (curX < _cellSize) && (curY < columnLength); curX = curX + _dX) { block.Add(new Coords { X = startX + curX, Y = startY + curY }); curY = curY + _dY; } int edgedX = _cellSize - (curX - _dX); int edgedY = edgedX * _dY / _dX; curX = _cellSize; curY = curY + edgedY - _dY; block.Add(new Coords { X = startX + curX, Y = startY + curY }); curY = curY + _dY; for (curX = _cellSize - _dX; (curX > 0) && (curY < columnLength); curX = curX - _dX) { block.Add(new Coords { X = startX + curX, Y = startY + curY }); curY = curY + _dY; } edgedX = curX + _dX; edgedY = edgedX * _dY / _dX; curY = curY + edgedY - _dY; block.Add(new Coords { X = startX, Y = startY + curY }); } curX = _cellSize; curY = columnLength; block.Add(new Coords { X = startX + curX, Y = startY + curY }); return block; } QrcodeDst class
The class constructor creates instances of the DstFile and QrCodeStitcher classes.
public QrcodeDst() { _dst = new DstFile(); _stitchGen = new QrCodeStitcher(); } The class has the following property setting method:
public QRCodeStitchInfo QrStitchInfo { set { _stitchGen.Info = value; } } In the QrcodeDst class, the FillStreamWithDst (Stream stream) method is implemented to save a QR code in the Tajima DST machine embroidery format. The GetQRCodeStitchBlocks () method generates stitch blocks for embroidery in the form of a list of coordinate lists with additional information whether the first stitch is a transition or stop stitch. The QrStitchInfo property of the QrcodeDst class is intended for receiving input information in the form of a string, for storing the QR code matrix.
The class method DstFile WriteStitchesToDstStream () takes as its parameters a list of coordinate blocks and a Stream instance for writing stitch data into it in machine embroidery format.
The following code fragment reads the data for coding from a file and uses an instance of QrcodeDst to save the stitch sequences of the QR code to the machine embroidery file:
var qrcodeGen = new QrcodeDst(); using (var inputStreamReader = new StreamReader(fileName)) { var text = inputStreamReader.ReadToEnd(); using (Stream outStream = new FileStream(outputPath, FileMode.Create, FileAccess.Write)) { if (qrcodeGen != null) { qrcodeGen.QrStitchInfo = new QRCodeStitchInfo {QrCodeText = text}; qrcodeGen.FillStream(outStream); } } } The file format for saving embroidery is described in the next paragraph.
DST file format
To convert stitch coordinates to bytes, the description of the DST file format is used here . The stitch sequence is stored as coded offsets from the previous stitch. That is, the file contains commands for moving the thread, indicating the type of stitch.
Possible stitch types:
• Usual
• Transition
• Stop
The stitch allows you to change the thread, if it is done manually.
DST file has a header, stitch data starts from 512th byte with numbering bytes.
from scratch.
The stitch is encoded in three bytes:
| Bit number | 7 | 6 | five | four | 3 | 2 | one | 0 |
| Byte 1 | y + 1 | y-1 | y + 9 | y-9 | x-9 | x + 9 | x-1 | x + 1 |
| Byte 2 | y + 3 | y-3 | y + 27 | y-27 | x-27 | x + 27 | x-3 | x + 3 |
| Byte 3 | transition | stop | y + 81 | y-81 | x-81 | x + 81 | Always installed | Always installed |
The transition and stop bits can be set at the same time. This is necessary for a long transition and a simultaneous change of the thread.
DST file must end with three bytes: 00 00 F3.
Below is the code that returns the stitch bytes by the values of the movement of the thread relative to the previous position:
byte[] encode_record(int x, int y, DstStitchType stitchType) { byte b0, b1, b2; b0 = b1 = b2 = 0; byte[] b = new byte[3]; // >+121 or < -121. if (x >= +41) { b2 += setbit(2); x -= 81; }; if (x <= -41) { b2 += setbit(3); x += 81; }; if (x >= +14) { b1 += setbit(2); x -= 27; }; if (x <= -14) { b1 += setbit(3); x += 27; }; if (x >= +5) { b0 += setbit(2); x -= 9; }; if (x <= -5) { b0 += setbit(3); x += 9; }; if (x >= +2) { b1 += setbit(0); x -= 3; }; if (x <= -2) { b1 += setbit(1); x += 3; }; if (x >= +1) { b0 += setbit(0); x -= 1; }; if (x <= -1) { b0 += setbit(1); x += 1; }; if (x != 0) { throw; }; if (y >= +41) { b2 += setbit(5); y -= 81; }; if (y <= -41) { b2 += setbit(4); y += 81; }; if (y >= +14) { b1 += setbit(5); y -= 27; }; if (y <= -14) { b1 += setbit(4); y += 27; }; if (y >= +5) { b0 += setbit(5); y -= 9; }; if (y <= -5) { b0 += setbit(4); y += 9; }; if (y >= +2) { b1 += setbit(7); y -= 3; }; if (y <= -2) { b1 += setbit(6); y += 3; }; if (y >= +1) { b0 += setbit(7); y -= 1; }; if (y <= -1) { b0 += setbit(6); y += 1; }; if (y != 0) { throw; }; switch (stitchType) { case DstStitchType.NORMAL: b2 += (byte)3; break; case DstStitchType.END: b2 = (byte)243; b0 = b1 = (byte)0; break; case DstStitchType.JUMP: b2 += (byte)131; break; case DstStitchType.STOP: b2 += (byte)195; break; default: b2 += 3; break; }; b[0] = b0; b[1] = b1; b[2] = b2; return b; } The formation of machine embroidery QR-code can be viewed at the link .
Download the source code for the formation of machine embroidery QR-code can be downloaded at the following link .
Download the console application forming the embroidery file can be on the link .
The folder with the application contains the necessary libraries, an executable file and a text file containing information for encoding.
To launch an application, type the following at the command prompt:
qrcodegen.exe test.asc
The application generates a file with the .DST extension in the application folder. It is possible to generate a SVG vector file and a PNG raster file. The file can be opened in a machine embroidery editing program, for example http://florianisoftware.com .
Related Links
• Site of Nathan Crawford - The code from this site is used as the basis for generating a machine embroidery PNG file.
• Rudolf´s Homepage Description format Taijama DST
• Embroidermodder site - Embroidermodder free tool for working with machine embroidery designs
Source: https://habr.com/ru/post/257763/
All Articles