Imager on FLIR Lepton do it yourself
Finally, we survived to the time when the thermal imaging technique, firstly, became available not only to military men and spies, and secondly, it miniaturized to the size of a handheld device. And what's more, modules have appeared for assembling our own DIY thermal imagers. But more about that later.
Some theory
Any heated bodies emit EMR. Wien's law of displacement, which indicates how much wavelength will be the peak of the radiation of a heated absolute black body:


')
At room temperature, the peak is in the infrared range invisible to our eye. If, for example, we forge iron, then when it is heated it will turn red, then white ... When cooled, the radiation wavelength will increase, shifting back to the IR range. Thus, from the observed wavelength of thermal radiation, we can get the body temperature.
But what about objects that have a sufficiently low temperature, for example, a room temperature? They certainly do not glow in the visible range. Here come to the aid of special devices - thermal imagers. They are able to register the waves of the middle and long infrared range. Such devices are used, for example, for monitoring equipment, when you need to find out which element or node is heated above an acceptable level. Also, thermal imagers are used to check the insulation of houses, determining the location and intensity of heat leakage.

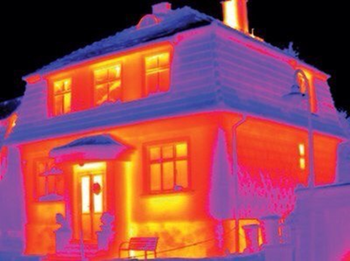
Example thermography (source: Internet)
For example, when I made my thermal imager, I examined plastic windows with it and immediately found the place from where it blows, since there is a bad seal.
Not so long ago, the FLIR infrared camera was at the center of a sports scandal: it showed that the bicycle frame of one of the participants of the bicycle race was suspiciously heated. It turned out that the motor was hidden inside, which helped the athlete to pedal. So this year, thermal imagers are used to detect such cases on the Tour de France.

What is FLIR Lepton?
In 2014, FLIR, a world leader in the development of thermal imaging technology, launched a miniature sensor, an LWIR sensor that can detect infrared waves in the range of 8-14 microns. It is this range that accounts for the maximum radiation of bodies with temperatures from –50 to +50 degrees Celsius. (But this does not mean that hotter bodies, for example, a kettle, will not be visible in this thermal imager).

The sensor is miniature, provides a thermal resolution of 80 x 60 pixels with a refresh rate of 9 Hz. The data acquisition interface is Video over SPI, and the controls are I2C. Both interfaces are supported by the Raspberry Pi, so DIY enthusiasts immediately had an idea what could be done with a thermal imager from Lepton.
In 2014, FLIR has not yet worked with the DIY community, so we gathered at groupgets.com and ordered a batch of 100 pieces in bulk. It happened before the collapse of the ruble, so I got the sensor pretty cheap. Unfortunately, the prices for such equipment are quite high. The sensor itself was worth $ 250, at that time it is less than 10,000 rubles. Now the thermal imager of the same resolution costs ~ 40,000 rubles in the store. In addition, Lepton is in the Flir One module for smartphones (~ 25 000 rubles).

Heat trace on the table

Lepton is able to catch radiation and distant objects from the street.
We collect the thermal imager
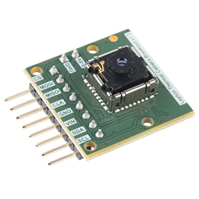
The guys from the company Pure Engineering made for FLIR Lepton breakout board , which is connected to Raspberry Pi, which works with it on I2C and SPI.

The image is displayed on a small LCD-monitor for the car through the RCA-connector.
I also added a regular Raspberry Pi camera with a cut-down infrared filter (NoIR) to my device so that it could see in the dark.
Thermal imaging equipment works in the infrared range, so it needs special optics. For example, for our device it is desirable to buy a protective glass, but the usual will not work, because it is opaque to IR rays. You need to buy special optics based on zinc selenide (ZnSe), germanium (Ge) or gallium arsenide (GaAs). In addition, sell and focusing lenses.

Enclosure and battery supply
All those who had to make portable devices, tormented by the question of manufacturing the case. I had the alpha version in a cardboard box. Very convenient: you can cut holes wherever you want. Inside was a very big battery. If you drop such a device on your leg, it will be very painful.


The final version was conceived in a portable gun-type layout. Since there are no such cases on sale, I asked a friend to make a model of a convenient pen, and a colleague printed it on a 3D printer. I put a battery in the handle, and for electronics a ready-made plastic rectangular case was taken.


Model DarkTemplar , sunsai print
The battery was supposed to provide long-term operation, including in the winter outside. And I wanted it to be convenient to charge - according to this criterion, lithium-polymer batteries are best, they are sold a lot of ready-made USB charging modules. But for those Li-Po, which I saw on sale, the working temperature range is from 0 ° C, that is, they do not withstand severe frost.
In addition to Li-Po, there are Pb, NiMh, NiCd and LiFePO 4 batteries. I did not want to take the finger batteries, since this would complicate the handle design - I would have to make a compartment with removable batteries and a cap. From the remaining options, I chose a small lead battery of 6 V. I had to add step-down converters to 5 V to it to power the Raspberry, and step-up converters up to 12 V to power the screen.
Shooting modes
Typical picture modes for thermal imagers:
- common shades of gray: the lighter, the hotter;
- red and blue palette, where red is hot, blue is cold;

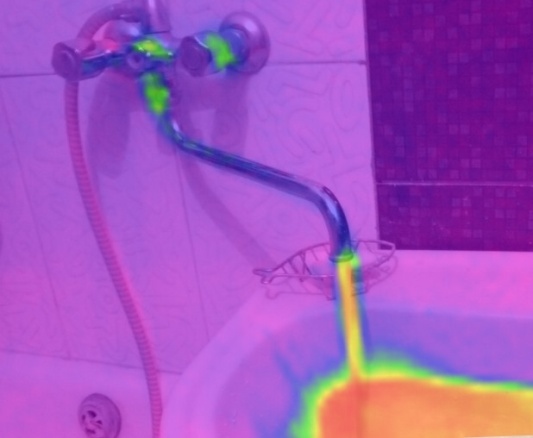
Author with a mug of hot tea and a cold can of cola - color mode of steel tint ;
- overlaying a conventional camera with a translucent image of a thermal imager. Thus, it turns out like augmented reality - with the temperature of objects. There is a ready code for OpenCV.
In addition, simultaneously with the display on the screen, we can save screenshots and videos.
Kettle boils on the gas stove
Libraries
The community has already written libraries for various platforms, including STM32, Raspberry Pi, Arduino. I started writing C code, but this is quite a hard task, so now I am switching to the Python library that uses OpenCV. Everything is much simpler there, and there are already ready examples with the same overlay. So I recommend exactly Python.
So, our imager can shoot and save images to disk. To download them, I installed hostapd, isc-dhcp-server and PureFTPd, turning this device into a Wi-Fi access point so that you can connect to it and download pictures.
Temperature measurement
In the screenshots from my imager there is no temperature scale. Why? The fact is that in the first version of Lepton there is a difficulty with the measurement mode (so-called radiometry) - you need to calibrate the sensor relative to a known temperature, which is done regularly by measuring the temperature of the special shutter before Lepton. But in my (first) version of the module there is no such curtain. (By the way, if you plan to buy Lepton, now it is logical to take it immediately with a curtain ).
In addition, in our technical barrel of honey there is a physical fly in the ointment. The law of Stefan Boltzmann states that for an absolutely black body, the emissivity is proportional to the fourth power of its temperature. However, ordinary objects are not completely black bodies, and for them the coefficient ε is introduced from 0 to 1.
Q = εσT 4 , where ε - emissivity, emissivity or blackness degree
In other words, different materials of the same temperature can emit at different intensities. For example, at the same temperature, a tree will radiate more powerfully than steel - due to the greater emissivity. And on the screen of our thermal imager, the tree will be as if “warmer”. In part, this can be compensated for by indicating to the instrument the emissivity coefficient, if known. But for each object in the frame this is problematic.

An example from Wikipedia. The painted side (ε≈0.45) of the aluminum cube looks warmer than polished (ε≈0.05) in the thermal image
The same applies to infrared thermometers (pyrometers). When you measure something with them, you need to set a correction factor to accurately estimate the temperature.
In addition, the exact measurement is hampered by the dependence of the radiation intensity on the angle, the reflectivity of the material, and so on. So such a thermal imager, unfortunately, does not show the exact temperature. There are models with temperature display, but they also require entering emissivity coefficient.
Further development
The project with a thermal imager is far from complete. As always, there are plenty of ideas:
- put on potentiometers trim. There are no analog inputs in the Raspberry Pi, so you need to add an additional ADC. Also with it I want to control the discharge of the battery;
- add a laser pointer;
- make IR illumination for a regular camera;
- Since I am now using OpenCV, I can use something from it, for example, add tracking of the contours of objects on the screen.
Links
- Google group FLIR Lepton
- github.com/groupgets/LeptonModule
- github.com/groupgets/pylepton
- Dev kit
- curtain version
The topic is based on my report from the past Mail.Ru DIY-èmit in Mail.Ru Group. Our next meeting will take place in 10 days - hurry to sign up !
Source: https://habr.com/ru/post/257189/
All Articles