Simple control of arduino via the Internet
Good day everyone.
About a year ago, I wrote a short review article for managing Arduino over the Internet using the NinjaBlocks server. It was a pretty good and convenient solution and it worked fine until one day the connection problems started. Attempts to persuade the developers through the forum to solve the problems were in vain - they simply ignored my requests and did not even bother to respond, which was very sad.
')
From that moment on, the entire Internet was scanned in search of a replacement - and many very interesting projects were found, but they either were too complicated to implement and required considerable programming knowledge, or were simply inconvenient. And here came the idea why not do everything yourself.
Of course, I really wanted to use modern data transfer protocols websockets or mqtt, which would allow to control all processes in real time, but if things were good for the arduino client, the availability of good libraries was good, but with the server side things were worse - the servers with support of the necessary protocols, which the usual hoster did not have. And I did not want to start my own server for the sake of igniting the LED. And the choice fell on the old and good http.
1. How it all works.
We have:
- php server located on a hosting which is bound to a domain name
- client in the form of arduino
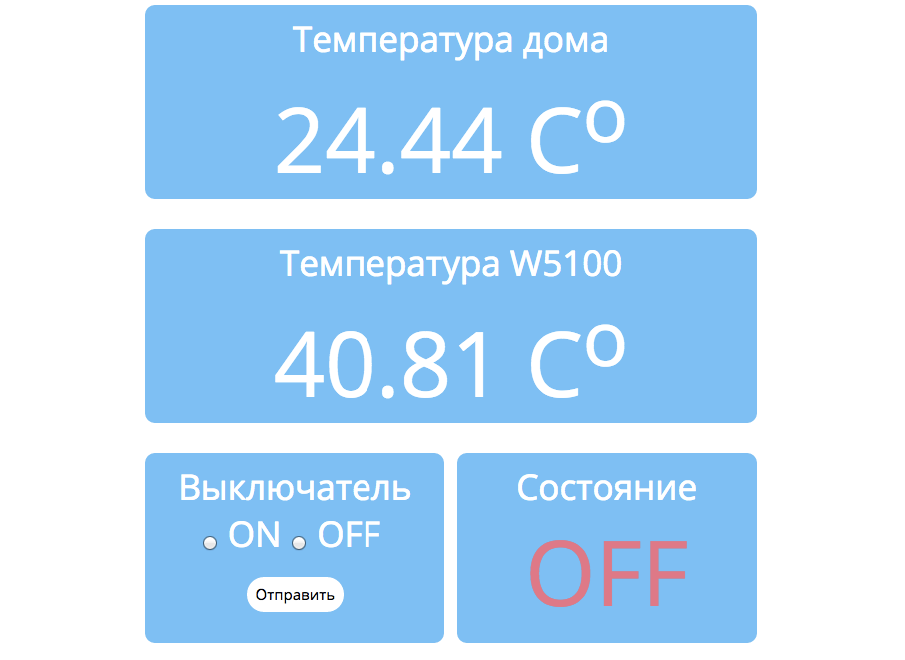
- Control Panel
Arduino connects to the server and sends a GET request containing the values of the temperature sensors.
The server accepts the request, and writes the temperature values to text files. At the same time, it reads the value of the set output for the arduino from a text file and sends it in response to a controller request.
Arduino receives a response from the server and according to it sets the status of its output
The control panel, using Ajax, reads the temperature value from text files and updates the sensor readings. And also reads their text file exit status and updates it on the page. Using the same Ajax, the value of the controller output is written to a text file via a form, from which it will then take the server and send it to the controller.
2. Client on Arduino
The sketch is quite simple, all it does is collect the value of the sensors and send them to the server, receive a response, enable or disable the output.
Sketch Arduino
#include <SPI.h>
#include <Ethernet.h>
#include <OneWire.h>
#include <DallasTemperature.h>
#define ONE_WIRE_BUS 2
OneWire oneWire (ONE_WIRE_BUS);
DallasTemperature sensors (& oneWire);
byte mac [] = {0x54, 0x34, 0x41, 0x30, 0x30, 0x31};
Ethernet Client;
char server [] = "*************"; // your server name
int buff = 0;
const int led = 5;
void setup ()
{
Ethernet.begin (mac);
sensors.begin ();
pinMode (led, OUTPUT);
digitalWrite (led, LOW);
}
void loop ()
{
sensors.requestTemperatures ();
if (client.connect (server, 80))
{
client.print ("GET /add_data.php?");
client.print ("temperature =");
client.print (sensors.getTempCByIndex (0));
client.print ("&");
client.print ("&");
client.print ("temperature1 =");
client.print (sensors.getTempCByIndex (1));
client.println ("HTTP / 1.1");
client.print ("Host:");
client.println (server);
client.println (“Connection: close”);
client.println ();
client.println ();
delay (200);
while (client.available ())
{
char c = client.read ();
if (c == '1')
{
buff = 1;
}
if (c == '0')
{
buff = 0;
}
}
client.stop ();
client.flush ();
delay (100);
}
else
{
client.stop ();
delay (1000);
client.connect (server, 80);
}
if (buff == 1)
{
digitalWrite (led, HIGH);
}
else
{
digitalWrite (led, LOW);
}
delay (500);
}
3. Server and control panel
The server consists of only several files:
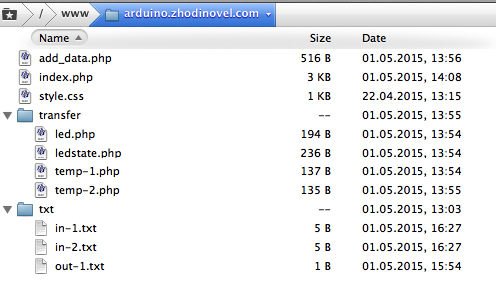
index.php - control panel
add_data.php - file processing requests from the controller and sending the response back to arduino
style.css - defines the appearance of the panel
Folder transfer - contains files with the help of which reading and writing of values from text files takes place.
led.php - writes the output state to the file out-1.txt, sent via the form in the control panel
ledstate.php - reads the state from a text file out-1.txt and displays on the panel in the form of "ON" or "OFF"
temp-1.php and temp-2.php - read the temperature values from the in-1.txt and in-2.txt files and send them to the control panel.
Folder txt - a kind of database for storing information.
The server is actually very simple and anyone can install it with minimal knowledge, for example, like me. Before working on this project, I had experience only with arduino, so php, ajax, html and css had to be studied from scratch.
Installation is very simple. Just copy the files to the server and upload the sketch to the controller, with the sketch correct the domain name, connect the sensors and the LED, and everything should work for you.
I am sure that experienced programmers will kick me and poke my nose at the places where I could write the code more succinctly and correctly. I only welcome this !!!
If you see that some things can be made easier and faster, then let me know.
What do we have in the end?
Pros:
- everything is simple and clear
- can be customized to your needs and tasks
- good stability
- the server can be deployed on any free hosting
Minuses:
- A large number of requests to the server (some hosters may not like it, in this case you need to increase the pause between requests in the sketch)
- eats a lot of traffic from the client (with 1 request per second about 300 MB per day)
- there is a small delay in switching on the outputs (it may be critical for some cases)
Future plans:
- add a button on the controller to turn the relay on and off with state change to the server
- add authorization
- add identification keys in requests
- organize the work of several boards simultaneously with one control panel
- add confirmation from the controller to enable output
- I'd love to use websockets or mqtt protocols, but I still tend to use websockets using socket.io
Perhaps, if it is interesting, I will write an article about managing via the Internet wifi module esp8266. I have already managed to test it successfully and made sure that everything works, but there are some nuances in the work.
And if there are enough people willing to write, there will be a detailed article where we will consider adding new units with sensors and managing additional outputs to the control panel.
I ask you to give advice on how best to implement authorization in the control panel so that the installation is relatively simple and clear and an acceptable level of security.
Everyone can visit my server page and check in action arduino.zhodinovel.com
!!! To change the output of the controller, put the marker on the desired value and click "SEND" !!!
Watch the video
Download files
1. Server
2. Sketch for arduino
Thank you all for your attention!
UPD. Added feedback to the panel in the form of a photoresistor. When the light is off, the reading is about 130, when it is on - 900.
Source: https://habr.com/ru/post/257115/
All Articles