How to recover data from faulty SSD
Greetings to all Habrovchan!
I suggest today to talk a little about information recovery from faulty SSD drives. But for a start, before we get acquainted with the technology of saving precious kilo-mega-and gigabytes, please pay attention to the diagram. On it, we tried to locate the most popular SSD models according to the probability of successful data recovery from them.
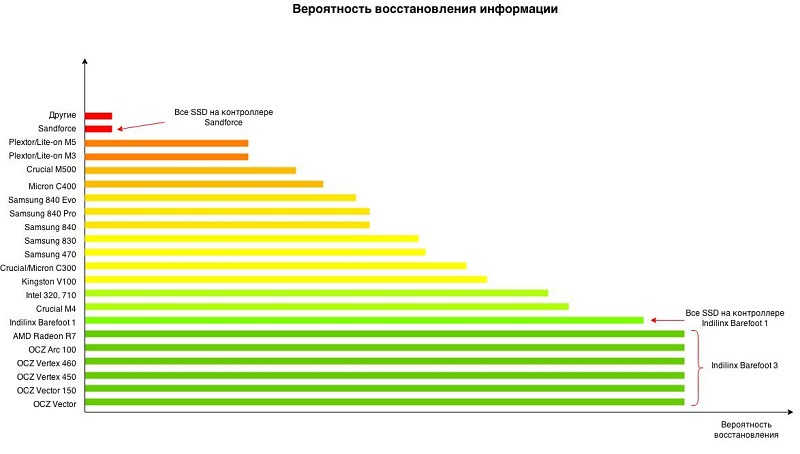
As you might guess, with drives located in the green zone, usually there is the least of all problems (provided that the engineer has the necessary tools, of course). And the drives from the red zone are capable of delivering a lot of suffering to both their owners and restoration engineers. In case of failure of such SSD chances to return back the lost data for today are too small. If your SSD is located in the red zone or next to it, then I would advise you to do a backup before each tooth brushing.
')
Those who already made backup, welcome under kat.
There should be a small reservation. Some companies know a little more, some a little less. The results, illustrated in the diagram, represent a cross-industry average as of 2015.
To date, two approaches to recovering data from faulty SSDs are common.
Solution of the problem that is called in the forehead. The logic is simple. User data is stored on NAND flash memory chips. The drive is faulty, but what if the chips themselves are ok? In the absolute majority of cases it is, the chips are efficient. Some of the data stored on them may be damaged, but the chips themselves function normally. Then you can unsolder each chip from the drive's PCB and read its contents using the programmer. And then try to collect a logical image of the drive from the received files. This approach is currently used when recovering data from usb flash drives and various memory cards. I must say that this work is not of grateful.
Difficulties may arise at the reading stage. NAND flash microcircuits are available in different packages, and for a specific microcircuit bundled with a programmer, the required adapter may not be available. For such cases, the kit usually has some universal adapter for decoupling. The engineer is forced, using thin wiring and a soldering iron, to connect the necessary legs of the chip with the corresponding contacts of the adapter. The task is quite solvable, but it requires direct hands, certain skills and time. I myself am not familiar with the soldering iron, so this work causes respect.

Let's not forget that in the SSD there will most likely be 8 or 16 such chips, and each will have to be unsoldered and counted. Yes, and the process of subtracting the microcircuit, too, fast can not be called.
Well, then it remains only from the received dumps to collect the image and the matter with the hat! But then the fun begins. I will not go into details, I will describe only the main tasks to be solved by the engineer and the software he uses.
The nature of NAND flash memory chips is such that errors will certainly appear in the stored data. Separate memory cells begin to read incorrectly, and stably wrong. And this is considered normal only as long as the number of errors within a certain range does not exceed a certain threshold. Correction codes (ECC) are used to combat bit errors. When saving user data, the drive pre-divides the data block into several ranges and adds to each range some redundant data that can detect and correct possible errors. The number of errors that can be corrected is determined by the code power.
The higher the code power, the longer the sequence of bytes to be assigned. The process of calculating and adding the mentioned sequence is called encoding, and the correction of bit errors is called decoding. Encoding and decoding circuits are usually hardware implemented inside the storage controller. When executing a read command, the drive, along with other operations, also performs correction of bit errors. With the received dump files it is necessary to carry out the same decoding procedure. To do this, determine the parameters of the code used.
The unit of reading and writing in memory chips is the unit, called the page. For modern microcircuits, the page size is approximately 8 KB or 4 KB. Moreover, this value is not a power of two, but a little more. That is, inside the page you can place 4 or 8 KB of user data and something else. This redundant part of the drive is used to store the correction codes and some service data. Usually the page is divided into several ranges. Each range consists of a user data area (UA) and service data area (SA). The latter stores the correction codes that protect the given range.

All pages have the same format, and for successful recovery it is necessary to determine which byte ranges correspond to user data and which are service data.
Most modern SSDs do not store user data in clear text; instead, they are pre-scrambled or encrypted. The difference between these two concepts is rather relative. Scramble is some reversible transform. The main task of this transformation is to obtain from the source data something similar to a random sequence of bits. This conversion is not cryptographically resistant. Knowledge of the transformation algorithm allows you to easily obtain the original data. In the case of encryption, knowledge of the algorithm alone does nothing. You must also know the key for decryption. Therefore, if hardware data encryption is used in the drive and you do not know the encryption settings, then you cannot recover the data from the read dumps. It is better not even to embark on this task. Fortunately, most manufacturers honestly admit that they use encryption.
Moreover, marketers have managed to make this criminal (in terms of data recovery) functionality an option that supposedly gives a competitive advantage over other drives. And it would be fine if there were separate models for paranoids, in which protection against unauthorized access would be qualitatively made. But now, apparently, the time has come when the lack of encryption is considered bad form.
In the case of scrambling, things are not so sad. In drives, it is implemented as a bitwise XOR operation (modulo 2 addition, excluding “OR”) , performed on the original data and some generated bit sequence (XOR pattern).
Often this operation is denoted by the symbol ⊕.
Insofar as
It remains to determine the XOR pattern. In the simplest case, the same XOR pattern is applied to all pages. Sometimes the drive generates a long pattern, say, 256 pages long, then each of the first 256 pages of the chip is added to its own piece of pattern, and this is repeated for the following groups of 256 pages. But there are times more complicated. When for each page your pattern is individually generated on the basis of some kind of law. In such cases, among other things, we must also try to unravel this law, which is not easy, to say the least.
After performing all the preliminary transformations (correcting bit errors, eliminating scrambling, determining the page format, and possibly some others), the final step is to assemble the image. Due to the fact that the number of rewriting cycles for microcircuit cells is limited, drives are forced to use wear leveling mechanisms in order to extend the lifetime of the microcircuits. The consequence of this is that user data is not stored consistently, but randomly scattered inside the microcircuits. Obviously, the drive needs to somehow remember where it has saved the current data block. For this, he uses special tables and lists, which he also stores on memory chips. Many of these structures are called the translator. Rather, the translator is a kind of abstraction that is responsible for converting logical addresses (sector numbers) into physical ones (a chip and a page).
Accordingly, in order to assemble a logical image of a drive, it is necessary to understand the format and purpose of all translator structures, as well as know how to find them. Some of the structures are quite voluminous, so the drive does not store it entirely in one place, but it also turns out to be scattered in pieces on different pages. In such cases, there should be a structure describing this distribution. It turns out a translator for the translator. This is usually stopped, but you can go even further.
This approach to data recovery forces you to fully emulate the drive at a low level. Hence the pros and cons of this approach.
Minuses:
Pros:
Very often, SSD developers, in addition to implementing the drive in accordance with the specification, also provide it with additional functionality that allows you to test the operation of individual drive subsystems and change a number of configuration parameters. Commands to the drive, allowing this to be done, are called technological. They also prove to be very useful when working with defective drives, the damage of which is programmatic.
As mentioned above, over time, bit errors inevitably appear in the memory chips. So, according to statistics, the cause of failure of SSD in most cases is the appearance of uncorrectable bit errors in service structures. That is, on the physical level, all elements work normally. But SSD can not be correctly initialized due to the fact that one of the service structures is damaged. This situation is handled differently by different SSD models. Some SSDs go into emergency mode, in which the drive functionality is significantly reduced, in particular, the drive returns an error to any read or write commands. Often at the same time, in order to somehow signal a breakdown, the drive changes some of its passport data. For example, the Intel 320 series instead of its serial number returns a string with an error code. The most common malfunctions of the series “BAD_CTX% error code%”.
In such situations, knowledge of technology teams is very helpful. Using them, you can analyze all service structures, also read the internal logs of the drive and try to figure out what all the same went wrong during the initialization process. Actually, most likely, techno-teams were added for this, so that the manufacturer could find out the reason for the failure of their drives and try to improve something in their work. Having determined the cause of the malfunction, you can try to eliminate it and bring the drive back to life. But all this requires a truly deep knowledge of the device architecture. By architecture, I mostly understand the drive firmware and service data with which it operates. A similar level of knowledge have perhaps the developers themselves. Therefore, if you don’t treat them, you either have to have comprehensive documentation on the drive, or you have to spend a fair amount of hours studying this model. Understandably, developers are in no hurry to share their work and there is no such documentation in the public domain. Speaking frankly, I generally doubt that such documentation exists.
Currently, there are too many SSD manufacturers, and new models appear too often, and there is no time for detailed study. Therefore, a slightly different approach is practiced.
Among the technology teams are very useful commands that allow you to read the pages of memory chips. Thus, you can read the entire dumps via the SATA drive interface without opening the SSD case. The drive itself in this case acts as a programmer for NAND flash memory chips. In principle, such actions should not even violate the warranty conditions on the drive.
Often, handlers of techno-commands for reading memory chips are implemented in such a way that it is possible to leave the correction of bit errors, and sometimes data decryption , on the side of the drive. That, in turn, greatly facilitates the process of data recovery. In fact, it remains only to deal with the mechanisms of translation and, one can say, the solution is ready.
In words, it is over, everything just sounds. But the development of such solutions takes a lot of man-hours. As a result, we add only one SSD model to support.
But the process of data recovery is simplified enormously! Having a similar utility, it remains only to connect the drive to the computer and run this utility, which with the help of techno-commands and analysis of service structures will build a logical image. Then there is only the analysis of partitions and file systems. That, too, can be a daunting task. But in most cases, the built image can easily restore most of the user data.
Minuses:
Pros:
In war, all means are good. But personally, I prefer the second approach as a more subtle instrument. And the most promising, since the ever wider distribution of hardware encryption eliminates the possibility of recovering information from “raw” dumps of microchips. However, the first approach has its own niche of tasks. By and large, these are tasks that cannot be solved using the technological functions of the drive. First of all, these are drives with a hardware failure, and there is no possibility to determine the damaged element, or the nature of the damage precludes repairs. And it is recommended to get down to business only if there is already a successful experience of recovering information from a similar SSD model, or there is information about a solution. You need to know what you will encounter: whether encryption or scrambling is used, which XOR pattern is most likely used, whether the translator format is known (is there an image collector). Otherwise, the chances of success are small, at least quickly solve the problem will not work. In addition, heating has a negative effect on worn out memory chips, as a result of which additional bit errors may appear, which, in turn, may add their own tar in the future.
That's all for now. Take care of yourself! And yes keeps your backup data!
I suggest today to talk a little about information recovery from faulty SSD drives. But for a start, before we get acquainted with the technology of saving precious kilo-mega-and gigabytes, please pay attention to the diagram. On it, we tried to locate the most popular SSD models according to the probability of successful data recovery from them.
As you might guess, with drives located in the green zone, usually there is the least of all problems (provided that the engineer has the necessary tools, of course). And the drives from the red zone are capable of delivering a lot of suffering to both their owners and restoration engineers. In case of failure of such SSD chances to return back the lost data for today are too small. If your SSD is located in the red zone or next to it, then I would advise you to do a backup before each tooth brushing.
')
Those who already made backup, welcome under kat.
There should be a small reservation. Some companies know a little more, some a little less. The results, illustrated in the diagram, represent a cross-industry average as of 2015.
To date, two approaches to recovering data from faulty SSDs are common.
Approach # 1. Subtracting dump NAND flash chips
Solution of the problem that is called in the forehead. The logic is simple. User data is stored on NAND flash memory chips. The drive is faulty, but what if the chips themselves are ok? In the absolute majority of cases it is, the chips are efficient. Some of the data stored on them may be damaged, but the chips themselves function normally. Then you can unsolder each chip from the drive's PCB and read its contents using the programmer. And then try to collect a logical image of the drive from the received files. This approach is currently used when recovering data from usb flash drives and various memory cards. I must say that this work is not of grateful.
Difficulties may arise at the reading stage. NAND flash microcircuits are available in different packages, and for a specific microcircuit bundled with a programmer, the required adapter may not be available. For such cases, the kit usually has some universal adapter for decoupling. The engineer is forced, using thin wiring and a soldering iron, to connect the necessary legs of the chip with the corresponding contacts of the adapter. The task is quite solvable, but it requires direct hands, certain skills and time. I myself am not familiar with the soldering iron, so this work causes respect.
Let's not forget that in the SSD there will most likely be 8 or 16 such chips, and each will have to be unsoldered and counted. Yes, and the process of subtracting the microcircuit, too, fast can not be called.
Well, then it remains only from the received dumps to collect the image and the matter with the hat! But then the fun begins. I will not go into details, I will describe only the main tasks to be solved by the engineer and the software he uses.
Bit errors
The nature of NAND flash memory chips is such that errors will certainly appear in the stored data. Separate memory cells begin to read incorrectly, and stably wrong. And this is considered normal only as long as the number of errors within a certain range does not exceed a certain threshold. Correction codes (ECC) are used to combat bit errors. When saving user data, the drive pre-divides the data block into several ranges and adds to each range some redundant data that can detect and correct possible errors. The number of errors that can be corrected is determined by the code power.
The higher the code power, the longer the sequence of bytes to be assigned. The process of calculating and adding the mentioned sequence is called encoding, and the correction of bit errors is called decoding. Encoding and decoding circuits are usually hardware implemented inside the storage controller. When executing a read command, the drive, along with other operations, also performs correction of bit errors. With the received dump files it is necessary to carry out the same decoding procedure. To do this, determine the parameters of the code used.
Memory Chip Pages Format
The unit of reading and writing in memory chips is the unit, called the page. For modern microcircuits, the page size is approximately 8 KB or 4 KB. Moreover, this value is not a power of two, but a little more. That is, inside the page you can place 4 or 8 KB of user data and something else. This redundant part of the drive is used to store the correction codes and some service data. Usually the page is divided into several ranges. Each range consists of a user data area (UA) and service data area (SA). The latter stores the correction codes that protect the given range.
All pages have the same format, and for successful recovery it is necessary to determine which byte ranges correspond to user data and which are service data.
Scrambling VS Encryption
Most modern SSDs do not store user data in clear text; instead, they are pre-scrambled or encrypted. The difference between these two concepts is rather relative. Scramble is some reversible transform. The main task of this transformation is to obtain from the source data something similar to a random sequence of bits. This conversion is not cryptographically resistant. Knowledge of the transformation algorithm allows you to easily obtain the original data. In the case of encryption, knowledge of the algorithm alone does nothing. You must also know the key for decryption. Therefore, if hardware data encryption is used in the drive and you do not know the encryption settings, then you cannot recover the data from the read dumps. It is better not even to embark on this task. Fortunately, most manufacturers honestly admit that they use encryption.
Moreover, marketers have managed to make this criminal (in terms of data recovery) functionality an option that supposedly gives a competitive advantage over other drives. And it would be fine if there were separate models for paranoids, in which protection against unauthorized access would be qualitatively made. But now, apparently, the time has come when the lack of encryption is considered bad form.
In the case of scrambling, things are not so sad. In drives, it is implemented as a bitwise XOR operation (modulo 2 addition, excluding “OR”) , performed on the original data and some generated bit sequence (XOR pattern).
Often this operation is denoted by the symbol ⊕.
Insofar as
X ⊕ X = 0Then, to obtain the initial data, it is necessary to perform a bitwise addition of the read buffer and the XOR pattern:
(X ⊕ Key) Key = X ⊕ (Key ⊕ Key) = X ⊕ 0 = X
It remains to determine the XOR pattern. In the simplest case, the same XOR pattern is applied to all pages. Sometimes the drive generates a long pattern, say, 256 pages long, then each of the first 256 pages of the chip is added to its own piece of pattern, and this is repeated for the following groups of 256 pages. But there are times more complicated. When for each page your pattern is individually generated on the basis of some kind of law. In such cases, among other things, we must also try to unravel this law, which is not easy, to say the least.
Build the image
After performing all the preliminary transformations (correcting bit errors, eliminating scrambling, determining the page format, and possibly some others), the final step is to assemble the image. Due to the fact that the number of rewriting cycles for microcircuit cells is limited, drives are forced to use wear leveling mechanisms in order to extend the lifetime of the microcircuits. The consequence of this is that user data is not stored consistently, but randomly scattered inside the microcircuits. Obviously, the drive needs to somehow remember where it has saved the current data block. For this, he uses special tables and lists, which he also stores on memory chips. Many of these structures are called the translator. Rather, the translator is a kind of abstraction that is responsible for converting logical addresses (sector numbers) into physical ones (a chip and a page).
Accordingly, in order to assemble a logical image of a drive, it is necessary to understand the format and purpose of all translator structures, as well as know how to find them. Some of the structures are quite voluminous, so the drive does not store it entirely in one place, but it also turns out to be scattered in pieces on different pages. In such cases, there should be a structure describing this distribution. It turns out a translator for the translator. This is usually stopped, but you can go even further.
This approach to data recovery forces you to fully emulate the drive at a low level. Hence the pros and cons of this approach.
Minuses:
- Complexity Since we fully emulate the drive, we will have to do all the dirty work for it.
- The risk of a fiasco . If it is not possible to solve at least one of the tasks, then recovery is out of the question. A lot of options: the inability to read the chips, because the programmer does not support them; unknown correction codes; unknown XOR pattern; encryption; unknown translator
- The risk of further ruining the drive . In addition to shaking hands, the risk is the heating of the memory chips itself. For worn out chips, this can lead to the appearance of an additional number of bit errors.
- Time and cost of work
Pros:
- A wide range of tasks . All that is needed from the drive is working memory chips. It does not matter in what condition the other elements.
Approach # 2. Technological mode
Very often, SSD developers, in addition to implementing the drive in accordance with the specification, also provide it with additional functionality that allows you to test the operation of individual drive subsystems and change a number of configuration parameters. Commands to the drive, allowing this to be done, are called technological. They also prove to be very useful when working with defective drives, the damage of which is programmatic.
As mentioned above, over time, bit errors inevitably appear in the memory chips. So, according to statistics, the cause of failure of SSD in most cases is the appearance of uncorrectable bit errors in service structures. That is, on the physical level, all elements work normally. But SSD can not be correctly initialized due to the fact that one of the service structures is damaged. This situation is handled differently by different SSD models. Some SSDs go into emergency mode, in which the drive functionality is significantly reduced, in particular, the drive returns an error to any read or write commands. Often at the same time, in order to somehow signal a breakdown, the drive changes some of its passport data. For example, the Intel 320 series instead of its serial number returns a string with an error code. The most common malfunctions of the series “BAD_CTX% error code%”.
In such situations, knowledge of technology teams is very helpful. Using them, you can analyze all service structures, also read the internal logs of the drive and try to figure out what all the same went wrong during the initialization process. Actually, most likely, techno-teams were added for this, so that the manufacturer could find out the reason for the failure of their drives and try to improve something in their work. Having determined the cause of the malfunction, you can try to eliminate it and bring the drive back to life. But all this requires a truly deep knowledge of the device architecture. By architecture, I mostly understand the drive firmware and service data with which it operates. A similar level of knowledge have perhaps the developers themselves. Therefore, if you don’t treat them, you either have to have comprehensive documentation on the drive, or you have to spend a fair amount of hours studying this model. Understandably, developers are in no hurry to share their work and there is no such documentation in the public domain. Speaking frankly, I generally doubt that such documentation exists.
Currently, there are too many SSD manufacturers, and new models appear too often, and there is no time for detailed study. Therefore, a slightly different approach is practiced.
Among the technology teams are very useful commands that allow you to read the pages of memory chips. Thus, you can read the entire dumps via the SATA drive interface without opening the SSD case. The drive itself in this case acts as a programmer for NAND flash memory chips. In principle, such actions should not even violate the warranty conditions on the drive.
Often, handlers of techno-commands for reading memory chips are implemented in such a way that it is possible to leave the correction of bit errors, and sometimes data decryption , on the side of the drive. That, in turn, greatly facilitates the process of data recovery. In fact, it remains only to deal with the mechanisms of translation and, one can say, the solution is ready.
In words, it is over, everything just sounds. But the development of such solutions takes a lot of man-hours. As a result, we add only one SSD model to support.
But the process of data recovery is simplified enormously! Having a similar utility, it remains only to connect the drive to the computer and run this utility, which with the help of techno-commands and analysis of service structures will build a logical image. Then there is only the analysis of partitions and file systems. That, too, can be a daunting task. But in most cases, the built image can easily restore most of the user data.
Minuses:
- The complexity and cost of development . Quite a few companies can afford to maintain their development department and conduct this kind of research.
- Solutions are individual .
- Limited range of tasks . Not all drives apply this approach. SSD must be physically sound. Also, rarely, but still happens that damage to some service structures, eliminates the possibility of restoring user data.
Pros:
- Simplicity
- In some cases, allows you to bypass encryption . In essence, the approach to data recovery using technology commands is currently the only known way to recover data from some drives using hardware-based data encryption.
Conclusion
In war, all means are good. But personally, I prefer the second approach as a more subtle instrument. And the most promising, since the ever wider distribution of hardware encryption eliminates the possibility of recovering information from “raw” dumps of microchips. However, the first approach has its own niche of tasks. By and large, these are tasks that cannot be solved using the technological functions of the drive. First of all, these are drives with a hardware failure, and there is no possibility to determine the damaged element, or the nature of the damage precludes repairs. And it is recommended to get down to business only if there is already a successful experience of recovering information from a similar SSD model, or there is information about a solution. You need to know what you will encounter: whether encryption or scrambling is used, which XOR pattern is most likely used, whether the translator format is known (is there an image collector). Otherwise, the chances of success are small, at least quickly solve the problem will not work. In addition, heating has a negative effect on worn out memory chips, as a result of which additional bit errors may appear, which, in turn, may add their own tar in the future.
That's all for now. Take care of yourself! And yes keeps your backup data!
Source: https://habr.com/ru/post/256895/
All Articles