Native Script. One code for all platforms

Native script (NS) is a library that allows you to make cross-platform applications using XML, CSS, JavaScript. Native script solves the same problem as the already known phonegap (creating cross-platform applications), but they have different approaches. Phonegap uses the browser engine to display your UI (in fact, you get a web page), Native script uses native rendering, uses elements of the native UI. The next important difference is that in order to access the camera, gps, and so on, you need to install plug-ins in the phonegap, while NS gives access from the box.
It is worth emphasizing that applications can be written for Android 4.2 and higher, and for iOS 7.1 and higher.
Fast start
To install a native script, nodejs is required, so if you don’t have one yet, go here . Then everything is simple. To install NS on the command line, execute:
')
npm install -g nativescript To create a project:
tns create MyApp After the project is created, go to the project directory:
cd MyApp And, like in phonegap, we add platforms:
tns platform add android tns platform add ios Everything is ready to run our first native script application. In order to do this, you need to lead one of the following commands:
Launch on a device connected via USB:
tns run android Run in the emulator:
tns run android --emulator You can also run in Genymotion:
tns run android --geny <device name> In general, no matter how you launch, you will have an application that counts the number of button presses left until the text “Hoorraaay! You unlocked the NativeScript clicker achievement! ”.

Here is a comparison of how the application looks on iOS and Android.
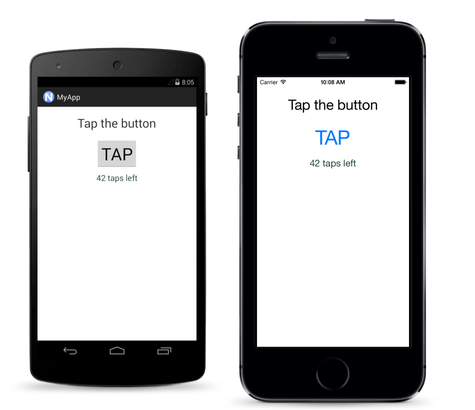
As you can see, the button is native everywhere, although the code for both platforms is the same.
What's inside?
The project structure is presented below:

Everything related to the type of application is in the main-page.xml file . Anyone who is used to working with html will be terrified by this file, but the benefit of the documentation is very good, and a little later everything becomes clearer.
<Page xmlns="http://www.nativescript.org/tns.xsd" loaded="pageLoaded"> <StackLayout> <Label text="Tap the button" cssClass="title"/> <Button text="TAP" tap="{{ tapAction }}" /> <Label text="{{ message }}" cssClass="message" textWrap="true"/> </StackLayout> </Page> app.js - entry point to the application. In NS, modules are used, as well as nodejs. I think everything is so clear here.
var application = require("application"); application.mainModule = "main-page"; application.cssFile = "./app.css"; application.start(); main-page.js - contains the code for main-page.xml.
var vmModule = require("./main-view-model"); function pageLoaded(args) { var page = args.object; page.bindingContext = vmModule.mainViewModel; } exports.pageLoaded = pageLoaded; The pageLoaded function will be executed when the page is loaded (see main-page.xml). The string page.bindingContext = vmModule.mainViewModel sets the binding context for this page (something like $ scope in an angular). Well, the last line exports the function.
The next file, main-view-model.js, will allow a closer look at the data binding mechanism in NS. NS supports two-way and one-way binding.
var __extends = this.__extends || function (d, b) { for (var p in b) if (b.hasOwnProperty(p)) d[p] = b[p]; function __() { this.constructor = d; } __.prototype = b.prototype; d.prototype = new __(); }; var observable = require("data/observable"); var HelloWorldModel = (function (_super) { __extends(HelloWorldModel, _super); function HelloWorldModel() { _super.call(this); this.counter = 42; this.set("message", this.counter + " taps left"); } HelloWorldModel.prototype.tapAction = function () { this.counter--; if (this.counter <= 0) { this.set("message", "Hoorraaay! You unlocked the NativeScript clicker achievement!"); } else { this.set("message", this.counter + " taps left"); } }; return HelloWorldModel; })(observable.Observable); exports.HelloWorldModel = HelloWorldModel; exports.mainViewModel = new HelloWorldModel(); In order for the dataBinding to work, in NS the object must throw a propertyChange event. This is implemented in the Observable class. In our case, it is passed to the function in which the HelloWorldModel inherits it. Further, already through the set method, the fields are assigned values. The __extends function at the very top of the file serves to implement inheritance.
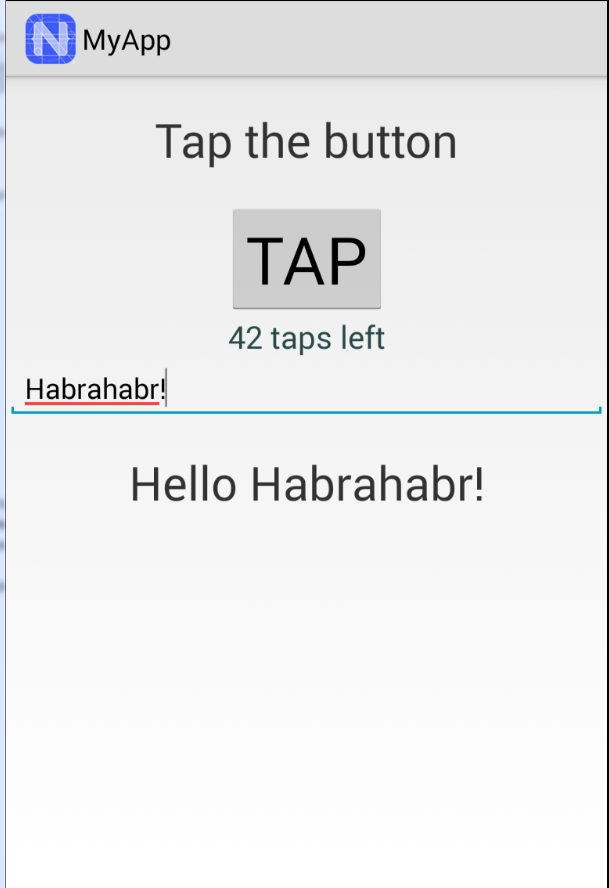
Check the two-way binding in the case. Add two lines before the tag to main-page.xml.
<TextField text="{{ name }}" hint=" "/> <Label cssClass="{{name, !!name ? 'title ' : 'title hidden'}}" text="{{ name, 'Hello ' + name }}"/> In the main-view-model.js file, add the line to the HelloWorldModel function:
this.set("name", ""); Finally in app.css. It is worth emphasizing that not all CSS properties are supported, the full list can be found here .
.hidden { visibility: collapsed; } As a result, we get:
Conclusion
Native script for me, as for a web developer, left mixed feelings. On the one hand, it is clear that the authors tried to do everything close to the web (JavaScript, CSS), but on the other hand, CSS properties are not all supported; in order to deal with XML you have to constantly go into the documentation. Perhaps NS will solve the problems that exist in the phonegap, somewhere here and there, there are some difficulties related to the web origin of the application. In any case, it’s cool that another framework has appeared that allows those who know JavaScript to write cross-platform applications, because this market is becoming crowded (phoneGap, Native Script, React Native) and as a result, the quality of frameworks should improve.
Source: https://habr.com/ru/post/256817/
All Articles