HP StormRunner Load. A practical guide. Part II
We continue a series of articles on HP StormRunner Load.
You can read the first part here.
ROLE: Performance Engineer
In this exercise, we will examine the load test using HP TruClient, a recording agent that connects to the Firefox browser.
HP TruClient is an advanced writing mechanism that connects to the Firefox browser (there is also a TruClient version for Internet Explorer, a version for Chrome is under development) to record your actions while navigating through the browser. TruClient creates a script of these actions, the launch of which can be played by several virtual users. The number of such users can then be increased to create the required load on the server.
HP TruClient scripts are different from some other types of scripts, as they more realistically reflect the actions of the browser user. The API-based script (Application Programming Interface) accurately reproduces the load on the server, but does not contain all the tasks that can be assigned to the server from the point of view of the person using the browser.
The advantage of TruClient scripts is that they are much easier to create and maintain. Browsers (and TruClient) automatically perform data correlation of a particular session, while in HTTP / HTML scripts it must be carefully programmed. Both types of entries create the necessary load, but HP TruClient creates a simpler simulation of real users and their full interaction with the browser.
The only flaw characteristic of HP TruClient scripts is related to scalability. When you play an API record on a server, a very small amount of resources (processor and memory) are required. This means that you can run more of such virtual users on this hardware than TruClient's virtual users. Nevertheless, given the low cost of cloud load generators, the use of TruClient scripts can be quite profitable.
Since the HP TruClient module needs to understand what is happening in your browser, it is installed directly in Firefox as a plugin and intercepts commands and actions performed in the browser.
')
In the next section, we will write a simple script using HP TruClient. The actions that you perform during a recording session are often called business processes or usage models. These are specific steps that shape the user's interaction with the server.
For example, when you buy a book in a bookstore, you probably follow these steps:
First you will write down these steps and save them in a script. When you run your load test, you will often combine this script with other similar business processes to accurately recreate the typical server load. You also propagate it to simulate a large number of users.
NOTE. Although we sometimes use terms such as “imitation” or “simulation,” the kind of traffic that the HP StormRunner Load generates is very authentic. Servers hosting websites do not distinguish between virtual and real users. In a properly designed load test, traffic is as real as real people referring to a website .
Click the Stop button on the TruClient panel.
A transaction is a kind of logical block that includes all or part of your script. Transactions are assigned descriptive names. Transactions have a beginning and an end. Together with the launch of the command, which is the starting point of the transaction, the countdown begins, which lasts until the completion of the transaction.
In this section, we will add a couple of transactions to our script to determine how long certain actions will be performed.
ROLE: Performance Engineer
Now that we have a recorded script, we can start simulating virtual users accessing our website. In the usual case, you, as a rule, define the most typical scenarios of user interaction with the site (usually 10–20) and write down the scripts for each of them.
Some of them are more likely to access the database, and we can focus on them in order to customize the database. Others create more load on the web server and help optimize this component of the infrastructure.
Load testing may have several goals. For example, we want to determine how many users the site will cope with before the performance begins to fall. We can also check which elements of the infrastructure are more susceptible to load, in order to optimize them. Or test the network infrastructure to identify and eliminate bottlenecks.
All these tests generate different data and solve different problems. Each of them is designed to identify specific problems and optimize web applications.
In this example, we will use the script we just recorded and consider some basic performance characteristics of a web application. This type of load test uses a small load and serves as the basis for future testing. If there are basic tests that do not burden our infrastructure too much, we can compare the results of further tests with a higher load and see what needs special attention.
We now have a test loaded into HP StormRunner Load and configured to run 20 users within 5 minutes. Virtual users will be added gradually over a 1-minute period and will also be gradually removed within 1 minute after the end of the test. Actual traffic will be generated from both US regions (western and eastern). These systems are commonly referred to as load generators, they are located in the cloud.
The allocation of load generator resources (running and initializing scripts) occurs when you run your test.
We will analyze the results in the next section.
You can read the first part here.
EXERCISE 2. Creating an HP TruClient Script
ROLE: Performance Engineer
In this exercise, we will examine the load test using HP TruClient, a recording agent that connects to the Firefox browser.
What is HP TruClient?
HP TruClient is an advanced writing mechanism that connects to the Firefox browser (there is also a TruClient version for Internet Explorer, a version for Chrome is under development) to record your actions while navigating through the browser. TruClient creates a script of these actions, the launch of which can be played by several virtual users. The number of such users can then be increased to create the required load on the server.
HP TruClient scripts are different from some other types of scripts, as they more realistically reflect the actions of the browser user. The API-based script (Application Programming Interface) accurately reproduces the load on the server, but does not contain all the tasks that can be assigned to the server from the point of view of the person using the browser.
The advantage of TruClient scripts is that they are much easier to create and maintain. Browsers (and TruClient) automatically perform data correlation of a particular session, while in HTTP / HTML scripts it must be carefully programmed. Both types of entries create the necessary load, but HP TruClient creates a simpler simulation of real users and their full interaction with the browser.
The only flaw characteristic of HP TruClient scripts is related to scalability. When you play an API record on a server, a very small amount of resources (processor and memory) are required. This means that you can run more of such virtual users on this hardware than TruClient's virtual users. Nevertheless, given the low cost of cloud load generators, the use of TruClient scripts can be quite profitable.
Install HP TruClient into your Firefox browser
Since the HP TruClient module needs to understand what is happening in your browser, it is installed directly in Firefox as a plugin and intercepts commands and actions performed in the browser.
')
- Click Get Started, located in the upper right corner of your browser.

- In the Get Started with StormRunner dialog box, click the Get TruClient button.

- A dialog box appears asking for permission to access and install the add-in. Select Allow and click Install Now.

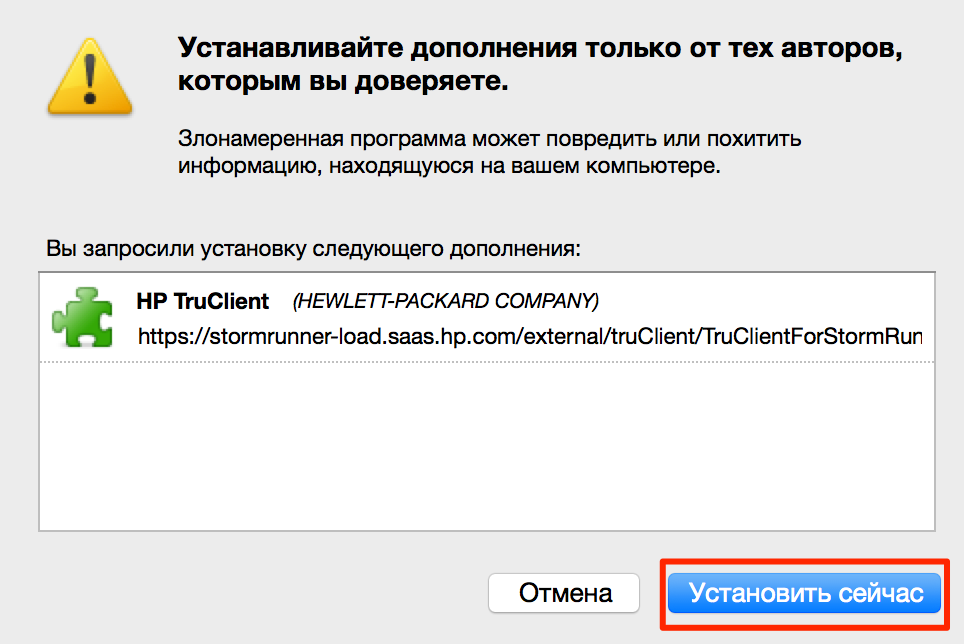
- Restart your browser when prompted. If the request does not appear, select Add-ons from the menu.

- In the list of installed extensions, you will see HP TruClient. Click the Restart Now link.

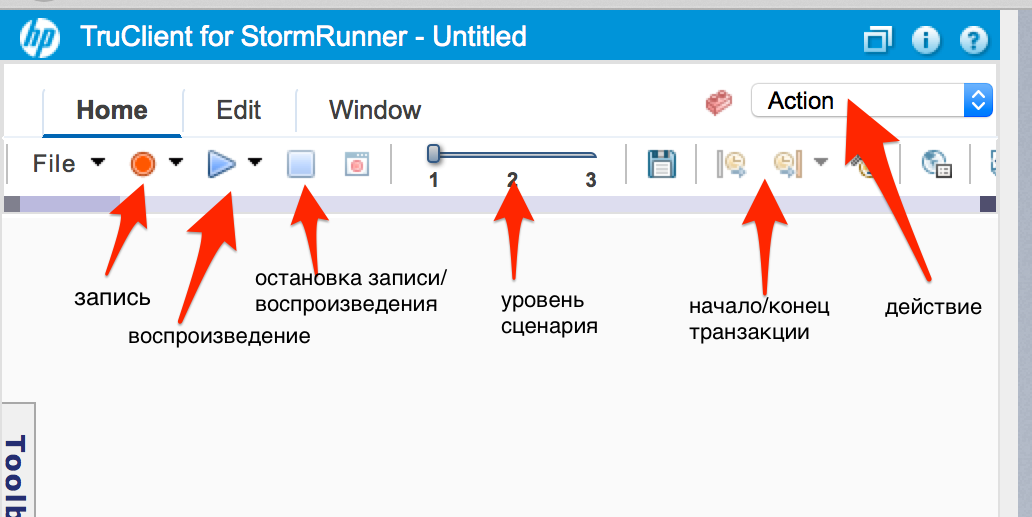
- After restarting Firefox, you will see a new panel on the left side of the browser. This new panel is the TruClient interface, where you will record and edit your user interface (UI) scripts. You can minimize this panel at any time by clicking the TC button.

- The figure below explains some of the features of the TruClient panel.
HP TruClient Script Writing
In the next section, we will write a simple script using HP TruClient. The actions that you perform during a recording session are often called business processes or usage models. These are specific steps that shape the user's interaction with the server.
For example, when you buy a book in a bookstore, you probably follow these steps:
- Login to the system.
- Book search.
- Adding a book to the cart.
- Checkout.
First you will write down these steps and save them in a script. When you run your load test, you will often combine this script with other similar business processes to accurately recreate the typical server load. You also propagate it to simulate a large number of users.
NOTE. Although we sometimes use terms such as “imitation” or “simulation,” the kind of traffic that the HP StormRunner Load generates is very authentic. Servers hosting websites do not distinguish between virtual and real users. In a properly designed load test, traffic is as real as real people referring to a website .
- Open a new tab in Firefox browser.
- Adjust the size of the browser window so that the TruClient panel is visible and there is enough space for the window with the site you need.
- Make sure that you see the HP TruClient Writing Panel.
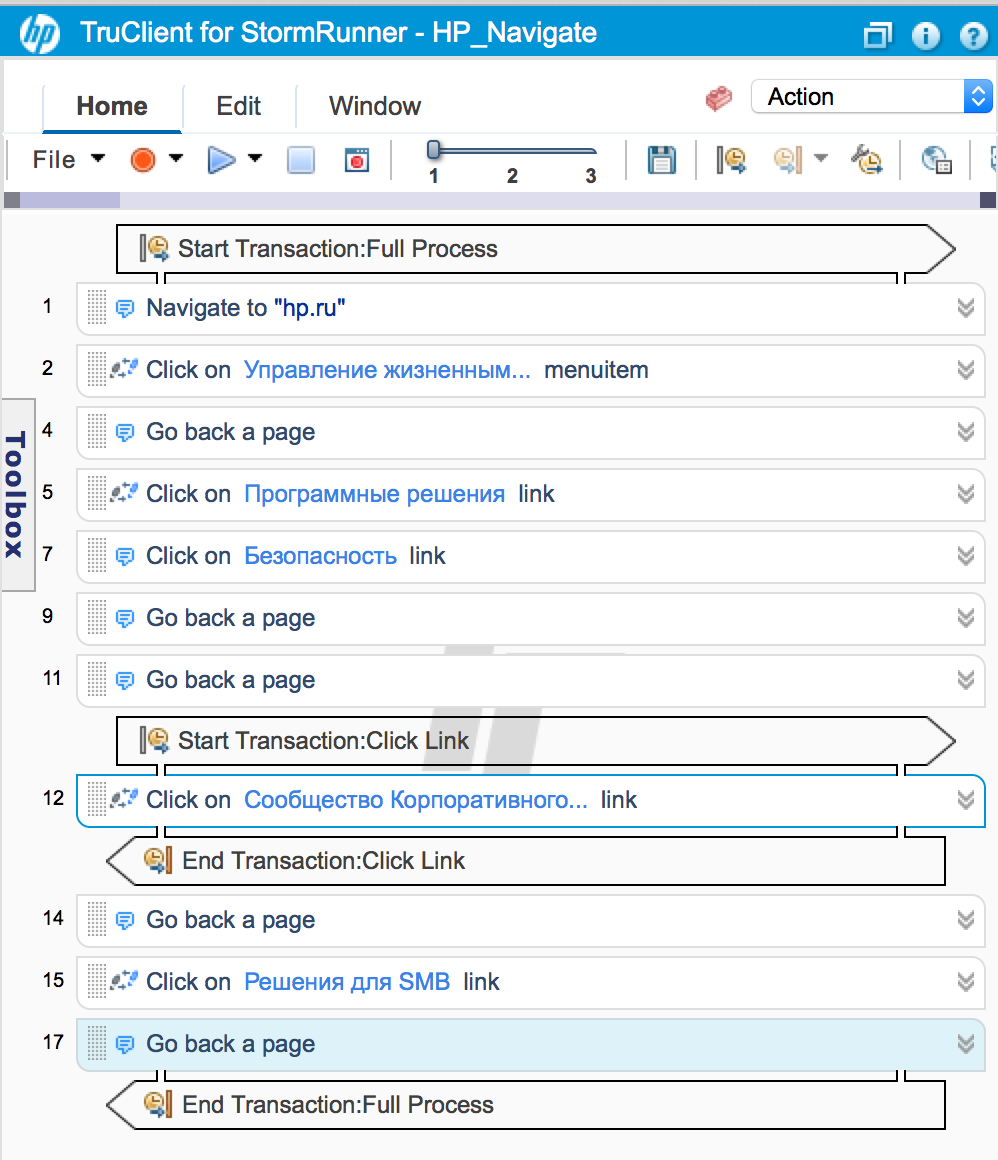
- Click the Start Recording button, and then go to www.hp.com . Make sure TruClient displays the recorded string containing the URL you entered. When recording using TruClient, all other tabs of Firefox will be closed.
- Select the link on hp.com and let the page associated with it fully appear in Firefox. Then click the Back button in the browser to return to the home page. If a question or other pop-up window appears during recording, close it.
- Select a total of 4 different links and each time go back using the Back button in the browser. Your script will look something like this:
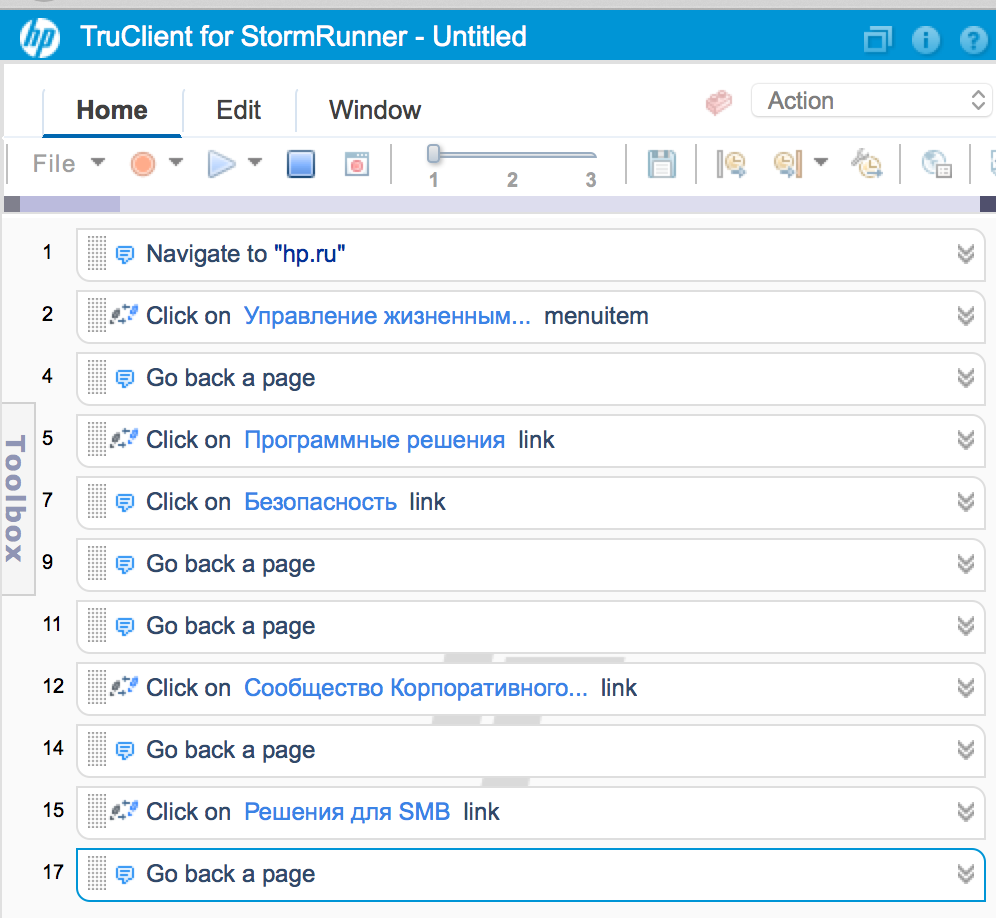
Click the Stop button on the TruClient panel.
Creating transactions
A transaction is a kind of logical block that includes all or part of your script. Transactions are assigned descriptive names. Transactions have a beginning and an end. Together with the launch of the command, which is the starting point of the transaction, the countdown begins, which lasts until the completion of the transaction.
In this section, we will add a couple of transactions to our script to determine how long certain actions will be performed.
- Select the first line in your script and click the Start a Transaction icon.
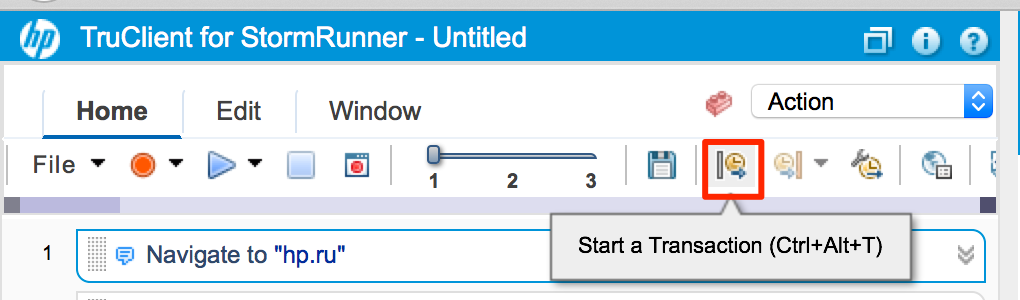
- Call this transaction "FullProcess". We will use it to determine the duration of our entire script.

- Select the last line in the script and click the End Transaction icon.
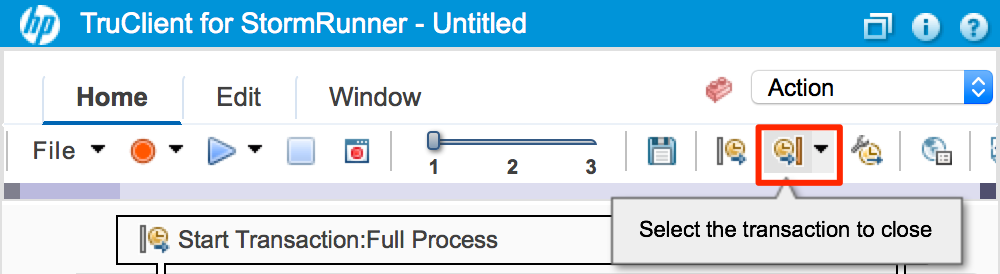 You will notice that the name “Full Process” will be automatically entered. This transaction will measure the execution time of the entire script.
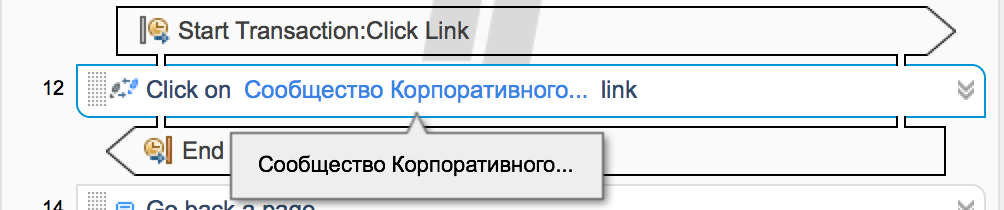
- Select one of the lines containing Click on ... link (Click the link ...).
- Create both the beginning and end of the transaction on this line and name this transaction “Click Link”.
- From the File menu, save your script on the desktop of the local computer
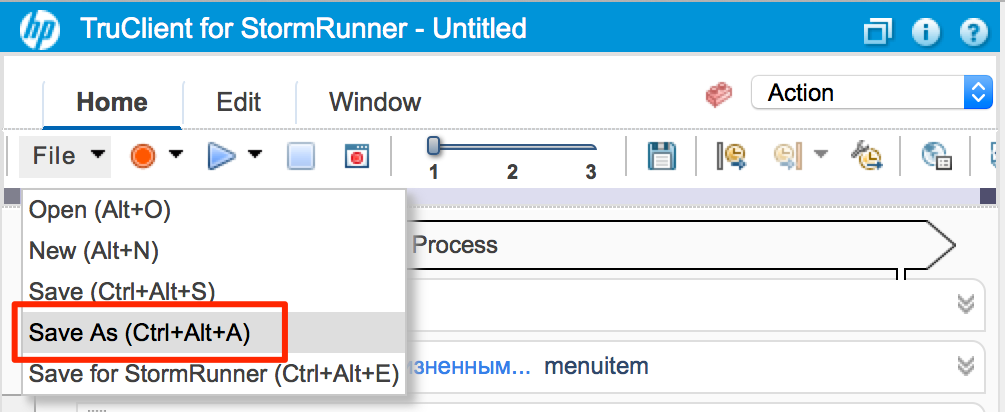 and name it "HP_Navigate".
  (NOTE. If you select Save for StormRunner (Save for StormRunner), a file is created to load at a slightly smaller size.
 - Your finished script will look something like this:
EXERCISE 3. Creating and running a test
ROLE: Performance Engineer
Load testing objectives
Now that we have a recorded script, we can start simulating virtual users accessing our website. In the usual case, you, as a rule, define the most typical scenarios of user interaction with the site (usually 10–20) and write down the scripts for each of them.
Some of them are more likely to access the database, and we can focus on them in order to customize the database. Others create more load on the web server and help optimize this component of the infrastructure.
Load testing may have several goals. For example, we want to determine how many users the site will cope with before the performance begins to fall. We can also check which elements of the infrastructure are more susceptible to load, in order to optimize them. Or test the network infrastructure to identify and eliminate bottlenecks.
All these tests generate different data and solve different problems. Each of them is designed to identify specific problems and optimize web applications.
Creating a load test
In this example, we will use the script we just recorded and consider some basic performance characteristics of a web application. This type of load test uses a small load and serves as the basis for future testing. If there are basic tests that do not burden our infrastructure too much, we can compare the results of further tests with a higher load and see what needs special attention.
- Minimize the HP TruClient add-on by clicking the icon in the upper right corner.
- Log in to HP SaaS and launch the StormRunner Load application.

- Make sure that the Get Started with StormRunner dialog box appears.
- Click the Create a test button.

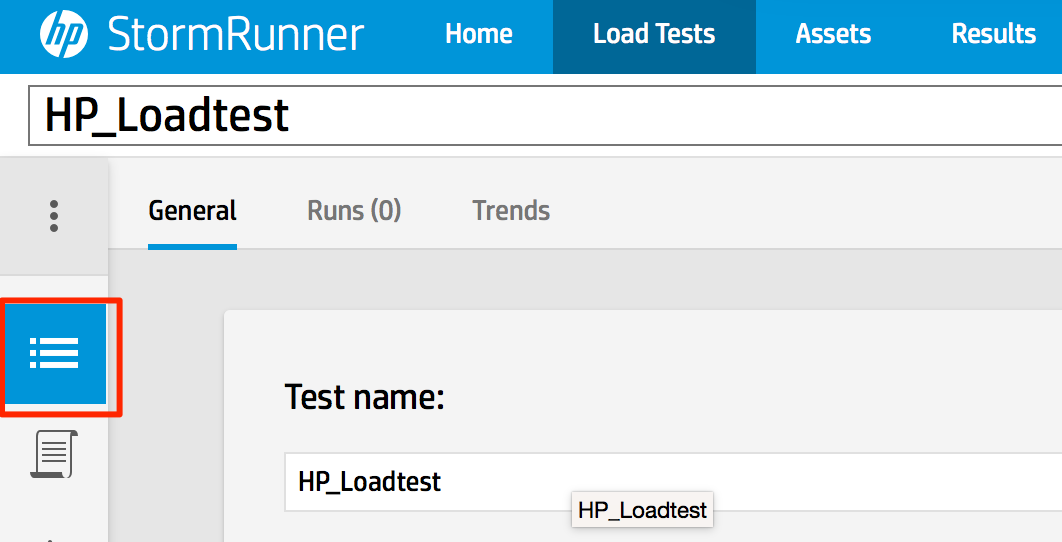
NOTE. To see this button, you may need to scroll down the page . - Select the Overview tab on the left side and give your test the name HP_Loadtest.
- Select the Scripts tab on the left.
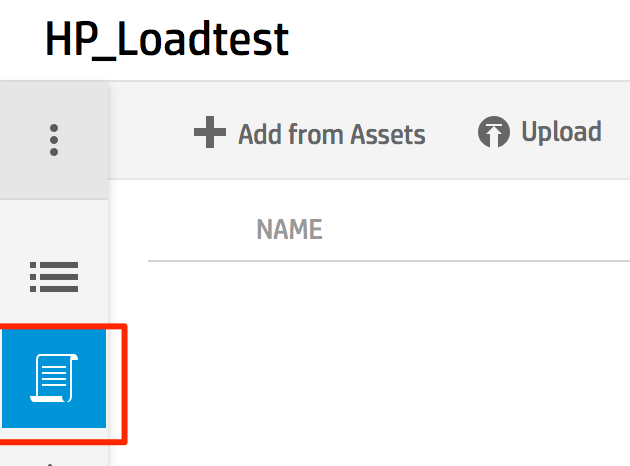 and click Upload.
- Select the HP_Navigate.zip file that stores the script you previously recorded, and click Open. Wait for the script to load.

NOTE. Scripts are saved as .zip files, as they consist of many separate files . - After downloading the script, set the value of Vusers (Virtual Users) to 20.
Set the Ramp up value (Time of adding) to 00 01 00 minutes.
Set the Duration value to 00 05 00 minutes.
Set the Tear down value (Time of deletion) to 00 01 00 minutes.
Thus, you create a test in which the number of virtual users who have access to the site rises from 0 to 20 within a minute, then all users interact with the site for 5 minutes, and finally within one more minute the number of users drops to zero . - Select the Distribution tab on the left.

Add a new region (Add Location)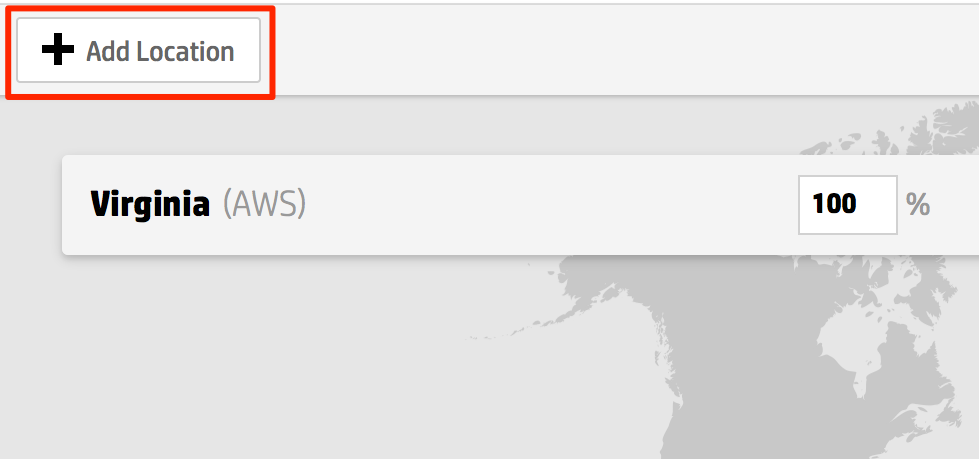
Choose Oregon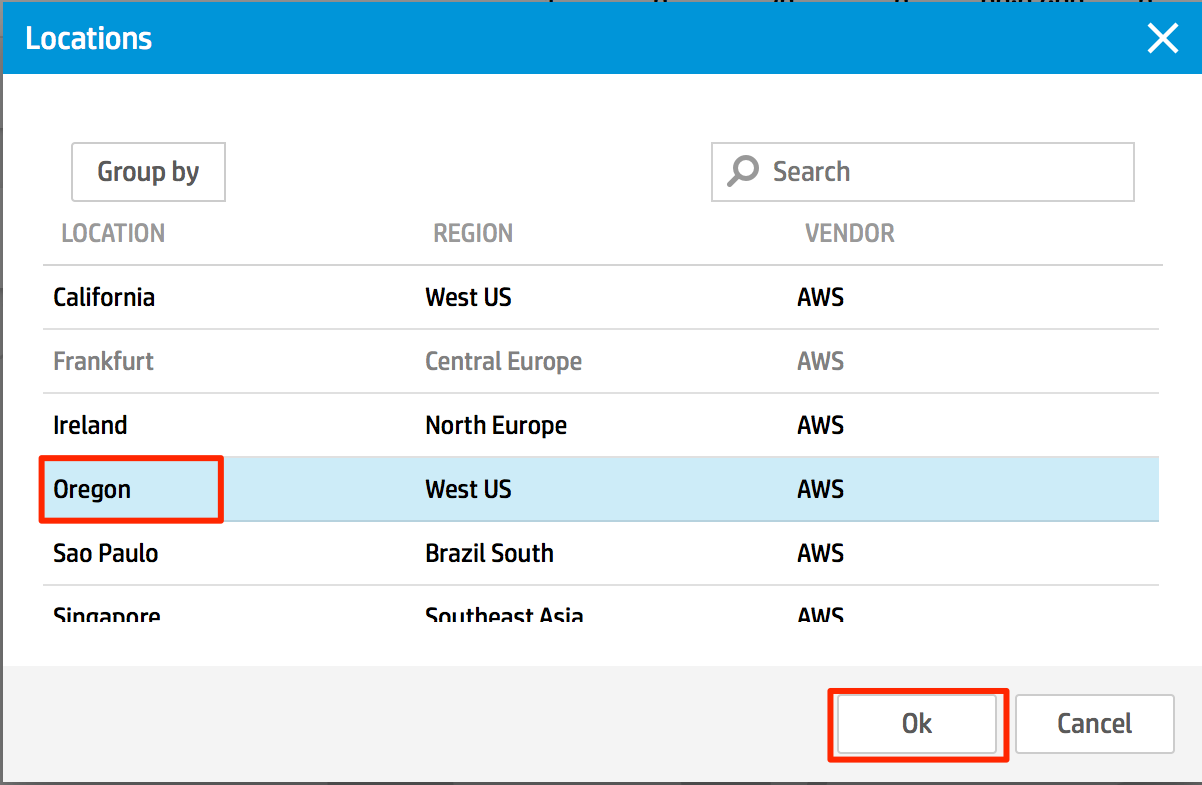
Set the distribution as 50% from the eastern region of the United States (Virginia) and 50% from the western region of the United States (Oregon). This means that out of 20 virtual users, 10 will be formed in cloud generators in the western part of the United States and 10 in cloud generators in the eastern part of the United States.
 - Select the SLA tab on the left.
 and set the transaction response time (TRT) to:
FullProcess: 35 seconds
ClickLink: 5 seconds
The SLA (Service Level Agreement) parameter defines the thresholds for our test. If in any transaction the threshold values are exceeded (that is, the service level agreement is violated), this will be reflected in the results.
Run load test
We now have a test loaded into HP StormRunner Load and configured to run 20 users within 5 minutes. Virtual users will be added gradually over a 1-minute period and will also be gradually removed within 1 minute after the end of the test. Actual traffic will be generated from both US regions (western and eastern). These systems are commonly referred to as load generators, they are located in the cloud.
The allocation of load generator resources (running and initializing scripts) occurs when you run your test.
- Click the Run Test button in the upper right corner to start your test.
 You can track the progress of the test initialization in the dialog box below.
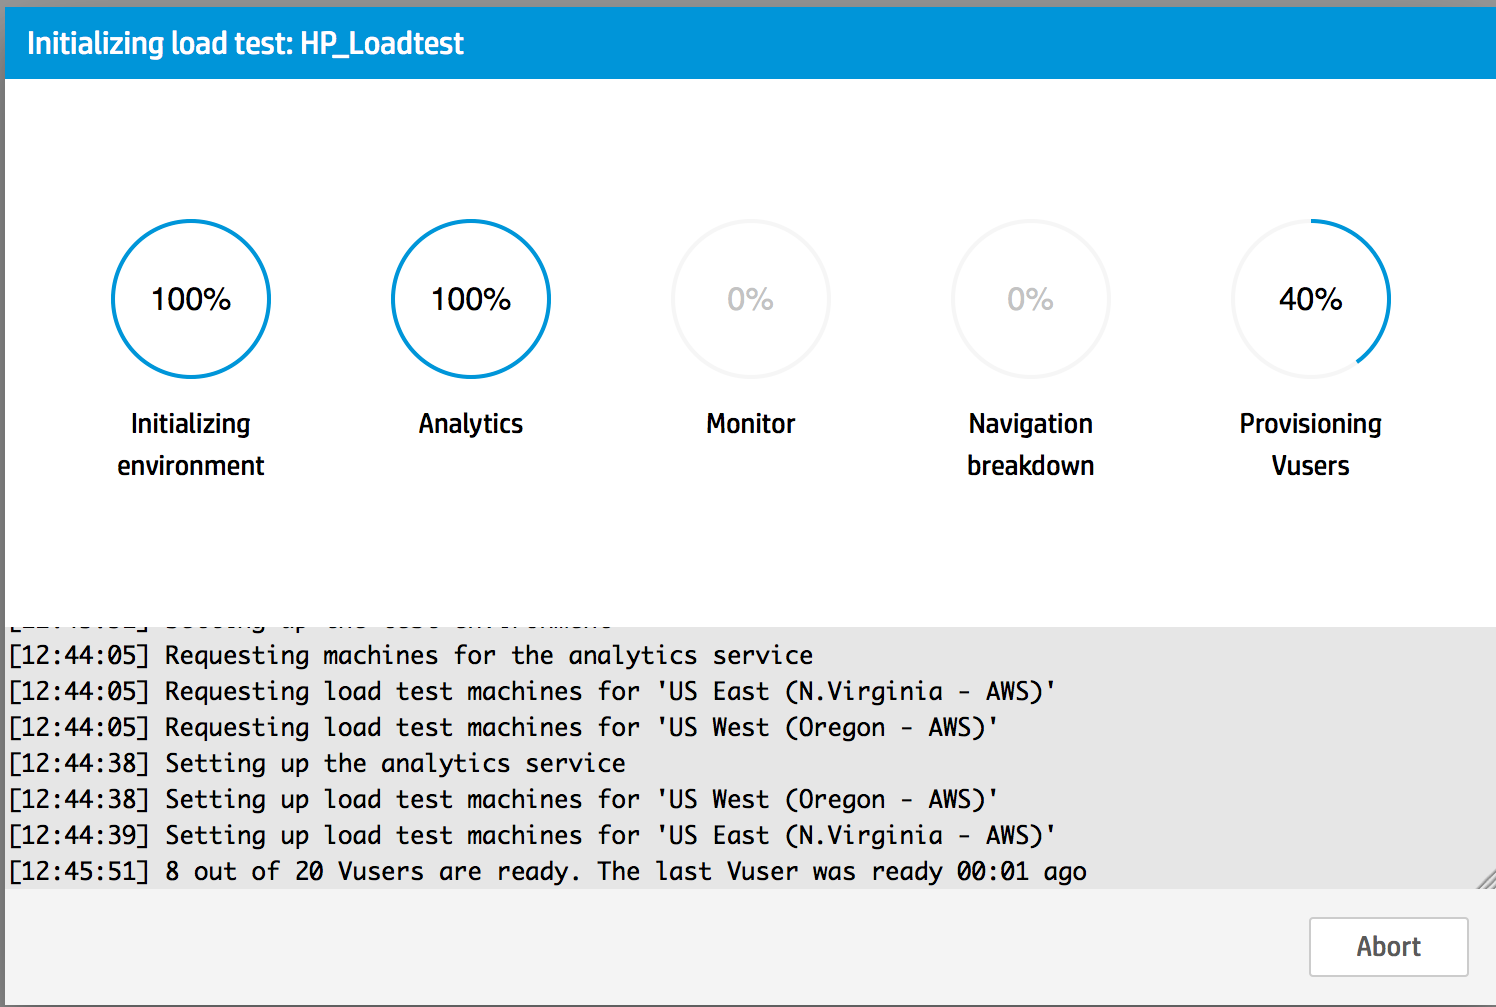
- While the test is running, check the statistics in the graphs. During the test, four graphs are displayed along with some information about the testing progress.
Charts
Running Vusers (Running Virtual Users) - this graph shows the addition, constant load and deletion of your 20 virtual users. In our example, 20 virtual users are added for 1 minute and work for 5 minutes, and then gradually removed. Gradually increasing and reducing the number of virtual users is important to maintain server integrity and prevent sudden peaks of workload.
Hits per Second (number of hits per second) - shows the number of hits (hits) or files requested from the server. Since a page often contains several resources, several files or resources are loaded when a page is visited. The graph with the number of hits per second gives a relative representation of the traffic generated by the load of virtual users.
Throughput — This graph tracks the amount of data (in bytes per second) coming from the server and called directly from the applied load. Often it is in general form correlated with the graph of the number of hits per second.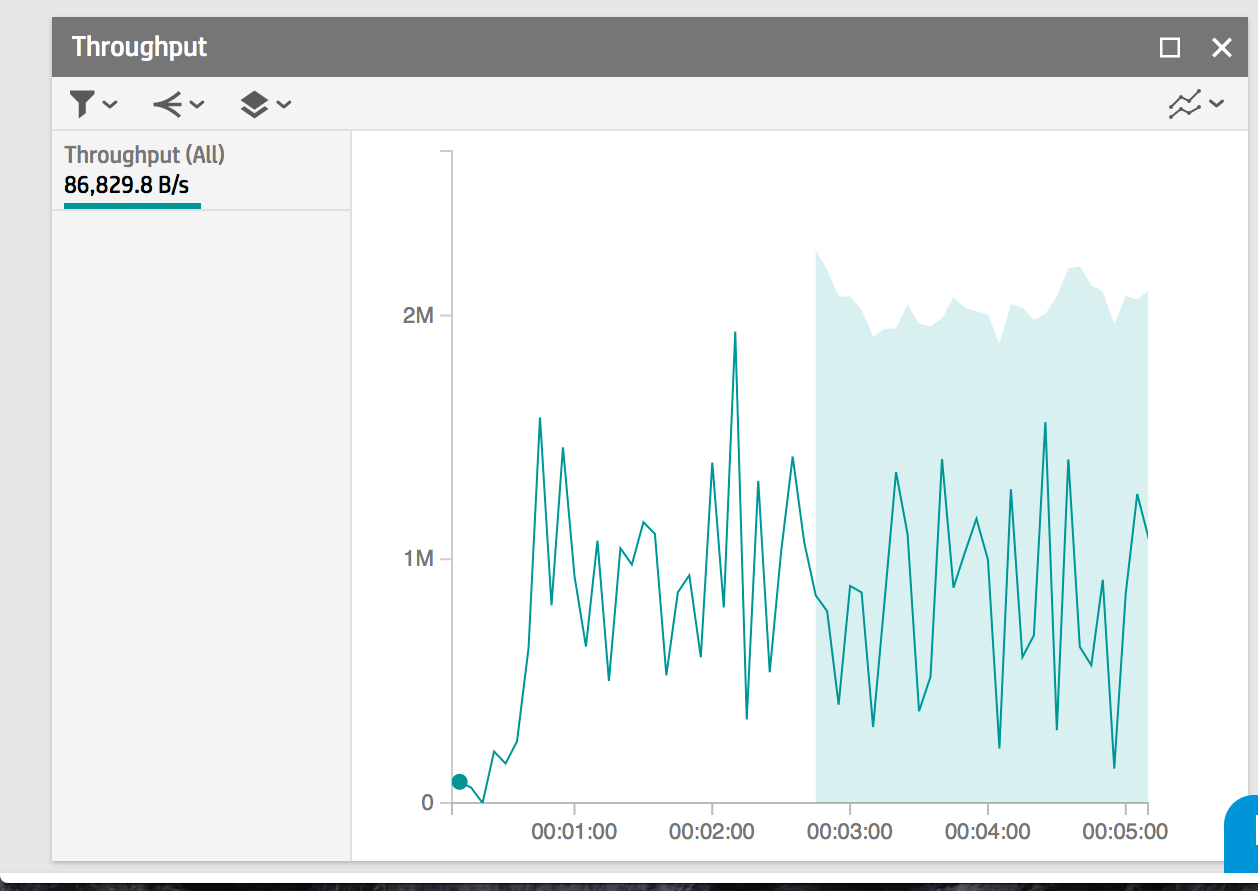
Errors - shows the number of server errors that occur when virtual users are working: for example, if a virtual user receives a 404 or 500 error in response to a page request. All types of server error codes are tracked in this graph.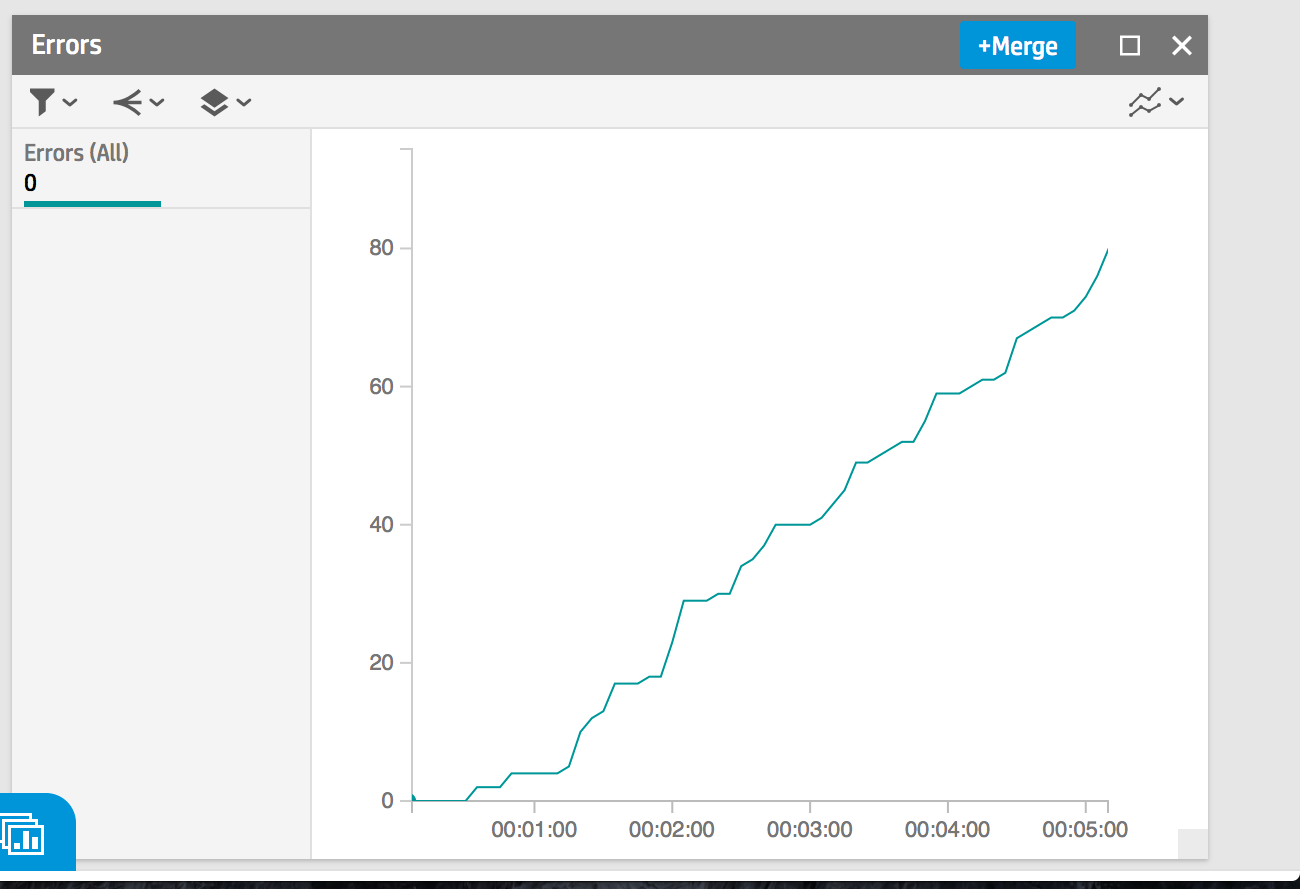
You can change the format for displaying results from widget mode to linear by selecting the appropriate item: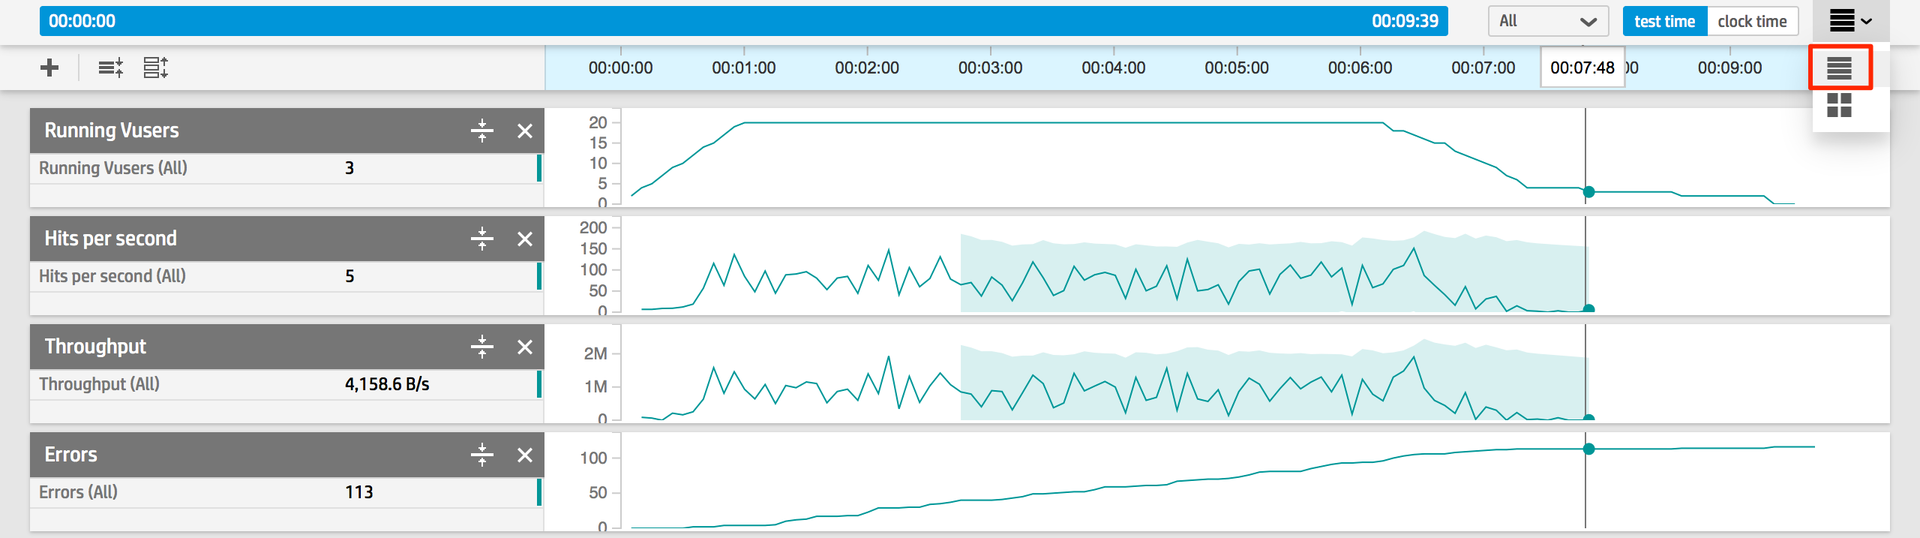
What do you think the shaded areas show (which appear some time after the start of the test)?
They represent the initial measurement data collected from the beginning of the test and demonstrate the basic indicators of the “normal” behavior predicted by the StormRunner. - Wait for your test to complete and check the summary statistics, such as Duration, UI Users, and test status. Our test was completed with errors, to understand the reasons. Did your test pass?

We will analyze the results in the next section.
Source: https://habr.com/ru/post/256805/
All Articles