IO Ninja is a programmable terminal emulator / sniffer (part 3). We write "answering machine"
 We continue the cycle of articles about the terminal / sniffer IO Ninja and proceed to consider one of the most advantageous sides of the new version of our product - programmability. It opens up new applications of such seemingly ordinary tools as a terminal or sniffer.
Plugin Architecture Overview
As in the previous, second version of the product, the executable files of the third version of IO Ninja contain only the framework of necessary components (including UI widgets, logging engine and classes for working with IO, such as io.Socket, io.Serial, io.PCap, and t .d.) The logic of working with specific transports is contained in plugins written in the Jancy language. These plug-ins are located in the selected “scripts” folder as source codes and are available both for review and editing by users.
In addition to modifying the built-in plug-ins, it is also possible to add the missing functionality using custom plug-ins of two types:
- Session plugin (session plugin) - heavy;
- Plugin layer (layer plugin) - easy.
The first type of plug-in is a full-fledged session plugin that creates a session from scratch. Here is what should be implemented in a typical session plugin:
')
- Defining the format of records in a log and creating a log representative — a function that turns log entries into a final, readable representation;
- Formation of UI (menu, buttons on the toolbar, properties in the property editor, etc.);
- Creation of transport and other IO-objects (sockets, ports, files, etc.);
- Handling events from UI widgets and IO objects and tying everything together.for exampleby pressing the connect button, it is necessary to start the connection setup process, make an entry in the log with the “start-install-connection” code and data describing the remote node address; When the connection is completed, create a corresponding entry in the log and update the UI (in particular, unblock the Send button), etc.
In principle, using a session plugin, you can write a solution for any task, from testing a certain sequence of requests and responses to a full-fledged protocol analyzer. However, even without familiarizing yourself with the source code of embedded IO Ninja sessions, it is obvious that writing a complete session is quite a laborious process, not very suitable for rapid prototyping and writing test scripts on your knees. In addition, I do not want to re-implement or copy-paste the logic of working with the transport connection. After all, this is all done in standard plugins, what about reuse? Finally, the writing of a full-fledged session largely ties everything to one specific transport, while at times it is necessary, for example, to check a certain sequence of requests on several different transports at once. Similarly, a protocol analyzer often simply needs to parse the data, regardless of which transport it was delivered to.
To solve all the above problems, IO Ninja provides a second type of plug-in - a light plugin layer (layer plugin).
Plugin layer cannot work by itself. Instead, it connects to a carrier session and expands its functionality accordingly. He can do this with the help of:
- Changes to the log representative;
- Attaching a log filter to “disguise” unwanted / uninteresting entries;
- Attachment of a log converter to generate secondary logs for decoding protocol messages (this usually also requires changing the log representative);
- Joining a log listener to monitor the events of the carrier session and, possibly, to perform some kind of response;
- Creating your own UI elements in addition to the UI carrier session.
The plugin layer is what most likely will have to be written for most practical tasks.
IDE
To facilitate the development of all types of IO Ninja plug-ins on Jancy, we provide the native integrated development environment IO Ninja IDE. This environment is based on the NetBeans Platform and provides all the standard code assist tools: syntax highlighting, auto-completion lists, argument-tips, go-to-definition lists, etc. In addition, there are wizards for generating templates of typical plugins.

This development environment is delivered in two variations. The first is a separate IO Ninja IDE package, which is installed as a standalone product. The second variation is suitable for developers who already have and use NetBeans for their projects (like several programmers in our office, including me). In this case, instead of installing a separate IO Ninja IDE, you can add NetBeans plug-ins for IO Ninja to an already present NetBeans installation. Both the first and second options can be found here: http://tibbo.com/ioninja/downloads.html .
Developers who for some reason do not like NetBeans, or who do not recognize the IDE as such, can develop plug-ins in their favorite text editor - vim, emacs, sublime, notepad finally.
Next, we will demonstrate the process of creating from scratch typical plugins using IO Ninja IDE. As a test protocol that our plug-ins will work with, let's take a real protocol for communicating Tibbo programmable devices with an interactive cross-debugger. For testing, you can use Device Explorer, which is part of the TIDE IDE development environment for Tibbo programmable devices (download TIDE or a separate Device Explorer here: http://tibbo.com/downloads/basic/software.html ).
So let's get started.
Answering machine
The first plugin we write will emulate a server of a certain protocol (in our example, the Tibbo programmable device protocol) to help us test the client side of this protocol. In other words, our plugin will perform the functions of an answering machine, namely: wait for the data, assemble them into packets, analyze and send something in response.
Launch IO Ninja IDE (or NetBeans with plug-ins for IO Ninja), click on the menu item File-> New Project, and select the project category: Categories - IO Ninja, Projects - Plugin Project (if you use a separate IO Ninja IDE, then these categories will be only available). On the next screen, select the plugin type plugin type template - Answering Machine, drive in some meaningful name in the Project Name (for example, TiosEmu) and click Next.

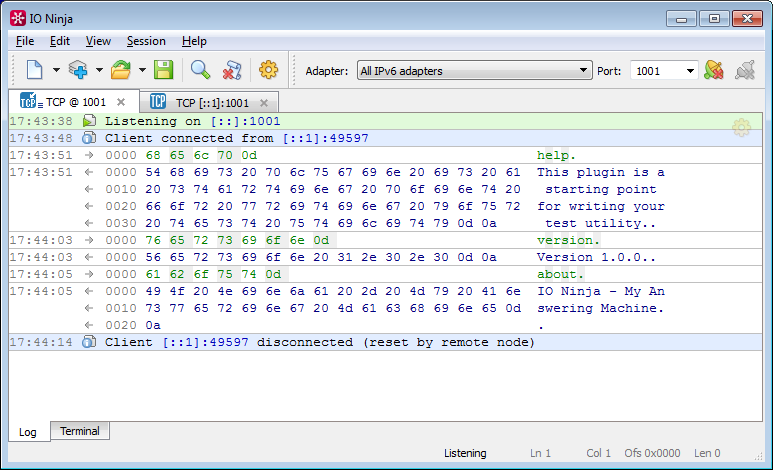
After filling the string descriptors on the next screen (Layer Name, Layer Description, etc.) and clicking the Finish button, the plug-in working core will be generated: the plugin sends a meaningful response to the “help”, “about” and “version” commands in its original form, CR (carriage return) or LF (line feed).
Run the plugin to look at its work. As mentioned above, the plug-in layer cannot work by itself and requires a carrier session, which must provide transport. When you run the plugin layer for the first time, IO Ninja IDE will ask you what to use as a carrier session.
For testing, select TCP Listener, adapter “All IPv6 adapters”, port 1001, click Listen. Open the second session of TCP Connection, remote address "[:: 1]: 1001", click Connect (as you guessed, it was an unobtrusive demonstration of IPv6 support, which appeared in version 3.4.0;)
Now send the “help”, “about” or “version” commands (possible in chunks) and enjoy the result:
Now let's analyze our plugin a bit. Open the only source file of the plugin TiosEmuLayer.jnc. The plug-in essentially consists of one TiosEmuLayer class inherited from doc.Layer, the base class for layer plug-ins (using Ctrl + Click, you can walk through API declarations and familiarize yourself with the framework of available IO Ninja components).
Let's look at the constructor of our plugin:
construct (doc.PluginHost* pluginHost) { basetype.construct (pluginHost); m_rxScanner.construct (scanRx); pluginHost.m_log.attachListener (onLogRecord @ pluginHost.m_mainThreadScheduler); } The first and second lines are clear without comments - as you can guess, the calls to the constructors of the parent class and the member field. But the last line requires some explanation.
The log file in IO Ninja is a sequence of records, each of which contains a timestamp, an integer record code, and (optionally) a block of arbitrary binary data. Immediately, we note that this block does not carry the text itself, in the form in which the user sees it in the log window, but the necessary parameters by which this text can be restored (the recovery of text lines of the log with the help of representative functions will be described in more detail in section dedicated to the creation of a protocol analyzer plugin).
When a session plugin receives or sends data, corresponding records are added to the log. The plugin layer can “monitor” the log for new entries, select from them those that are of interest (for example, RX) and perform certain actions in response.
This model - although at first it may seem somewhat unnatural (why not monitor events on the socket immediately instead of a log?), Was chosen according to a number of parameters: simple to implement, transparent and predictable, provides standardization in interactions of plug-ins of arbitrary nature, suitable for creating cascades of processing, does not introduce strong connectivity, etc. Of course, such a model has certain limitations, but we will not dwell on this here in detail.
The attachListener method adds the log listener. The next non-obvious point is the use of the dog @. In Jancy, the dog @ (reads “at”) denotes a binary layout operator to create pointers to functions that are guaranteed to be called in the desired environment. In this case, we want the listener to be called in the main thread of the plugin.
Inside our listener, we check the record code and, if it is log.StdRecordCode.Rx (that is, incoming data), we pass it for further processing, and otherwise we ignore it:
onLogRecord ( uint64_t timestamp, uint_t recordCode, void const* p, size_t size ) { if (recordCode == log.StdRecordCode.Rx) try m_rxScanner.write (p, size); } Now let's dwell on the mechanism for processing incoming data in emulators and protocol analyzers.
Communication protocols can be divided into categories according to various criteria: protocol level in the OSI model, packet-oriented (message-oriented protocols) and stream-oriented (stream-oriented-protocols), binary and text, etc.
In terms of writing a protocol analyzer, two factors represent the greatest value:
- whether the protocol relies on the delivery of the message as a whole (or is pre-accumulation required);
- whether fixed headers are used (or do requests and responses have different lengths, and requires parsing of the request / response language by a certain parser).
For example, TCP / IP stack protocols down to the transport layer inclusive rely on the delivery of messages as a whole and use fixed headers, and at the levels above there are options: let's say DHCP relies on delivery as a whole and uses headers, and HTTP works with the stream and uses text requests / replies.
In the case where fixed headers are used, it is most convenient to parse the protocols using the mechanism of structures, pointers and address arithmetic supported by Jancy and familiar to C / C ++ programmers. Here, the fact that Jancy has a high degree of compatibility with C / C ++ will help a lot - it allows you to simply copy the C-definitions of protocol headers from publicly available sources and directly paste them into the Jancy script (sometimes even cosmetic changes are not required).
Unfortunately, this mechanism is completely unsuitable for parsing protocols belonging to the opposite category, namely, when, instead of going through the structures of headers, it is necessary to analyze the language of requests / responses. In this case, a certain parser is required - it means that it is logical to apply the methodology that is used when building compilers. To be fair, it should be noted that the grammar of the query language in protocols is, as a rule, immeasurably simpler than that in even the most primitive programming languages.
So. The first stage in the compilation cascade is lexical analysis (or tokenization), that is, the division into lexemes and the transformation of the input stream of characters into a stream of tokens. The module that performs this task is called the lexer (or scanner). Unlike file compilers, writing a lexer for a streaming protocol is complicated by the fact that it is not always easy to split the input IO stream into compilation units.
In Jancy, as in the language that was specifically created for use in IO Ninja, there is a convenient tool for parsing IO streams. This is a built-in incremental lexical analyzer generator. It works on the principle of well-known tools like Lex , Flex , Ragel , etc. Let's look at the code generated by the wizard:
jnc.AutomatonResult automaton TiosEmuLayer.scanRx () { %% "about" [\r\n] try transmitString ("IO Ninja - Tios Emu\r\n"); %% "version" [\r\n] try transmitString ("Version 1.0.0\r\n"); %% "help" [\r\n] try transmitString ("This is a starting point for your test utility\r\n"); %% . // ignore everything else } Automaton functions are compiled into a DFA to recognize lexemes, each of which is described using a regular expression. When the machine detects a token, it performs the corresponding action.
The automaton function itself cannot be called directly - after all, it is necessary to store the state of the automaton somewhere (including the accumulated part of the token). For this purpose, an object of the jnc.Recognizer class is used, and already it will implicitly call our automaton, make necessary transitions between states, rollbacks, accumulation of token characters, etc.
Here is an instance of this class in the generated plugin:
class TiosEmuLayer: doc.Layer { jnc.Recognizer m_rxScanner; // ... } As an analogy clear to all, the following example can be given. There is a game console and there is a game disc. To play the game, you need to insert a disk into the console. In this case, the game can be played incrementally, since the status of the passage is saved on the hard disk of the console. In this example, replace the prefix with a copy of the jnc.Recognizer class, the game disc is replaced by an automaton function, and the passing of the game is replaced by the input stream, and everything will fall into place.
But enough theory, let's practice: let's add to our plug-in command recognition TiOS.
First, TiOS works via UDP, which means that incremental parsing with state preservation between the received data segments does not make sense and is even harmful: one datagram is one command. Therefore, instead of jnc.Recognizer.write, we will use the jnc.Recognizer.recognize method (which takes place in the sequence reset, write, eof)
Further, since the TiOS device in its original state does not have an IP address at all (it must be assigned by an application spinning on the device, either from settings or from a DHCP server), direct IP addressing is generally impossible. Therefore, the TiOS protocol uses the broadcast IP address to communicate with the device, and the device uses the MAC address in the packet body to address the device when broadcasting.
Note
The MAC address of the ethernet frame, by the way, does not have to be broadcast. Many modern switches artificially limit the allowed speed of broadcast traffic, so our interactive cross-debugger TIDE uses PCap to generate UDP frames, in which IP is broadcast, and here is MAC - of a specific device.
Add a field with the MAC of our fictitious device to the plugin class (note the hex-literal, a means of Jancy's convenient assignment of hard-coded binary constants, for example, icons, cursors, public keys, etc.):
typedef uchar_t MacAddress [6]; class TiosEmuLayer: doc.Layer { MacAddress m_macAddress = 0x"1 2 3 4 5 6"; char const* m_macAddressString = formatMacAddress (m_macAddress); // ... } Let's write a couple of helpers to work with MAC addresses - after all, we will have to check the MAC addresses of the commands that have arrived, as well as add the MAC to the response packets.
Source
MacAddress parseMacAddress (char const* string) { MacAddress address; char const* p = string; for (size_t i = 0; i < 6; i++) { address [i] = (uchar_t) atoi (p); p = strchr (p, '.'); if (!p) break; p++; } return address; } char const* formatMacAddress (MacAddress address) { return $"%1.%2.%3.%4.%5.%6" ( address [0], address [1], address [2], address [3], address [4], address [5] ); } In addition to the MAC prefix, any TiOS packet can be terminated with a suffix to identify and match requests and responses (some analogue of the sequence number / acknowledgment number in TCP) - if the request contained such a suffix, then the response to this request should have the same suffix.
Our plugin emulator will support the commands "?" (echo), “X” (get-device-status), “PC” (get-vm-status), “B” (buzz) - this is enough to be seen from the Tibbo Device Explorer. The first command is used to auto-detect devices in the local segment, the second and third commands return the expanded status of the device and the virtual machine.
So, we sculpt a packet analyzer using automaton functions.
TiosEmuLayer.onLogRecord ( uint64_t timestamp, uint_t recordCode, void const* p, size_t size ) { if (recordCode != log.StdRecordCode.Rx) return; bool result = try m_packetScanner.recognize (scanPacket, p, size); if (!result) m_reply = "C"; else if (!m_reply) return; char const* id = strchr (p, '|'); // find id - if there's any try transmitString ($"[$m_macAddressString]$m_reply$id"); } jnc.AutomatonResult automaton TiosEmuLayer.scanPacket (jnc.Recognizer* recognizer) { %% "_?" m_reply = "A"; %% "_[" (\d+ '.')* \d+ ']' MacAddress address = parseMacAddress (recognizer.m_lexeme + 2); if (memcmp (address, m_macAddress, sizeof (address)) != 0) { m_reply = null; return jnc.AutomatonResult.Stop; // don't scan further } recognizer.m_automatonFunc = scanCommand; // change automaton } The onLogRecord function sends the RX data for analysis to the automatic function scanPacket and then sends a response packet (or silently quits if no answer is needed). To form response packets, Jancy formatting literals (Perl-like formatting) are used.
The machine scanPacket demonstrates the extremely useful possibility of parsing multilanguage input data (analogous to fgoto / fcall for changing machines in Ragel). After parsing and checking the first part of the packet containing the MAC prefix, we “jump” to the second automaton, scanCommand, to parse the packet body with the actual command and identifying suffix:
jnc.AutomatonResult automaton TiosEmuLayer.scanCommand (jnc.Recognizer* recognizer) { %% id = '|' .* %% 'X' id? m_reply = "A<IONJ-3.4.0>/ec8ec901-bb4b-4468-bfb9-bf482589cc17/test!"; %% "PC" id? m_reply = "A*R*/00/&h A:0000,B:0000,PC:00000000,SP:00,FL:Z**/65535"; %% 'B' id? m_reply = "A"; } The second automaton demonstrates the ability to define named regular expressions for later use. Note that standard classes of characters such as spaces, decimal digits, etc. do not need special definitions and are accessible, as in Perl, through the escape sequences \ d, \ D, s, \ S, \ w, \ W.
We launch our plug-in on the carrier UDP session, select the adapter “All IPv4 Adapters” and open port 65535. We want our plug-in to respond to the address from which the request came - for this we select the Auto-switch Remote Address checkbox (a button with a compass ). Now we start Device Explorer and we see the dummy device generated by our emulator. Fanfare, fireworks, hulks.

The full text of the plugin can be downloaded here: http://tibbo.com/downloads/open/ioninja-plugin-samples/TiosEmu.zip
Conclusion
Of course, the output we did not have a full-fledged TiOS emulator, but rather a blank blank. However, this should be quite enough to demonstrate the concept itself and to understand which direction to dig further - this emulator may well serve as a starting point for writing some more useful testing utility in your particular case.
In the next part of the article, we will look at creating a plug-in layer for analyzing the protocol.
Source: https://habr.com/ru/post/256803/
All Articles