vCloud Director for the smallest (part 1): network setup
UPDATE: We have automated the creation of network and NAT rules. Now, when making a subscription, all this is created by itself :). All you have to do is deploy a virtual machine from a template or from scratch. At the same time, you still have the opportunity to change the network settings if necessary.
Just do not forget about the Firewall, which by default does not allow any traffic and requires setting up rules .
Today we will talk about how to start working in the vCloud Director 5.5 control panel, which is used in the cloud service Cloudlite.ru , and at the same time learn how to configure the network.
vCloud Director is a platform for managing virtual infrastructure on the IaaS model. For those who have not previously encountered the "industrial" versions of the panels, it may seem difficult. But the first impression is deceptive: as soon as the “fright” of the rich functionality passes, you will appreciate its capabilities and that freedom in the settings that vCloud Director gives. Namely, the panel allows:
')
• create and manage virtual machines;
• to migrate them from another cloud;
• install any virtual machines with OS from the existing templates and download the ovf templates yourself;
• flexibly manage access rights to a pool of virtual resources;
• create internal and routable (with Internet access) and isolated networks;
• configure flexible Firewall rules and create VPN connections;
• configure load balancing between virtual machines and more.
Let's start with the basics, so 80 lvl administrators can watch aside how eaglets learn to fly :)

First, let's take a look at the basic elements of vCloud Director, to make it easier to navigate when setting up.
A virtual data center (virtual datacenter, VDC) is a pool of virtual computing resources (processors, memory, disk space). In fact, this is the environment in which you will create virtual machines, containers (vApp), networks.
vApp is a container in which virtual machines reside. vApp allows you to combine virtual machines according to their purpose (mail server, accounting, etc.) and manage a group of virtual machines. This is especially useful if you have a large virtual infrastructure. On the basis of vApp, you can create templates: this can save time if there is a need to deploy groups of virtual machines of the same type.
Virtual Machines (VMs) - with this, I think everyone understands everything. Let me just say that in vCloud Director you can create them from templates in a directory (directly from the OS) or from scratch, installing the OS you need from an ISO image.
Catalogs are folders in which you can store vApp templates, virtual machines, and media files (ISO images).
An organization level network (Org VDC Networks) is a network of your virtual data center that is accessible to all vApps and virtual machines. An organization level network can be isolated (isolated, without access to the Internet) and routable (routed, with access to the Internet).
The vApp level network , as the name suggests, works only within the selected vApp: for virtual machines from other vApps, it will not be available by default, thereby providing additional isolation between the two containers. This, for example, can be used if you have several projects in one virtual data center that do not have to “see” each other.
Now we will show step by step what the initial network setup process looks like. We recommend to start working with it, since in this case the vApp can be connected to the existing network when it is created. But if, after all, first of all you create a vApp with a virtual machine, then the algorithm of actions will be slightly different. This instruction will help to do everything right in this situation.
So let's get started.
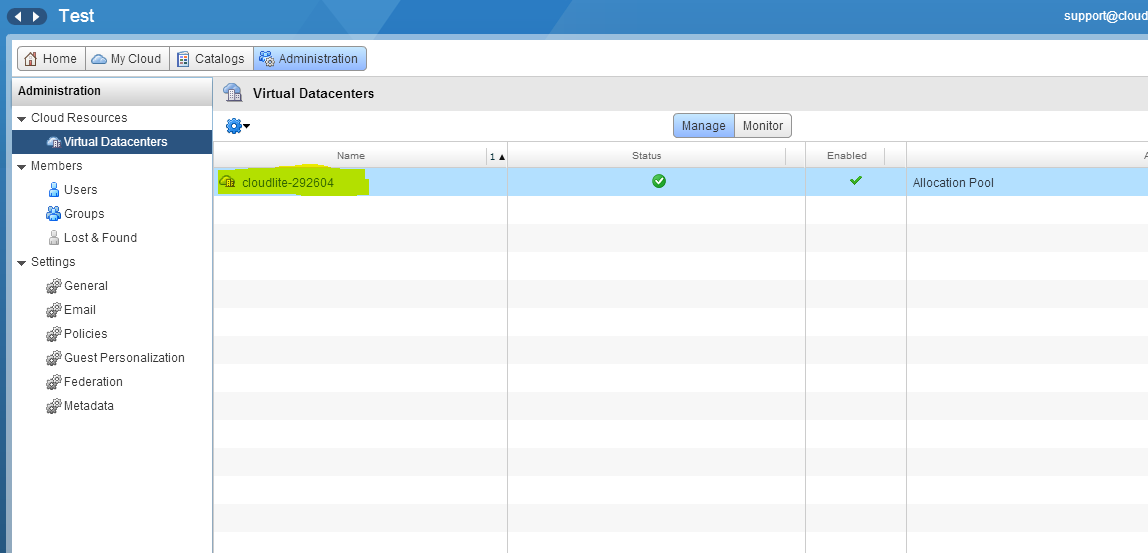
1. Go to the Administration section and click twice with your mouse on the virtual data center.
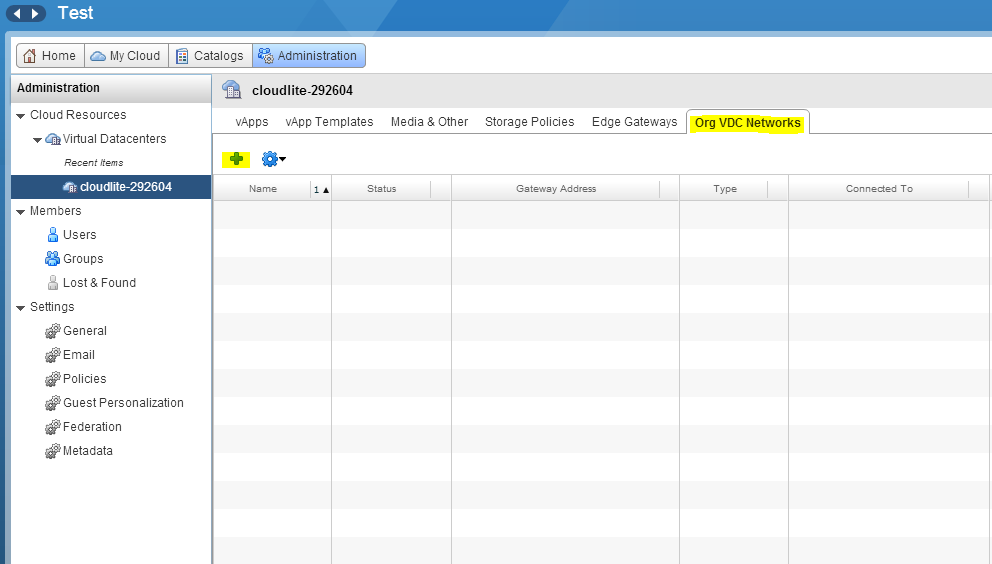
2. Go to the Org VDC Networks tab and click on the green +.
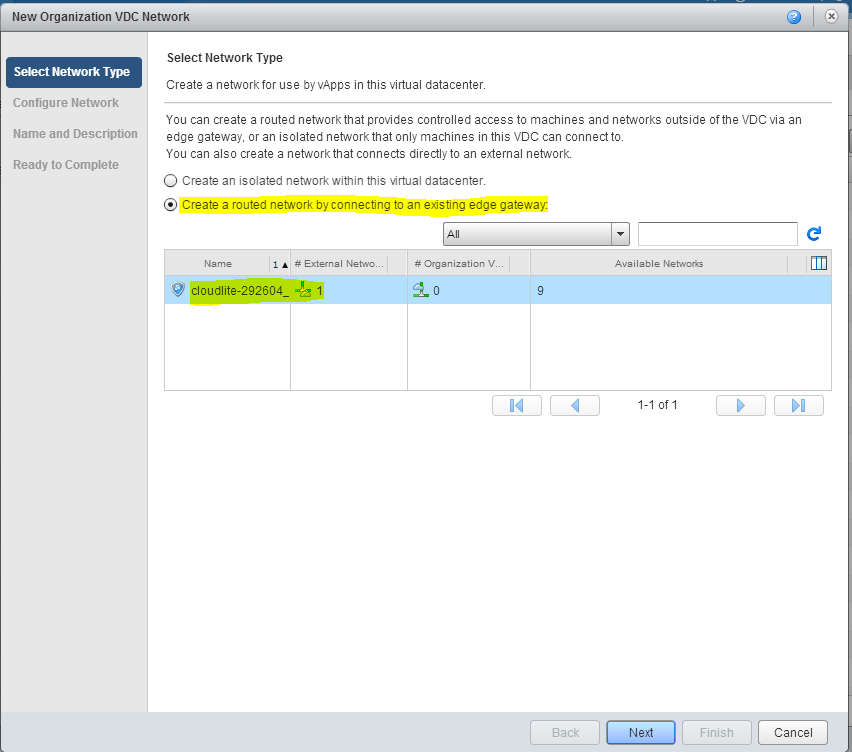
3. In the window that appears, select the type of network: if you need access to the Internet, then choose a routed network (routed). Select the vShield Edge and click Next.
vShield Edge deserves a couple of separate words. This set of services combines DHCP, NAT, Firewall, VPN, and Web Load Balancing in one package.
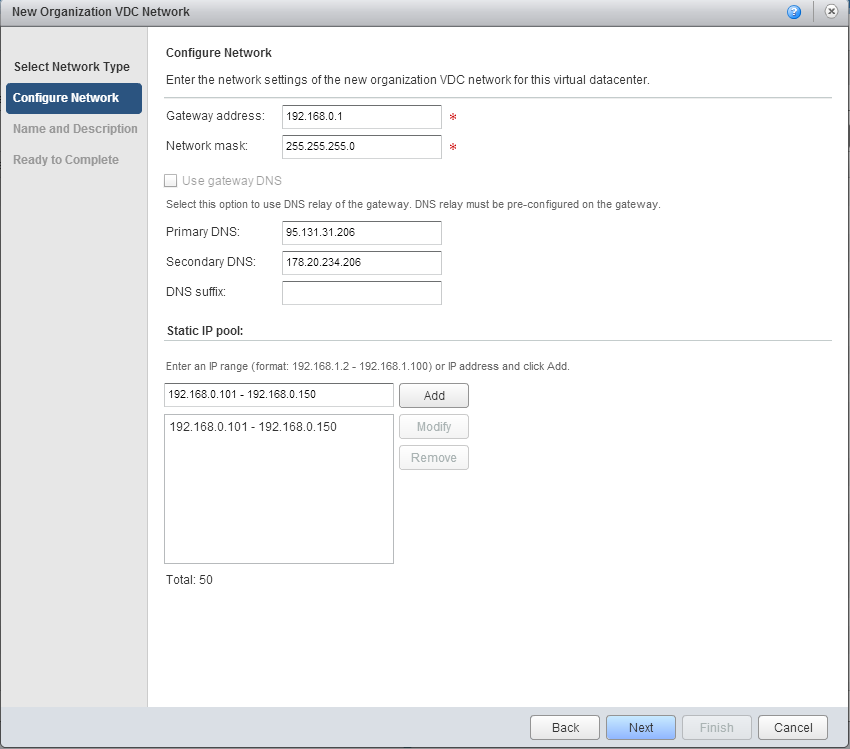
4. In the Configure Network tab, fill in the network settings:
• Gateway address - gateway address, for example, 192.168.0.1;
• Network mask - subnet mask, for example, 255.255.255.0;
• Primary DNS — primary DNS address, for example, 95.131.31.206;
• Secondary DNS — The secondary DNS address, for example, 178.20.234.206.
• In the Static IP pool field, enter the range of addresses that will be automatically assigned to your virtual machines in the future.
Entries must be in the format xxx.xxx.xxx.xxx- yyy.yyy.yyy.yyy, where xxx.xxx.xxx.xxx is the starting address of the subnet, and yyy.yyy.yyy.yyyy is the ending IP address of the subnet. For example, 192.168.0.101 - 192.168.0.150. For your virtual machines will be allocated addresses from the specified pool. Below will be the number of available IP (total: 50). Click Next.
5. We come up with the name of the network and a description, if necessary.
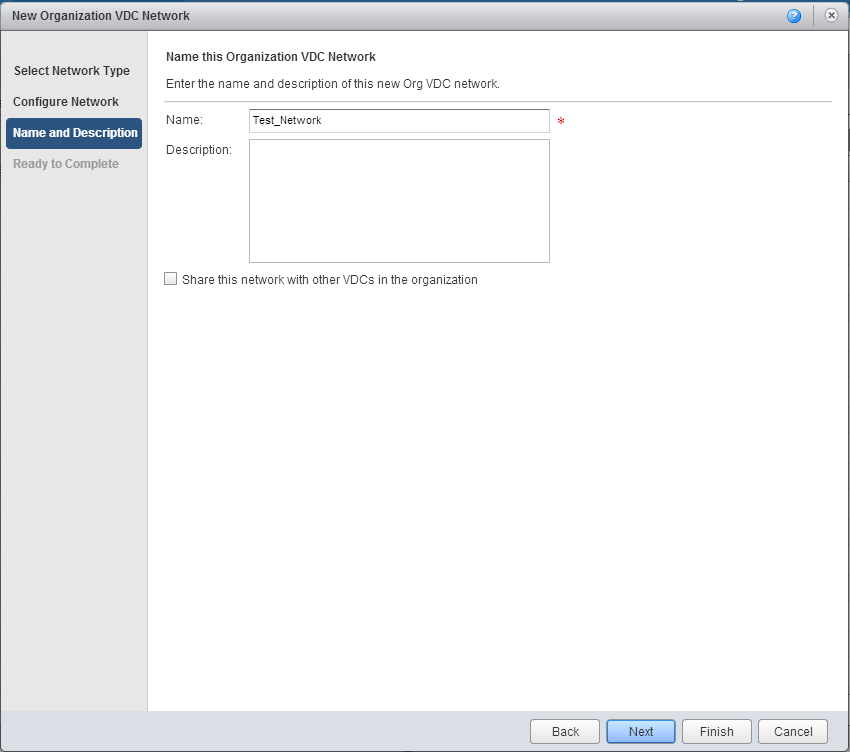
6. Check again all the settings and click Finish .

Everything, with the network of the organization sorted out. Here it is, created.

Now it remains to configure access to the Internet. To do this, you need to configure address translation (Network Address Translation -
network address translation.
To exit from the local network to the Internet, configure SNAT.
1. The first thing we need to see the range of external IP-addresses, which is available to us. To do this, go back to the Administration section and click twice on the virtual data center. Go to the Edge Gateways tab and click on the desired vShield Edge with the right mouse button. Select the option Properties .

2. Observe the necessary information in the Sub-Allocate IP Pools tab. Remember or even write :)

3. Go back to our vShield Edge, right-click on it and select the Edge Gateway Services option.

4. In the window that appears, open the NAT tab and click Add SNAT .
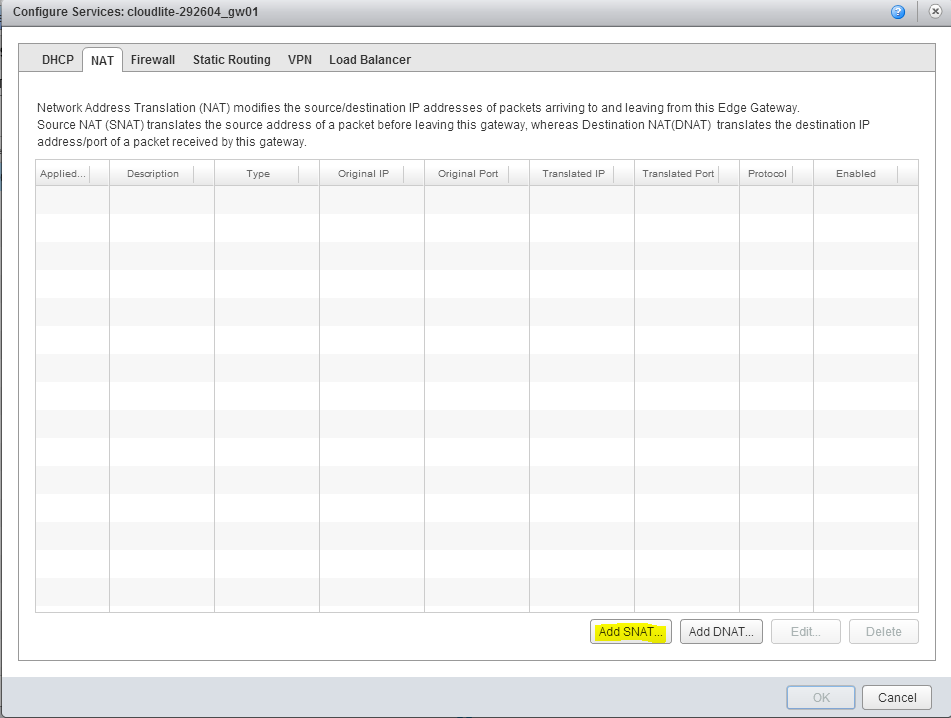
5. In a new window:
• in the field Applied on we apply the external network (not the organization level network!).
• in the Description field specify the description for the SNAT rule;
• in the Original (Internal) source IP / range field, specify the internal address range, for example, 192.168.0.0/24;
• in the Translated (External) source IP / range field, enter the external address that will be used to access the Internet (the address that we looked at in the Sub-Allocate IP Pools and remembered). Click OK.

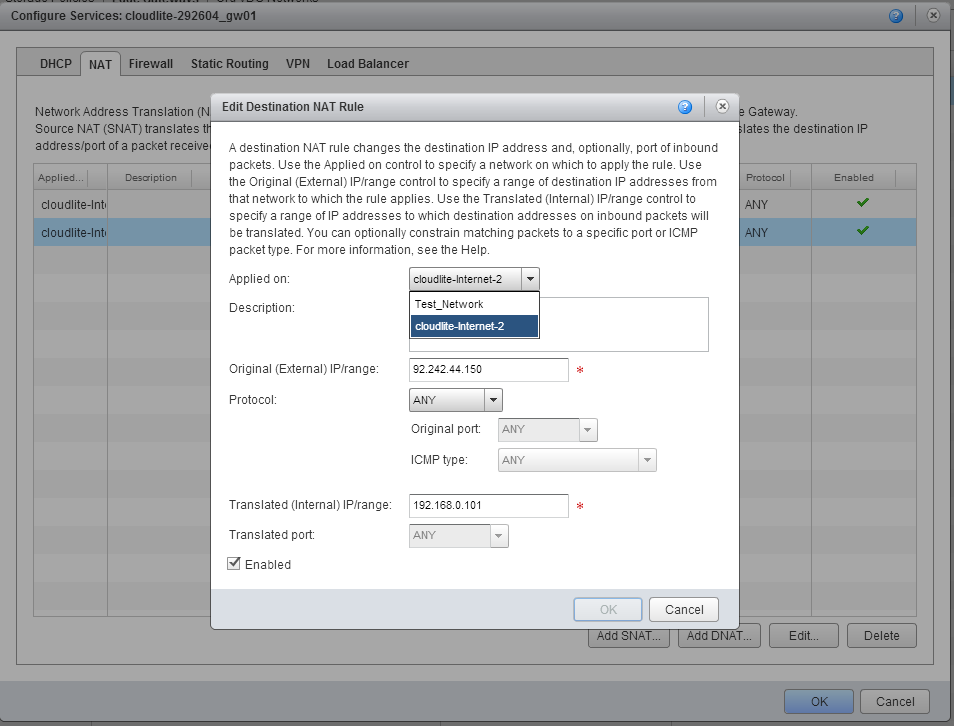
Now we create the DNA T rule in order to provide our services on the Internet, for example, a website with cats (c).
1. Click on Add DNAT.
2. In the window that appears, fill in the following
• in the field Applied on we specify the external network (as in the case of SNAT, it is not an organization level network!);
• in the Description field, specify the description of the DNAT rule;
• in the Original (External) IP / range field, specify the external address (the address from the Sub-Allocate IP Pools tab);
• in the Protocol field - the protocol or all protocols (then select Any);
• in the Port field - the port;
• in the Translated (Internal) IP / range field, enter the internal IP address, for example, 192.168.0.101.
Click OK.
1. Go back to the virtual data center page, select the Edge Gateways tab and click on the desired vShield Edge with the right mouse button.
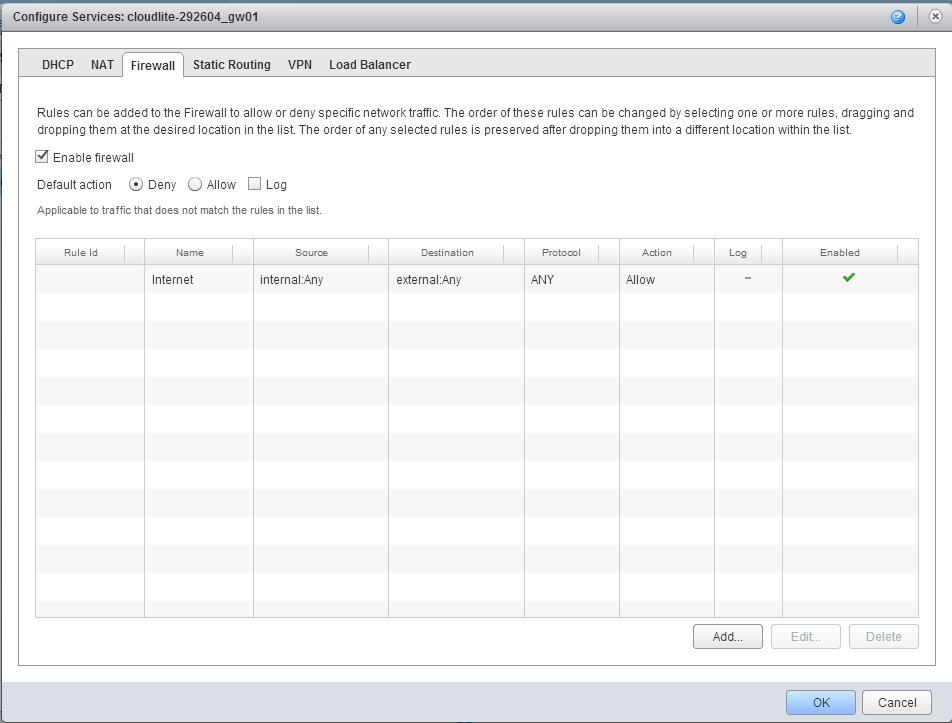
2. Select the option Edge Gateway Services . In the Configure Services window that appears, go to the Firewall tab.
3. By default, the Default action option is set to Deny, that is, the Firewall will block all traffic. To prevent this from happening, you need to configure the rules (the Add button).

In the Name field, specify the name of the rule.
In the Source field, enter the required source addresses: single IP address, range of IP addresses, CIDR or key variables:
• Internal - all internal networks
• External - all external networks
• Any - any networks
For example, you can enter Internal.
In the Source Port field, select the source port. You can specify a single port, a range of ports, or specify all ports using the Any key variable;
In the Destination field, enter the address of the recipient. In the same format as for the Source field, for example, external;
In the Destination Port field, select the destination port. The port can also be registered manually. You can leave Any;
In the Protocol field, select the required protocol or all (key variable Any);
In the Action field, select the required value (allow - enable, deny - disable). Click OK.
Important : if the Allow option is selected in the Firewall, then in the rule you set the parameters of the sessions that the Firewall will block. To do this, select the Deny option in the rule window. If the Deny option is set, then the rule sets the session parameters, which the Firewall will skip.
On this with the network setup everything.
You can also set up a vApp level network — isolated or routed (routed), while the routed network will connect to the organization level network and use it to access the Internet. This connection option may be required if you need to isolate virtual machines in different vApps at the network level.
In the next part, we’ll tell you about creating a virtual machine from templates, from scratch and loading your own ISO images.
We invite you to hone your skills in cloudlite.ru , we still have a free test drive for 1 month.
PS If you did everything according to the guide, and the network did not work out / or the virtual machine did not connect to the Internet, then check with this checklist .
Part 2. Creating Virtual Machines
Just do not forget about the Firewall, which by default does not allow any traffic and requires setting up rules .
Today we will talk about how to start working in the vCloud Director 5.5 control panel, which is used in the cloud service Cloudlite.ru , and at the same time learn how to configure the network.
vCloud Director is a platform for managing virtual infrastructure on the IaaS model. For those who have not previously encountered the "industrial" versions of the panels, it may seem difficult. But the first impression is deceptive: as soon as the “fright” of the rich functionality passes, you will appreciate its capabilities and that freedom in the settings that vCloud Director gives. Namely, the panel allows:
')
• create and manage virtual machines;
• to migrate them from another cloud;
• install any virtual machines with OS from the existing templates and download the ovf templates yourself;
• flexibly manage access rights to a pool of virtual resources;
• create internal and routable (with Internet access) and isolated networks;
• configure flexible Firewall rules and create VPN connections;
• configure load balancing between virtual machines and more.
Let's start with the basics, so 80 lvl administrators can watch aside how eaglets learn to fly :)
Let's talk on the concepts
First, let's take a look at the basic elements of vCloud Director, to make it easier to navigate when setting up.
A virtual data center (virtual datacenter, VDC) is a pool of virtual computing resources (processors, memory, disk space). In fact, this is the environment in which you will create virtual machines, containers (vApp), networks.
vApp is a container in which virtual machines reside. vApp allows you to combine virtual machines according to their purpose (mail server, accounting, etc.) and manage a group of virtual machines. This is especially useful if you have a large virtual infrastructure. On the basis of vApp, you can create templates: this can save time if there is a need to deploy groups of virtual machines of the same type.
Virtual Machines (VMs) - with this, I think everyone understands everything. Let me just say that in vCloud Director you can create them from templates in a directory (directly from the OS) or from scratch, installing the OS you need from an ISO image.
Catalogs are folders in which you can store vApp templates, virtual machines, and media files (ISO images).
An organization level network (Org VDC Networks) is a network of your virtual data center that is accessible to all vApps and virtual machines. An organization level network can be isolated (isolated, without access to the Internet) and routable (routed, with access to the Internet).
The vApp level network , as the name suggests, works only within the selected vApp: for virtual machines from other vApps, it will not be available by default, thereby providing additional isolation between the two containers. This, for example, can be used if you have several projects in one virtual data center that do not have to “see” each other.
From theory to practice
Now we will show step by step what the initial network setup process looks like. We recommend to start working with it, since in this case the vApp can be connected to the existing network when it is created. But if, after all, first of all you create a vApp with a virtual machine, then the algorithm of actions will be slightly different. This instruction will help to do everything right in this situation.
So let's get started.
Create an organization level network
1. Go to the Administration section and click twice with your mouse on the virtual data center.
2. Go to the Org VDC Networks tab and click on the green +.
3. In the window that appears, select the type of network: if you need access to the Internet, then choose a routed network (routed). Select the vShield Edge and click Next.
vShield Edge deserves a couple of separate words. This set of services combines DHCP, NAT, Firewall, VPN, and Web Load Balancing in one package.
4. In the Configure Network tab, fill in the network settings:
• Gateway address - gateway address, for example, 192.168.0.1;
• Network mask - subnet mask, for example, 255.255.255.0;
• Primary DNS — primary DNS address, for example, 95.131.31.206;
• Secondary DNS — The secondary DNS address, for example, 178.20.234.206.
• In the Static IP pool field, enter the range of addresses that will be automatically assigned to your virtual machines in the future.
Entries must be in the format xxx.xxx.xxx.xxx- yyy.yyy.yyy.yyy, where xxx.xxx.xxx.xxx is the starting address of the subnet, and yyy.yyy.yyy.yyyy is the ending IP address of the subnet. For example, 192.168.0.101 - 192.168.0.150. For your virtual machines will be allocated addresses from the specified pool. Below will be the number of available IP (total: 50). Click Next.
5. We come up with the name of the network and a description, if necessary.
6. Check again all the settings and click Finish .
Everything, with the network of the organization sorted out. Here it is, created.
Now it remains to configure access to the Internet. To do this, you need to configure address translation (Network Address Translation -
network address translation.
Configuring SNAT and DNAT rules
To exit from the local network to the Internet, configure SNAT.
1. The first thing we need to see the range of external IP-addresses, which is available to us. To do this, go back to the Administration section and click twice on the virtual data center. Go to the Edge Gateways tab and click on the desired vShield Edge with the right mouse button. Select the option Properties .
2. Observe the necessary information in the Sub-Allocate IP Pools tab. Remember or even write :)
3. Go back to our vShield Edge, right-click on it and select the Edge Gateway Services option.
4. In the window that appears, open the NAT tab and click Add SNAT .
5. In a new window:
• in the field Applied on we apply the external network (not the organization level network!).
• in the Description field specify the description for the SNAT rule;
• in the Original (Internal) source IP / range field, specify the internal address range, for example, 192.168.0.0/24;
• in the Translated (External) source IP / range field, enter the external address that will be used to access the Internet (the address that we looked at in the Sub-Allocate IP Pools and remembered). Click OK.
Now we create the DNA T rule in order to provide our services on the Internet, for example, a website with cats (c).
1. Click on Add DNAT.
2. In the window that appears, fill in the following
• in the field Applied on we specify the external network (as in the case of SNAT, it is not an organization level network!);
• in the Description field, specify the description of the DNAT rule;
• in the Original (External) IP / range field, specify the external address (the address from the Sub-Allocate IP Pools tab);
• in the Protocol field - the protocol or all protocols (then select Any);
• in the Port field - the port;
• in the Translated (Internal) IP / range field, enter the internal IP address, for example, 192.168.0.101.
Click OK.
To top it up let's set up a firewall
1. Go back to the virtual data center page, select the Edge Gateways tab and click on the desired vShield Edge with the right mouse button.
2. Select the option Edge Gateway Services . In the Configure Services window that appears, go to the Firewall tab.
3. By default, the Default action option is set to Deny, that is, the Firewall will block all traffic. To prevent this from happening, you need to configure the rules (the Add button).
Configure Firewall Rules
In the Name field, specify the name of the rule.
In the Source field, enter the required source addresses: single IP address, range of IP addresses, CIDR or key variables:
• Internal - all internal networks
• External - all external networks
• Any - any networks
For example, you can enter Internal.
In the Source Port field, select the source port. You can specify a single port, a range of ports, or specify all ports using the Any key variable;
In the Destination field, enter the address of the recipient. In the same format as for the Source field, for example, external;
In the Destination Port field, select the destination port. The port can also be registered manually. You can leave Any;
In the Protocol field, select the required protocol or all (key variable Any);
In the Action field, select the required value (allow - enable, deny - disable). Click OK.
Important : if the Allow option is selected in the Firewall, then in the rule you set the parameters of the sessions that the Firewall will block. To do this, select the Deny option in the rule window. If the Deny option is set, then the rule sets the session parameters, which the Firewall will skip.
On this with the network setup everything.
You can also set up a vApp level network — isolated or routed (routed), while the routed network will connect to the organization level network and use it to access the Internet. This connection option may be required if you need to isolate virtual machines in different vApps at the network level.
In the next part, we’ll tell you about creating a virtual machine from templates, from scratch and loading your own ISO images.
We invite you to hone your skills in cloudlite.ru , we still have a free test drive for 1 month.
PS If you did everything according to the guide, and the network did not work out / or the virtual machine did not connect to the Internet, then check with this checklist .
Part 2. Creating Virtual Machines
Source: https://habr.com/ru/post/256733/
All Articles